在上一篇博文中,我们写了程序来发送和接受消息从一个队列中。
在这篇博文中我们将创建一个工作队列,用于在多个工作人员之间分配耗时的任务。
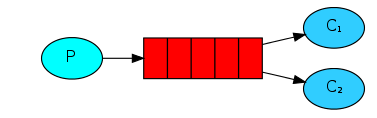
Work Queues 工作队列(又称:任务队列)背后的主要思想是避免立即执行资源密集型任务,并且必须等待它完成。相反,我们安排任务稍后完成。我们将任务封装 为消息并将其发送到队列。在后台运行的工作进程将弹出任务并最终执行作业。当您运行许多工作程序时,它们之间将共享任务。
这个概念在Web应用程序中特别有用,因为在短的HTTP请求窗口中无法处理复杂的任务。
我们没有真实的业务场景,因此接下来我们将会用Thread.sleep()方法来模拟一个耗时比较久的任务。
编写application.properties
我们将在生成的项目中找到application.properties文件,其中没有任何内容。
添加application.properties 配置如下:
spring.profiles.active=usage_message
logging.level.org=ERROR
tutorial.client.duration=10000
# 当declareExchange为true时,将持久标志设置为此值
spring.rabbitmq.durable=true
# PERSISTENT或NON_PERSISTENT确定RabbitMQ是否应该保留消息
spring.rabbitmq.deliveryMode=PERSISTENT
# 更多属性设置 https://docs.spring.io/spring-amqp/reference/htmlsingle/#_common_properties
编写Java配置类
刚才配置文件中我们配置了一个
tutorial.client.duration=10000
但是这个配置字段不存在于任何框架jar包里,因此我们需要编写一个类来处理这个属性
import org.springframework.beans.factory.annotation.Autowired;
import org.springframework.beans.factory.annotation.Value;
import org.springframework.boot.CommandLineRunner;
import org.springframework.context.ConfigurableApplicationContext;

public class RabbitAmqpTutorialsRunner implements CommandLineRunner {

    @Value("${tutorial.client.duration:0}")
    private int duration;

    @Autowired
    private ConfigurableApplicationContext ctx;

    @Override
    public void run(String... args) throws Exception {
        // TODO Auto-generated method stub
        System.out.println("Ready ... running for " + duration + "ms");
        Thread.sleep(duration);
        ctx.close();
    }

}
我们仍然和之前教程一样需要一个Java配置类:
import org.springframework.amqp.core.Queue;
import org.springframework.context.annotation.Bean;
import org.springframework.context.annotation.Configuration;
import org.springframework.context.annotation.Profile;

import com.xingyun.springamqp.business.Tut2Receiver;
import com.xingyun.springamqp.business.Tut2Sender;

@Profile({"tut2", "work-queues"})
@Configuration
public class Tut2Config {

    @Bean
    public Queue hello() {
        return new Queue("hello");
    }

    @Profile("receiver")
    private static class ReceiverConfig {

        @Bean
        public Tut2Receiver receiver1() {
            return new Tut2Receiver(1);
        }

        @Bean
        public Tut2Receiver receiver2() {
            return new Tut2Receiver(2);
        }
    }

    @Profile("sender")
    @Bean
    public Tut2Sender sender() {
        return new Tut2Sender();
    }
}
通过上面这个配置类,我们做了四件事
- 首先通过 @Profile 注解,定义了 两个配置文件前缀别名,tut2 或者 work-queues
- 通过@Configuration 注解来让Spring 知道这是一个Java 配置文件
- 定义了 一个队列,名字叫做hello
- 另外定义了两个配置文件,一个叫做sender,一个叫做receiver
为什么要有这两个配置文件? 因为我们待会运行生产者和消费者的时候,可以通过动态加载不同的配置文件来启动不同的类。
比如我们启动生产者发布信息就可以调用这个配置:
--spring.profiles.active=tut2,sender
当我们想启动消费者就动态调用这个配置
--spring.profiles.active=tut2,receiver
接下来我们需要修改下整个应用程序的启动类:
import org.springframework.boot.CommandLineRunner;
import org.springframework.boot.SpringApplication;
import org.springframework.boot.autoconfigure.SpringBootApplication;
import org.springframework.context.annotation.Bean;
import org.springframework.context.annotation.Profile;
import org.springframework.scheduling.annotation.EnableScheduling;

import com.xingyun.springamqp.config.RabbitAmqpTutorialsRunner;

@SpringBootApplication
@EnableScheduling
public class RabbitMq0x02SpringAmqpWorkQueuesSampleApplication {

    public static void main(String[] args) {
        SpringApplication.run(RabbitMq0x02SpringAmqpWorkQueuesSampleApplication.class, args);
    }

    @Profile("usage_message")
    @Bean
    public CommandLineRunner usage() {
        return new CommandLineRunner() {

            @Override
            public void run(String... arg0) throws Exception {
                System.out.println("This app uses Spring Profiles to control its behavior.\n");
                System.out.println("Sample usage: java -jar "
                        + "RabbitMQ_0x02_SpringAMQP_WorkQueues_Sample-0.0.1-SNAPSHOT.jar "
                        + "--spring.profiles.active=work-queues,sender");
            }
        };
    }

    @Profile("!usage_message")
    @Bean
    public CommandLineRunner tutorial() {
        return new RabbitAmqpTutorialsRunner();
    }
}
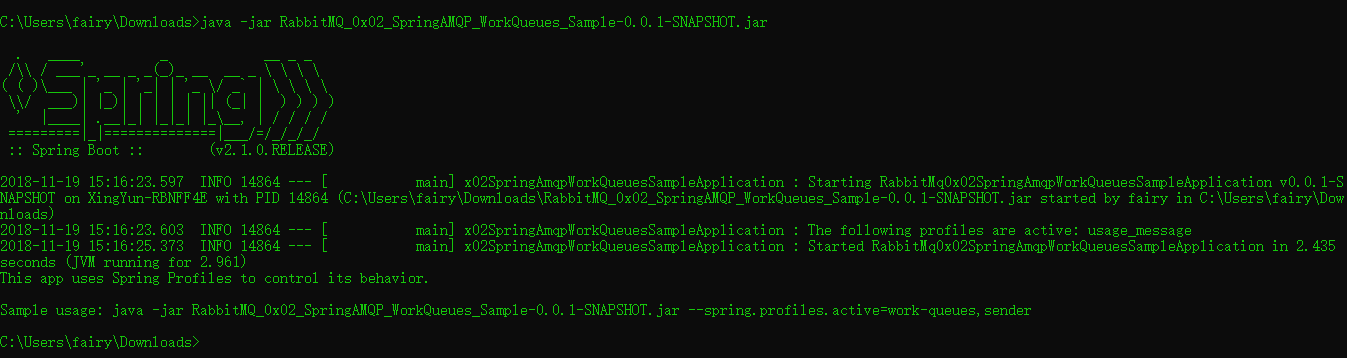
当执行这个项目的jar 文件时会自动加载这个usage_message 配置,打印用法信息。
我们在启动类上添加@EnableScheduling,以便于开启对定时任务的支持.
生产者
我们将修改发送方以通过在RabbitTemplate上使用相同的方法发布消息convertAndSend,以非常人为的方式在消息中附加一个点来提供识别其是否为更长时间运行任务的方法。该文档将此定义为“将Java对象转换为Amqp消息并将其发送到具有默认路由密钥的默认交换”。
import org.springframework.amqp.core.Queue;
import org.springframework.amqp.rabbit.core.RabbitTemplate;
import org.springframework.beans.factory.annotation.Autowired;
import org.springframework.scheduling.annotation.Scheduled;

public class Tut2Sender {

        @Autowired
        private RabbitTemplate template;

        @Autowired
        private Queue queue;

        int dots = 0;
        int count = 0;

        @Scheduled(fixedDelay = 1000, initialDelay = 500)
        public void send() {
            StringBuilder builder = new StringBuilder("Hello");
            if (dots++ == 3) {
                dots = 1;
            }
            for (int i = 0; i < dots; i++) {
                builder.append('.');
            }

            builder.append(Integer.toString(++count));
            String message = builder.toString();
            template.convertAndSend(queue.getName(), message);
            System.out.println(" [x] Sent '" + message + "'");
        }
}
消费者
我们的接收器Tut2Receiver模拟doWork()方法中伪造任务的任意长度,其中点数转换为工作所需的秒数。同样,我们利用“hello”队列上的@RabbitListener和@RabbitHandler来接收消息。消耗该消息的实例将添加到我们的监视器中,以显示处理消息的实例,消息和时间长度。
import org.springframework.amqp.rabbit.annotation.RabbitHandler;
import org.springframework.amqp.rabbit.annotation.RabbitListener;
import org.springframework.util.StopWatch;

@RabbitListener(queues = "hello")
public class Tut2Receiver {

    private final int instance;

    public Tut2Receiver(int i) {
        this.instance = i;
    }

    @RabbitHandler
    public void receive(String in) throws InterruptedException {
        StopWatch watch = new StopWatch();
        watch.start();
        System.out.println("instance " + this.instance +
            " [x] Received '" + in + "'");
        doWork(in);
        watch.stop();
        System.out.println("instance " + this.instance +
            " [x] Done in " + watch.getTotalTimeSeconds() + "s");
    }

    private void doWork(String in) throws InterruptedException {
        for (char ch : in.toCharArray()) {
            if (ch == '.') {
                Thread.sleep(1000);
            }
        }
    }
}
查看用法
java -jar RabbitMQ_0x02_SpringAMQP_WorkQueues_Sample-0.0.1-SNAPSHOT.jar
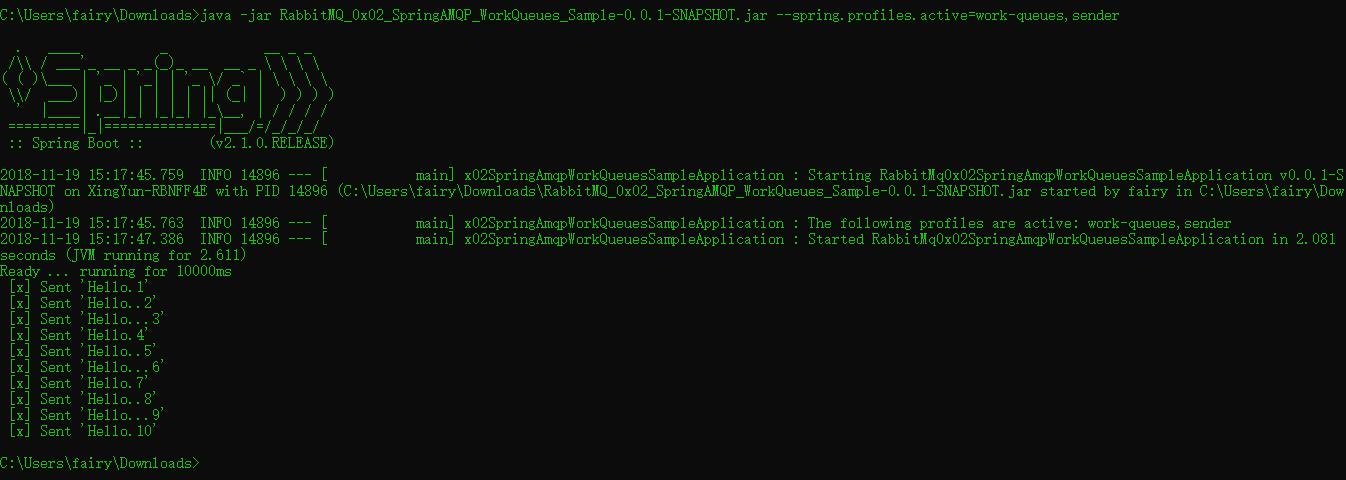
运行生产者
java -jar RabbitMQ_0x02_SpringAMQP_WorkQueues_Sample-0.0.1-SNAPSHOT.jar --spring.profiles.active=work-queues,sender
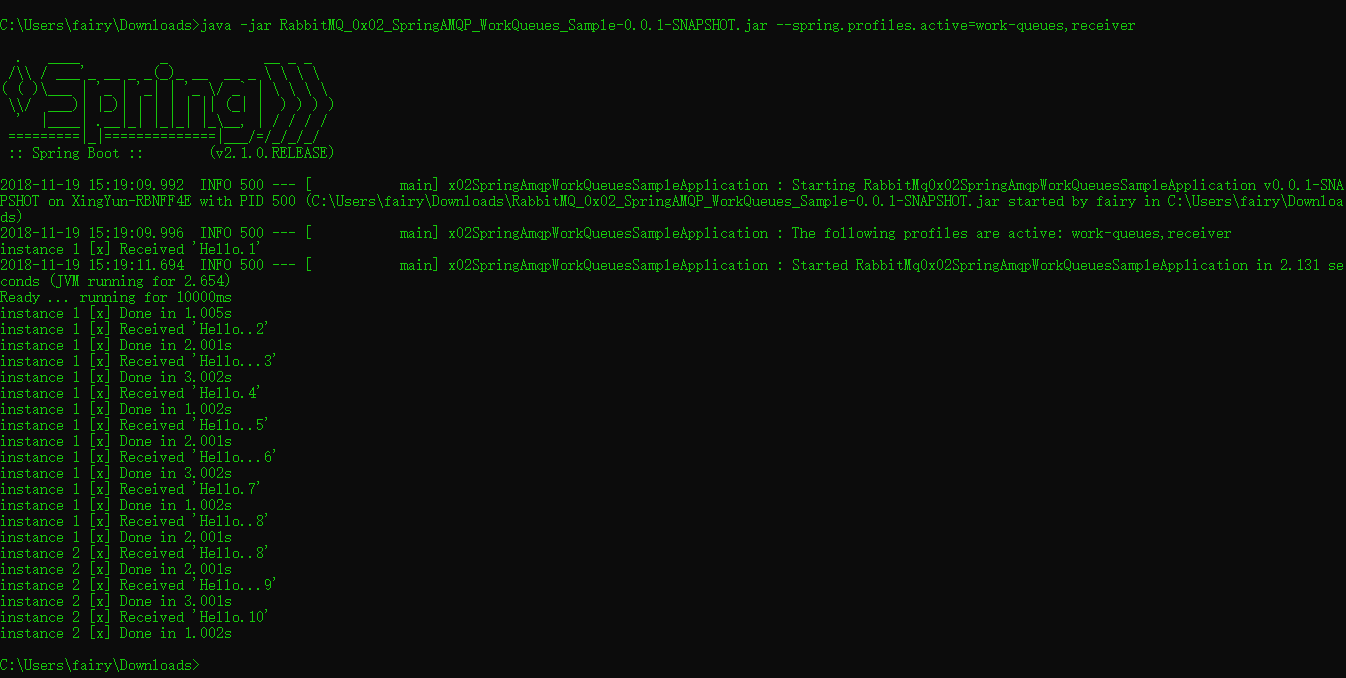
运行消费者
java -jar RabbitMQ_0x02_SpringAMQP_WorkQueues_Sample-0.0.1-SNAPSHOT.jar --spring.profiles.active=work-queues,receiver