1. Nginx
1.1 Nginx简介
Nginx是俄罗斯人开发,开源的,免费的。
Nginx功能:
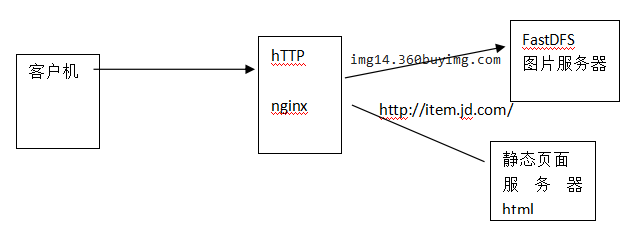
1) nginx作为http服务器:类似apache,tomcat,遵循http协议。
a) 访问图片服务器,加载图片
b) 页面静态化:nginx访问html页面。
2) 负载均衡(反向代理服务器)
a) 高并发
b) 提高网站性能
3) 高速缓存
a) 不建议使用。网站访问量较小,可以使用。
4) 保护网站安全。
1.2 Nginx作为HTTP服务器
Nginx作为HTTP服务器,类似tomcat,访问页面。
业务使用:
1) 访问图片服务器--查看:Linux下安装Nginx并配置一个图片服务器
2) 访问Freemarker页面静态化页面,这个就是常见的前后端分离需要的功能
1.3 正向代理
正向代理,针对客户机来说,代理服务器可见,客户机发送请求,不能直接访问服务器,把请求交给代理服务器,代理服务器转发请求给目的服务器,获取请求数据,把数据交给用户。
正向代理特点:
1) 从宏观上分析:代理服务器和客户机处于统一机房。
2) 客户机是知道代理服务器存在
3) 代理服务器必须经过配置然后才能使用。

1.4 反向代理服务器
反向代理:针对客户机来说,反向代理服务器针对客户来说是不可见,客户机发送请求,反向代理服务器转发请求,返回结果。
反向代理特点:
1) 反向代理服务器和项目部署在同一个机房。
2) 反向代理服务器对客户机是不可见的。

1.5 负载均衡
负载均衡是根据http重定向转发请求,提高网站性能。
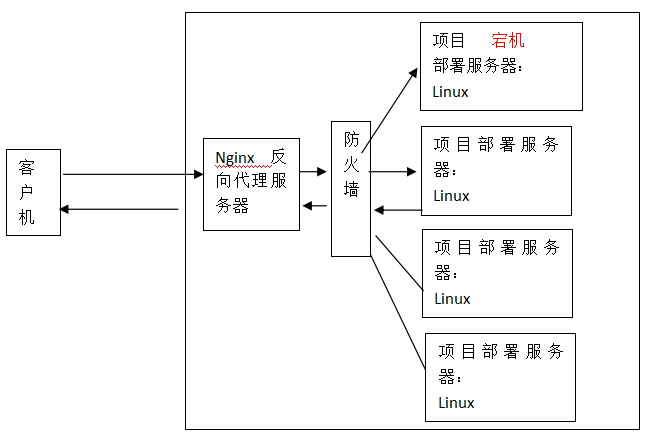
如果集群中请求机器出现宕机,或者比较忙,nginx修改http请求地址,重定向机器完好,或者不忙的机器,提高网站性能。提高网站容错能力。
1.6 高速缓存
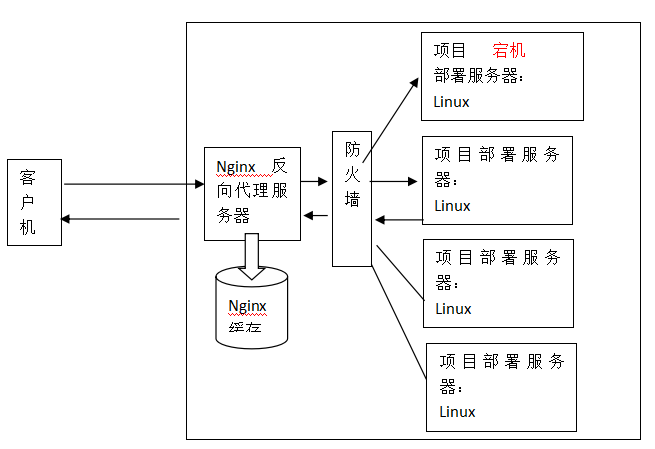
Nginx缓存:
Nginx缓存的是一些静态资源:html页面,样式,js都可缓存。
1.7 网站安全

Nginx保护网站安全:
主要通过nginx和服务器之间防火墙保护网站安全,防火墙只允许经过nginx请求通过,其他的请求不能通过。
2. nginx安装
2.1 下载
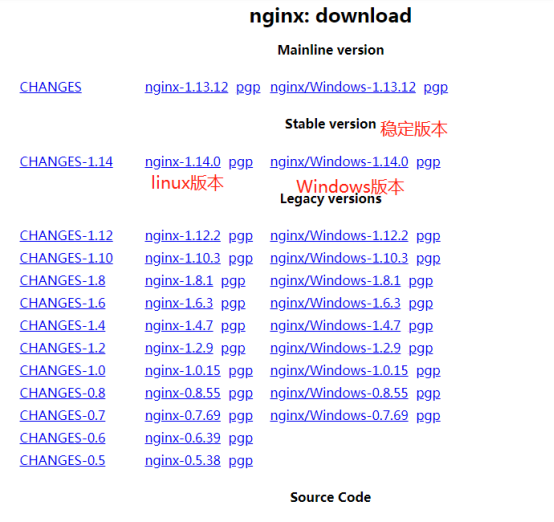
进入http://nginx.org/en/download.html 下载nginx1.14.0版本(当前最新稳定版本)。
2.2 安装
2.2.1 nginx安装环境
nginx是C语言开发,建议在linux上运行,本教程使用Centos6.5作为安装环境。
- gcc
安装nginx需要先将官网下载的源码进行编译,编译依赖gcc环境,如果没有gcc环境,需要安装gcc:yum install gcc-c++
- PCRE
PCRE(Perl Compatible Regular Expressions)是一个Perl库,包括 perl 兼容的正则表达式库。nginx的http模块使用pcre来解析正则表达式,所以需要在linux上安装pcre库。
yum install -y pcre pcre-devel
注:pcre-devel是使用pcre开发的一个二次开发库。nginx也需要此库。
- zlib
zlib库提供了很多种压缩和解压缩的方式,nginx使用zlib对http包的内容进行gzip,所以需要在linux上安装zlib库。
yum install -y zlib zlib-devel
- openssl
OpenSSL 是一个强大的安全套接字层密码库,囊括主要的密码算法、常用的密钥和证书封装管理功能及SSL协议,并提供丰富的应用程序供测试或其它目的使用。
nginx不仅支持http协议,还支持https(即在ssl协议上传输http),所以需要在linux安装openssl库。
yum install -y openssl openssl-devel
//一键安装上面四个依赖
yum -y install gcc zlib zlib-devel pcre-devel openssl openssl-devel
2.3 安装nginx
1) 导入nginx安装包
a) Rz命令导入nginx安装包到opt目录下面。
2) 解压:tar –zxvf nginx-1.14.0.tar.gz
转到:cd nginx-1.14.0
输入:./configure
3) 编译
make
4) 安装
make install
5) 启动
cd /usr/local 如果存在nginx文件夹表示nginx服务器已经搭建好了
下面会存在conf(配置,各种配置文件) html(网页程序) logs(日志) sbin(中会有个nginx,启动时候会启动sbin中的nginx)
进入nginx安装目录/usr/local/nginx/sbin
输入:./nginx
6) 访问nginx

3. Nginx命令
3.1 Nginx启动流程
Nginx启动时候默认加载安装目录conf下的配置文件nginx.conf
也可以指定加载配置路径:./nginx -c /opt/nginx-1.14.0/conf/nginx.conf
3.2 启动命令
1)./nginx 默认加载/usr/local/nginx/conf下的配置文件nginx.conf,所以修改配置文件的时候直接修改/usr/local/nginx/conf下的配置文件nginx.conf就行了
2)./nginx –s reload 修改完配置文件后,需要再次启动nginx服务器,同时要重新加载一下。要执行该命令,必须先启动nginx。
3.3 停止命令
1)./nginx –s stop
解析:强制终止nginx进程。
2)./nginx –s quit
解析:凌迟处死,先让nginx把任务完成,然后终止。
4. Nginx.conf (/usr/local/nginx/conf)
| #user nobody; worker_processes 1; //全局块,配置工作进程数。默认1 events { worker_connections 1024; //events块,工作连接数,默认1024. } http { //http块,配置多个Server,配置虚拟主机,负载均衡等等。 include mime.types; default_type application/octet-stream; sendfile on;
keepalive_timeout 65; server { //server块,配置服务器,服务器端口,服务器IP地址。 listen 80; server_name localhost; location / { //资源路径块,定位资源文件位置。 root html; index index.html index.htm; }
error_page 500 502 503 504 /50x.html; location = /50x.html { root html; }
} } |
全局块:配置影响nginx全局参数,配置工作进程数。默认1
Events:工作连接数,默认1024.
http块:配置多个Server,配置虚拟主机,负载均衡等等。
Server块:配置服务器,服务器端口,服务器IP地址。
Location块:定位资源文件位置。
5. 配置端口映射
修改配置文件 /usr/local/nginx/conf/nginx.conf
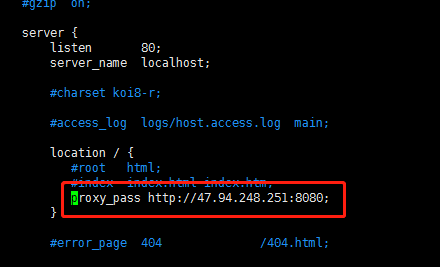
直接在/usr/local/nginx/sbin下启动nginx
./nginx
然后再次访问

6. 虚拟主机
虚拟主机 (Virtual Host) 是在同一台机器搭建属于不同域名或者基于不同 IP 的多个网站服务的技术. 可以为运行在同一物理机器上的各个网站指配不同的 IP 和端口, 也可让多个网站拥有不同的域名.
1) 基于端口虚拟主机
2) 基于域名虚拟主机
6.1 端口虚拟主机
修改nginx.conf配置文件:
| http { include mime.types; default_type application/octet-stream; sendfile on;
keepalive_timeout 65; server { listen 80; server_name localhost; location / { root html; index index.html index.htm; //和下面的index.html是不一样的(可以写点内 容进行区分) }
error_page 500 502 503 504 /50x.html; location = /50x.html { root html; }
} server { listen 81; server_name localhost; location / { root html-81; index index.html index.htm; }
error_page 500 502 503 504 /50x.html; location = /50x.html { root html; }
} |
6.2 创建资源访问路径
[root@localhost nginx]# ll
total 16
drwxr-xr-x. 2 root root 4096 May 12 22:56 conf
drwxr-xr-x. 2 root root 4096 May 12 23:17 html
drwxr-xr-x. 2 root root 4096 May 12 23:18 html-81
drwxr-xr-x. 2 root root 4096 May 12 22:56 sbin
nginx配置文件Server就是我们虚拟主机服务器,访问81端口所对应的主机,81端口所对应资源路径是location / html-81,访问文件夹html-81中index.html
修改index.html
<h1>Welcome to nginx!HTML-81</h1>
6.3 重启nginx
重启命令:./nginx –s reload

6.4 基于域名虚拟主机
理解:
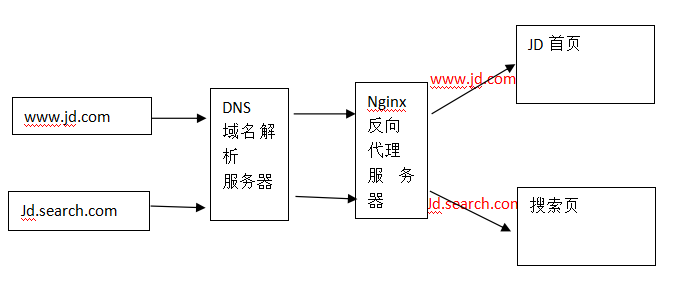
测试访问nginx域名虚拟主机,不需要经过DNS域名解析服务器。可以本地hosts文件,添加以上域名,跳过DNS域名解析服务器。
添加域名:C:\Windows\System32\drivers\etc\hosts
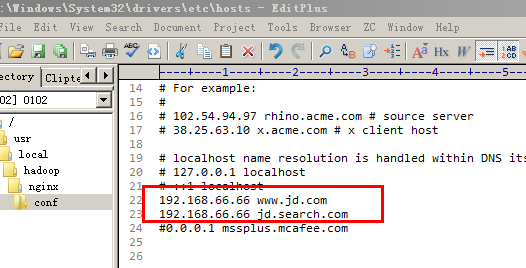
修改nginx.conf配置文件:
| http { include mime.types; default_type application/octet-stream; sendfile on;
keepalive_timeout 65; server { listen 80; server_name www.jd.com; location / { root html; index index.html index.htm; }
error_page 500 502 503 504 /50x.html; location = /50x.html { root html; }
} server { listen 80; server_name jd.search.com; location / { root html-81; index index.html index.htm; }
error_page 500 502 503 504 /50x.html; location = /50x.html { root html; }
} |
7. 反向代理
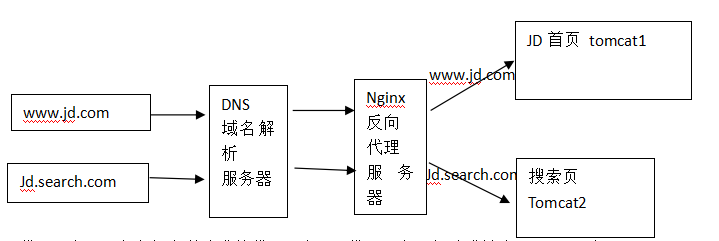
代理服务器:客户机发送请求给代理服务器,代理服务器把请求转发tomcat服务器,tomcat接受请求,处理请求,返回处理结果给代理服务器,代理服务器返回给客户机。
7.1 部署tomcat
根据图解,部署2台tomcat服务器:
[root@localhost tomcat-nginx]# ll
total 8
drwxr-xr-x. 9 root root 4096 May 12 23:58 tomcat1
drwxr-xr-x. 9 root root 4096 May 12 23:59 tomcat2
修改tomcat2端口,修改3个端口,tomcat1和tomcat2端口不能相同。


分别修改tomcat1和tomcat2初始化页面:webapps/ROOT/index.jsp

7.2 配置nginx.conf
| http { include mime.types; default_type application/octet-stream; sendfile on;
keepalive_timeout 65; upstream mytomcat1{ //这就是代理服务 server 192.168.66.66:8080; } upstream mytomcat2{ server 192.168.66.66:8081; } server { //server块,配置服务器,服务器端口,服务器IP地址。 listen 80; server_name www.jd.com; location / { //在location配置代理 #root html; //这两个配置的话,访问的是本地的静态资源 #index index.html index.htm; proxy_pass http://mytomcat1; //转向我们的代理服务 }
error_page 500 502 503 504 /50x.html; location = /50x.html { root html; }
} server { listen 80; server_name jd.search.com; location / { //在location配置代理 #root html-81; #index index.html index.htm; proxy_pass http://mytomcat2; }
error_page 500 502 503 504 /50x.html; location = /50x.html { root html; }
} |
1) 客户机发送请求www.jd.com
2) Nginx接受请求:通过nginx.conf配置主机Server地址匹配:www.jd.com
3) 匹配成功:就会去location下面寻找需要资源
4) 在location配置代理:去寻找代理服务器。http://mytomcat1
5) 寻找名称是mytomcat1的upstream
6) Upstream负责把请求转发tomcat1,或者tomcat2.
另外一个知识点是利用Nginx通过域名直接访问Tomcat应用--nginx通过域名访问项目(不接项目名称),cookie丢失问题
8. 负载均衡
发送一个请求给反向代理服务器,反向代理服务器把请求分发给服务器,如果有服务器宕机,nginx重定向请求,如果服务器较忙,nginx也可以转发请求。
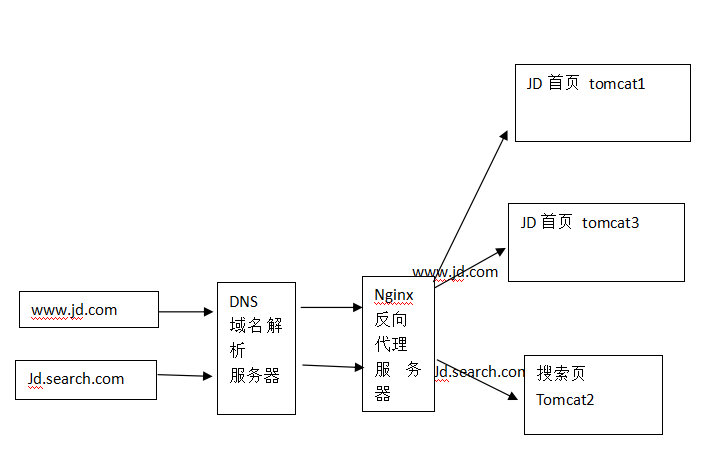
根据图解:
部署3台tomcat,www.jd.com访问至少2台服务器才有负载均衡。
创建tomcat3服务器:
[root@localhost tomcat-nginx]# ll
total 12
drwxr-xr-x. 9 root root 4096 May 12 23:58 tomcat1
drwxr-xr-x. 9 root root 4096 May 12 23:59 tomcat2
drwxr-xr-x. 9 root root 4096 May 13 00:24 tomcat3
修改tomcat3的端口:修改3个端口
修改完端口,启动tomcat3服务器。
8.1 配置nginx.conf
| http { include mime.types; default_type application/octet-stream; sendfile on;
keepalive_timeout 65; upstream mytomcat1{ //这就是代理服务 server 192.168.66.66:8080; server 192.168.66.66:8082; } upstream mytomcat2{ //这就是代理服务 server 192.168.66.66:8081; } server { listen 80; server_name www.jd.com; location / { #root html; #index index.html index.htm; proxy_pass http://mytomcat1; //转向我们的代理服务 }
error_page 500 502 503 504 /50x.html; location = /50x.html { root html; }
} server { listen 80; server_name jd.search.com; location / { #root html-81; #index index.html index.htm; proxy_pass http://mytomcat2; //转向我们的代理服务 }
error_page 500 502 503 504 /50x.html; location = /50x.html { root html; }
} |
负载均衡流程:
1) 客户机发送请求给nginx服务器
2) Nginx的Server匹配请求地址
3) 从location寻找资源,没有静态资源,找代理
4) 通过proxy_pass转发upstream代理服务器
5) Upstream代理服务器有2台
6) Nginx根据nginx轮询算法访问tomcat服务器(2台服务器都不忙)
8.2 负载均衡策略
1) 轮询
Nginx代理服务器:upstream中包含的服务器默认权重都是1,也就说tomcat1和tomcat3地位都是平等,访问规则:ACACACAC…………..
2) 修改权重
访问规则:ACCACCACC…
upstream mytomcat1{
server 192.168.66.66:8080 weight=1;
server 192.168.66.66:8082 weight=2;
}