版权声明:本文为博主原创文章,未经博主允许不得转载。 https://blog.csdn.net/coolbeliever/article/details/81979089
模版测试较为复杂,它不像Alpha测试一样,单单通过简单的大于小于等运算符来比较,但是和Alpha测试一样,都是测试像素点,符合要求的就渲染,不符合要求的就不渲染。了解模版测试,需要理解较多术语:
1.GBuffer:几何缓冲,相当于一个容器
2.RefenceValue:模版值,Guffer中的像素点就是与这个值按位与后进行比较
3.stencilOperation:比较后进行的操作
4.ReadMask|WriteMask:读遮罩|写遮罩
理解了以上的术语,那么模版测试的公式就差不多可以理解了:其公式为:
referenceValue&readMask comparisonFunction stencilBufferValue&readMask
如果满足了以上公式,就会通过模版测试,反之亦然。
emmmm。。。。。博主还是感觉口说不如实践,下面用一个穿墙透视的例子来帮助读者理解模版测试
1.首先,在场景中新建三个Cube,并调整位置,使其分别在前,中,后三个位置,并且其大小顺序为 中>前>后。
如图所示:
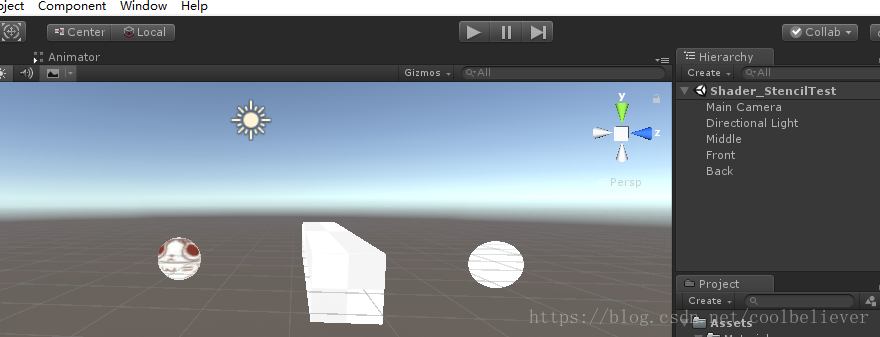
2.新建三个材质与三个Shader,将三个Shader拖到三个材质上,并将三个材质分别拖到三个游戏物体上。
3.编写最前面游戏物体的Shader,如下:
Shader "Hidden/StencilTestFront"
{
	Properties
	{
		_MainTex ("Texture", 2D) = "white" {}
	}
	SubShader
	{
		ZWrite Off  //深度测试,这里不作解释,不理解的可以去unity官方文档上查阅
		Pass
		{
		//CompareFunction:
		//Greater 	当GBufffer中的值大于Ref的值时才渲染(这里指的是公式中按位与之后的结果的比较,后面都是指的这个,以后不再说明)
		//GEqual 	当GBufffer中的值大于或者等于Ref的值时才渲染
		//Less 	...小于...
		//LEqual 	...小于或者等于...
		//Equal 	...等于...
		//NotEqual 	...不等于...
		//Always 	总是通过
		//Never 	总是不通过


		//Operator:
		//Keep 	保持GBuffer中的值不变
		//Zero 	将0写入GBuffer
		//Replace 	替换GBuffer中的值为Ref。
		//IncrSat   递增GBuffer中的值,如果该值等于255,则保持不变
		//DecrSat 	递减GBuffer中的值,如果该值等于0,则保持不变
		//Invert 	按位取反GBuffer中的值
		//IncrWrap 	递增GBuffer中的值,如果该值等于255,则变成0
		//DecrWrap 	递减GBuffer中的值,如果该值等于0,则变成255
			Stencil
			{
				Ref 2  //设置参考值为2
				Comp always   //让模版测试总是通过
				Pass replace	//如果上面模版测试通过,就将GBuffer中的值替换为Ref的值
			}
			CGPROGRAM
			#pragma vertex vert
			#pragma fragment frag

			#include "UnityCG.cginc"

			struct appdata
			{
				float4 vertex : POSITION;
				float2 uv : TEXCOORD0;
			};

			struct v2f
			{
				float2 uv : TEXCOORD0;
				float4 vertex : SV_POSITION;
			};

			v2f vert (appdata v)
			{
				v2f o;
				o.vertex = UnityObjectToClipPos(v.vertex);
				o.uv = v.uv;
				return o;
			}

			sampler2D _MainTex;

			fixed4 frag (v2f i) : SV_Target
			{
				fixed4 col = tex2D(_MainTex, i.uv);
				return col;
			}
			ENDCG
		}
	}
}
4.编写middle的Shader,代码如下:
Shader "Hidden/StencilTestMiddle"
{
	Properties
	{
		_MainTex ("Texture", 2D) = "white" {}
	}
	SubShader
	{
		// No culling or depth
		//Cull Off ZWrite Off ZTest Always

		Pass
		{
			Stencil
			{
				Ref 2
				Comp NotEqual
			}
			CGPROGRAM
			#pragma vertex vert
			#pragma fragment frag

			#include "UnityCG.cginc"

			struct appdata
			{
				float4 vertex : POSITION;
				float2 uv : TEXCOORD0;
			};

			struct v2f
			{
				float2 uv : TEXCOORD0;
				float4 vertex : SV_POSITION;
			};

			v2f vert (appdata v)
			{
				v2f o;
				o.vertex = UnityObjectToClipPos(v.vertex);
				o.uv = v.uv;
				return o;
			}

			sampler2D _MainTex;

			fixed4 frag (v2f i) : SV_Target
			{
				fixed4 col = tex2D(_MainTex, i.uv);
				// just invert the colors
				//col.rgb = 1 - col.rgb;
				return col;
			}
			ENDCG
		}
	}
}
5.编写Back的Shader,代码如下:
Shader "Hidden/StencilTestBack"
{
	Properties
	{
		_MainTex ("Texture", 2D) = "white" {}
	}
	SubShader
	{
		// No culling or depth
		//Cull Off ZWrite Off ZTest Always

		Pass
		{
			Stencil
			{
				Ref 2
			}
			CGPROGRAM
			#pragma vertex vert
			#pragma fragment frag

			#include "UnityCG.cginc"

			struct appdata
			{
				float4 vertex : POSITION;
				float2 uv : TEXCOORD0;
			};

			struct v2f
			{
				float2 uv : TEXCOORD0;
				float4 vertex : SV_POSITION;
			};

			v2f vert (appdata v)
			{
				v2f o;
				o.vertex = UnityObjectToClipPos(v.vertex);
				o.uv = v.uv;
				return o;
			}

			sampler2D _MainTex;

			fixed4 frag (v2f i) : SV_Target
			{
				fixed4 col = tex2D(_MainTex, i.uv);
				// just invert the colors
				//col.rgb = 1 - col.rgb;
				return col;
			}
			ENDCG
		}
	}
}
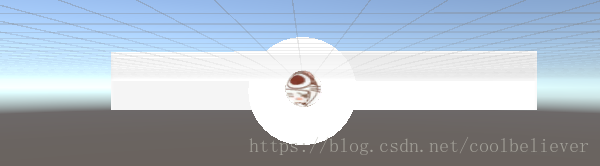
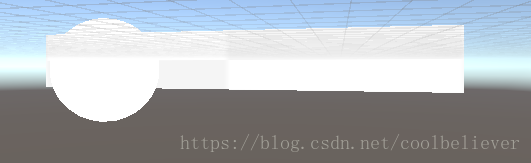
完成之后,即可查看效果: