1. 前言
本文主要是通过轻松漫画方式将 复杂的spark sql转为RDD原理 呈现给大家.
2. 版本
spark 2.3.2
3. 准备
3.1 mysql表
CREATE TABLE employee
(
id BIGINT UNSIGNED NOT NULL PRIMARY KEY AUTO_INCREMENT,
name VARCHAR(15) NOT NULL,
age INT NOT NULL
) ;

insert into employee (name,age) values ('Tom',25);
3.2 测试代码
public class SqlTest {
    public static void main(String[] args) {
        SparkSession spark = SparkSession.builder().appName("sql_test").master("local").getOrCreate();
        String url = "jdbc:mysql://localhost:3306/sample1?zeroDateTimeBehavior=convertToNull&characterEncoding=utf8&useLocalSessionState=true&useSSL=false&autoReconnect=true&failOverReadOnly=false&maxReconnects=10";
        //查找的表名
        String table = "employee";
        Properties connectionProperties = getProperties();

        //指定表连接数据库
        Dataset<Row> jdbc = spark.read().jdbc(url, table, connectionProperties);
        jdbc.createOrReplaceTempView(table);
        Dataset<Row> jdbcDF = spark.sql("select id,age from employee where lower(name)='tom' and age>20");
        //显示数据
        List<Row> rows = jdbcDF.collectAsList();
        System.out.println(rows);

    }

    private static Properties getProperties() {
        Properties connectionProperties = new Properties();
        connectionProperties.put("user", "root");
        connectionProperties.put("password", "123456");
        connectionProperties.put("driver", "com.mysql.jdbc.Driver");
        return connectionProperties;
    }
}
输出结果
[[1,25]]
4. 图解sparkSql解析原理
4.1 图解读取mysql 的 employee表
4.1.1 解读代码
Dataset<Row> jdbc = spark.read().jdbc(url, table, connectionProperties);
4.1.2 通过漫画轻松了解全过程
4.1.3 漫画讲解
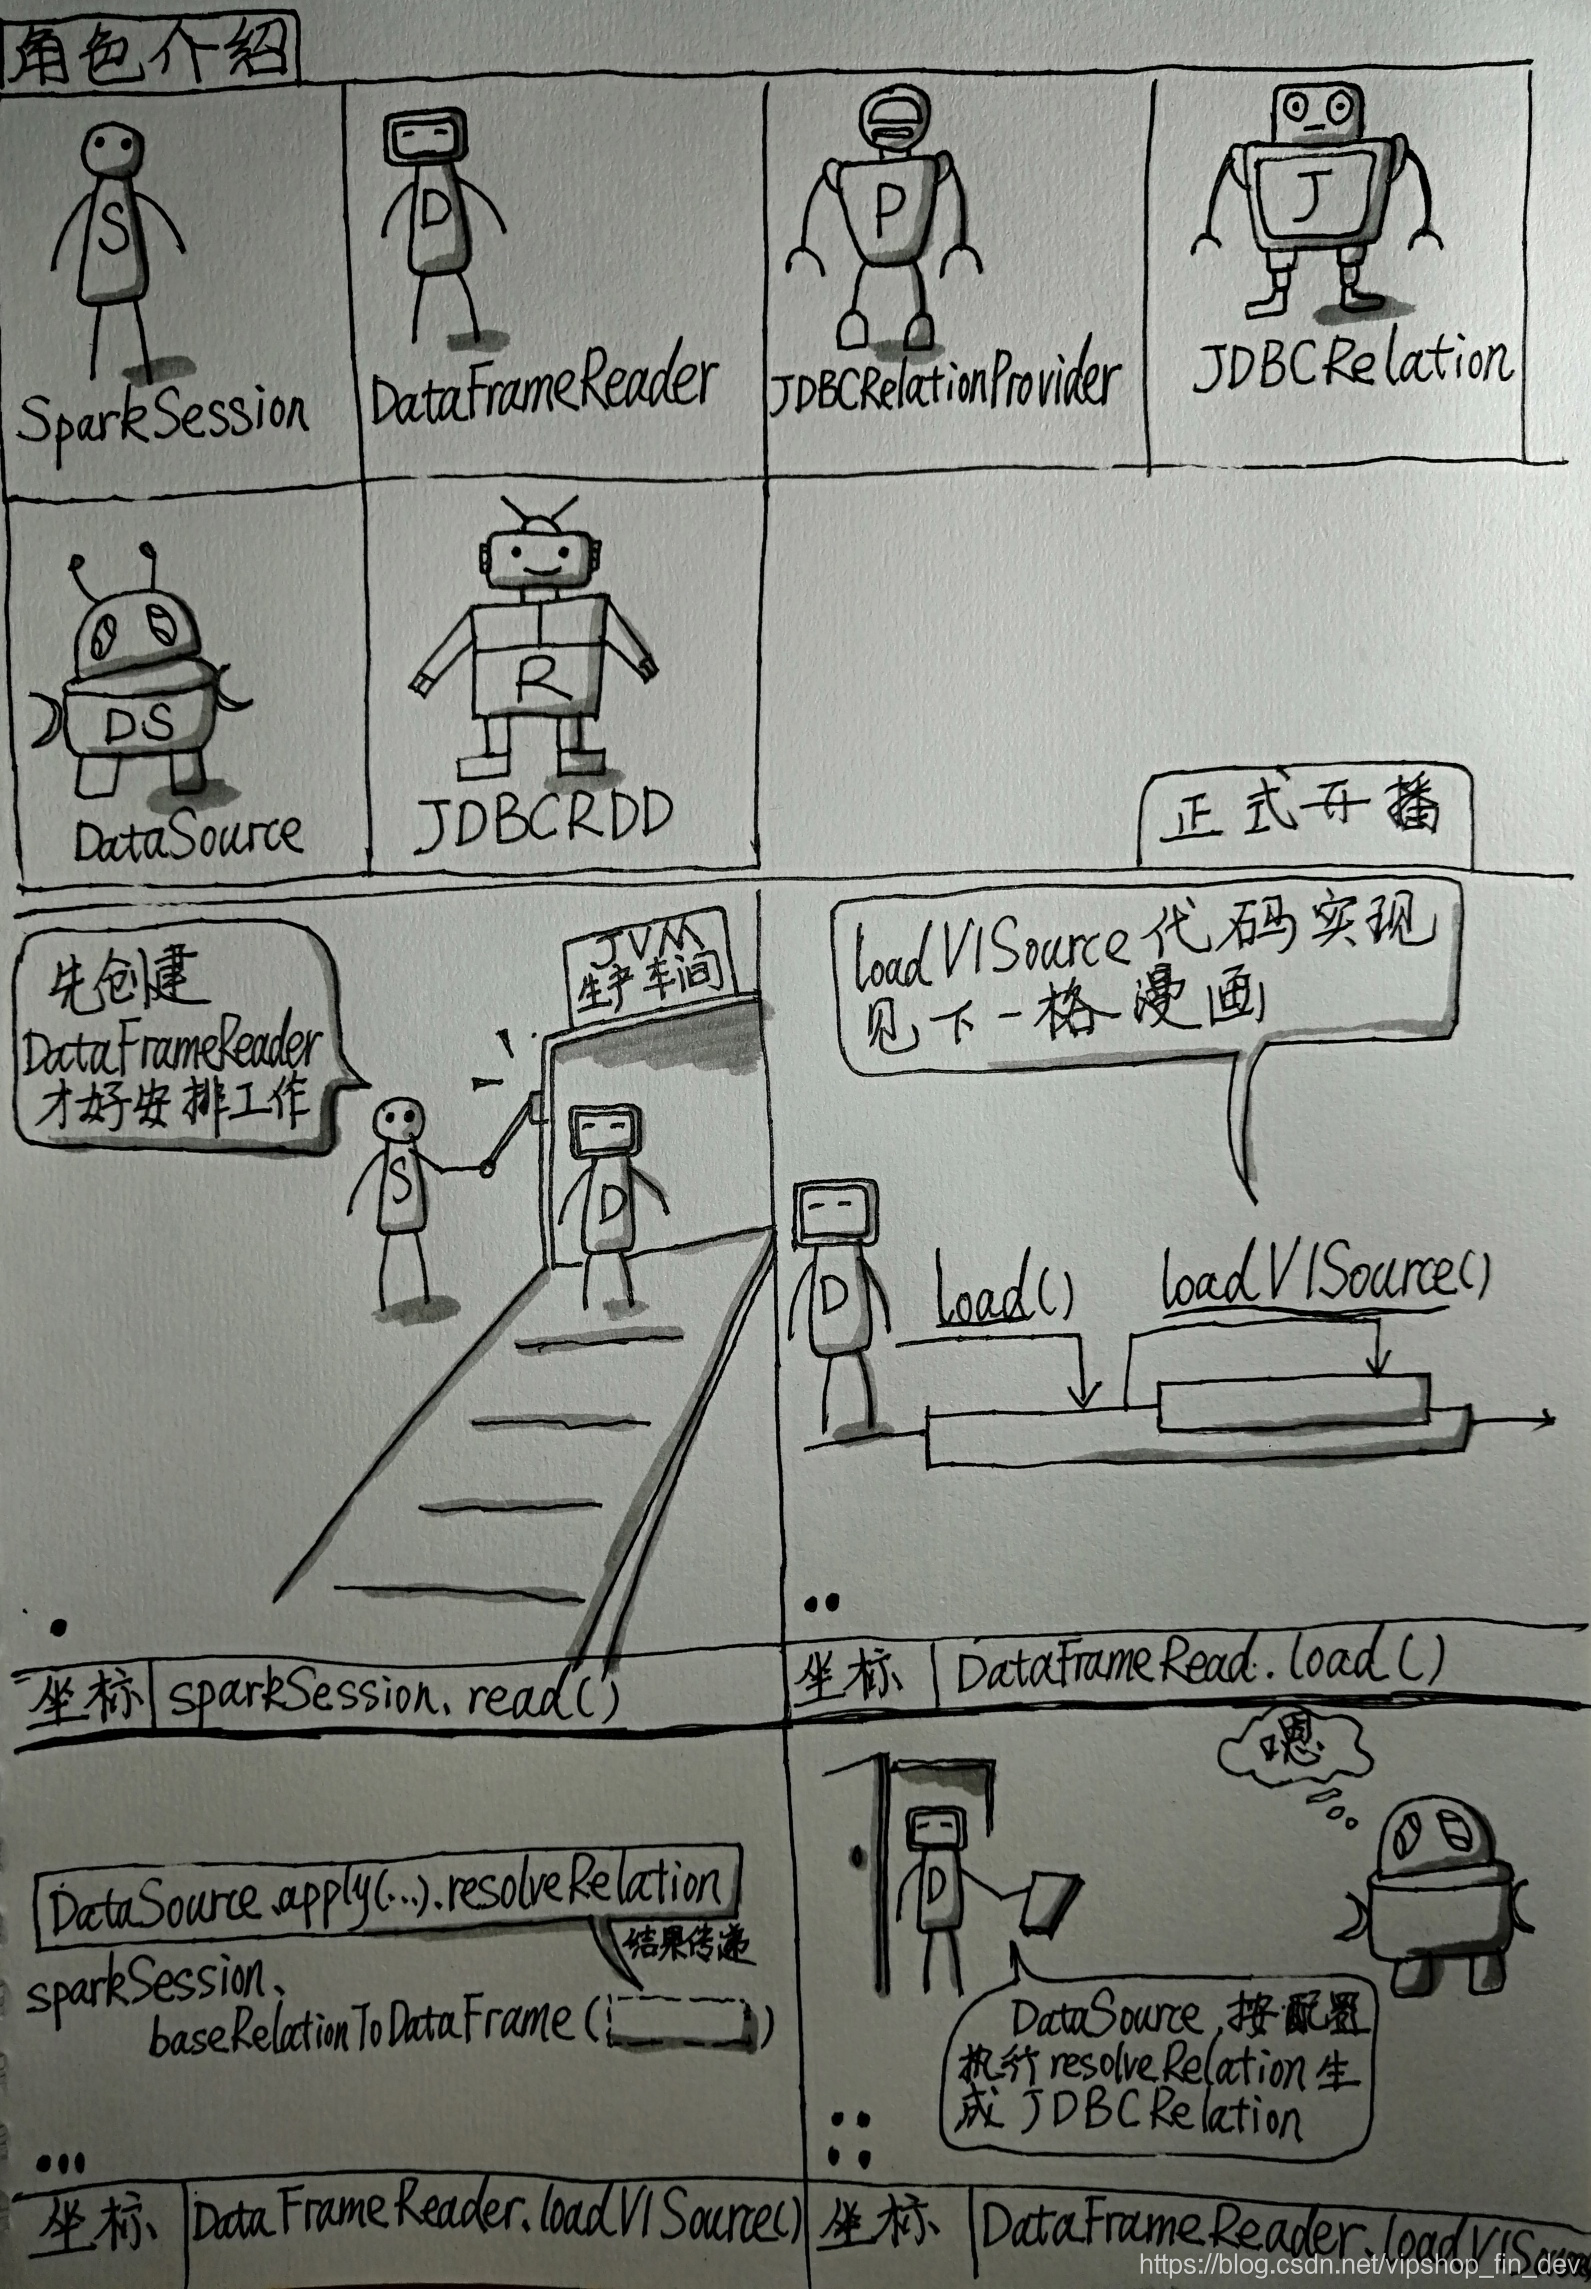
图1
本步骤比较简单,见SparkSession类read()方法
def read: DataFrameReader = new DataFrameReader(self)
图2
本步骤是代码执行到 jdbc(url, table, connectionProperties) 后执行的一系列方法,本步骤相对较简单,下面提供相关代码实现:
  def jdbc(url: String, table: String, properties: Properties): DataFrame = {
    assertNoSpecifiedSchema("jdbc")
    this.extraOptions ++= properties.asScala
    this.extraOptions += (JDBCOptions.JDBC_URL -> url, JDBCOptions.JDBC_TABLE_NAME -> table)
    format("jdbc").load()
  }
  def load(): DataFrame = {
    load(Seq.empty: _*) // force invocation of `load(...varargs...)`
  }

  def load(paths: String*): DataFrame = {
      ....
      if (classOf[DataSourceV2].isAssignableFrom(cls)) {
	    ...
	 }else{
      loadV1Source(paths: _*)
     }
  }
图3
图3主要是把DataFrameReader.loadV1Source()方法的代码展示出来:
  private def loadV1Source(paths: String*) = {
    // Code path for data source v1.
    sparkSession.baseRelationToDataFrame(
      DataSource.apply(
        sparkSession,
        paths = paths,
        userSpecifiedSchema = userSpecifiedSchema,
        className = source,
        options = extraOptions.toMap).resolveRelation())
  }
图4
展示DataFrameReader.loadV1Source()方法要求DataSource执行resolveRelation()方法后生成JDBCRelation对象,并将这对象传递给sparkSession.baseRelationToDataFrame(…)执行
图5
本步骤执行内容可看下面简化后的代码:
  def resolveRelation(checkFilesExist: Boolean = true): BaseRelation = {
    //图2中的jdbc方法中format("jdbc")中的jdbc会传递给DataSource,这里的relation最终会是RelationProvider对象
    val relation = (providingClass.newInstance(), userSpecifiedSchema) match {
      case (dataSource: SchemaRelationProvider, Some(schema)) =>
        dataSource.createRelation(sparkSession.sqlContext, caseInsensitiveOptions, schema)
      case (dataSource: RelationProvider, None) =>
        //通过本方法创建JDBCRelationProvider对象
        dataSource.createRelation(sparkSession.sqlContext, caseInsensitiveOptions)
        ...
    }
    relation match {
      case hs: HadoopFsRelation =>
        ...
      case _ =>
        //检查字段是否重复,如果重复,则抛异常
        SchemaUtils.checkColumnNameDuplication(
          relation.schema.map(_.name),
          "in the data schema",
          equality)
    }
}
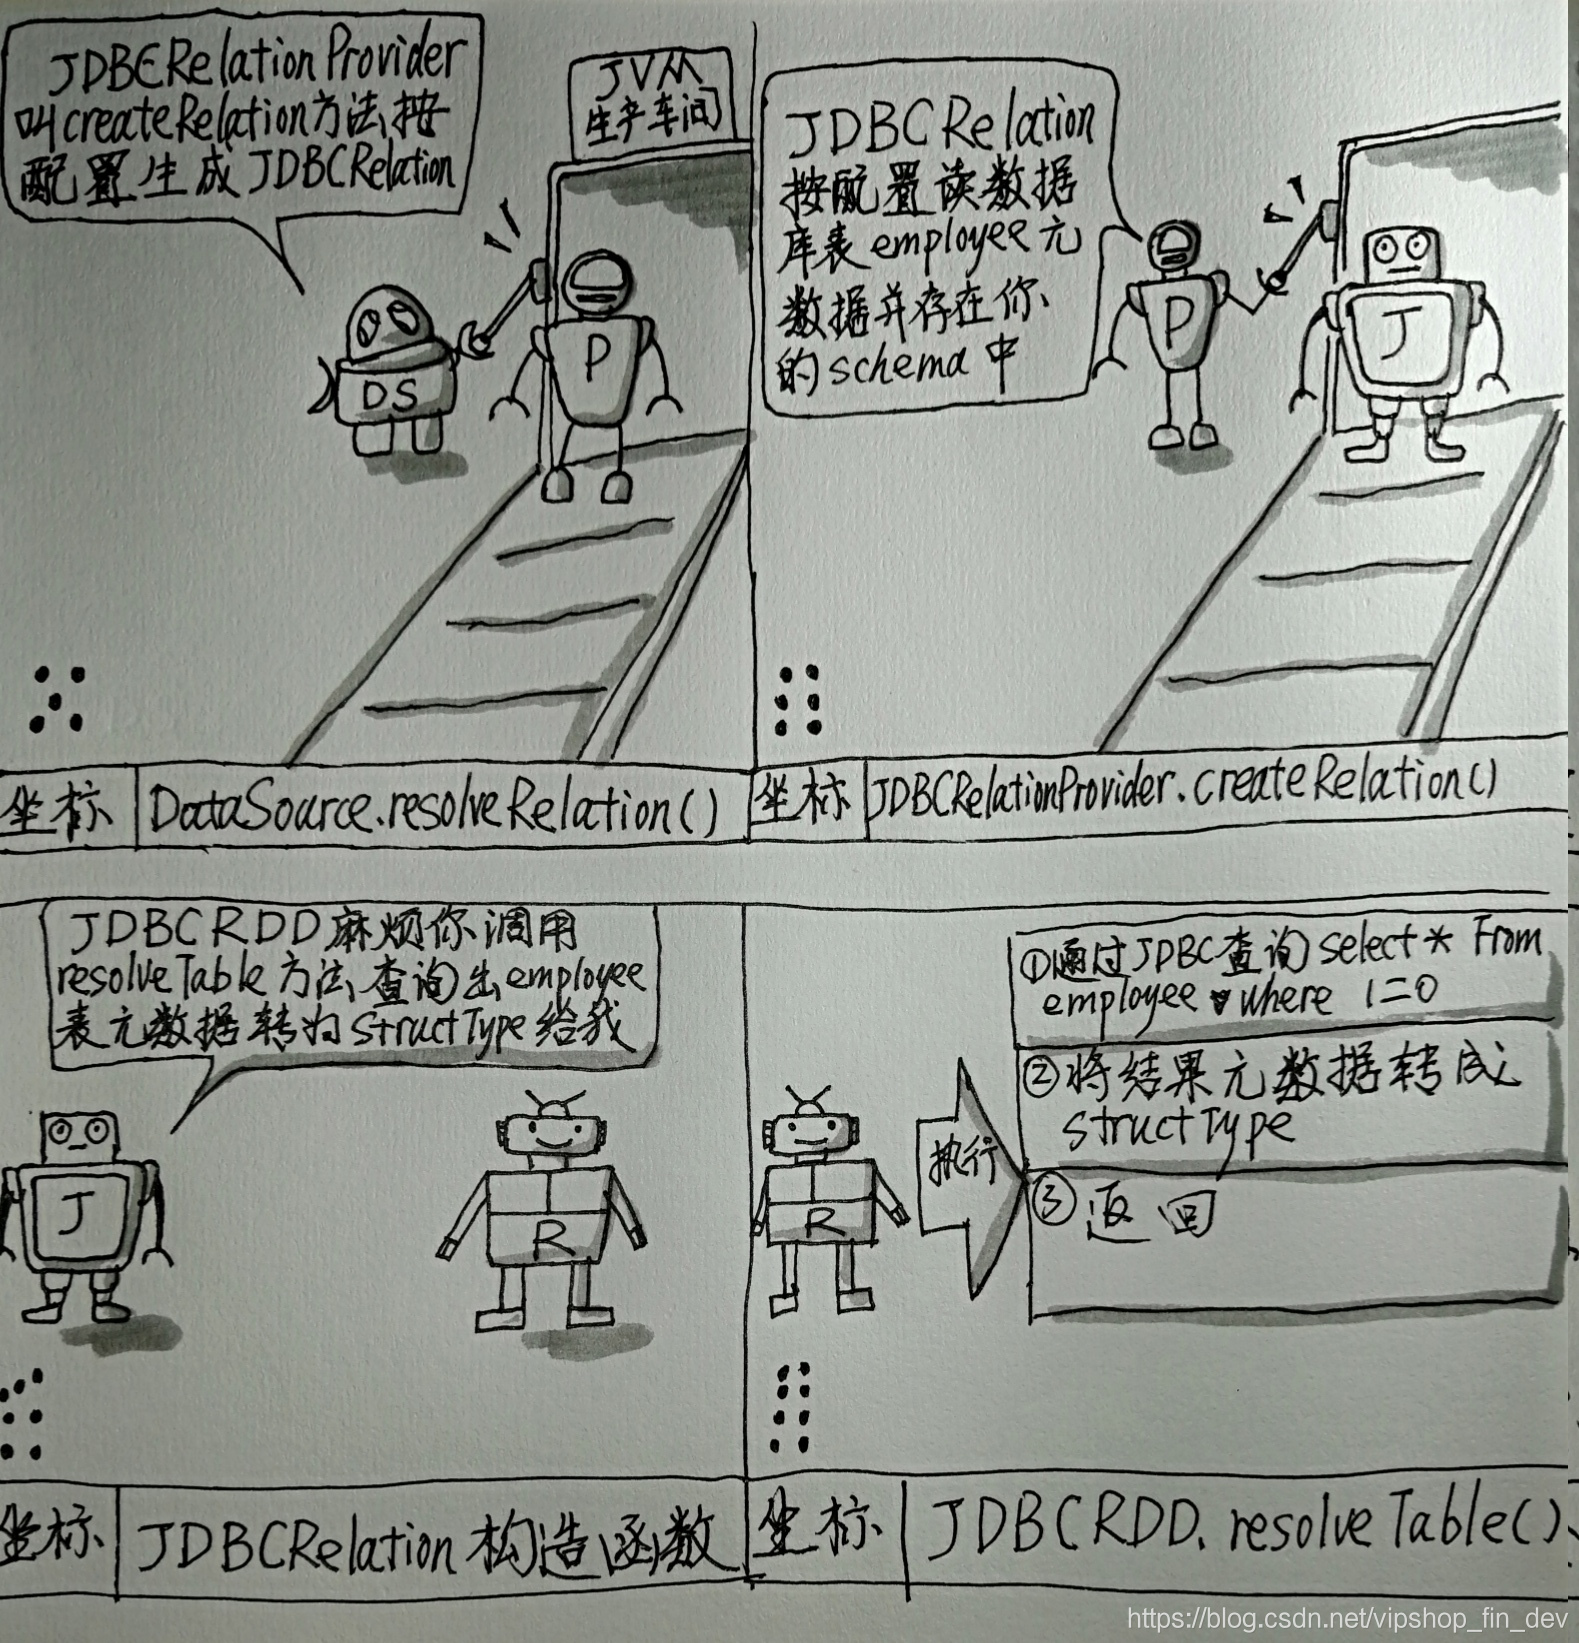
图6
本图的代码实现在JdbcRelationProvider.createRelation()方法,具体代码简化如下:
  override def createRelation(
      sqlContext: SQLContext,
      parameters: Map[String, String]): BaseRelation = {
    import JDBCOptions._
    val jdbcOptions = new JDBCOptions(parameters)
    val partitionColumn = jdbcOptions.partitionColumn
    val lowerBound = jdbcOptions.lowerBound
    val upperBound = jdbcOptions.upperBound
    val numPartitions = jdbcOptions.numPartitions
    //如果没有传入分区字段,则partitionInfo为null
    val partitionInfo = if (partitionColumn.isEmpty) {
      assert(lowerBound.isEmpty && upperBound.isEmpty, "When 'partitionColumn' is not specified, " +
        s"'$JDBC_LOWER_BOUND' and '$JDBC_UPPER_BOUND' are expected to be empty")
      null
    } else {
      assert(lowerBound.nonEmpty && upperBound.nonEmpty && numPartitions.nonEmpty,
        s"When 'partitionColumn' is specified, '$JDBC_LOWER_BOUND', '$JDBC_UPPER_BOUND', and " +
          s"'$JDBC_NUM_PARTITIONS' are also required")
      //建立分区
      JDBCPartitioningInfo(
        partitionColumn.get, lowerBound.get, upperBound.get, numPartitions.get)
    }
    val parts = JDBCRelation.columnPartition(partitionInfo)
    JDBCRelation(parts, jdbcOptions)(sqlContext.sparkSession)
  }
图7
本步骤的主要逻辑是schema的构建上,代码如下:
  override val schema: StructType = {
    val tableSchema = JDBCRDD.resolveTable(jdbcOptions)
    jdbcOptions.customSchema match {
      case Some(customSchema) => JdbcUtils.getCustomSchema(
        tableSchema, customSchema, sparkSession.sessionState.conf.resolver)
      case None => tableSchema
    }
  }
图8
JDBCRDD的resolveTable方法较简单,代码如下:
  def resolveTable(options: JDBCOptions): StructType = {
    val url = options.url
    val table = options.table
    val dialect = JdbcDialects.get(url)
    val conn: Connection = JdbcUtils.createConnectionFactory(options)()
    try {
      //getSchemaQuery(table)的实现为: "SELECT * FROM $table WHERE 1=0"
      val statement = conn.prepareStatement(dialect.getSchemaQuery(table))
      try {
        val rs = statement.executeQuery()
        try {
          //将数据库表的元数据转为StructType
          JdbcUtils.getSchema(rs, dialect, alwaysNullable = true)
        } finally {
          rs.close()
        }
      } finally {
        statement.close()
      }
    } finally {
      conn.close()
    }
  }
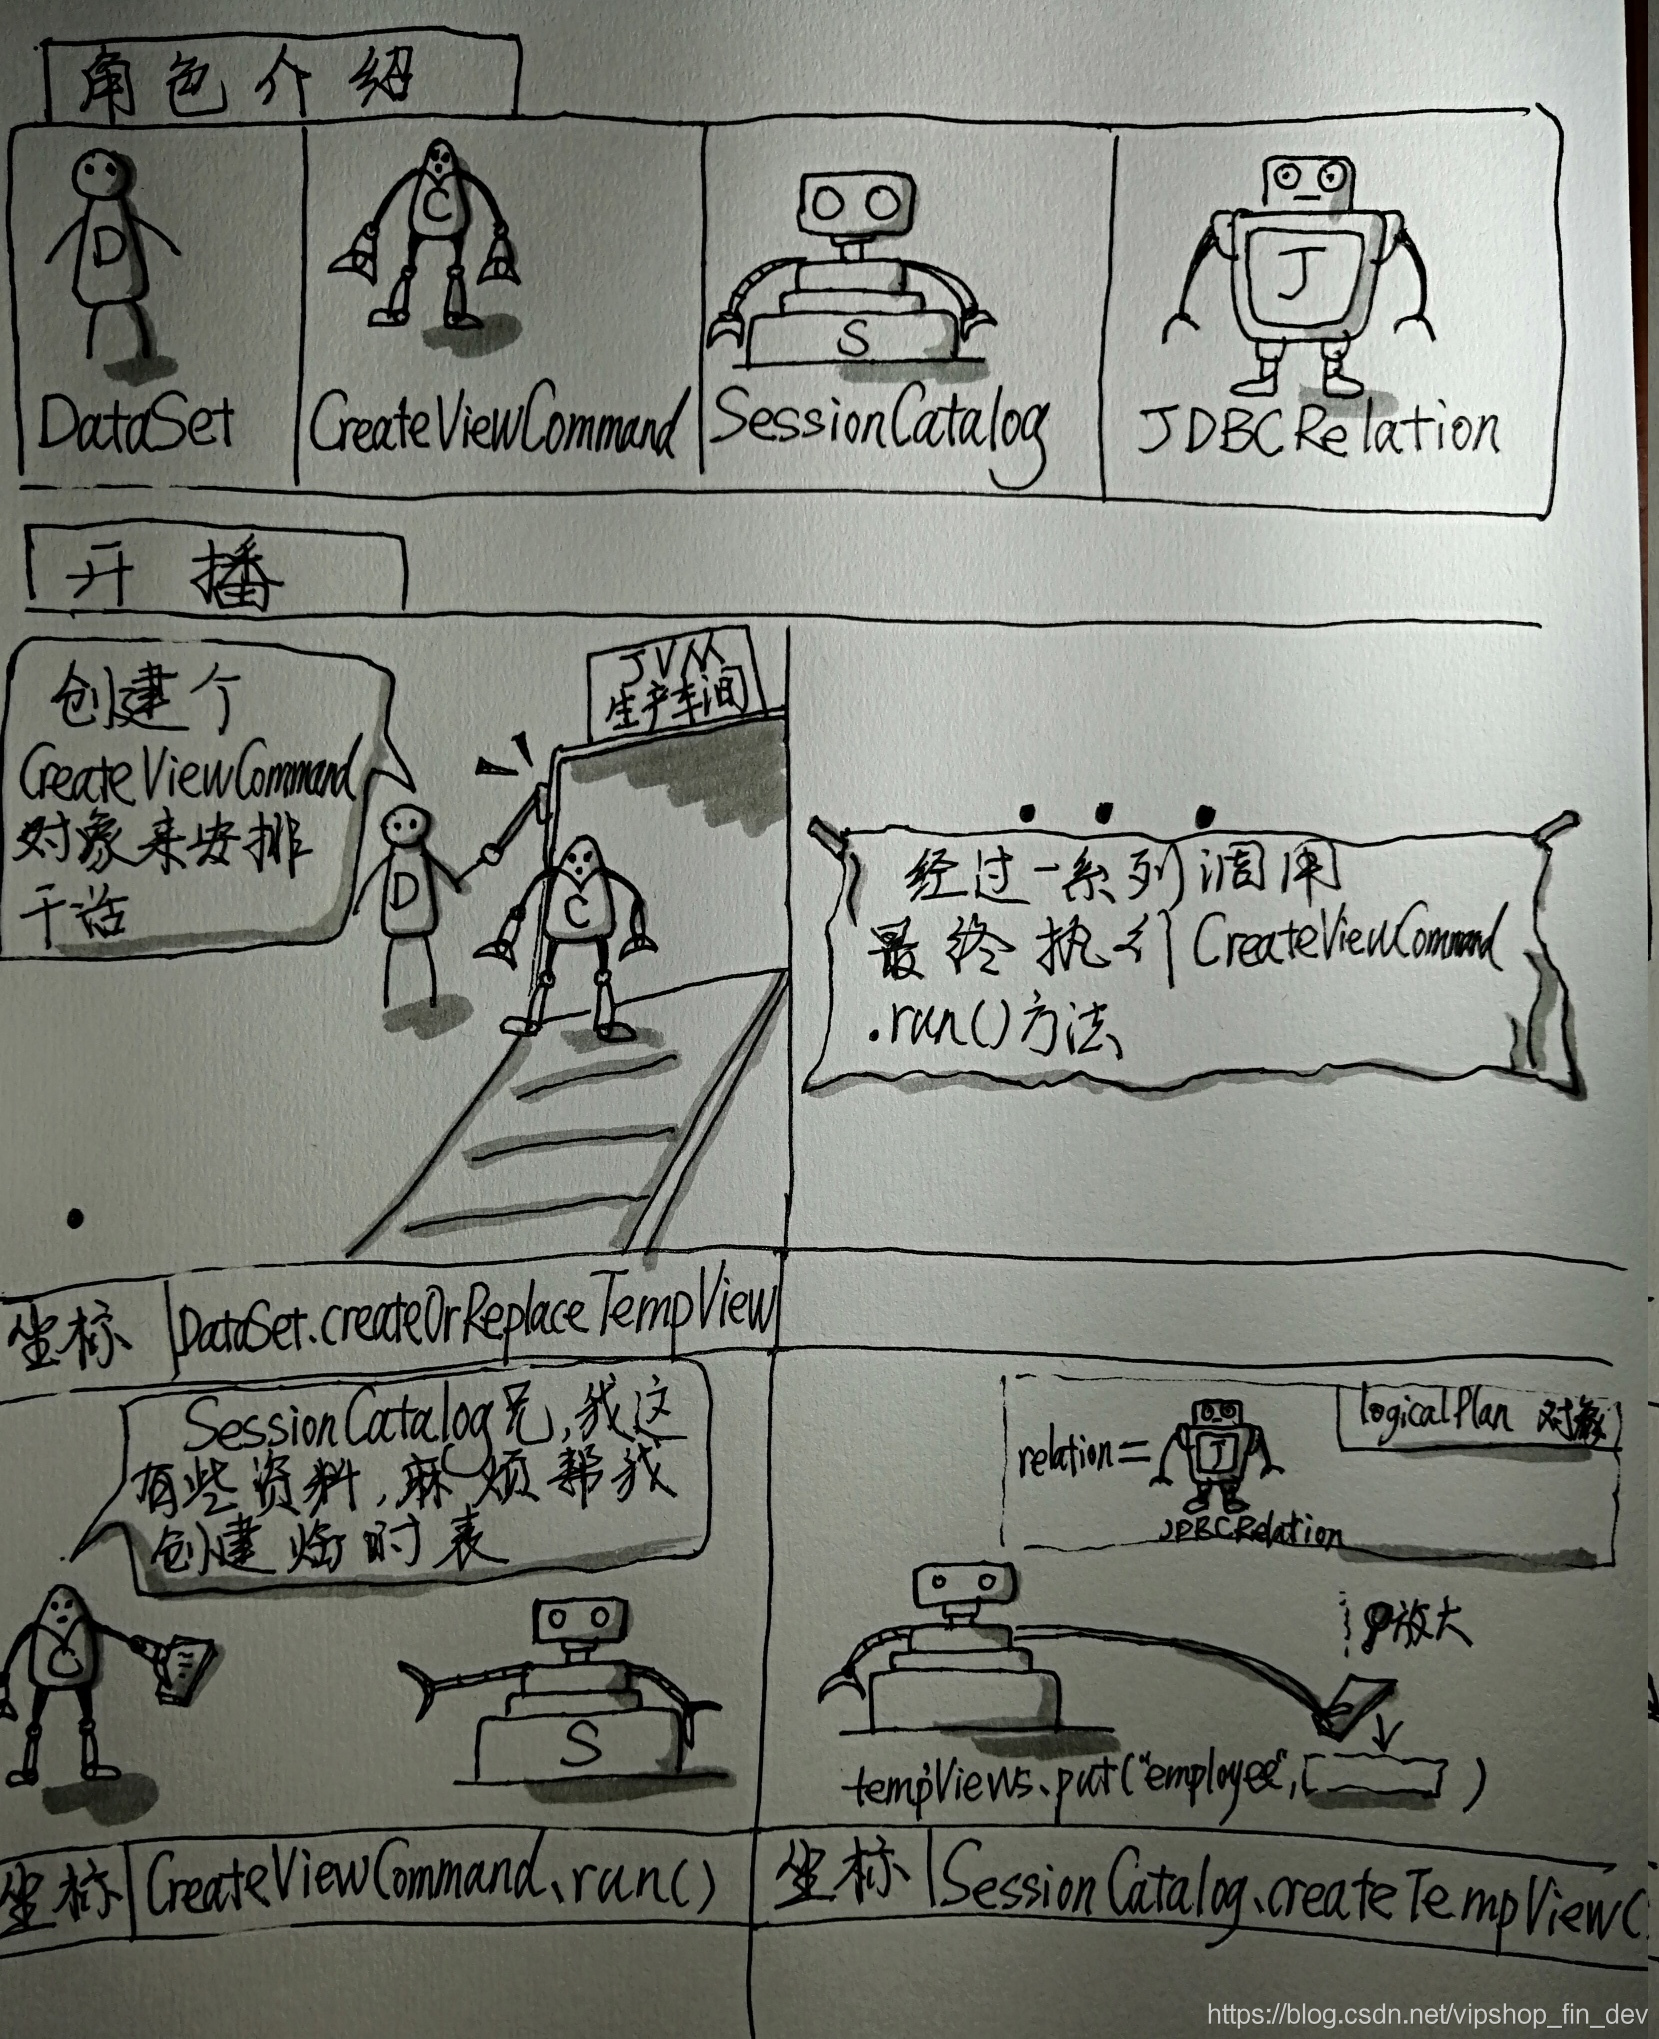
4.2 图解创建临时表
4.2.1 解读代码
jdbc.createOrReplaceTempView(table);
4.2.2 通过漫画轻松了解全过程
4.2.3 漫画讲解
图1
直接上代码:
  def createOrReplaceTempView(viewName: String): Unit = withPlan {
    createTempViewCommand(viewName, replace = true, global = false)
  }
  private def createTempViewCommand(
      viewName: String,
      replace: Boolean,
      global: Boolean): CreateViewCommand = {
    val viewType = if (global) GlobalTempView else LocalTempView

    val tableIdentifier = try {
      ...
      CreateViewCommand(
      name = tableIdentifier,
      userSpecifiedColumns = Nil,
      comment = None,
      properties = Map.empty,originalText = None,child = planWithBarrier,
      allowExisting = false,replace = replace,viewType = viewType)
  }
图2
最终会调用 CreateViewCommand.run()方法
图3
CreateViewCommand.run方法
  override def run(sparkSession: SparkSession): Seq[Row] = {
    if (viewType == LocalTempView) {
      val aliasedPlan = aliasPlan(sparkSession, analyzedPlan)
      //创建临时view
      catalog.createTempView(name.table, aliasedPlan, overrideIfExists = replace)
    } else if (viewType == GlobalTempView) {
   ...
   }
   Seq.empty[Row]
}
图4
代码如下所示,其中tableDefinition是LogicalPlan对象,其relation变量就是对应JDBCRelation对象
  def createTempView(
      name: String,
      tableDefinition: LogicalPlan,
      overrideIfExists: Boolean): Unit = synchronized {
    val table = formatTableName(name)
    if (tempViews.contains(table) && !overrideIfExists) {
      throw new TempTableAlreadyExistsException(name)
    }
    tempViews.put(table, tableDefinition)
  }
4.3 解析sql及完成逻辑算子树绑定
4.3.1 解读代码
Dataset<Row> jdbcDF = spark.sql("select id,age from employee where lower(name)='tom' and age>20");
4.3.2 过程解析
4.3.2.1 生成AST语法树
Spark sql对sql语法的解析是使用ANTLR引擎来解析的,具体的ANTLR解析文件可以见SqlBase.g4文件。AST语法树的生成过程不是本文叙述重点,跳过…
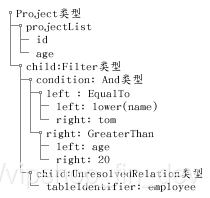
4.3.2.2 生成Unresolved LogicalPlan
本例子中生成Unresolved LogicalPlan可见AstBuilder.withQuerySpecification()方法,取对Unresolved LogicalPlan生成有影响的部分代码出来简化如下:
  private def withQuerySpecification(
      ctx: QuerySpecificationContext,
      relation: LogicalPlan): LogicalPlan = withOrigin(ctx) {
         //生成逻辑判断类型(转换类型还是select类型)
          val specType = Option(kind).map(_.getType).getOrElse(SqlBaseParser.SELECT)
          specType match {
			  case SqlBaseParser.SELECT =>
			      //获取UnsolvedRelaction,即表名
                  val withLateralView = ctx.lateralView.asScala.foldLeft(relation)(withGenerate)
                  //遍历过滤条件并生成Filter LogicalPlan节点,并与上面的节点构造出withFilter LogicalPlan
                  val withFilter = withLateralView.optionalMap(where)(filter)
                  //project也叫投影,即select和from中间的字段
			      val withProject = if (aggregation != null) {
			          withAggregation(aggregation, namedExpressions, withFilter)
			      } else if (namedExpressions.nonEmpty) {
			          //如果namedExpressions不为空,则与withFilter一起生成Project LogicalPlan
			          Project(namedExpressions, withFilter)
			      } else {
			          withFilter
			      }
                    ....
			}
}
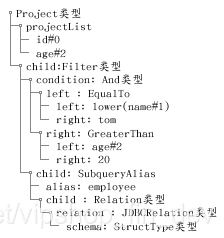
4.3.2.3 当前Unresolved LogicalPlan树为:
4.3.2.4 生成Analyzed LogicalPlan
一般在调用QueryExecution的analyzed()方法时会触发Analyzed LogicalPlan的生成,真正执行Analyze的是RuleExecutor类的execute,Spark sql内置了34多条rule规则来分析绑定逻辑计划 .
循环地每一条rule去尝试递归处理替换 Unsolved LogicalPlan.
本sql起作用的rule有:ResolveRelations,ResolveReferences,ResolveFunctions
- 其中ResolveRelations最终是通过调用SessionCatalog.lookupRelation(…)方法来解析绑定表名
- ResolveFunctions通过调用SessionCatalog.lookupFunction查找绑定udf函数
- 其中lookupRelation(),lookupFunction()方法实现简化后如下:
  //根据表名返回绑定节点
  def lookupRelation(name: TableIdentifier): LogicalPlan = {
    synchronized {
      //返回db值为default
      val db = formatDatabaseName(name.database.getOrElse(currentDb))
      val table = formatTableName(name.table)
      if (db == globalTempViewManager.database) {
        ...
      } else if (name.database.isDefined || !tempViews.contains(table)) {
        ...
        } else {
          SubqueryAlias(table, UnresolvedCatalogRelation(metadata))
        }
      } else {
        //按表名,返回SubqueryAlias对象
        SubqueryAlias(table, tempViews(table))
      }
    }
  }
  //根据函数名返回绑定函数节点
  def lookupFunction(
      name: FunctionIdentifier,
      children: Seq[Expression]): Expression = synchronized {
    if (name.database.isEmpty && functionRegistry.functionExists(name)) {
      // This function has been already loaded into the function registry.
      return functionRegistry.lookupFunction(name, children)
    }
    ...
}
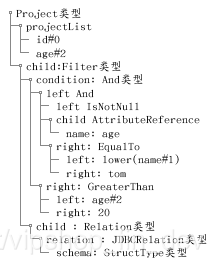
4.3.2.5 Analyzed LogicalPlan树为
4.4 逻辑计划优化及生成物理计划
4.4.1 代码解读入口
List<Row> rows = jdbcDF.collectAsList();
4.4.2 解析过程
4.4.2.1 spark sql优化
spark sql优化器的执行方式与Analyzer处理方式类似,spark sql自带了50多条,每条规则会遍历逻辑节点优化替换。
4.4.2.2 优化后的逻辑树
4.4.2.3 物理计划生成
物理计划主要是由QueryPlanner.plan()生成多个物理计划,并最终选取第一个.物理计划的生成是根据SparkStrategy来生成,Spark有8个生成策略.
像测试例子sql中的 age>20 and isNotNull(age) 这两条件就是通过DataSourceStrategy来最终将条件下推到mysql执行,且生成JDBCRDD。
这里重点结合DataSourceStrategy讲解一下条件下推到数据源及JDBCRDD的生成过程.
4.4.23.1 条件下推
条件下推的判断主要是在DataSourceStrategy.translateFilter()方法,每个过滤条件都会通过本方法测试能否下推到mysql查询sql条件中,下面节选本方法部分代码:
  protected[sql] def translateFilter(predicate: Expression): Option[Filter] = {
    predicate match {
      case expressions.EqualTo(a: Attribute, Literal(v, t)) =>
        Some(sources.EqualTo(a.name, convertToScala(v, t)))
      case expressions.EqualTo(Literal(v, t), a: Attribute) =>
        Some(sources.EqualTo(a.name, convertToScala(v, t)))

      case expressions.EqualNullSafe(a: Attribute, Literal(v, t)) =>
        Some(sources.EqualNullSafe(a.name, convertToScala(v, t)))
      case expressions.EqualNullSafe(Literal(v, t), a: Attribute) =>
        Some(sources.EqualNullSafe(a.name, convertToScala(v, t)))

      case expressions.GreaterThan(a: Attribute, Literal(v, t)) =>
        Some(sources.GreaterThan(a.name, convertToScala(v, t)))
      ...
}
4.4.2.3.1 RDD生成
DataSourceStrategy的apply方法中:
  def apply(plan: LogicalPlan): Seq[execution.SparkPlan] = plan match {
    case PhysicalOperation(projects, filters, l @ LogicalRelation(t: CatalystScan, _, _, _)) =>
     ...
    case PhysicalOperation(projects, filters,
                           l @ LogicalRelation(t: PrunedFilteredScan, _, _, _)) =>
      pruneFilterProject(
        l,
        projects,
        filters,
        //这里的传递的函数参数中的toCatalystRDD会返回一个JDBCRDD
        (a, f) => toCatalystRDD(l, a, t.buildScan(a.map(_.name).toArray, f))) :: Nil

    case PhysicalOperation(projects, filters, l @ LogicalRelation(t: PrunedScan, _, _, _)) =>
      ....
    case _ => Nil
  }
后面会执行pruneFilterProjectRaw()方法,本方法简化后代码为:
  private def pruneFilterProjectRaw(
    relation: LogicalRelation,
    projects: Seq[NamedExpression],
    filterPredicates: Seq[Expression],
    scanBuilder: (Seq[Attribute], Seq[Expression], Seq[Filter]) => RDD[InternalRow]): SparkPlan = {
      ....
      val scan = RowDataSourceScanExec(
        relation.output,
        requestedColumns.map(relation.output.indexOf),
        pushedFilters.toSet,
        handledFilters,
        //这里便是上面  (a, f) => toCatalystRDD(...)那个函数,之所以变成三个参数是因为中间经过了pruneFilterProject方法,又被包多一层
        scanBuilder(requestedColumns, candidatePredicates, pushedFilters),
        relation.relation,
        relation.catalogTable.map(_.identifier))
      execution.ProjectExec(
       //注意原本逻辑计划中的Filter的child是relation,在这里Filter转换成物理计划时,其child会被设置为RowDataSourceScanExec对象,而这个对象中的rdd就是上面的JDBCRDD
        projects, filterCondition.map(execution.FilterExec(_, scan)).getOrElse(scan))

}
现阶段的物理执行计划如下:

4.4.2.4 执行前准备
提交给spark系统执行前,还需要作一些优化准备工作,具体见QueryExection.prepareforExecution()方法
  protected def prepareForExecution(plan: SparkPlan): SparkPlan = {
    preparations.foldLeft(plan) { case (sp, rule) => rule.apply(sp) }
  }
spark sql支持的执行前准备规则见QueryExection.preparations()方法
  protected def preparations: Seq[Rule[SparkPlan]] = Seq(
    python.ExtractPythonUDFs,
    PlanSubqueries(sparkSession),
    EnsureRequirements(sparkSession.sessionState.conf),
    //为支持全阶段代码生成 的节点添加一个WholeStageCodegenExec节点
    CollapseCodegenStages(sparkSession.sessionState.conf),
    //join时,检查是否需要添加Exchange节点
    ReuseExchange(sparkSession.sessionState.conf),
    ReuseSubquery(sparkSession.sessionState.conf))
4.4.2.5 代码生成
在这个阶段WholeStageCodegenExec会根据各节点代码生成合并成一个java类,并由Janino编译器编译.本例子动态生成的代码是:
public Object generate(Object[]references){
       return new GeneratedIteratorForCodegenStage1(references);
       }

final class GeneratedIteratorForCodegenStage1 extends org.apache.spark.sql.execution.BufferedRowIterator {
   private Object[] references;
   private scala.collection.Iterator[] inputs;
   private org.apache.spark.sql.catalyst.expressions.codegen.BufferHolder[] scan_mutableStateArray_2 = new org.apache.spark.sql.catalyst.expressions.codegen.BufferHolder[3];
   private org.apache.spark.sql.catalyst.expressions.codegen.UnsafeRowWriter[] scan_mutableStateArray_3 = new org.apache.spark.sql.catalyst.expressions.codegen.UnsafeRowWriter[3];
   private UnsafeRow[] scan_mutableStateArray_1 = new UnsafeRow[3];
   private scala.collection.Iterator[] scan_mutableStateArray_0 = new scala.collection.Iterator[1];

   public GeneratedIteratorForCodegenStage1(Object[] references) {
       this.references = references;
   }

   public void init(int index, scala.collection.Iterator[] inputs) {
       partitionIndex = index;
       this.inputs = inputs;
       scan_mutableStateArray_0[0] = inputs[0];
       scan_mutableStateArray_1[0] = new UnsafeRow(3);
       scan_mutableStateArray_2[0] = new org.apache.spark.sql.catalyst.expressions.codegen.BufferHolder(scan_mutableStateArray_1[0], 64);
       scan_mutableStateArray_3[0] = new org.apache.spark.sql.catalyst.expressions.codegen.UnsafeRowWriter(scan_mutableStateArray_2[0], 3);
       scan_mutableStateArray_1[1] = new UnsafeRow(3);
       scan_mutableStateArray_2[1] = new org.apache.spark.sql.catalyst.expressions.codegen.BufferHolder(scan_mutableStateArray_1[1], 64);
       scan_mutableStateArray_3[1] = new org.apache.spark.sql.catalyst.expressions.codegen.UnsafeRowWriter(scan_mutableStateArray_2[1], 3);
       scan_mutableStateArray_1[2] = new UnsafeRow(2);
       scan_mutableStateArray_2[2] = new org.apache.spark.sql.catalyst.expressions.codegen.BufferHolder(scan_mutableStateArray_1[2], 32);
       scan_mutableStateArray_3[2] = new org.apache.spark.sql.catalyst.expressions.codegen.UnsafeRowWriter(scan_mutableStateArray_2[2], 2);

   }

   protected void processNext() throws java.io.IOException {
       while (scan_mutableStateArray_0[0].hasNext()) {
           InternalRow scan_row_0 = (InternalRow) scan_mutableStateArray_0[0].next();
           ((org.apache.spark.sql.execution.metric.SQLMetric) references[0] /* numOutputRows */).add(1);
           do {
               boolean scan_isNull_2 = scan_row_0.isNullAt(2);
               UTF8String scan_value_2 = scan_isNull_2 ? null : (scan_row_0.getUTF8String(2));

               boolean filter_isNull_0 = true;
               boolean filter_value_0 = false;

               boolean filter_isNull_1 = scan_isNull_2;
               UTF8String filter_value_1 = null;

               if (!scan_isNull_2) {
                  //lower udf函数已自动转换为java硬编码
                   filter_value_1 = (scan_value_2).toLowerCase();
               }
               if (!filter_isNull_1) {
                   filter_isNull_0 = false; // resultCode could change nullability.
                   filter_value_0 = filter_value_1.equals(((UTF8String) references[2] /* literal */));

               }
               if (filter_isNull_0 || !filter_value_0) continue;

               ((org.apache.spark.sql.execution.metric.SQLMetric) references[1] /* numOutputRows */).add(1);

               boolean scan_isNull_0 = scan_row_0.isNullAt(0);
               Decimal scan_value_0 = scan_isNull_0 ? null : (scan_row_0.getDecimal(0, 20, 0));
               boolean scan_isNull_1 = scan_row_0.isNullAt(1);
               int scan_value_1 = scan_isNull_1 ? -1 : (scan_row_0.getInt(1));
               scan_mutableStateArray_2[2].reset();

               scan_mutableStateArray_3[2].zeroOutNullBytes();

               if (scan_isNull_0) {
                   scan_mutableStateArray_3[2].write(0, (Decimal) null, 20, 0);
               } else {
                   scan_mutableStateArray_3[2].write(0, scan_value_0, 20, 0);
               }

               if (scan_isNull_1) {
                   scan_mutableStateArray_3[2].setNullAt(1);
               } else {
                   scan_mutableStateArray_3[2].write(1, scan_value_1);
               }
               scan_mutableStateArray_1[2].setTotalSize(scan_mutableStateArray_2[2].totalSize());
               append(scan_mutableStateArray_1[2]);

           } while (false);
           if (shouldStop()) return;
       }
   }

}
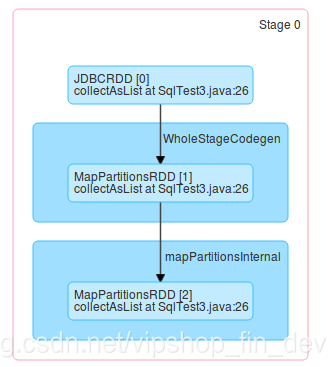
4.4.2.6 mapPartitionsRDD转换处理
最后在SparkPlan.getByteArrayRdd()还会做一次mapPartitionsRDD的处理。
4.4 最终RDD
画: 吴炼钿
文: 吴炼钿