分享一下我老师大神的人工智能教程!零基础,通俗易懂!http://blog.csdn.net/jiangjunshow
也欢迎大家转载本篇文章。分享知识,造福人民,实现我们中华民族伟大复兴!
本文实践自 Johann Fradj 的文章《How To Implement A* Pathfinding with Cocos2D Tutorial》,文中使用Cocos2D,我在这里使用Cocos2D-x 3.0进行学习和移植。在这篇文章,将会学习到如何在Cocos2D中实现A星算法。在开始之前,先阅读文章《Introduction to A* Pathfinding》将会有所帮助。
步骤如下:
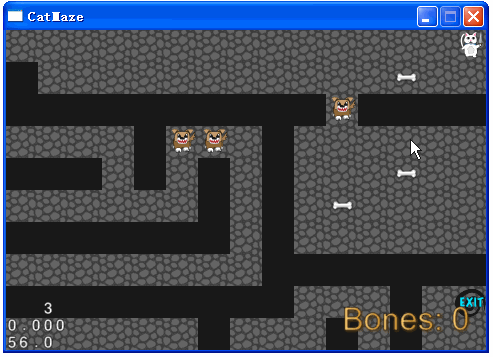
1.下载本文章的准备工程,编译运行,如下图所示:
在这款游戏中,猫需要通过由狗守卫的地牢,除非拿骨头贿赂狗,不然狗会将猫吃掉。注意到猫只能水平或垂直的移动,每次只能移动一个方块。

2.开始修改成A星寻路算法。打开CatSprite.h文件,创建ShortestPathStep内部类,代表路径上的一步操作。代码如下:
|
1
2 3 4 5 6 7 8 9 10 11 12 13 14 15 16 17 18 |
class ShortestPathStep :
public cocos2d::Object
{ public: ShortestPathStep(); ~ShortestPathStep(); static ShortestPathStep *createWithPosition( const cocos2d::Point &pos); bool initWithPosition( const cocos2d::Point &pos); int getFScore() const; bool isEqual( const ShortestPathStep *other) const; std::string getDescription() const; CC_SYNTHESIZE(cocos2d::Point, _position, Position); CC_SYNTHESIZE( int, _gScore, GScore); CC_SYNTHESIZE( int, _hScore, HScore); CC_SYNTHESIZE(ShortestPathStep*, _parent, Parent); }; |
正如所见,这是一个很简单的类,记录了以下内容:
方块的坐标
G值(记住,这是开始点到当前点的方块数量)
H值(记住,这是当前点到目标点的方块估算数量)
Parent是它的上一步操作
F值,这是方块的和值(它是G+H的值)
打开CatSprite.cpp文件,添加以下代码:
|
1
2 3 4 5 6 7 8 9 10 11 12 13 14 15 16 17 18 19 20 21 22 23 24 25 26 27 28 29 30 31 32 33 34 35 36 37 38 39 40 41 42 43 44 45 46 47 48 49 50 51 52 53 54 55 56 |
CatSprite::ShortestPathStep::ShortestPathStep() :
_position(Point::ZERO), _gScore( 0), _hScore( 0), _parent(nullptr) { } CatSprite::ShortestPathStep::~ShortestPathStep() { } CatSprite::ShortestPathStep *CatSprite::ShortestPathStep::createWithPosition( const Point &pos) { ShortestPathStep *pRet = new ShortestPathStep(); if (pRet && pRet->initWithPosition(pos)) { pRet->autorelease(); return pRet; } else { CC_SAFE_DELETE(pRet); return nullptr; } } bool CatSprite::ShortestPathStep::initWithPosition( const Point &pos) { bool bRet = false; do { this->setPosition(pos); bRet = true; } while ( 0); return bRet; } int CatSprite::ShortestPathStep::getFScore() const { return this->getGScore() + this->getHScore(); } bool CatSprite::ShortestPathStep::isEqual( const CatSprite::ShortestPathStep *other) const { return this->getPosition() == other->getPosition(); } std::string CatSprite::ShortestPathStep::getDescription() const { return StringUtils::format( "pos=[%.0f;%.0f] g=%d h=%d f=%d", this->getPosition().x, this->getPosition().y, this->getGScore(), this->getHScore(), this->getFScore()); } |
这里定义了getDescription方法,以方便调试。创建了isEquals方法,当且仅当两个ShortestPathSteps的方块坐标相同时,它们相等(例如它们代表着相同的方块)。
3.创建Open和Closed列表。打开CatSprite.h文件,添加如下代码:
|
1
2 |
cocos2d::Vector<ShortestPathStep*> _spOpenSteps;
cocos2d::Vector<ShortestPathStep*> _spClosedSteps; |
4.检查开始和结束点。重新实现moveToward方法,获取当前方块坐标和目标方块坐标,然后检查是否需要计算一条路径,最后测试目标方块坐标是否可行走的(在这里只有墙壁是不可行走的)。打开CatSprite.cpp文件,修改moveToward方法,为如下:
|
1
2 3 4 5 6 7 8 9 10 11 12 13 14 15 16 17 18 19 20 |
void CatSprite::moveToward(
const Point &target)
{ Point fromTileCoord = _layer->tileCoordForPosition( this->getPosition()); Point toTileCoord = _layer->tileCoordForPosition(target); if (fromTileCoord == toTileCoord) { CCLOG( "You're already there! :P"); return; } if (!_layer->isValidTileCoord(toTileCoord) || _layer->isWallAtTileCoord(toTileCoord)) { SimpleAudioEngine::getInstance()->playEffect( "hitWall.wav"); return; } CCLOG( "From: %f, %f", fromTileCoord.x, fromTileCoord.y); CCLOG( "To: %f, %f", toTileCoord.x, toTileCoord.y); } |
编译运行,在地图上进行点击,如果不是点击到墙壁的话,可以在控制台看到如下信息:
|
1
2 |
From: 24.000000, 0.000000
To: 22.000000, 3.000000 |
其中"From"就是猫的方块坐标,"To"就是所点击的方块坐标。
5.实现A星算法。根据算法,第一步是添加当前坐标到open列表。还需要三个辅助方法:
一个方法用来插入一个ShortestPathStep对象到适当的位置(有序的F值)
一个方法用来计算从一个方块到相邻方块的移动数值
一个方法是根据"曼哈顿距离"算法,计算方块的H值
打开CatSprite.cpp文件,添加如下方法:
|
1
2 3 4 5 6 7 8 9 10 11 12 13 14 15 16 17 18 19 20 21 22 23 24 25 26 27 28 |
void CatSprite::insertInOpenSteps(CatSprite::ShortestPathStep *step)
{ int stepFScore = step->getFScore(); ssize_t count = _spOpenSteps.size(); ssize_t i = 0; for (; i < count; ++i) { if (stepFScore <= _spOpenSteps.at(i)->getFScore()) { break; } } _spOpenSteps.insert(i, step); } int CatSprite::computeHScoreFromCoordToCoord( const Point &fromCoord, const Point &toCoord) { // 这里使用曼哈顿方法,计算从当前步骤到达目标步骤,在水平和垂直方向总的步数 // 忽略了可能在路上的各种障碍 return abs(toCoord.x - fromCoord.x) + abs(toCoord.y - fromCoord.y); } int CatSprite::costToMoveFromStepToAdjacentStep( const ShortestPathStep *fromStep, const ShortestPathStep *toStep) { // 因为不能斜着走,而且由于地形就是可行走和不可行走的成本都是一样的 // 如果能够对角移动,或者有沼泽、山丘等等,那么它必须是不同的 return 1; } |
接下来,需要一个方法去获取给定方块的所有相邻可行走方块。因为在这个游戏中,HelloWorld管理着地图,所以在那里添加方法。打开HelloWorldScene.cpp文件,添加如下方法:
|
1
2 3 4 5 6 7 8 9 10 11 12 13 14 15 16 17 18 19 20 21 22 23 24 25 26 27 28 29 30 31 32 33 34 |
PointArray *HelloWorld::walkableAdjacentTilesCoordForTileCoord(
const Point &tileCoord)
const
{ PointArray *tmp = PointArray::create( 4); // 上 Point p(tileCoord.x, tileCoord.y - 1); if ( this->isValidTileCoord(p) && ! this->isWallAtTileCoord(p)) { tmp->addControlPoint(p); } // 左 p.setPoint(tileCoord.x - 1, tileCoord.y); if ( this->isValidTileCoord(p) && ! this->isWallAtTileCoord(p)) { tmp->addControlPoint(p); } // 下 p.setPoint(tileCoord.x, tileCoord.y + 1); if ( this->isValidTileCoord(p) && ! this->isWallAtTileCoord(p)) { tmp->addControlPoint(p); } // 右 p.setPoint(tileCoord.x + 1, tileCoord.y); if ( this->isValidTileCoord(p) && ! this->isWallAtTileCoord(p)) { tmp->addControlPoint(p); } return tmp; } |
可以继续CatSprite.cpp中的moveToward方法了,在moveToward方法的后面,添加如下代码:
|
1
2 3 4 5 6 7 8 9 10 11 12 13 14 15 16 17 18 19 20 21 22 23 24 25 26 27 28 29 30 31 32 33 34 35 36 37 38 39 40 41 42 43 44 45 46 47 48 49 50 51 52 53 54 55 56 57 58 59 60 61 62 63 64 65 66 67 68 69 70 71 72 73 74 75 76 77 78 79 80 81 82 83 84 85 86 87 88 89 90 91 92 93 94 95 96 97 98 99 100 101 102 103 104 |
bool pathFound =
false;
_spOpenSteps.clear(); _spClosedSteps.clear(); // 首先,添加猫的方块坐标到open列表 this->insertInOpenSteps(ShortestPathStep::createWithPosition(fromTileCoord)); do { // 得到最小的F值步骤 // 因为是有序列表,第一个步骤总是最小的F值 ShortestPathStep *currentStep = _spOpenSteps.at( 0); // 添加当前步骤到closed列表 _spClosedSteps.pushBack(currentStep); // 将它从open列表里面移除 // 需要注意的是,如果想要先从open列表里面移除,应小心对象的内存 _spOpenSteps.erase( 0); // 如果当前步骤是目标方块坐标,那么就完成了 if (currentStep->getPosition() == toTileCoord) { pathFound = true; ShortestPathStep *tmpStep = currentStep; CCLOG( "PATH FOUND :"); do { CCLOG( "%s", tmpStep->getDescription().c_str()); tmpStep = tmpStep->getParent(); // 倒退 } while (tmpStep); // 直到没有上一步 _spOpenSteps.clear(); _spClosedSteps.clear(); break; } // 得到当前步骤的相邻方块坐标 PointArray *adjSteps = _layer->walkableAdjacentTilesCoordForTileCoord(currentStep->getPosition()); for (ssize_t i = 0; i < adjSteps->count(); ++i) { ShortestPathStep *step = ShortestPathStep::createWithPosition(adjSteps->getControlPointAtIndex(i)); // 检查步骤是不是已经在closed列表 if ( this->getStepIndex(_spClosedSteps, step) != - 1) { continue; } // 计算从当前步骤到此步骤的成本 int moveCost = this->costToMoveFromStepToAdjacentStep(currentStep, step); // 检查此步骤是否已经在open列表 ssize_t index = this->getStepIndex(_spOpenSteps, step); // 不在open列表,添加它 if (index == - 1) { // 设置当前步骤作为上一步操作 step->setParent(currentStep); // G值等同于上一步的G值 + 从上一步到这里的成本 step->setGScore(currentStep->getGScore() + moveCost); // H值即是从此步骤到目标方块坐标的移动量估算值 step->setHScore( this->computeHScoreFromCoordToCoord(step->getPosition(), toTileCoord)); // 按序添加到open列表 this->insertInOpenSteps(step); } else { // 获取旧的步骤,其值已经计算过 step = _spOpenSteps.at(index); // 检查G值是否低于当前步骤到此步骤的值 if ((currentStep->getGScore() + moveCost) < step->getGScore()) { // G值等同于上一步的G值 + 从上一步到这里的成本 step->setGScore(currentStep->getGScore() + moveCost); // 因为G值改变了,F值也会跟着改变 // 所以为了保持open列表有序,需要将此步骤移除,再重新按序插入 // 在移除之前,需要先保持引用 step->retain(); // 现在可以放心移除,不用担心被释放 _spOpenSteps.erase(index); // 重新按序插入 this->insertInOpenSteps(step); // 现在可以释放它了,因为open列表应该持有它 step->release(); } } } } while (_spOpenSteps.size() > 0); if (!pathFound) { SimpleAudioEngine::getInstance()->playEffect( "hitWall.wav"); } |
添加以下方法:
|
1
2 3 4 5 6 7 8 9 10 11 |
ssize_t CatSprite::getStepIndex(
const cocos2d::Vector<CatSprite::ShortestPathStep *> &steps,
const CatSprite::ShortestPathStep *step)
{ for (ssize_t i = 0; i < steps.size(); ++i) { if (steps.at(i)->isEqual(step)) { return i; } } return - 1; } |
编译运行,在地图上进行点击,如下图所示:

|
1
2 3 4 5 6 7 8 9 10 11 12 13 |
From:
24.
000000,
0.
000000
To: 22. 000000, 3. 000000 PATH FOUND : pos=[ 22; 3] g= 9 h= 0 f= 9 pos=[ 21; 3] g= 8 h= 1 f= 9 pos=[ 20; 3] g= 7 h= 2 f= 9 pos=[ 20; 2] g= 6 h= 3 f= 9 pos=[ 20; 1] g= 5 h= 4 f= 9 pos=[ 21; 1] g= 4 h= 3 f= 7 pos=[ 22; 1] g= 3 h= 2 f= 5 pos=[ 23; 1] g= 2 h= 3 f= 5 pos=[ 24; 1] g= 1 h= 4 f= 5 pos=[ 24; 0] g= 0 h= 0 f= 0 |
注意该路径是从后面建立的,所以必须从下往上看猫选择了哪条路径。
6.跟随路径前进。现在已经找到了路径,只需让猫跟随前进即可。需要创建一个数组去存储路径,打开CatSprite.h文件,添加如下代码:
|
1
|
cocos2d::Vector<ShortestPathStep*> _shortestPath;
|
打开CatSprite.cpp文件,更改moveToward方法,注释掉语句bool pathFound = false;,如下:
|
1
|
//bool pathFound = false;
|
替换语句pathFound = true;为如下:
|
1
2 |
//pathFound = true; this->constructPathAndStartAnimationFromStep(currentStep); |
并且注释掉下方的调试语句:
|
1
2 3 4 5 6 7 |
//ShortestPathStep *tmpStep = currentStep; //CCLOG("PATH FOUND :"); //do //{ // CCLOG("%s", tmpStep->getDescription().c_str()); // tmpStep = tmpStep->getParent(); // 倒退 //} while (tmpStep); // 直到没有上一步 |
替换语句if (!pathFound)为如下:
|
1
2 |
//if (!pathFound) if (_shortestPath.empty()) |
现在创建一个方法,用来存储整个路径,并且负责动画的播放。添加方法如下:
|
1
2 3 4 5 6 7 8 9 10 11 12 13 14 15 16 17 18 19 20 |
void CatSprite::constructPathAndStartAnimationFromStep(CatSprite::ShortestPathStep *step)
{ _shortestPath.clear(); do { // 起始位置不要进行添加 if (step->getParent()) { // 总是插入到索引0的位置,以便反转路径 _shortestPath.insert( 0, step); } step = step->getParent(); // 倒退 } while (step); // 直到没有上一步 for ( const ShortestPathStep *s : _shortestPath) { CCLOG( "%s", s->getDescription().c_str()); } } |
编译运行,如果点击了和之前一样的位置,就可以在控制台看到如下信息:
|
1
2 3 4 5 6 7 8 9 10 11 |
From:
24.
000000,
0.
000000
To: 22. 000000, 3. 000000 pos=[ 24; 1] g= 1 h= 4 f= 5 pos=[ 23; 1] g= 2 h= 3 f= 5 pos=[ 22; 1] g= 3 h= 2 f= 5 pos=[ 21; 1] g= 4 h= 3 f= 7 pos=[ 20; 1] g= 5 h= 4 f= 9 pos=[ 20; 2] g= 6 h= 3 f= 9 pos=[ 20; 3] g= 7 h= 2 f= 9 pos=[ 21; 3] g= 8 h= 1 f= 9 pos=[ 22; 3] g= 9 h= 0 f= 9 |
这些信息跟之前的很类似,除了它是从开始到结束,而不是相反的,并且步骤都被很好的存储在数组中以供使用。最后要做的是遍历shortestPath数组,让猫沿着路径动画前进。为了实现这一点,创建一个方法,从数组中获取步骤,让猫移动到那个位置,然后添加一个回调函数去重复调用这个方法直到路径完成。添加方法如下:
|
1
2 3 4 5 6 7 8 9 10 11 12 13 14 15 16 17 18 19 20 21 |
void CatSprite::popStepAndAnimate()
{ // 检查是否仍有路径步骤需要前进 if (_shortestPath.size() == 0) { return; } // 得到下一步移动的步骤 ShortestPathStep *s = _shortestPath.at( 0); // 准备动作和回调 MoveTo *moveAction = MoveTo::create( 0.4f, _layer->positionForTileCoord(s->getPosition())); CallFunc *moveCallback = CallFunc::create(CC_CALLBACK_0(CatSprite::popStepAndAnimate, this)); // 移除步骤 _shortestPath.erase( 0); // 运行动作 this->runAction(Sequence::create(moveAction, moveCallback, nullptr)); } |
在constructPathAndStartAnimationFromStep方法里的最下面添加如下代码:
|
1
|
this->popStepAndAnimate();
|
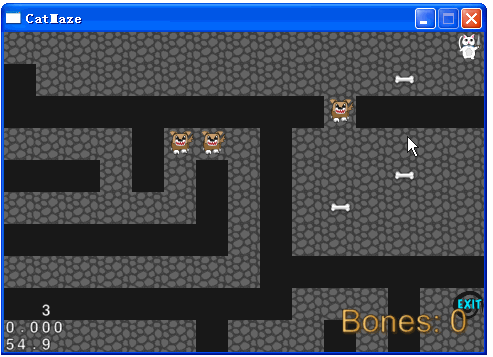
编译运行,可以看到猫自动移动到所点击的位置了。如下图所示:
猫看起来有点僵硬
猫没有带走骨头
猫可以穿过狗(没有带着骨头),而不被吃掉
当在猫走完路径之前,点击了一个新的路径的话,猫会有奇怪的行为
因此,为了解决猫的僵硬行为,还有游戏逻辑(胜利/失败,狗,骨头,等等......),必须加上之前实现的旧游戏逻辑。
7.重新添加游戏逻辑。为了修复这些问题,替换popStepAndAnimate方法为如下:
|
1
2 3 4 5 6 7 8 9 10 11 12 13 14 15 16 17 18 19 20 21 22 23 24 25 26 27 28 29 30 31 32 33 34 35 36 37 38 39 40 41 42 43 44 45 46 47 48 49 50 51 52 53 54 55 56 57 58 59 60 61 62 63 64 65 66 67 68 69 70 71 72 73 74 75 76 77 78 79 80 81 82 |
void CatSprite::popStepAndAnimate()
{ Point currentPosition = _layer->tileCoordForPosition( this->getPosition()); if (_layer->isBoneAtTilecoord(currentPosition)) { SimpleAudioEngine::getInstance()->playEffect( "pickup.wav"); _numBones++; _layer->showNumBones(_numBones); _layer->removeObjectAtTileCoord(currentPosition); } else if (_layer->isDogAtTilecoord(currentPosition)) { if (_numBones == 0) { _layer->loseGame(); return; } else { _numBones--; _layer->showNumBones(_numBones); _layer->removeObjectAtTileCoord(currentPosition); SimpleAudioEngine::getInstance()->playEffect( "catAttack.wav"); } } else if (_layer->isExitAtTilecoord(currentPosition)) { _layer->winGame(); return; } else { SimpleAudioEngine::getInstance()->playEffect( "step.wav"); } // 检查是否仍有路径步骤需要前进 if (_shortestPath.size() == 0) { return; } // 得到下一步移动的步骤 ShortestPathStep *s = _shortestPath.at( 0); Point futurePosition = s->getPosition(); Point diff = futurePosition - currentPosition; if (abs(diff.x) > abs(diff.y)) { if (diff.x > 0) { this->runAnimation(_facingRightAnimation); } else { this->runAnimation(_facingLeftAnimation); } } else { if (diff.y > 0) { this->runAnimation(_facingForwardAnimation); } else { this->runAnimation(_facingBackAnimation); } } // 准备动作和回调 MoveTo *moveAction = MoveTo::create( 0.4f, _layer->positionForTileCoord(s->getPosition())); CallFunc *moveCallback = CallFunc::create(CC_CALLBACK_0(CatSprite::popStepAndAnimate, this)); // 移除步骤 _shortestPath.erase( 0); // 运行动作 Sequence *moveSequence = Sequence::create(moveAction, moveCallback, nullptr); moveSequence->setTag( 1); this->runAction(moveSequence); } |
这里只是对原来的代码进行重构。接着在moveToward方法里面的最上面添加如下代码:
|
1
|
this->stopActionByTag(
1);
|
编译运行,可以看到一切正常了,如下图所示:

walkableAdjacentTilesCoordForTileCoord:更改以便包括对角线方块
costToMoveFromStep:toAdjacentStep:更改以让对角线移动跟水平/垂直移动有不一样的成本
如何计算出在对角线方向上的成本值?使用简单的数学即可。猫从一个方块的中心移动到另一个方块的中心,并且因为方块是正方形,A、B和C形成了一个三角形,如下图所示:
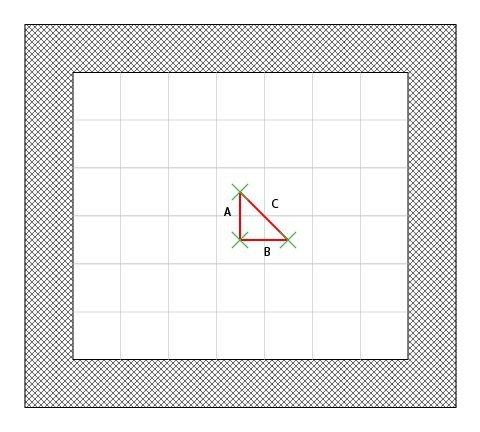
C = √(A2 + B2)
并且A = B = 1 (从一个正方形移动到另一个正方形的成本 = G值)
C = √(2)
C ≈ 1.41
所以对角线的移动成本等于1.41,这低于向左移动再向上移动的成本值2(1+1)。正如所知的,使用整型计算远比浮点型更高效,所以不是使用浮点型来标示对角线移动的成本值,而是简单地对成本值乘以10,然后四舍五入,所以水平/垂直移动的成本值为10,而对角线移动的成本值为14。更改costToMoveFromStepToAdjacentStep方法为如下:
|
1
2 3 4 5 |
int CatSprite::costToMoveFromStepToAdjacentStep(
const ShortestPathStep *fromStep,
const ShortestPathStep *toStep)
{ return ((fromStep->getPosition().x != toStep->getPosition().x) && (fromStep->getPosition().y != toStep->getPosition().y)) ? 14 : 10; } |
更改walkableAdjacentTilesCoordForTileCoord方法为如下:
|
1
2 3 4 5 6 7 8 9 10 11 12 13 14 15 16 17 18 19 20 21 22 23 24 25 26 27 28 29 30 31 32 33 34 35 36 37 38 39 40 41 42 43 44 45 46 47 48 49 50 51 52 53 54 55 56 57 58 59 60 61 62 63 64 65 66 67 68 69 70 71 |
PointArray *HelloWorld::walkableAdjacentTilesCoordForTileCoord(
const Point &tileCoord)
const
{ PointArray *tmp = PointArray::create( 8); bool t = false; bool l = false; bool b = false; bool r = false; // 上 Point p(tileCoord.x, tileCoord.y - 1); if ( this->isValidTileCoord(p) && ! this->isWallAtTileCoord(p)) { tmp->addControlPoint(p); t = true; } // 左 p.setPoint(tileCoord.x - 1, tileCoord.y); if ( this->isValidTileCoord(p) && ! this->isWallAtTileCoord(p)) { tmp->addControlPoint(p); l = true; } // 下 p.setPoint(tileCoord.x, tileCoord.y + 1); if ( this->isValidTileCoord(p) && ! this->isWallAtTileCoord(p)) { tmp->addControlPoint(p); b = true; } // 右 p.setPoint(tileCoord.x + 1, tileCoord.y); if ( this->isValidTileCoord(p) && ! this->isWallAtTileCoord(p)) { tmp->addControlPoint(p); r = true; } // 左上 p.setPoint(tileCoord.x - 1, tileCoord.y - 1); if (t && l && this->isValidTileCoord(p) && ! this->isWallAtTileCoord(p)) { tmp->addControlPoint(p); } // 左下 p.setPoint(tileCoord.x - 1, tileCoord.y + 1); if (b && l && this->isValidTileCoord(p) && ! this->isWallAtTileCoord(p)) { tmp->addControlPoint(p); } // 右上 p.setPoint(tileCoord.x + 1, tileCoord.y - 1); if (t && r && this->isValidTileCoord(p) && ! this->isWallAtTileCoord(p)) { tmp->addControlPoint(p); } // 右下 p.setPoint(tileCoord.x + 1, tileCoord.y + 1); if (b && r && this->isValidTileCoord(p) && ! this->isWallAtTileCoord(p)) { tmp->addControlPoint(p); } return tmp; } |
重要提示:添加对角线方块的代码和添加水平/垂直方块的代码有些不同。事实上,例如,只有当顶部和左侧的方块被添加时,左上对角线才能够被添加。这是为了防止猫穿过墙壁的角落。以下是所有的详细情况处理:
O = Origin
T = Top
B = Bottom
L = Left
R = Right
TL = Top – Left
…
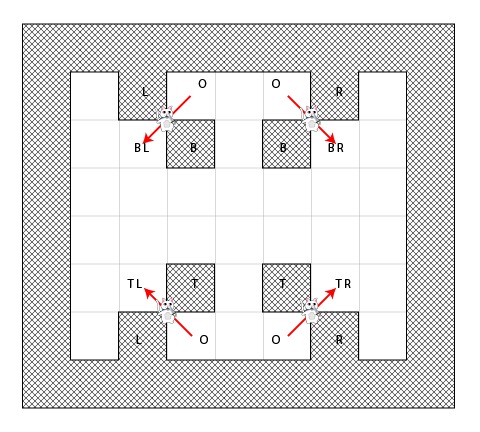
就拿上面图像的左上部分来进行举例。猫想要从原始点(O)到左下对角线方块(BL)。如果在左侧或者底部(或者都有)有一面墙,然后尝试走对角线,算法将会封掉墙壁的角落(或者两面墙壁的角落)。所以只有当左侧和底部没有墙壁时,左下对角线方块才可行走。如下图所示:
参考资料:
1.Introduction to A* Pathfinding http://www.raywenderlich.com/4946/introduction-to-a-pathfinding
2.How To Implement A* Pathfinding with Cocos2D Tutorial http://www.raywenderlich.com/4970/how-to-implement-a-pathfinding-with-cocos2d-tutorial
3.如何使用Cocos2D实现A星寻路算法 http://www.raywenderlich.com/zh-hans/21315/%E5%A6%82%E4%BD%95%E4%BD%BF%E7%94%A8cocos2d%E5%AE%9E%E7%8E%B0a%E6%98%9F%E5%AF%BB%E8%B7%AF%E7%AE%97%E6%B3%95
4.一个用了A*算法的cocos2d-x游戏 http://www.oschina.net/code/snippet_184773_11479
非常感谢以上资料,本例子源代码附加资源下载地址:http://download.csdn.net/detail/akof1314/6929101
github地址:https://github.com/akof1314/Cocos2dxGame/tree/master/CatMaze
如文章存在错误之处,欢迎指出,以便改正。转载请注明出处。
给我老师的人工智能教程打call!http://blog.csdn.net/jiangjunshow

我们对Markdown编辑器进行了一些功能拓展与语法支持,除了标准的Markdown编辑器功能,我们增加了如下几点新功能,帮助你用它写博客:
- 全新的界面设计 ,将会带来全新的写作体验;
- 在创作中心设置你喜爱的代码高亮样式,Markdown 将代码片显示选择的高亮样式 进行展示;
- 增加了 图片拖拽 功能,你可以将本地的图片直接拖拽到编辑区域直接展示;
- 全新的 KaTeX数学公式 语法;
- 增加了支持甘特图的mermaid语法1 功能;
- 增加了 多屏幕编辑 Markdown文章功能;
- 增加了 焦点写作模式、预览模式、简洁写作模式、左右区域同步滚轮设置 等功能,功能按钮位于编辑区域与预览区域中间;
- 增加了 检查列表 功能。
功能快捷键
撤销:Ctrl/Command + Z
重做:Ctrl/Command + Y
加粗:Ctrl/Command + B
斜体:Ctrl/Command + I
标题:Ctrl/Command + Shift + H
无序列表:Ctrl/Command + Shift + U
有序列表:Ctrl/Command + Shift + O
检查列表:Ctrl/Command + Shift + C
插入代码:Ctrl/Command + Shift + K
插入链接:Ctrl/Command + Shift + L
插入图片:Ctrl/Command + Shift + G
合理的创建标题,有助于目录的生成
直接输入1次#,并按下space后,将生成1级标题。
输入2次#,并按下space后,将生成2级标题。
以此类推,我们支持6级标题。有助于使用TOC语法后生成一个完美的目录。
如何改变文本的样式
强调文本 强调文本
加粗文本 加粗文本
标记文本
删除文本
引用文本
H2O is是液体。
210 运算结果是 1024.
插入链接与图片
链接: link.
图片: 
带尺寸的图片: ![]()
当然,我们为了让用户更加便捷,我们增加了图片拖拽功能。
如何插入一段漂亮的代码片
去博客设置页面,选择一款你喜欢的代码片高亮样式,下面展示同样高亮的 代码片.
// An highlighted block var foo = 'bar'; 生成一个适合你的列表
- 项目
- 项目
- 项目
- 项目
- 项目1
- 项目2
- 项目3
- 计划任务
- 完成任务
创建一个表格
一个简单的表格是这么创建的:
| 项目 | Value |
|---|---|
| 电脑 | $1600 |
| 手机 | $12 |
| 导管 | $1 |
设定内容居中、居左、居右
使用:---------:居中
使用:----------居左
使用----------:居右
| 第一列 | 第二列 | 第三列 |
|---|---|---|
| 第一列文本居中 | 第二列文本居右 | 第三列文本居左 |
SmartyPants
SmartyPants将ASCII标点字符转换为“智能”印刷标点HTML实体。例如:
| TYPE | ASCII | HTML |
|---|---|---|
| Single backticks | 'Isn't this fun?' |
‘Isn’t this fun?’ |
| Quotes | "Isn't this fun?" |
“Isn’t this fun?” |
| Dashes | -- is en-dash, --- is em-dash |
– is en-dash, — is em-dash |
创建一个自定义列表
- Markdown
- Text-to- HTML conversion tool
- Authors
- John
- Luke
如何创建一个注脚
一个具有注脚的文本。2
注释也是必不可少的
Markdown将文本转换为 HTML。
KaTeX数学公式
您可以使用渲染LaTeX数学表达式 KaTeX:
Gamma公式展示 是通过欧拉积分
你可以找到更多关于的信息 LaTeX 数学表达式here.
新的甘特图功能,丰富你的文章
gantt
        dateFormat  YYYY-MM-DD
        title Adding GANTT diagram functionality to mermaid
        section 现有任务
        已完成               :done,    des1, 2014-01-06,2014-01-08
        进行中               :active,  des2, 2014-01-09, 3d
        计划一               :         des3, after des2, 5d
        计划二               :         des4, after des3, 5d
- 关于 甘特图 语法,参考 这儿,
UML 图表
可以使用UML图表进行渲染。 Mermaid. 例如下面产生的一个序列图::
这将产生一个流程图。:
- 关于 Mermaid 语法,参考 这儿,
FLowchart流程图
我们依旧会支持flowchart的流程图:
- 关于 Flowchart流程图 语法,参考 这儿.
导出与导入
导出
如果你想尝试使用此编辑器, 你可以在此篇文章任意编辑。当你完成了一篇文章的写作, 在上方工具栏找到 文章导出 ,生成一个.md文件或者.html文件进行本地保存。
导入
如果你想加载一篇你写过的.md文件或者.html文件,在上方工具栏可以选择导入功能进行对应扩展名的文件导入,
继续你的创作。
注脚的解释 ↩︎