第二次作业记录.
show running-config : 特权模式下检验交换机当前的运行配置。
show vlan : 显示默认 VLAN。默认情况下,所有接口都分配给 VLAN 1。
1.设置当前交换机主机名为S1;
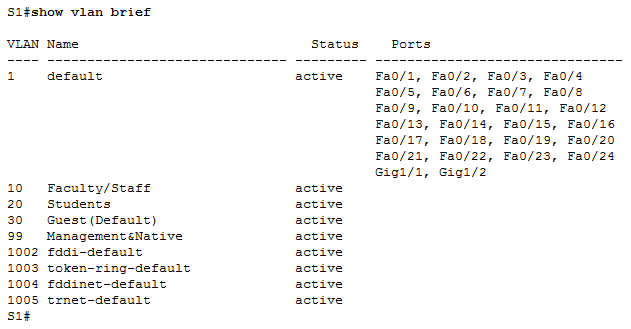
Switch(config)#hostname S12.在 S1 上,使用 vlan-id 按如下所示创建四个 VLAN:
S1(config)#vlan 10                        //进入VLAN 10的配置模式
S1(config-vlan)#name Faculty/Staff                //为VLAN 10命名
S1(config-vlan)#vlan 20
S1(config-vlan)#name Students
S1(config-vlan)#vlan 30
S1(config-vlan)#name Guest(Default)
S1(config-vlan)#vlan 99
S1(config-vlan)#name Management&Native
3. show vlan brief : 检查新 VLAN 是否创建成功。
4.switchport mode access : 将接口配置为接入端口。
switchport access vlan vlan-id : 将 VLAN 分配给该端口。
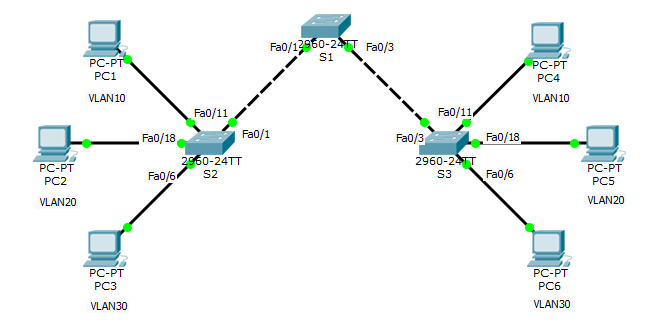
只能为一个接入端口分配一个接入 VLAN , 在S2上依次分配VLAN 30 , VLAN 10 , VLAN 20给端口Fa0/6 , Fa0/11 , Fa0/18。
S2(config)#interface fastEthernet 0/6
S2(config-if)#switchport mode access
S2(config-if)#switchport access vlan 30
S2(config-if)#interface fastEthernet 0/11
S2(config-if)#switchport mode access
S2(config-if)#switchport access vlan 10
S2(config-if)#interface fastEthernet 0/18
S2(config-if)#switchport mode access
S2(config-if)#switchport access vlan 205.将 S1 Fa0/1 和 Fa0/3 配置为中继,并使用 VLAN 99 作为本征 VLAN。
S1(config)#interface FastEthernet 0/1
S1(config-if)#switchport mode trunk                //配置中继模式
S1(config-if)#switchport trunk native vlan 99      //配置VLAN 99为本征VLAN
S1(config-if)#interface FastEthernet 0/3
S1(config-if)#switchport mode trunk
S1(config-if)#switchport trunk native vlan 99 %CDP-4-NATIVE_VLAN_MISMATCH: Native VLAN mismatch discovered on FastEthernet0/1 (99), with S2 FastEthernet0/1 (1).
%CDP-4-NATIVE_VLAN_MISMATCH: Native VLAN mismatch discovered on FastEthernet0/3 (99), with S3 FastEthernet0/3 (1).
6.确认 S2 上已启用中继,并将 VLAN 99 配置为本征 VLAN。
动态中继协议 (DTP) 已自动启用 S2 上的 Fast Ethernet 0/1 端口作为中继。一旦在 S1 上将模式配置为中继,则从 S1 发送到 S2 的 DTP 消息会自动通知 S1 将 Fa0/1 的状态变为中继。可以在 S2 上使用以下命令来确认这一点:
S2#show interface fastEthernet 0/1 switchport
Name: Fa0/1
Switchport: Enabled
Administrative Mode: dynamic auto                //管理模式
Operational Mode: trunk                            //工作模式
Administrative Trunking Encapsulation: dot1q
Operational Trunking Encapsulation: dot1q
Negotiation of Trunking: On
Access Mode VLAN: 1 (default)
Trunking Native Mode VLAN: 1 (default)
<省略部分输出>
S2#请注意管理模式设置为 dynamic auto(动态自动)。这是 Cisco IOS 交换机上所有端口的默认状态。然而,由于 DTP 已经就中继进行了协商,因此工作模式是 trunk(中继),从而导致本征 VLAN 不匹配。
最好的办法是将中继接口的管理模式配置为中继模式。这可确保该接口被静态配置为中继端口,绝不会协商为其它模式。
S2(config)#interface FastEthernet0/1
S2(config-if)#switchport mode trunk
S2(config-if)#switchport trunk native vlan 99
要更正本征 VLAN 不匹配的问题,请在中继端口上配置 switchport trunk native vlan 99 命令(请看上面)。
7.确认 S3 上已启用中继,并将 VLAN 99 配置为本征 VLAN。
S3#show interfaces fastEthernet 0/3 switchport
Name: Fa0/3
Switchport: Enabled
Administrative Mode: dynamic auto
Operational Mode: trunk
Administrative Trunking Encapsulation: dot1q
Operational Trunking Encapsulation: dot1q
Negotiation of Trunking: On
Access Mode VLAN: 1 (default)
Trunking Native Mode VLAN: 1 (default)
<省略部分输出>
S3#