版权声明:未经本人允许严禁转载 https://blog.csdn.net/WanJiaBaoBao/article/details/83957579
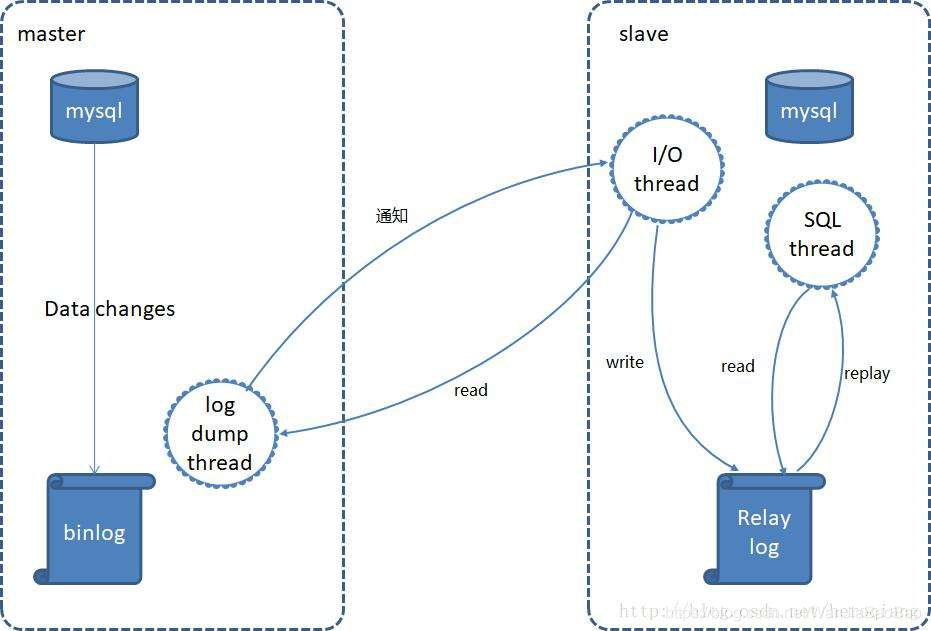
MySQL主从原理
- 主MySQL接收到写操作后,将写操作的记录全部记录到bin log日志中并生成log dump线程;
- 从MySQL的I/O线程去请求主MySQL的bin log日志,主MySQL的bin log接受到请求后,通过log dump线程 将bin log的操作记录传送给从MySQl的I/O线程;
- 从MySQL的I/O线程将收到的操作记录写入relay log中继日志文件中;
- 从MySQL的SQL线程去读取relay log中继日志中的内容,并将其解析为操作步骤来实现主从数据一致。
配置环境
- 已关闭防火墙、selinux;
- MySQL安装请参照MySQL二进制包安装;
- 主服务器安装zabibx请参照源码安装Zabbix监控服务;
- 所用地址如下表:
| IP地址 | 角色 | 安装内容 |
|---|---|---|
| 192.168.91.133/24 | slave(从) | MySQL、Zabbix-agent(编译安装) |
| 192.168.91.134/24 | master(主) | MySQL、Zabbix-server、Zabbix-agent(编译安装) |
主从配置前期准备
- 登录数据库,创建一个同步账号并授权给从(slave)数据库,并刷新权限
[root@localhost ~]# mysql -uroot -p'123456'
mysql> grant replication slave on *.* to repl@'192.168.91.133' identified by '123456';
Query OK, 0 rows affected, 1 warning (0.01 sec)
mysql> flush privileges;
Query OK, 0 rows affected (0.00 sec)
- 将主(master)MySQL进行临时锁表(退出数据库将自动解锁)
mysql> FLUSH TABLES WITH READ LOCK;
Query OK, 0 rows affected (0.09 sec)
- 将主(master)MySQL进行全量备份
[root@localhost ~]# mysqldump -uroot -p'123456' --all-databases > /opt/all-$(date +'%Y%m%d_%H%M%S').sql
mysqldump: [Warning] Using a password on the command line interface can be insecure.
[root@localhost ~]# scp /opt/all-20181111_132122.sql [email protected]:/opt
[email protected]'s password:
all-20181111_132122.sql                                               100% 3807KB  52.0MB/s   00:00
- 在从(slave)MySQL上将主(master)MySQL传送过来的全量备份进行导入
[root@localhost ~]# mysql -uroot -p'liyang123#!' < /opt/all-20181111_132122.sql
mysql: [Warning] Using a password on the command line interface can be insecure.
主从配置步骤
- 修改主(master)/etc/my.cnf配置文件
[root@localhost ~]# vim /etc/my.cnf
[mysqld]
basedir=/usr/local/mysql
datadir=/opt/data
socket=/tmp/mysql.sock
port=3306
pid-file=/opt/data/mysql.pid
user=mysql
skip-name-resolve
log-bin=mysql-bin		##启用bin log日志
server-id=1			##数据库服务器的唯一标识符,主库的server-id必须比从库小
- 重新启动主(master)库的mysqld服务,并查看主库状态
[root@localhost ~]# service mysqld restart
Shutting down MySQL..... SUCCESS!
Starting MySQL... SUCCESS!
[root@localhost ~]# mysql -uroot -p'123456' -e "show master status"
mysql: [Warning] Using a password on the command line interface can be insecure.
+------------------+----------+--------------+------------------+-------------------+
| File             | Position | Binlog_Do_DB | Binlog_Ignore_DB | Executed_Gtid_Set |
+------------------+----------+--------------+------------------+-------------------+
| mysql-bin.000001 |      154 |              |                  |                   |
+------------------+----------+--------------+------------------+-------------------+

注:记住“file“名与“Position”的值,设置从库时与主库对应
- 配置从(slave)/etc/my.cnf配置文件
[root@localhost ~]# vim /etc/my.cnf
[mysqld]
basedir=/usr/local/mysql
datadir=/opt/data
socket=/tmp/mysql.sock
port=3306
pid-file=/opt/data/mysql.pid
user=mysql
skip-name-resolve
relay-log=mysql-relay-bin		##开启relay-bin中继日志
server-id=2			##设置从库唯一标识,从库的server-id值必须大于主库
- 重新启动从(slave)库的mysqld服务
[root@localhost ~]# service mysqld restart
Shutting down MySQL.. SUCCESS!
Starting MySQL. SUCCESS!
- 登录数据库,配置并开启主从同步
[root@localhost ~]# mysql -uroot -p'123456'
mysql> CHANGE MASTER TO MASTER_HOST='192.168.91.134',
    -> MASTER_USER='repl',
    -> MASTER_PASSWORD='123456',
    -> MASTER_LOG_FILE='mysql-bin.000001',
    -> MASTER_LOG_POS=154;
Query OK, 0 rows affected, 2 warnings (0.02 sec)

mysql> start slave;		##开启主从同步功能
Query OK, 0 rows affected (0.00 sec)
- 查看从服务器状态
mysql> show slave status \G
*************************** 1. row ***************************
               Slave_IO_State: Waiting for master to send event
                  Master_Host: 192.168.91.134
                  Master_User: repl
                  Master_Port: 3306
                Connect_Retry: 60
              Master_Log_File: mysql-bin.000001
          Read_Master_Log_Pos: 154
               Relay_Log_File: mysql-relay-bin.000002
                Relay_Log_Pos: 320
        Relay_Master_Log_File: mysql-bin.000001
             Slave_IO_Running: Yes
            Slave_SQL_Running: Yes
              Replicate_Do_DB:
          Replicate_Ignore_DB:
           Replicate_Do_Table:
       Replicate_Ignore_Table:
      Replicate_Wild_Do_Table:
  Replicate_Wild_Ignore_Table:
                   Last_Errno: 0
                   Last_Error:
                 Skip_Counter: 0
          Exec_Master_Log_Pos: 154
              Relay_Log_Space: 527
              Until_Condition: None
               Until_Log_File:
                Until_Log_Pos: 0
           Master_SSL_Allowed: No
           Master_SSL_CA_File:
           Master_SSL_CA_Path:
              Master_SSL_Cert:
            Master_SSL_Cipher:
               Master_SSL_Key:
        Seconds_Behind_Master: 0
Master_SSL_Verify_Server_Cert: No
                Last_IO_Errno: 0
                Last_IO_Error:
               Last_SQL_Errno: 0
               Last_SQL_Error:
  Replicate_Ignore_Server_Ids:
             Master_Server_Id: 1
                  Master_UUID: a090431a-e558-11e8-8d9f-005056337520
             Master_Info_File: /opt/data/master.info
                    SQL_Delay: 0
          SQL_Remaining_Delay: NULL
      Slave_SQL_Running_State: Slave has read all relay log; waiting for more updates
           Master_Retry_Count: 86400
                  Master_Bind:
      Last_IO_Error_Timestamp:
     Last_SQL_Error_Timestamp:
               Master_SSL_Crl:
           Master_SSL_Crlpath:
           Retrieved_Gtid_Set:
            Executed_Gtid_Set:
                Auto_Position: 0
         Replicate_Rewrite_DB:
                 Channel_Name:
           Master_TLS_Version:
Zabbix监控MySQL主从同步配置
- 在从(slave)服务器上安装zabbix_agentd的配置请参照源码编译安装Zabbix(文档最下面)
- 在从(slave)服务器上编写主从监控脚本
[root@localhost ~]# vim /usr/local/etc/scripts/mysql_mas_sla.sh
#!/bin/bash

slave_IO=$(mysql -uroot -p'123456' -e "show slave status \G" 2>/dev/null | grep 'Slave_IO_Running' | awk '{print $2}')
Slave_SQL=$(mysql -uroot -p'123456' -e "show slave status \G" 2>/dev/null | grep 'Slave_SQL_Running:' | awk '{print $2}')

if [ "$slave_IO" == "Yes" -a "$Slave_SQL" == "Yes" ];then
        echo 0
else
        echo 1
fi

[root@localhost ~]# vim /usr/local/etc/scripts/mysql_read_exec.sh
!/bin/bash

Read_Master=$(mysql -uroot -p'123456' -e "show slave status \G" 2>/dev/null | grep 'Read_Master_Log_Pos' | awk '{print $2}')
Exec_Master=$(mysql -uroot -p'123456' -e "show slave status \G" 2>/dev/null | grep 'Exec_Master_Log_Pos' | awk '{print $2}')

if [ $Read_Master -eq $Exec_Master ];then
        echo 0
else
        echo 1
fi

[root@localhost ~]# chmod +x /usr/local/etc/scripts/mysql_mas_sla.sh
[root@localhost ~]# chmod +x /usr/local/etc/scripts/mysql_read_exec.sh
[root@localhost ~]# ll /usr/local/etc/scripts/
total 8
-rwxr-xr-x 1 root root 337 Nov 11 19:38 mysql_mas_sla.sh
-rwxr-xr-x 1 root root 330 Nov 11 19:40 mysql_read_exec.sh
- 修改从(slave)服务器/usr/local/etc/zabbix_agentd.conf配置文件
[root@localhost ~]# vim /usr/local/etc/zabbix_agentd.conf
......
### Option: UnsafeUserParameters
# UnsafeUserParameters=0
UnsafeUserParameters=1

### Option: UserParameter
# UserParameter=
UserParameter=check_mysql_mas_sla,/bin/bash /usr/local/etc/scripts/mysql_mas_sla.sh
UserParameter=check_mysql_read_exec,/bin/bash /usr/local/etc/scripts/mysql_read_exec.sh
......
- 重新启动从(slave)上zabbix_agentd服务
[root@localhost ~]# killall zabbix_agentd
[root@localhost ~]# zabbix_agentd
- 在主(master)手动验证
[root@localhost ~]# zabbix_get -s 192.168.91.133 -k 'check_mysql_mas_sla'
0
[root@localhost ~]# zabbix_get -s 192.168.91.133 -k 'check_mysql_read_exec'
0
-
在网页上进行监控项设置
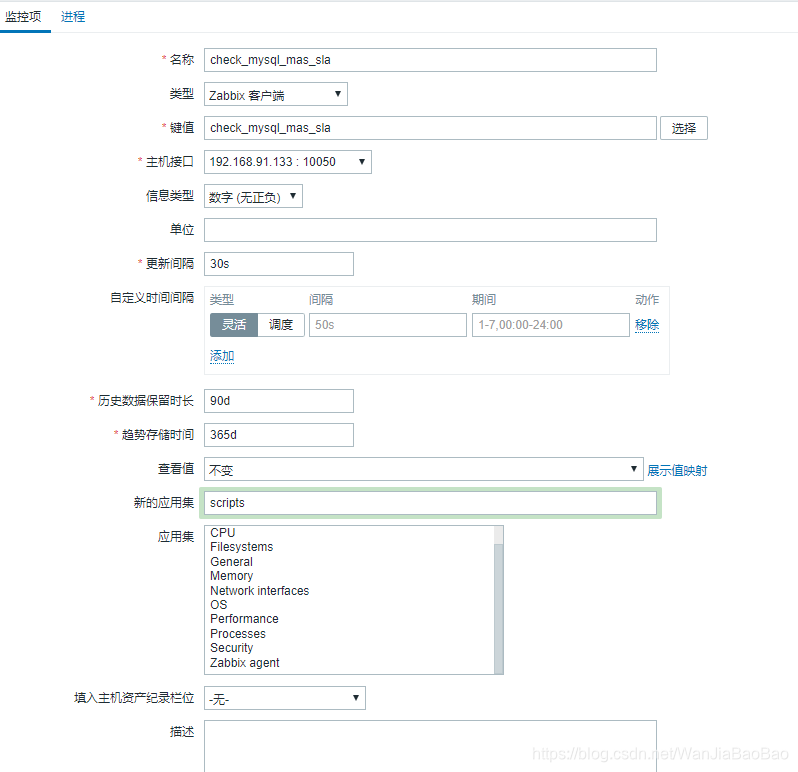
-
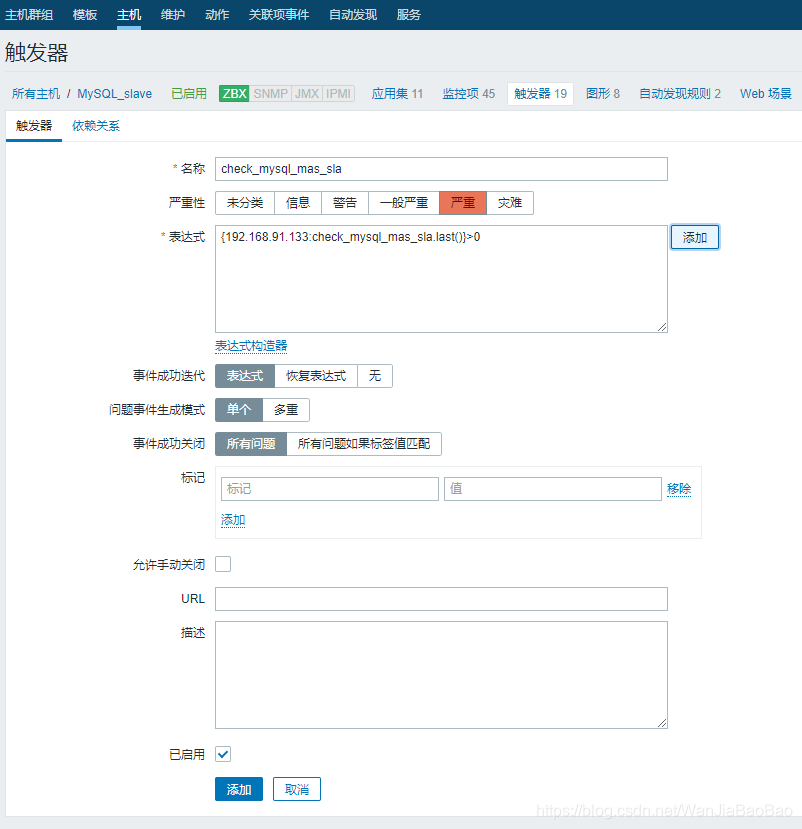
添加触发器