模块&包
模块的概念:
在计算机程序的开发过程中,随着程序代码越写越多,在一个文件里的代码就会越来越长,越来越不容易维护。
为了编写可维护的代码,我们把很多函数分组,分别放到不同的文件里,这样每个文件包含的代码相对较少,很多编程语言都采用这种组织代码的方式。在Python中,一个.py文件就是一个模块(Module)。
使用模块有什么好处?
最大的好处是大大提高了代码的可维护性。
其次,编写代码不需要从零开始。当一个模块编写完毕,就可以被其他地方引用。我们自己在编写程序的时候,也经常会用到这些编写好的模块,包括Python内置的模块和来自第三方的模块。
所以,模块分为三种:
1、python标准库
2、第三方模块
3、应用程序自定义模块
另外,使用模块还可以避免函数名和变量名冲突。相同名字的函数和变量完全可以在不同的模块中。因此,我们自己在编写模块时,不必考虑会和其他模块冲突。但是,需要注意的是尽量不要和内置函数名字冲突。

模块导入方法
1、import 语句
(1)执行对应文件(执行完)。
(2)引入变量名
注意:
执行同级文件时,可以import同级文件,如果不在同一级,一定要from同级然后在import文件,这样python解释器才认识。(执行程序bin是程序的入口(编译器只认识执行文件bin),main里面是与逻辑相关的主函数),sys.path只把执行文件的路径拿出来,想要用其他的,都得在执行文件路径同级的地方下手或者加一下sys.path路径,让python解释器认识。
import module1[,module2[,].....]
当我们使用import语句的时候,Python解释器是怎样找到对应的文件的呢?解释器有自己的搜索路径,存在sys.path里。
2、from...import语句
from modname import name1[,name2[,...]]
这个声明不会把整个modulename模块导入当前的命名空间中,只会将name1或者name2单个引入执行这个声明的模块的全局符号表。
3、From...import*语句
from modname import *
这是提供了一个简单的方法来导入一个模块中所有的项目,一般不建议使用,导致和下面定义的重复或者其他模块中变量名重复,覆盖。
4、运行的本质
 import test

 from test import func
第一种和第二种,首先都是通过sys.path找到test.py,然后执行test脚本(全部执行),区别是第一种是把test变量加载到名字空间,第2种只是把add的变量名加载进来。
包(package)
如果不同的人编写的模块名相同怎么办?为了防止这种冲突,python又引入按目录来组织模块的方法,称为包(package)。
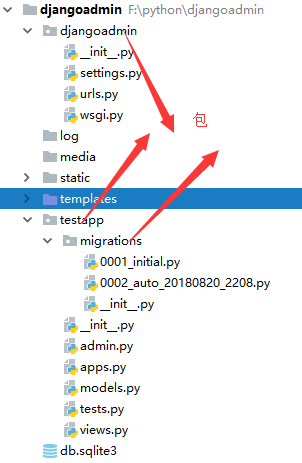
引入包以后,只要顶层的包名不与别人冲突,那么所有的模块名都不会和别人的冲突,请注意,每一个包目录下面都会有一个__init__.py的文件,这个文件是必须存在的,否则,Python就把这个目录当成普通目录(文件夹),而不是一个包。__init__.py可以是空文件,也可以有Python代码,因为__init__.py本身就是一个模块,而它的模块名就是对应包的名字。
调用包就是执行包下的__init__.py文件
注意点(很重要)

1、---------------------------
在nod1里面import hello是找不到的,但是自己把这个路径加进去就可以找到了。
import sys,os
BASE_DIR=os.path.dirname(os.path.dirname(os.path.abspath(__file__)))
sys.path.append(BASE_DIR)
import hello
hello.helloa()
2、------------------------
1 if __name=='__main__':
2     print('ok')
如果我们是直接执行某个.py文件的时候,该文件中那么”__name__ == '__main__'“是True,但是我们如果从另外一个.py文件通过import导入该文件的时候,这时__name__的值就是我们这个py文件的名字而不是__main__。(防止别人调用我们的执行文件)
这个功能还有一个用处:被执行文件调试代码的时候,在”if __name__ == '__main__'“中加入一些我们的调试代码,我们可以让外部模块调用的时候不执行我们的调试代码,但是如果我们想排查问题的时候,直接执行该模块文件,调试代码能够正常运行(只在运行的时候执行)!
3、-------------------------------
 1 ##--------------cal.py
 2 def add(x,y):
 3     return x+y
 4 ##-------------main.py
 5 import cal   #只能为from module import cal
 6
 7 def main():
 8
 9     cal.add(1,2)
10
11
12 ##------------------bin.py
13 from module import main  #from . import main
14
15     main.main()
(bin一般为执行文件)
一、XML
XML是实现不同语言或程序之间进行数据交换的协议,XML文件格式如下:


 1 <data>
 2     <country name="Liechtenstein">
 3         <rank updated="yes">2</rank>
 4         <year>2023</year>
 5         <gdppc>141100</gdppc>
 6         <neighbor direction="E" name="Austria" />
 7         <neighbor direction="W" name="Switzerland" />
 8     </country>
 9     <country name="Singapore">
10         <rank updated="yes">5</rank>
11         <year>2026</year>
12         <gdppc>59900</gdppc>
13         <neighbor direction="N" name="Malaysia" />
14     </country>
15     <country name="Panama">
16         <rank updated="yes">69</rank>
17         <year>2026</year>
18         <gdppc>13600</gdppc>
19         <neighbor direction="W" name="Costa Rica" />
20         <neighbor direction="E" name="Colombia" />
21     </country>
22 </data>
1、解析XML
 1 from xml.etree import ElementTree as ET
 2
 3
 4 # 打开文件,读取XML内容
 5 str_xml = open('xo.xml', 'r').read()
 6
 7 # 将字符串解析成xml特殊对象,root代指xml文件的根节点
 8 root = ET.XML(str_xml)
 9
10 利用ElementTree.XML将字符串解析成xml对象
1 from xml.etree import ElementTree as ET
2
3 # 直接解析xml文件
4 tree = ET.parse("xo.xml")
5
6 # 获取xml文件的根节点
7 root = tree.getroot()
8
9 利用ElementTree.parse将文件直接解析成xml对象
2、操作XML
XML格式类型是节点嵌套节点,对于每一个节点均有以下功能,以便对当前节点进行操作:
  1 class Element:
  2     """An XML element.
  3
  4     This class is the reference implementation of the Element interface.
  5
  6     An element's length is its number of subelements.  That means if you
  7     want to check if an element is truly empty, you should check BOTH
  8     its length AND its text attribute.
  9
 10     The element tag, attribute names, and attribute values can be either
 11     bytes or strings.
 12
 13     *tag* is the element name.  *attrib* is an optional dictionary containing
 14     element attributes. *extra* are additional element attributes given as
 15     keyword arguments.
 16
 17     Example form:
 18         <tag attrib>text<child/>...</tag>tail
 19
 20     """
 21
 22     当前节点的标签名
 23     tag = None
 24     """The element's name."""
 25
 26     当前节点的属性
 27
 28     attrib = None
 29     """Dictionary of the element's attributes."""
 30
 31     当前节点的内容
 32     text = None
 33     """
 34     Text before first subelement. This is either a string or the value None.
 35     Note that if there is no text, this attribute may be either
 36     None or the empty string, depending on the parser.
 37
 38     """
 39
 40     tail = None
 41     """
 42     Text after this element's end tag, but before the next sibling element's
 43     start tag.  This is either a string or the value None.  Note that if there
 44     was no text, this attribute may be either None or an empty string,
 45     depending on the parser.
 46
 47     """
 48
 49     def __init__(self, tag, attrib={}, **extra):
 50         if not isinstance(attrib, dict):
 51             raise TypeError("attrib must be dict, not %s" % (
 52                 attrib.__class__.__name__,))
 53         attrib = attrib.copy()
 54         attrib.update(extra)
 55         self.tag = tag
 56         self.attrib = attrib
 57         self._children = []
 58
 59     def __repr__(self):
 60         return "<%s %r at %#x>" % (self.__class__.__name__, self.tag, id(self))
 61
 62     def makeelement(self, tag, attrib):
 63         创建一个新节点
 64         """Create a new element with the same type.
 65
 66         *tag* is a string containing the element name.
 67         *attrib* is a dictionary containing the element attributes.
 68
 69         Do not call this method, use the SubElement factory function instead.
 70
 71         """
 72         return self.__class__(tag, attrib)
 73
 74     def copy(self):
 75         """Return copy of current element.
 76
 77         This creates a shallow copy. Subelements will be shared with the
 78         original tree.
 79
 80         """
 81         elem = self.makeelement(self.tag, self.attrib)
 82         elem.text = self.text
 83         elem.tail = self.tail
 84         elem[:] = self
 85         return elem
 86
 87     def __len__(self):
 88         return len(self._children)
 89
 90     def __bool__(self):
 91         warnings.warn(
 92             "The behavior of this method will change in future versions.  "
 93             "Use specific 'len(elem)' or 'elem is not None' test instead.",
 94             FutureWarning, stacklevel=2
 95             )
 96         return len(self._children) != 0 # emulate old behaviour, for now
 97
 98     def __getitem__(self, index):
 99         return self._children[index]
100
101     def __setitem__(self, index, element):
102         # if isinstance(index, slice):
103         #     for elt in element:
104         #         assert iselement(elt)
105         # else:
106         #     assert iselement(element)
107         self._children[index] = element
108
109     def __delitem__(self, index):
110         del self._children[index]
111
112     def append(self, subelement):
113         为当前节点追加一个子节点
114         """Add *subelement* to the end of this element.
115
116         The new element will appear in document order after the last existing
117         subelement (or directly after the text, if it's the first subelement),
118         but before the end tag for this element.
119
120         """
121         self._assert_is_element(subelement)
122         self._children.append(subelement)
123
124     def extend(self, elements):
125         为当前节点扩展 n 个子节点
126         """Append subelements from a sequence.
127
128         *elements* is a sequence with zero or more elements.
129
130         """
131         for element in elements:
132             self._assert_is_element(element)
133         self._children.extend(elements)
134
135     def insert(self, index, subelement):
136         在当前节点的子节点中插入某个节点,即:为当前节点创建子节点,然后插入指定位置
137         """Insert *subelement* at position *index*."""
138         self._assert_is_element(subelement)
139         self._children.insert(index, subelement)
140
141     def _assert_is_element(self, e):
142         # Need to refer to the actual Python implementation, not the
143         # shadowing C implementation.
144         if not isinstance(e, _Element_Py):
145             raise TypeError('expected an Element, not %s' % type(e).__name__)
146
147     def remove(self, subelement):
148         在当前节点在子节点中删除某个节点
149         """Remove matching subelement.
150
151         Unlike the find methods, this method compares elements based on
152         identity, NOT ON tag value or contents.  To remove subelements by
153         other means, the easiest way is to use a list comprehension to
154         select what elements to keep, and then use slice assignment to update
155         the parent element.
156
157         ValueError is raised if a matching element could not be found.
158
159         """
160         # assert iselement(element)
161         self._children.remove(subelement)
162
163     def getchildren(self):
164         获取所有的子节点(废弃)
165         """(Deprecated) Return all subelements.
166
167         Elements are returned in document order.
168
169         """
170         warnings.warn(
171             "This method will be removed in future versions.  "
172             "Use 'list(elem)' or iteration over elem instead.",
173             DeprecationWarning, stacklevel=2
174             )
175         return self._children
176
177     def find(self, path, namespaces=None):
178         获取第一个寻找到的子节点
179         """Find first matching element by tag name or path.
180
181         *path* is a string having either an element tag or an XPath,
182         *namespaces* is an optional mapping from namespace prefix to full name.
183
184         Return the first matching element, or None if no element was found.
185
186         """
187         return ElementPath.find(self, path, namespaces)
188
189     def findtext(self, path, default=None, namespaces=None):
190         获取第一个寻找到的子节点的内容
191         """Find text for first matching element by tag name or path.
192
193         *path* is a string having either an element tag or an XPath,
194         *default* is the value to return if the element was not found,
195         *namespaces* is an optional mapping from namespace prefix to full name.
196
197         Return text content of first matching element, or default value if
198         none was found.  Note that if an element is found having no text
199         content, the empty string is returned.
200
201         """
202         return ElementPath.findtext(self, path, default, namespaces)
203
204     def findall(self, path, namespaces=None):
205         获取所有的子节点
206         """Find all matching subelements by tag name or path.
207
208         *path* is a string having either an element tag or an XPath,
209         *namespaces* is an optional mapping from namespace prefix to full name.
210
211         Returns list containing all matching elements in document order.
212
213         """
214         return ElementPath.findall(self, path, namespaces)
215
216     def iterfind(self, path, namespaces=None):
217         获取所有指定的节点,并创建一个迭代器(可以被for循环)
218         """Find all matching subelements by tag name or path.
219
220         *path* is a string having either an element tag or an XPath,
221         *namespaces* is an optional mapping from namespace prefix to full name.
222
223         Return an iterable yielding all matching elements in document order.
224
225         """
226         return ElementPath.iterfind(self, path, namespaces)
227
228     def clear(self):
229         清空节点
230         """Reset element.
231
232         This function removes all subelements, clears all attributes, and sets
233         the text and tail attributes to None.
234
235         """
236         self.attrib.clear()
237         self._children = []
238         self.text = self.tail = None
239
240     def get(self, key, default=None):
241         获取当前节点的属性值
242         """Get element attribute.
243
244         Equivalent to attrib.get, but some implementations may handle this a
245         bit more efficiently.  *key* is what attribute to look for, and
246         *default* is what to return if the attribute was not found.
247
248         Returns a string containing the attribute value, or the default if
249         attribute was not found.
250
251         """
252         return self.attrib.get(key, default)
253
254     def set(self, key, value):
255         为当前节点设置属性值
256         """Set element attribute.
257
258         Equivalent to attrib[key] = value, but some implementations may handle
259         this a bit more efficiently.  *key* is what attribute to set, and
260         *value* is the attribute value to set it to.
261
262         """
263         self.attrib[key] = value
264
265     def keys(self):
266         获取当前节点的所有属性的 key
267
268         """Get list of attribute names.
269
270         Names are returned in an arbitrary order, just like an ordinary
271         Python dict.  Equivalent to attrib.keys()
272
273         """
274         return self.attrib.keys()
275
276     def items(self):
277         获取当前节点的所有属性值,每个属性都是一个键值对
278         """Get element attributes as a sequence.
279
280         The attributes are returned in arbitrary order.  Equivalent to
281         attrib.items().
282
283         Return a list of (name, value) tuples.
284
285         """
286         return self.attrib.items()
287
288     def iter(self, tag=None):
289         在当前节点的子孙中根据节点名称寻找所有指定的节点,并返回一个迭代器(可以被for循环)。
290         """Create tree iterator.
291
292         The iterator loops over the element and all subelements in document
293         order, returning all elements with a matching tag.
294
295         If the tree structure is modified during iteration, new or removed
296         elements may or may not be included.  To get a stable set, use the
297         list() function on the iterator, and loop over the resulting list.
298
299         *tag* is what tags to look for (default is to return all elements)
300
301         Return an iterator containing all the matching elements.
302
303         """
304         if tag == "*":
305             tag = None
306         if tag is None or self.tag == tag:
307             yield self
308         for e in self._children:
309             yield from e.iter(tag)
310
311     # compatibility
312     def getiterator(self, tag=None):
313         # Change for a DeprecationWarning in 1.4
314         warnings.warn(
315             "This method will be removed in future versions.  "
316             "Use 'elem.iter()' or 'list(elem.iter())' instead.",
317             PendingDeprecationWarning, stacklevel=2
318         )
319         return list(self.iter(tag))
320
321     def itertext(self):
322         在当前节点的子孙中根据节点名称寻找所有指定的节点的内容,并返回一个迭代器(可以被for循环)。
323         """Create text iterator.
324
325         The iterator loops over the element and all subelements in document
326         order, returning all inner text.
327
328         """
329         tag = self.tag
330         if not isinstance(tag, str) and tag is not None:
331             return
332         if self.text:
333             yield self.text
334         for e in self:
335             yield from e.itertext()
336             if e.tail:
337                 yield e.tail
338
339 节点功能一览表
由于 每个节点 都具有以上的方法,并且在上一步骤中解析时均得到了root(xml文件的根节点),so 可以利用以上方法进行操作xml文件。
a. 遍历XML文档的所有内容
 1 from xml.etree import ElementTree as ET
 2
 3 ############ 解析方式一 ############
 4 """
 5 # 打开文件,读取XML内容
 6 str_xml = open('xo.xml', 'r').read()
 7
 8 # 将字符串解析成xml特殊对象,root代指xml文件的根节点
 9 root = ET.XML(str_xml)
10 """
11 ############ 解析方式二 ############
12
13 # 直接解析xml文件
14 tree = ET.parse("xo.xml")
15
16 # 获取xml文件的根节点
17 root = tree.getroot()
18
19
20 ### 操作
21
22 # 顶层标签
23 print(root.tag)
24
25
26 # 遍历XML文档的第二层
27 for child in root:
28     # 第二层节点的标签名称和标签属性
29     print(child.tag, child.attrib)
30     # 遍历XML文档的第三层
31     for i in child:
32         # 第二层节点的标签名称和内容
33         print(i.tag,i.text)
b、遍历XML中指定的节点
 1 from xml.etree import ElementTree as ET
 2
 3 ############ 解析方式一 ############
 4 """
 5 # 打开文件,读取XML内容
 6 str_xml = open('xo.xml', 'r').read()
 7
 8 # 将字符串解析成xml特殊对象,root代指xml文件的根节点
 9 root = ET.XML(str_xml)
10 """
11 ############ 解析方式二 ############
12
13 # 直接解析xml文件
14 tree = ET.parse("xo.xml")
15
16 # 获取xml文件的根节点
17 root = tree.getroot()
18
19
20 ### 操作
21
22 # 顶层标签
23 print(root.tag)
24
25
26 # 遍历XML中所有的year节点
27 for node in root.iter('year'):
28     # 节点的标签名称和内容
29     print(node.tag, node.text)
c、修改节点内容
由于修改的节点时,均是在内存中进行,其不会影响文件中的内容。所以,如果想要修改,则需要重新将内存中的内容写到文件。
 1 # 顶层标签
 2 print(root.tag)
 3
 4 # 循环所有的year节点
 5 for node in root.iter('year'):
 6     # 将year节点中的内容自增一
 7     new_year = int(node.text) + 1
 8     node.text = str(new_year)
 9
10     # 设置属性
11     node.set('name', 'alex')
12     node.set('age', '18')
13     # 删除属性
14     del node.attrib['name']
15
16
17 ############ 保存文件 ############
18 tree = ET.ElementTree(root)
19 tree.write("newnew.xml", encoding='utf-8')
d、删除节点
 1 from xml.etree import ElementTree as ET
 2
 3 ############ 解析字符串方式打开 ############
 4
 5 # 打开文件,读取XML内容
 6 str_xml = open('xo.xml', 'r').read()
 7
 8 # 将字符串解析成xml特殊对象,root代指xml文件的根节点
 9 root = ET.XML(str_xml)
10
11 ############ 操作 ############
12
13 # 顶层标签
14 print(root.tag)
15
16 # 遍历data下的所有country节点
17 for country in root.findall('country'):
18     # 获取每一个country节点下rank节点的内容
19     rank = int(country.find('rank').text)
20
21     if rank > 50:
22         # 删除指定country节点
23         root.remove(country)
24
25 ############ 保存文件 ############
26 tree = ET.ElementTree(root)
27 tree.write("newnew.xml", encoding='utf-8')
28
29 解析字符串方式打开,删除,保存
 1 from xml.etree import ElementTree as ET
 2
 3 ############ 解析文件方式 ############
 4
 5 # 直接解析xml文件
 6 tree = ET.parse("xo.xml")
 7
 8 # 获取xml文件的根节点
 9 root = tree.getroot()
10
11 ############ 操作 ############
12
13 # 顶层标签
14 print(root.tag)
15
16 # 遍历data下的所有country节点
17 for country in root.findall('country'):
18     # 获取每一个country节点下rank节点的内容
19     rank = int(country.find('rank').text)
20
21     if rank > 50:
22         # 删除指定country节点
23         root.remove(country)
24
25 ############ 保存文件 ############
26 tree.write("newnew.xml", encoding='utf-8')
27
28 解析文件方式打开,删除,保存
e、自己创建xml文档
 1 import xml.etree.ElementTree as ET
 2
 3 new_xml=ET.Element("namelist")
 4 name=ET.SubElement(new_xml,"name",attrib={"enroled":"yes"})
 5 age=ET.SubElement(name,"age",attrib={"checked":"no"})
 6 sex = ET.SubElement(name,"sex")
 7 sex.text = '33'
 8 name2 = ET.SubElement(new_xml,"name",attrib={"enrolled":"no"})
 9 age = ET.SubElement(name2,"age")
10 age.text = '19'
11
12 et = ET.ElementTree(new_xml) #生成文档对象
13 et.write("test.xml", encoding="utf-8",xml_declaration=True)
14
15 ET.dump(new_xml) #打印生成的格式
二、json(序列化)
如果我们要在不同的编程语言之间传递对象,就必须把对象序列化为标准格式,比如XML,但更好的方法是JSON,因为JSON表示出来就是一个字符串,可以被所有语言读取,也可以方便地存储到磁盘或者网络传输。Json不仅是标准化格式,并且比XML更快,而且可以直接在Web页面读取,非常方便。
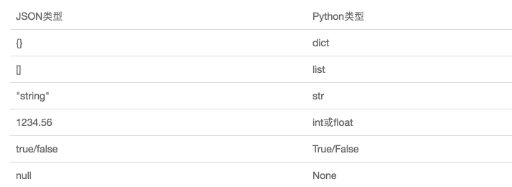
Json表示的对象就是标准的JavaScript语言对象,Json和Python内置的数据类型如下:
 1 import json
 2 dic={'name':'liming','sex':'male','bobby':'basketball'}
 3 print(type(dic))
 4 j=json.dumps(dic) #编码
 5 print(type(j))
 6 print(j)
 7 f=open('json','w')
 8 f.write(j)
 9 f.close()
10 f=open('json')
11 data=json.loads(f.read()) #解码
12 print(type(data))
三、pickle(序列化)
pickle的问题和所有其他编程语言特有的序列化问题一样,就只能勇于python,并且可能不同版本的python都不兼容,因此,只能用于保存一些不重要的数据,不能成功的反序列化也没关系。
 1 import pickle
 2 dic={'name':'liming','sex':'male','bobby':'basketball'}
 3 print(type(dic))
 4 #--------------序列化
 5
 6 j=pickle.dumps(dic)
 7 print(type(j)) #字节byte
 8
 9 f=open('pickle_test','wb')
10 f.write(j)  #-------------------等价于pickle.dump(dic,f)
11 f.close()
12
13 #------------------反序列化
14 import pickle
15 f=open('pickle_test','rb')
16 data=pickle.loads(f.read())   #  等价于data=pickle.load(f)
17 print(data['sex'])
四、requests
python标准库中提供了:urllib等模块以提供Http请求,但是他的API太low,它需要巨量的工作,甚至各种方法的覆盖,来完成简单的任务。
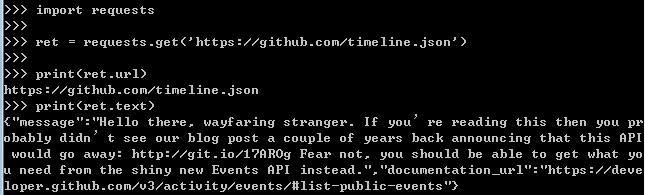
1 import requests
2
3 ret = requests.get('https://github.com/timeline.json')
4
5 print(ret.url)
6 print(ret.text)
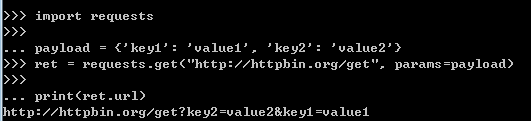
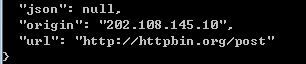
1 import requests
2
3 payload = {'key1': 'value1', 'key2': 'value2'}
4 ret = requests.get("http://httpbin.org/get", params=payload)
5
6 print(ret.url)
7 print(ret.text)
 1 # 1、基本POST实例
 2
 3 import requests
 4
 5 payload = {'key1': 'value1', 'key2': 'value2'}
 6 ret = requests.post("http://httpbin.org/post", data=payload)
 7
 8 print(ret.url)
 9
10 print(ret.text)
11
12
13 # 2、发送请求头和数据实例
14
15 import requests
16 import json
17
18 url = 'https://api.github.com/some/endpoint'
19 payload = {'some': 'data'}
20 headers = {'content-type': 'application/json'}
21
22 ret = requests.post(url, data=json.dumps(payload), headers=headers)
23
24 print(ret.text)
25 print(ret.cookies)


 1 requests.get(url, params=None, **kwargs)
 2 requests.post(url, data=None, json=None, **kwargs)
 3 requests.put(url, data=None, **kwargs)
 4 requests.head(url, **kwargs)
 5 requests.delete(url, **kwargs)
 6 requests.patch(url, data=None, **kwargs)
 7 requests.options(url, **kwargs)
 8
 9 # 以上方法均是在此方法的基础上构建
10 requests.request(method, url, **kwargs)
五、random
 1 import random
 2
 3 print(random.random())#(0,1)----float
 4
 5 print(random.randint(1,4))  #[1,4]
 6
 7 print(random.randrange(1,4)) #[1,4)
 8
 9 print(random.choice([1,'3',[3,5]]))#随机选择一个
10
11 print(random.sample([1,'23',2,4],3))#随机选择3个[4, 2,1]
12
13 print(random.uniform(1,5))#float (1.5)1.327109612082716
14
15
16 item=[1,2,3,4,5]  #打乱list
17 random.shuffle(item)
18 print(item)
实例:
 1 #验证码的生成
 2 import random
 3 def code():
 4     code_y=''
 5     for i in range(4):
 6         num=random.randint(0,9)
 7         ret=chr(random.randint(65,122))
 8         a=str(random.choice([num,ret]))
 9         code_y+=a
10     return code_y
11 print(code())
12
13
六、re(正则)
1、re.match()
re.match 尝试从字符串的起始位置匹配一个模式,如果不是起始位置匹配成功的话,则返回none。
函数语法:
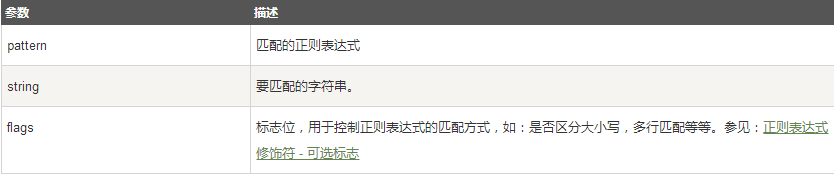
1 re.match(pattern,string,flags=0)
匹配成功re.match()方法返回一个匹配对象,否则返回none。
group()和groups()匹配对象函数来获取匹配表达式。

 1 #!/usr/bin/python
 2 import re
 3
 4 line = "Cats are smarter than dogs"
 5
 6 matchObj = re.match( r'(.*) are (.*?) .*', line, re.M|re.I)#多行模式或者忽略大小写
 7
 8 if matchObj:
 9    print "matchObj.group() : ", matchObj.group()
10    print "matchObj.group(1) : ", matchObj.group(1)
11    print "matchObj.group(2) : ", matchObj.group(2)
12 else:
13    print "This is none!"
运行结果:

2、re.search()
re.search扫描整个字符串并返回第一个成功的匹配。
re.search(pattern, string, flags=0)

匹配成功re.match()方法返回一个匹配对象,否则返回none。
group()和groups()匹配对象函数来获取匹配表达式。

#实例:
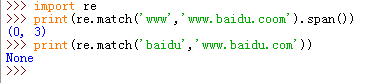
import re print(re.search('www','www.baidu.com').span()) print(re.search('baidu','www.baidu.com').span())
结果:
 1 #!/usr/bin/python
 2 import re
 3
 4 line = "Cats are smarter than dogs";
 5
 6 searchObj = re.search( r'(.*) are (.*?) .*', line, re.M|re.I)
 7
 8 if searchObj:
 9    print "searchObj.group() : ", searchObj.group()
10    print "searchObj.group(1) : ", searchObj.group(1)
11    print "searchObj.group(2) : ", searchObj.group(2)
12 else:
13    print "This is none!"
结果:

re.match与re.search的区别?
re.match只匹配字符串的开始,如果字符串的开始不符合正则,则匹配失败,返回none;而re.search匹配整个字符串,知道找到一个匹配。
相同点:只匹配一次,找到符合匹配的内容后就直接返回,不继续往后找,并且返回的是一个对象,.group()后得到这个对象的值。
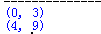
 1 #!/usr/bin/python
 2 import re
 3
 4 line = "Cats are smarter than dogs";
 5
 6 matchObj = re.match( r'dogs', line, re.M|re.I)
 7 if matchObj:
 8    print "match --> matchObj.group() : ", matchObj.group()
 9 else:
10    print "No match!!"
11
12 matchObj = re.search( r'dogs', line, re.M|re.I)
13 if matchObj:
14    print "search --> matchObj.group() : ", matchObj.group()
15 else:
16    print "No match!!"
结果:

3、re.sub()
re模块提供了re.sub用于替换字符串的匹配项。
re.sub(pattern, repl, string, count=0, flags=0)

4、re.split
#split,根据正则匹配分割字符串
split(pattern,string,maxsplit=0,flags=0)
#pattern:正则模型
#string要匹配的字符串
#maxsplit:指定分割数
#flags:匹配模式
有分组和不分组两种形式:

ret=re.split('[ab]','abcd')     #先按'a'分割得到''和'bcd',在对''和'bcd'分别按'b'分割
print(ret)#['', '', 'cd']
 re.split('a*', 'hello world')   # 对于一个找不到匹配的字符串而言,split 不会对其作出分割
#['hello world']
1 IP:
2 ^(25[0-5]|2[0-4]\d|[0-1]?\d?\d)(\.(25[0-5]|2[0-4]\d|[0-1]?\d?\d)){3}$
3 手机号:
4 ^1[3|4|5|8][0-9]\d{8}$
5 邮箱:
6 [a-zA-Z0-9_-]+@[a-zA-Z0-9_-]+(\.[a-zA-Z0-9_-]+)+
5、re.findall()(区别re.search和re.match它找出所有符合正则的内容返回时一个list)
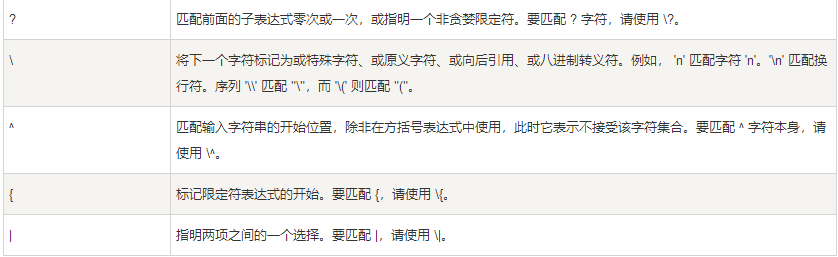
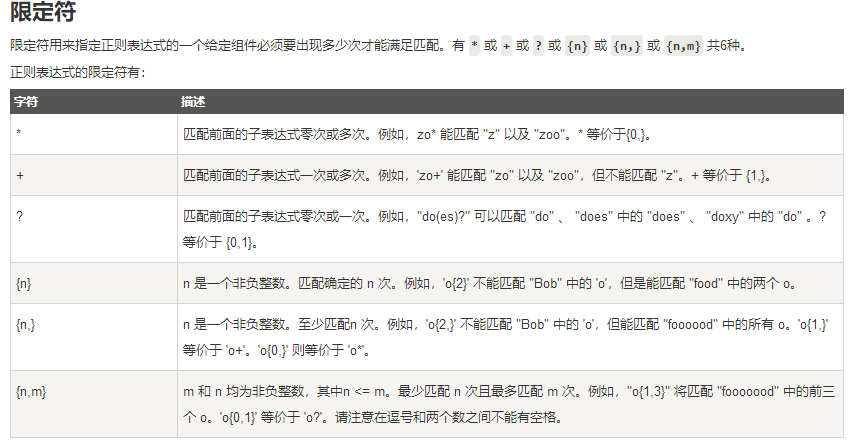
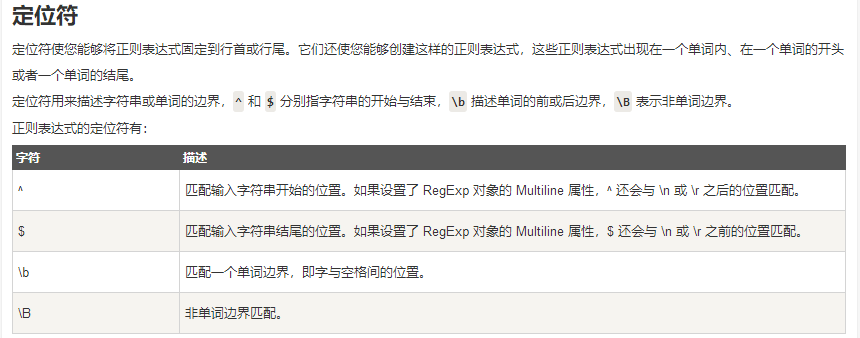
元字符之. ^ $ * + ? {}
.匹配任意一个字符(除换行)
^在字符串的开头匹配内容
$在字符串的结尾匹配上内容
*匹配前面的子表达式0次到无穷 +是匹配1到无穷次 -----重复(贪婪匹配,不是按1或者0来,按多来,有几个都显示出来)
? 0或1次 ---至多取1次
{} 万能的,可以自己填{0,}==* {1,}==+ {0,6}==0-6任意一个都可以 {6}重复6次
import re

ret=re.findall('a..in','helloalvin')#..代表两个字符
print(ret)#['alvin']


ret=re.findall('^a...n','alvinhelloawwwn')
print(ret)#['alvin']


ret=re.findall('a...n$','alvinhelloawwwn')
print(ret)#['awwwn']


ret=re.findall('a...n$','alvinhelloawwwn')
print(ret)#['awwwn']


ret=re.findall('abc*','abcccc')#贪婪匹配[0,+oo]
print(ret)#['abcccc']

ret=re.findall('abc+','abccc')#[1,+oo]
print(ret)#['abccc']

ret=re.findall('abc?','abccc')#[0,1]
print(ret)#['abc']


ret=re.findall('abc{1,4}','abccc')
print(ret)#['abccc'] 贪婪匹配
注意:前面的*,+,?等都是贪婪匹配,也就是说尽可能的去匹配,后面加?使其变成惰性匹配。
ret=re.findall('abc*?','abccccc')
print(ret)
#['ab']   惰性匹配0次
元字符之字符集[]:
在元字符[],里面没有特殊字符,*、+都没有特殊意义。
有特殊意义:- (范围)[a-z] ^ [^a-z]匹配非a-z \转义字符(能让普通字符变得有意义,把有意义的变为没有意义)
 1 #--------------------------------------------字符集[]
 2 ret=re.findall('a[bc]d','acd')
 3 print(ret)#['acd']  #起一个或的作用
 4
 5 ret=re.findall('[a-z]','acd')
 6 print(ret)#['a', 'c', 'd']
 7
 8 ret=re.findall('[.*+]','a.cd+')
 9 print(ret)#['.', '+']
10
11 #在字符集里有功能的符号: - ^ \
12
13 ret=re.findall('[1-9]','45dha3')
14 print(ret)#['4', '5', '3']
15
16 ret=re.findall('[^ab]','45bdha3')
17 print(ret)#['4', '5', 'd', 'h', '3']
18
19 ret=re.findall('[\d]','45bdha3')
20 print(ret)#['4', '5', '3']
元字符之转义字符\
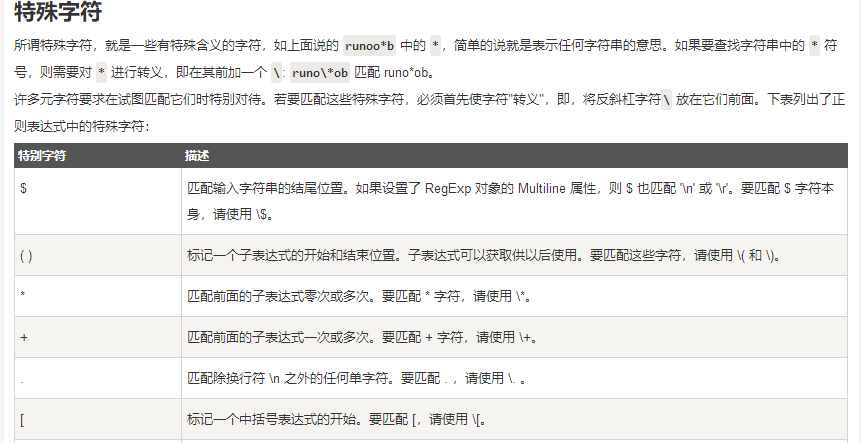
反斜杠后面跟元字符去除功能,比如\.(只是一个. www\.baidu.com 不能匹配到www_baidu.com)
反斜杠后面跟普通字符实现特殊功能,比如\d
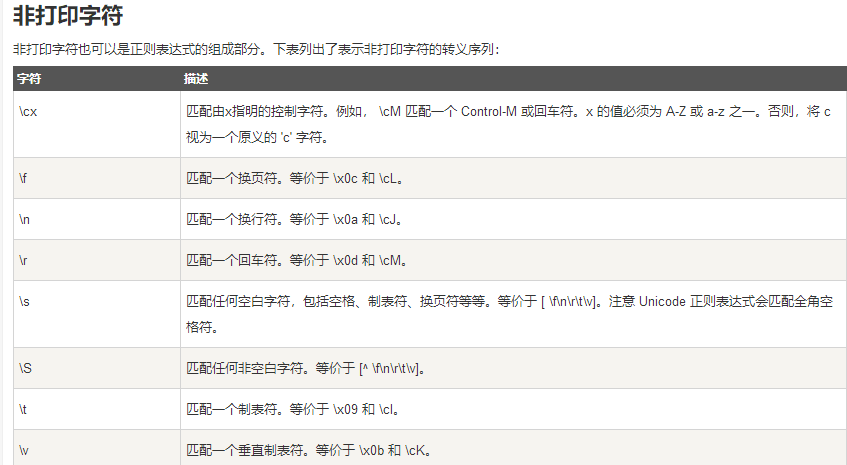
\d 匹配任何十进制数;它相当于类 [0-9]。
\D 匹配任何非数字字符;它相当于类 [^0-9]。
\s 匹配任何空白字符;它相当于类 [ \t\n\r\f\v]。
\S 匹配任何非空白字符;它相当于类 [^ \t\n\r\f\v]。
\w 匹配任何字母数字字符;它相当于类 [a-zA-Z0-9_]。
\W 匹配任何非字母数字字符;它相当于类 [^a-zA-Z0-9_]
\b 匹配一个特殊字符边界,比如空格 ,&,#等
ret=re.findall('I\b','I am LIST')
print(ret)#[]
ret=re.findall(r'I\b','I am LIST')
print(ret)#['I']
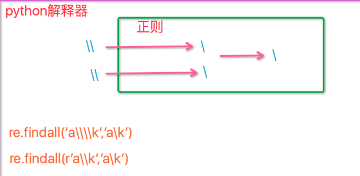
 1 #-----------------------------eg1:
 2 import re
 3 ret=re.findall('c\l','abc\le')
 4 print(ret)#[]
 5 ret=re.findall('c\\l','abc\le')
 6 print(ret)#[]
 7 ret=re.findall('c\\\\l','abc\le')#一个\是没有特殊意义的,两个\是代表转义字符,想要让编译器也识别,比须再加两个\
 8 print(ret)#['c\\l']
 9 ret=re.findall(r'c\\l','abc\le')#或者加上r编译器就认识了
10 print(ret)#['c\\l']
11
12 #-----------------------------eg2:
13 #之所以选择\b是因为\b在ASCII表中是有意义的
14 m = re.findall('\bblow', 'blow')
15 print(m) #[]
16 m = re.findall(r'\bblow', 'blow')
17 print(m)  #['blow']
元字符之分组()
findall()优先考虑组里面的内容
ep:re.findall('(abc)+','abcabcabc')---->['abc']并不是;['abcabcabc'] #(abc)作为整体只能匹配一个结果
为实现这一目的,re.findall('(?:abc)+','abcabcabc')---->['abcabcabc']
re.findall('abc+','abcabcabc')------->['abc','abc','abc']#a匹配a,b匹配b,c匹配c,然后到了+只得是多个c,没匹配上,所以返回列表中的一个字符串,第一个匹配结束,开始第二次匹配a又开始匹配,所有结果是三个‘abc’
m = re.findall(r'(ad)+', 'add')
print(m)  #['ad']

ret=re.search('(?P<id>\d{2})/(?P<name>\w{3})','23/com')
print(ret.group())#23/com
print(ret.group('id'))#23
元字符之|
ret=re.search('(ab)|\d','rabhdg8sd')
print(ret.group())#ab

ret=re.findall('(ab)|\d','rabhdg8sd')
print(ret))#['ab',' ']
6、re.compile()
import re
obj=re.compile('\d{4}') #{}里面表示的是取几个符合前面条件(
数字
) ret=obj.search('abc1234rrr') print(ret.group()) #1234
7、re.finditer()返回的是一个迭代器对象(存在迭代器)
import re
ret=re.finditer('\d','abc345ggt46q')
print(next(ret).group())  #3
print(next(ret).group())   #4
注意:
1 import re
2 ret=re.findall('www\.(baidu|sina)\.com','www.baidu.com')
3 print(ret) #['baidu']findall会优先把匹配结果组里的内容返回,如果想要匹配结果,取消权限即可。
4 ret=re.findall('www.(?:baidu|sina).com','www.baidu.com')
5 print(ret)['www.baidu.com']
补充:
疑难重点:
分组:
django的url用的到:
'(?P<name>[a-z]+)(?P<age>\d+)'


计算最里层的括号:
12+(2*3+2-6*(2-1))
计算(2-1):re.findall('\([^()]*\)','12+(2*3+2-6*(2-1))')
七、logging模块
简单应用:
import logging
logging.debug('debug message')
logging.info('info message')
logging.warning('warning message')
logging.error('error message')
logging.critical('critical message')
输出:
WARNING:root:warning message
ERROR:root:error message
CRITICAL:root:critical message
默认情况下,python的logging模块将日志打印到了标准输出屏幕中,只显示了大于或者等于WARNING级别的日志,说明默认日志级别为warning,日志级别等级(CRITICAL > ERROR > WARNING > INFO > DEBUG > NOTSET),默认的日志格式为日志级别:Logger名称:用户输出消息。
import logging
logging.basicConfig(leval=logging.DEBUG,
                                format='%(asctime)s %(filename)s [line:%
                                (lineno)d] %(lenvelname)s %(message)s',
                                 detefmt='%a,%d %b %Y %H:%M:%s',
                                 filename='test.log'
                                  filemode='w'

logging.debug('debug message')
logging.info('info message')
logging.warning('warning message')
logging.error('error message')
logging.critical('critical message')

)

#结果:
#test.log
#Mon, 05 May 2014 16:29:53 test_logging.py[line:9] DEBUG debug message
#Mon, 05 May 2014 16:29:53 test_logging.py[line:10] INFO info message
#Mon, 05 May 2014 16:29:53 test_logging.py[line:11] WARNING warning message
#Mon, 05 May 2014 16:29:53 test_logging.py[line:12] ERROR error message
#Mon, 05 May 2014 16:29:53 test_logging.py[line:13] CRITICAL critical message
可见在logging.basicConfig()函数中可通过具体参数来更改logging模块默认行为,可用参数有
filename:用指定的文件名创建FiledHandler(后边会具体讲解handler的概念),这样日志会被存储在指定的文件中。
filemode:文件打开方式,在指定了filename时使用这个参数,默认值为“a”还可指定为“w”。
format:指定handler使用的日志显示格式。
datefmt:指定日期时间格式。
level:设置rootlogger(后边会讲解具体概念)的日志级别
stream:用指定的stream创建StreamHandler。可以指定输出到sys.stderr,sys.stdout或者文件(f=open('test.log','w')),默认为sys.stderr。若同时列出了filename和stream两个参数,则stream参数会被忽略。
format参数中可能用到的格式化串:
%(name)s Logger的名字
%(levelno)s 数字形式的日志级别
%(levelname)s 文本形式的日志级别
%(pathname)s 调用日志输出函数的模块的完整路径名,可能没有
%(filename)s 调用日志输出函数的模块的文件名
%(module)s 调用日志输出函数的模块名
%(funcName)s 调用日志输出函数的函数名
%(lineno)d 调用日志输出函数的语句所在的代码行
%(created)f 当前时间,用UNIX标准的表示时间的浮 点数表示
%(relativeCreated)d 输出日志信息时的,自Logger创建以 来的毫秒数
%(asctime)s 字符串形式的当前时间。默认格式是 “2003-07-08 16:49:45,896”。逗号后面的是毫秒
%(thread)d 线程ID。可能没有
%(threadName)s 线程名。可能没有
%(process)d 进程ID。可能没有
%(message)s用户输出的消息
logger对象
上面几个例子中我们认识了logging.debug()、logging.info()、logging.warning()、logging.error()、logging.critical()(分别用于记录不同级别的日志信息),logging.basicConfig()(用默认日志格式(Formatter)为日志系统建立一个默认的流处理器(StreamHandler),设置基础配置(如日志级别等)并加入root loger)这几个logging模块级别的函数,另外还有一个模块级别的函数是logging.getLogger([name](返回一个logger
对象,如果没有指定的名字将返回root logger))
-----吸功大法
(1)
 1 import logging
 2
 3 logger = logging.getLogger()
 4 # 创建一个handler,用于写入日志文件
 5 fh = logging.FileHandler('test.log')
 6
 7 # 再创建一个handler,用于输出到控制台
 8 ch = logging.StreamHandler()
 9
10 formatter = logging.Formatter('%(asctime)s - %(name)s - %(levelname)s - %(message)s')
11
12 fh.setFormatter(formatter)
13 ch.setFormatter(formatter)
14
15 logger.addHandler(fh) #logger对象可以添加多个fh和ch对象
16 logger.addHandler(ch)
17
18 logger.debug('logger debug message')
19 logger.info('logger info message')
20 logger.warning('logger warning message')
21 logger.error('logger error message')
22 logger.critical('logger critical message')
结果:
2014-05-06 12:54:43,222 - root - WARNING - logger warning message
2014-05-06 12:54:43,223 - root - ERROR - logger error message
2014-05-06 12:54:43,224 - root - CRITICAL - logger critical message
先简单介绍一下,logging库提供了多个组件:Logger、Handler、Filter、Formatter。Logger对象提供应用程序可直接使用的接口,Handler发送日志到适当的目的地,Filter提供了过滤日志信息的方法,Formatter指定日志显示格式。
Logger是一个树形层级结构,输出信息之前都要获得一个Logger(如果没有显示的获取则自动创建并使用root Logger,如第一个例子所示)。
logger = logging.getLogger()返回一个默认的Logger也即root Logger,并应用默认的日志级别、Handler和Formatter设置。
当然也可以通过Logger.setLevel(lel)指定最低的日志级别,可用的日志级别有logging.DEBUG、logging.INFO、logging.WARNING、logging.ERROR、logging.CRITICAL。
Logger.debug()、Logger.info()、Logger.warning()、Logger.error()、Logger.critical()输出不同级别的日志,只有日志等级大于或等于设置的日志级别的日志才会被输出。
从这个输出可以看出logger = logging.getLogger()返回的Logger名为root。这里没有用logger.setLevel(logging.Debug)显示的为logger设置日志级别,所以使用默认的日志级别WARNIING,故结果只输出了大于等于WARNIING级别的信息。
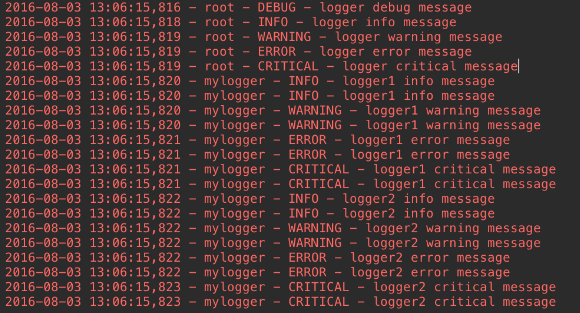
(2):
 1 ##################################################
 2 logger1 = logging.getLogger('mylogger')
 3 logger1.setLevel(logging.DEBUG)
 4
 5 logger2 = logging.getLogger('mylogger')
 6 logger2.setLevel(logging.INFO)
 7
 8 logger1.addHandler(fh)
 9 logger1.addHandler(ch)
10
11 logger2.addHandler(fh)
12 logger2.addHandler(ch)
13
14 logger1.debug('logger1 debug message')
15 logger1.info('logger1 info message')
16 logger1.warning('logger1 warning message')
17 logger1.error('logger1 error message')
18 logger1.critical('logger1 critical message')
19
20 logger2.debug('logger2 debug message')
21 logger2.info('logger2 info message')
22 logger2.warning('logger2 warning message')
23 logger2.error('logger2 error message')
24 logger2.critical('logger2 critical message')
25 复制代码
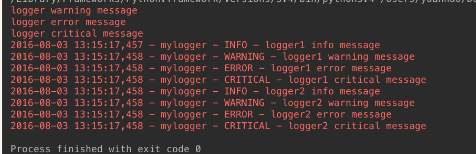
这里有两个个问题:
<1>我们明明通过logger1.setLevel(logging.DEBUG)将logger1的日志级别设置为了DEBUG,为何显示的时候没有显示出DEBUG级别的日志信息,而是从INFO级别的日志开始显示呢?
原来logger1和logger2对应的是同一个Logger实例,只要logging.getLogger(name)中名称参数name相同则返回的Logger实例就是同一个,且仅有一个,也即name与Logger实例一一对应。在logger2实例中通过logger2.setLevel(logging.INFO)设置mylogger的日志级别为logging.INFO,所以最后logger1的输出遵从了后来设置的日志级别。
<2>为什么logger1、logger2对应的每个输出分别显示两次?
这是因为我们通过logger = logging.getLogger()显示的创建了root Logger,而logger1 = logging.getLogger('mylogger')创建了root Logger的孩子(root.)mylogger,logger2同样。而孩子,孙子,重孙……既会将消息分发给他的handler进行处理也会传递给所有的祖先Logger处理。
ok,那么现在我们把
# logger.addHandler(fh)
# logger.addHandler(ch) 注释掉,我们再来看效果:
因为我们注释了logger对象显示的位置,所以才用了默认方式,即标准输出方式。因为它的父级没有设置文件显示方式,所以在这里只打印了一次。
孩子,孙子,重孙……可逐层继承来自祖先的日志级别、Handler、Filter设置,也可以通过Logger.setLevel(lel)、Logger.addHandler(hdlr)、Logger.removeHandler(hdlr)、Logger.addFilter(filt)、Logger.removeFilter(filt)。设置自己特别的日志级别、Handler、Filter。若不设置则使用继承来的值。
(3):
限制只有满足过滤规则的日志才会输出。
比如我们定义了filter = logging.Filter('a.b.c'),并将这个Filter添加到了一个Handler上,则使用该Handler的Logger中只有名字带 a.b.c前缀的Logger才能输出其日志。
filter = logging.Filter('mylogger')
logger.addFilter(filter)
这是只对logger这个对象进行筛选
如果想对所有的对象进行筛选,则:
filter = logging.Filter('mylogger')
fh.addFilter(filter)0
ch.addFilter(filter)
这样,所有添加fh或者ch的logger对象都会进行筛选。
 1 import logging
 2
 3 logger = logging.getLogger()
 4 # 创建一个handler,用于写入日志文件
 5 fh = logging.FileHandler('test.log')
 6
 7 # 再创建一个handler,用于输出到控制台
 8 ch = logging.StreamHandler()
 9
10 formatter = logging.Formatter('%(asctime)s - %(name)s - %(levelname)s - %(message)s')
11
12 fh.setFormatter(formatter)
13 ch.setFormatter(formatter)
14
15 # 定义一个filter
16 filter = logging.Filter('mylogger')
17 fh.addFilter(filter)
18 ch.addFilter(filter)
19
20 # logger.addFilter(filter)
21 logger.addHandler(fh)
22 logger.addHandler(ch)
23
24
25
26
27 logger.setLevel(logging.DEBUG)
28
29 logger.debug('logger debug message')
30 logger.info('logger info message')
31 logger.warning('logger warning message')
32 logger.error('logger error message')
33 logger.critical('logger critical message')
34
35 ##################################################
36 logger1 = logging.getLogger('mylogger')
37 logger1.setLevel(logging.DEBUG)
38
39 logger2 = logging.getLogger('mylogger')
40 logger2.setLevel(logging.INFO)
41
42 logger1.addHandler(fh)
43 logger1.addHandler(ch)
44
45 logger2.addHandler(fh)
46 logger2.addHandler(ch)
47
48 logger1.debug('logger1 debug message')
49 logger1.info('logger1 info message')
50 logger1.warning('logger1 warning message')
51 logger1.error('logger1 error message')
52 logger1.critical('logger1 critical message')
53
54 logger2.debug('logger2 debug message')
55 logger2.info('logger2 info message')
56 logger2.warning('logger2 warning message')
57 logger2.error('logger2 error message')
58 logger2.critical('logger2 critical message')
 1 #coding:utf-8
 2 import logging
 3
 4 # 创建一个logger
 5 logger = logging.getLogger()
 6
 7 logger1 = logging.getLogger('mylogger')
 8 logger1.setLevel(logging.DEBUG)
 9
10 logger2 = logging.getLogger('mylogger')
11 logger2.setLevel(logging.INFO)
12
13 logger3 = logging.getLogger('mylogger.child1')
14 logger3.setLevel(logging.WARNING)
15
16 logger4 = logging.getLogger('mylogger.child1.child2')
17 logger4.setLevel(logging.DEBUG)
18
19 logger5 = logging.getLogger('mylogger.child1.child2.child3')
20 logger5.setLevel(logging.DEBUG)
21
22 # 创建一个handler,用于写入日志文件
23 fh = logging.FileHandler('/tmp/test.log')
24
25 # 再创建一个handler,用于输出到控制台
26 ch = logging.StreamHandler()
27
28 # 定义handler的输出格式formatter
29 formatter = logging.Formatter('%(asctime)s - %(name)s - %(levelname)s - %(message)s')
30 fh.setFormatter(formatter)
31 ch.setFormatter(formatter)
32
33 #定义一个filter
34 #filter = logging.Filter('mylogger.child1.child2')
35 #fh.addFilter(filter)
36
37 # 给logger添加handler
38 #logger.addFilter(filter)
39 logger.addHandler(fh)
40 logger.addHandler(ch)
41
42 #logger1.addFilter(filter)
43 logger1.addHandler(fh)
44 logger1.addHandler(ch)
45
46 logger2.addHandler(fh)
47 logger2.addHandler(ch)
48
49 #logger3.addFilter(filter)
50 logger3.addHandler(fh)
51 logger3.addHandler(ch)
52
53 #logger4.addFilter(filter)
54 logger4.addHandler(fh)
55 logger4.addHandler(ch)
56
57 logger5.addHandler(fh)
58 logger5.addHandler(ch)
59
60 # 记录一条日志
61 logger.debug('logger debug message')
62 logger.info('logger info message')
63 logger.warning('logger warning message')
64 logger.error('logger error message')
65 logger.critical('logger critical message')
66
67 logger1.debug('logger1 debug message')
68 logger1.info('logger1 info message')
69 logger1.warning('logger1 warning message')
70 logger1.error('logger1 error message')
71 logger1.critical('logger1 critical message')
72
73 logger2.debug('logger2 debug message')
74 logger2.info('logger2 info message')
75 logger2.warning('logger2 warning message')
76 logger2.error('logger2 error message')
77 logger2.critical('logger2 critical message')
78
79 logger3.debug('logger3 debug message')
80 logger3.info('logger3 info message')
81 logger3.warning('logger3 warning message')
82 logger3.error('logger3 error message')
83 logger3.critical('logger3 critical message')
84
85 logger4.debug('logger4 debug message')
86 logger4.info('logger4 info message')
87 logger4.warning('logger4 warning message')
88 logger4.error('logger4 error message')
89 logger4.critical('logger4 critical message')
90
91 logger5.debug('logger5 debug message')
92 logger5.info('logger5 info message')
93 logger5.warning('logger5 warning message')
94 logger5.error('logger5 error message')
95 logger5.critical('logger5 critical message')
 1 import os
 2 import time
 3 import logging
 4 from config import settings
 5
 6
 7 def get_logger(card_num, struct_time):
 8
 9     if struct_time.tm_mday < 23:
10         file_name = "%s_%s_%d" %(struct_time.tm_year, struct_time.tm_mon, 22)
11     else:
12         file_name = "%s_%s_%d" %(struct_time.tm_year, struct_time.tm_mon+1, 22)
13
14     file_handler = logging.FileHandler(
15         os.path.join(settings.USER_DIR_FOLDER, card_num, 'record', file_name),
16         encoding='utf-8'
17     )
18     fmt = logging.Formatter(fmt="%(asctime)s :  %(message)s")
19     file_handler.setFormatter(fmt)
20
21     logger1 = logging.Logger('user_logger', level=logging.INFO)
22     logger1.addHandler(file_handler)
23     return logger1
八、sys(临时改变环境变量的模块,要想长久的改变,还得手动的在计算机里面改变一下环境变量)
用于提供对python解释器的相关操作:
sys.path 显示执行文件所在的路径
sys.argv 命令行参数list,第一个元素是程序本身路径
sys.exit() 退出程序,正常退出时exit(0)
sys.version 获取python解释器程序的版本信息
sys.maxint 最大Int值
sys.platform 返回操作系统平台名称
 1 #!/usr/bin/python
 2 import sys
 3 import time
 4
 5
 6 def view_bar(num, total):
 7     rate = float(num) / float(total)
 8     rate_num = int(rate * 100)
 9     r = '%d%%' % (rate_num, )  #指(rate_num)%
10     sys.stdout.write(r)
11     sys.stdout.flush()
12
13
14 if __name__ == '__main__':
15     for i in range(0, 100):
16         time.sleep(0.1)
17         view_bar(i, 100)

sys.stdout.flush()刷新 打印一个放到缓存区刷flush放到屏幕上
九、os
用于提供系统级别的操作(os是与操作系统交互的一个接口):
BASE_DIR路径用法:
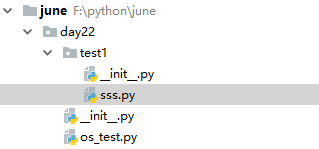
__file__:当前文件的文件名,但是在python解释器中会自动添加绝对路径,但是在终端运行的时候不会添加,要想得到文件的绝对路径(os.path.abspath(__file__),要想得到文件所在目录:os.path.dirname(os.path.abspath(__file__)),上一级目录:os.path.dirname(os.path.dirname(os.path.abspath(__file__))),这样可以在引入自定义模块的时候可以直接把路径添加进来,保持和运行文件在同一个目录下即可。
 1 import os
 2 print(os.getcwd())
 3 os.chdir('test1')
 4 print(os.getcwd())
 5 #os.makedirs('name1/name2')
 6 #os.removedirs('name1/name2')
 7 #os.mkdir('sss.py')建单级目录
 8 #os.rmdir('sss.py')删单级目录
 9 #os.remove('sss.py') 删除一个文件
10 #print(os.stat('sss.py'))获取文件/目录信息
11 #os.sep  输出操作系统特殊的分隔符(windows和linux)
12 #os.linesep 输出当前平台的终止符  \n  \r\n
13 #os.pathsep 输出用于分割文件路径的字符串;  :
14 #os.system('bash commend')运行shell命令直接显示
15 #os.environ获取系统的环境变量
16 #print(os.path.abspath('sss.py')) 绝对路径
17 #a=print(os.path.dirname('sss.py'))绝对路径的除文件名以外的路径
18 #b=print(os.path.basename('sss.py'))绝对路径的文件名
19 #os.path.exists(path)  如果path存在,返回True;如果path不存在,返回False
20 #os.path.isabs(path)  如果path是绝对路径,返回True
21 #os.path.isfile(path)  如果path是一个存在的文件,返回True。否则返回False
22 #os.path.isdir(path)  如果path是一个存在的目录,则返回True。否则返回False
23 #os.path.join(a,b)把a和b的路径拼接起来  用的很多
24 #print(os.path.getatime('sss.py'))返回path所指向的文件或者目录的最后存取时间
25 #print(os.path.getmtime('sss.py'))返回path所指向的文件或者目录的最后修改时间很常用
十、time
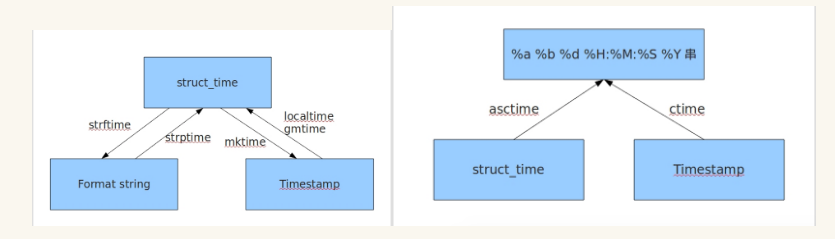
 1 #!/usr/bin/python
 2 #_*_ encoding:utf-8 _*_
 3 import time
 4 print(time.time())  #返回当前时间的时间戳
 5
 6 print(time.localtime())#将一个时间戳转换为当前时区的struct_time
 7
 8 print(time.gmtime()) #和time.localtime作用一样都是转换为当前时区的struct_time
 9
10 print(time.mktime(time.localtime()))#将一个struct_time转换为时间戳
11
12 print(time.asctime())#把一个表示时间的元组或者struct_time表示成这种形式:Wed Oct 31 15:41:49 2018
13 #如果没有参数,将会time.localtime()作为参数传入
14
15 print(time.ctime())#把一个时间戳转换为time.asctime()的形式,如果没有参数,默认参数是time.time()
16 #作用相当于time.asctime(time.localtime(secs))
17
18 print(time.strftime('%Y-%m-%d  %X',)) # strftime(format[, t]) 把一个时间的元组或者struct_time(time.localtime())转化为格式化的字符串,若没有参数将默认time.localtime()
19
20 print(time.strptime('2018-10-31 16:02:16','%Y-%m-%d %X'))#time.strptime(string[, format]) 是strftime的逆操作 将格式化的时间变为时间的元组或者struct_time
21 #format默认为:"%a %b %d %H:%M:%S %Y"
22
23 print(time.sleep(3)) #线程推迟的时间运行,单位为秒
24
25 print(time.clock())# 而在WINDOWS中,第一次调用,返回的是进程运行的实际时间。而第二次之后的调用是自第一次调用以后到现在的运行
26 # 时间,即两次时间差。
运行结果:

十、hashlib(加密的相关操作)
用于加密相关的操作,3.x里代替了md5模块和sha模块,主要提供 SHA1, SHA224, SHA256, SHA384, SHA512 ,MD5 算法
 1 import hashlib
 2
 3 m=hashlib.md5('asdj'.encode('utf8'))# m=hashlib.sha256()加盐目的是为了不会被解码,或者什么都不写md5()
 4
 5 m.update('hello'.encode('utf8'))#变为密文
 6 print(m.hexdigest())  #5d41402abc4b2a76b9719d911017c592
 7
 8 m.update('alvin'.encode('utf8'))
 9
10 print(m.hexdigest())  #92a7e713c30abbb0319fa07da2a5c4af
11
12 m2=hashlib.md5()
13 m2.update('helloalvin'.encode('utf8'))
14 print(m2.hexdigest()) #92a7e713c30abbb0319fa07da2a5c4af把上面两个组合在一块的输出
以上加密算法虽然依然非常厉害,但时候存在缺陷,即:通过撞库可以反解。所以,有必要对加密算法中添加自定义key再来做加密。
1 import hashlib
2
3 # ######## 256 ########
4
5 hash = hashlib.sha256('898oaFs09f'.encode('utf8'))
6 hash.update('alvin'.encode('utf8'))
7 print (hash.hexdigest())#e79e68f070cdedcfe63eaf1a2e92c83b4cfb1b5c6bc452d214c1b7e77cdfd1c7
python 还有一个 hmac 模块,它内部对我们创建 key 和 内容 再进行处理然后再加密,用法和256和md5类似hmac.new('asd'.encode('utf8'))。
十一、configparser(配置文件)
其实就是dict里面套dict
先在pycharm中建立一个.txt文件
 1 [DEFAULT]
 2 ServerAliveInterval = 45
 3 Compression = yes
 4 CompressionLevel = 9
 5 ForwardX11 = yes
 6
 7 [bitbucket.org]
 8 User = hg
 9
10 [topsecret.server.com]
11 Port = 50022
12 ForwardX11 = no
建一个.py文件
 1 import configparser
 2
 3 config = configparser.ConfigParser()
 4 config["DEFAULT"] = {'ServerAliveInterval': '45',
 5                       'Compression': 'yes',
 6                      'CompressionLevel': '9'}
 7
 8 config['bitbucket.org'] = {}
 9 config['bitbucket.org']['User'] = 'hg'
10 config['topsecret.server.com'] = {}
11 topsecret = config['topsecret.server.com']
12 topsecret['Host Port'] = '50022'     # mutates the parser
13 topsecret['ForwardX11'] = 'no'  # same here
14 config['DEFAULT']['ForwardX11'] = 'yes'
15 with open('example.ini', 'w') as configfile:
16    config.write(configfile)
实现配置文件的增、删、改、查
 1 import configparser
 2
 3 config = configparser.ConfigParser()
 4
 5 #---------------------------------------------查
 6 print(config.sections())   #[]
 7
 8 config.read('example.ini')
 9
10 # print(config.sections())   #list['bitbucket.org', 'topsecret.server.com']
11 #
12 # print('bytebong.com' in config)# False
13 #
14 #print(config['bitbucket.org']['User']) # hg
15 #
16 #print(config['DEFAULT']['Compression']) #yes
17 #
18 # print(config['topsecret.server.com']['ForwardX11'])  #no
19 #
20 #
21 # for key in config['bitbucket.org']:
22 #     print(key) #user  compressionlevel serveraliveinterval  compression  forwardx11 把自身和默认的都取出来
23
24
25
26
27 #
28 #
29 # print(config.options('bitbucket.org'))#['user', 'serveraliveinterval', 'compression', 'compressionlevel', 'forwardx11']
30 # print(config.items('bitbucket.org'))  #[('serveraliveinterval', '45'), ('compression', 'yes'), ('compressionlevel', '9'), ('forwardx11', 'yes'), ('user', 'hg')]
31 # #
32 # print(config.get('bitbucket.org','compression'))#yes
33 #
34 #
35 # #---------------------------------------------删,改,增(config.write(open('i.cfg', "w")))
36 #
37 #
38 # config.add_section('yuan')
39 # #
40 # config.remove_section('topsecret.server.com') #删除整个块
41 # config.remove_option('bitbucket.org','user') #删除字典某个键值
42 #
43 config.set('bitbucket.org','k1','11111')
44
45 config.write(open('i.cfg', "w"))