最近研究android控件开发,学习无捷径,逛github,看到一个LabelView的demo,感觉还是挺不错,也比较实用,所以拿来学习了一下。
附上源项目的地址:https://github.com/linger1216/labelview
效果图:

再开始学习源码之前我们可以先分析build的过程:
label是放到原始标签之上的,所以label可能是一个单独的控件叠加到view之上。可惜像Button这样的控件 是不支持含有子View的,所以排除了这种可能;那么另一种可能就是在控件的指定位置绘制一个label了。
下面进入源码:
我们直接进入builder,
在这之前我们还需要明确 onDraw onMeasure onLayout 三个函数
onDraw:所有绘制view 的动作在这里
onMeasure:决定了view的大小
onLayout:决定了view 的位置
首先先分析下对与label这个view需要设定什么样的属性:
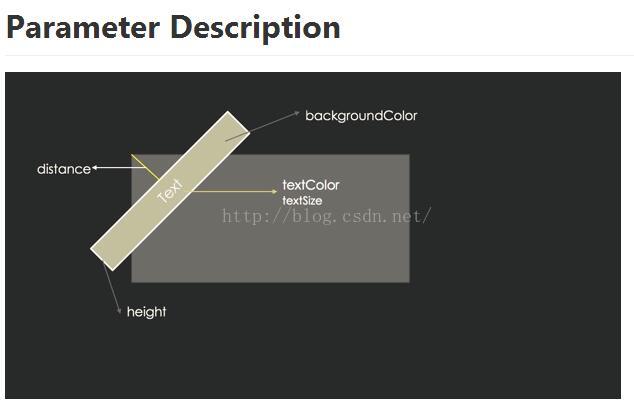
position:位置(Left_top,Right_top,Left_bottom,Right_bottom)
visible:可见(true,false)
height:label宽度(个人喜好,)
distance:label距角的距离
textSize:字体大小
textColor:字体颜色
background:背景色
以上这些属性我们需要先设定好默认值,以便于我们通过TypedArray获取设定的参数。
public static final int RIGHT_TOP = 1;
    public static final int LEFT_TOP = 2;
    public static final int RIGHT_BOTTOM = 3;
    public static final int LEFT_BOTTOM = 4;
    public static final boolean DEAFULT_VISIABLE = true;
    public static final int DEFAULT_RECT_HEIGHT = 10;
    public static final int DEFAULT_RECT_DISTANCE = 20;
    public static final int DEFAULT_TEXT_SIZE = 10;
    public static final int DEFAULT_TEXT_COLOR = 0xffffffff;
    public static final int DEFAULT_BACKGROUND_COLOR = 0x9f27CDC0;
    public static final int DEFAULT_GRAVITY = LEFT_TOP;
从xml中的 属性获取值
 TypedArray ta = context.obtainStyledAttributes(attrs, R.styleable.labelbuilder,defStyleAttr,0);
        builder.setLabelHeight(view,ta.getDimensionPixelSize(R.styleable.labelbuilder_labelHeight, builder.dip2Px(DEFAULT_RECT_HEIGHT)));
        builder.setLabelDistance(view,ta.getDimensionPixelSize(R.styleable.labelbuilder_labelDistance, builder.dip2Px(DEFAULT_RECT_DISTANCE)));
        builder.setTextSize(view,ta.getDimensionPixelSize(R.styleable.labelbuilder_labelTextSize, builder.dip2Px(DEFAULT_TEXT_SIZE)));
        builder.setText(view, ta.getString(R.styleable.labelbuilder_labelText));
        builder.setTextColor(view, ta.getColor(R.styleable.labelbuilder_labelTextColor, DEFAULT_TEXT_COLOR));
        builder.setBackgoundColor(view, ta.getColor(R.styleable.labelbuilder_labelBackground, DEFAULT_BACKGROUND_COLOR));
        builder.setOrientation(view, ta.getInt(R.styleable.labelbuilder_labelGravity, DEFAULT_GRAVITY));
        builder.setLabelVisiable(view, ta.getBoolean(R.styleable.labelbuilder_labelVisibility, DEAFULT_VISIABLE));
        builder.setAlpha(view, ta.getInteger(R.styleable.labelbuilder_labelAlpha,0));
ta.recycle();为什么要调用recycle()方法呢,大概的解释是TypeArray 采用的是 池-单例模式,如果不回收,每次View 的 create都要new 一个对象,然后等个GC(Gabage Collection),对内存是不小的开销,具体可以参考这里。
http://blog.csdn.net/Monicabg/article/details/45014327
到这里,我们相关的属性就设置好了,
接下来就是绘制我们的View 了。
由于我们这个只是一个Label的builder,我们要想让View 应用我们的Builder,就需要提供我们必要的参数。
Canvas:View的画布,我们View 的绘制都是在View的这个Canvas上制作的。
MeasuredHeight:
MeasuredWidth:这两个是控件的宽度和高度。我们需要这两个参数来确定我们要画的位置。
参数传进来后我们来确定下画label的方案(以绘制右上角的Label为例):
绘制的位置受到distance(上边有提到,是角顶点距label的距离),和height(label宽度影响。
绘制的过程就是绘制一个height宽度的Line,并延该方向绘制Label上的文字。
在绘制前还要做的事就是提前初始化好Pain、Path
rectPaint = new Paint();
        rectPaint.setAntiAlias(true);
        rectPaint.setDither(true);
        rectPaint.setStyle(Paint.Style.STROKE);
        rectPaint.setStrokeJoin(Paint.Join.ROUND); //set the type one line join another one
        rectPaint.setStrokeCap(Paint.Cap.SQUARE);  //set the type of line's begin and end
        rectPath = new Path();
textPaint = new Paint();
textPaint.setAntiAlias(true);
textPaint.setDither(true);
textPaint.setStrokeCap(Paint.Cap.SQUARE);
textPaint.setStrokeJoin(Paint.Join.ROUND);
textBound = new Rect();
①、确定Line的起始坐标和终止坐标。
startX = measuredWidth - 1.4142f*(height/2+distance);
                startY = 0;
                endX = measuredWidth;
                endY = 1.4142*(height/2+distance);
②、绘制路径
rectPaint.setStrokeWidth(height);//in onDraw()
        rectPath.reset();//remember to reset path
        rectPath.moveTo(startX, startY);
        rectPath.lineTo(endX, endY);
        canvas.drawPath(rectPath, rectPaint);
③、如果有文字,我们还要在上面绘制文字
</pre><pre name="code" class="java">if(text!=null&&!text.equals("")) {//in onDraw()
            textPaint.setTextSize(textSize);
            textPaint.setColor(textColor);
            textPaint.getTextBounds(text, 0, text.length(), textBound); //get TextBound

            float begin_h_offset = (distance+height/2) - textBound.width() / 2;
            if (begin_h_offset < 0) {  //如果text宽度大于label的长度 容纳不下
                begin_h_offset = 0;
            }
            //在路径上绘制文字
            canvas.drawTextOnPath(text, rectPath, begin_h_offset, textBound.height() / 2, textPaint);
}但为了起到Builder的作用,使用于所有的View,我们可以在构造函数中这样写
public LabelBuilder(Context context,AttributeSet attrs,int defStyleAttr){//get attrs in builder
...
}
public void onDraw(Canvas canvas,int measuredWidth,int measuredHeight){
...
} https://github.com/linger1216/labelview
ps: 博主认为根据github中p出的distance的介绍,label的绘制坐标计算感觉在原文中有错误,所以本文中的坐标计算并非原文的坐标计算,如果博主的错误,欢迎大家指正。