本节来介绍angular中的操作以及TypeScript语法的简单介绍。关于TypeScript语法的更为详细的内容,打算在整个angular教程结束后再单独介绍。
0. 安装所需要的插件及配置插件
安装bootstrap
进入项目目录,使用以下命令安装:
cd media
npm install bootstrap --save
然后在angular.json配置文件中添加样式的引用。
"styles": [
           "src/styles.css",
           "./node_modules/bootstrap/dist/css/bootstrap.min.css"
            ]
安装jquery
cd media
npm install jquery --save
在angular.json中引入jquery:
"scripts": ["./node_modules/jquery/dist/jquery.min.js"]
1. angular中新建一个组件
现在我们在项目中新建一个名称为article的组件,由于手动创建组件比较麻烦,所以我们使用angular提供的angular cli工具来创建(手动创建的方法附在文末,不感兴趣的童鞋不用看),命令如下:
ng generate component article也可使用命令的简写方式:
ng g c articlesrc/app目录下会多出一个article文件夹,里面angular cli工具帮我们创建的4个文件,article.component.css, article.component.html,article.component.spec.ts, article.component.ts。同时,还会更新ng.modules.ts这个文件。
2. 引用组件
在根组件的模板文件app.component.html中加入<app-article></app-article>即可引用我们刚刚新建的article组件,app.component.html代码:
<div style="text-align:center">
    <h1>
        Welcome to {{ title }}!
    </h1>
</div>
<!-- 下面是对article组件的引用 -->
<app-article></app-article>
显示效果如下:
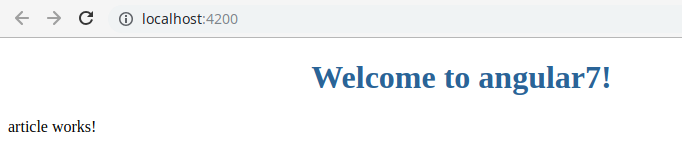
表明我们的article组件引用成功。
3. 组件的嵌套引用
新建一个operator组件,然后在article组件中引入operator。article.component.html模板文件内容:
<p>
  article works!
</p>
<!--  引用operator组件 -->
<app-operator></app-operator>
页面刷新后显示如下:

引用关系如下: 根组件(app)引用了article,article又引用了operator.
4.组件选择器的其它定义方式
组件选择器的定义还可以通过属性和类的方法来定义,如下所示:
@Component({
  //selector: 'app-article',
  //selector: '[app-article]', //属性方式
    selector: '.app-article',//类方式
  templateUrl: './article.component.html',
  styleUrls: ['./article.component.css']
})
则引用组件的方式也需要发生改变:
<!--属性方式来引用-->
<div app-article></div>

<!--类方式引用-->
<div class="app-article"></div>
5. 数据模型定义以及数据绑定
将业务逻辑中的数据通过插值表达式显示在模板文件,即html页面上,或者将html页面上的事件传输到业务逻辑。
插值表达式
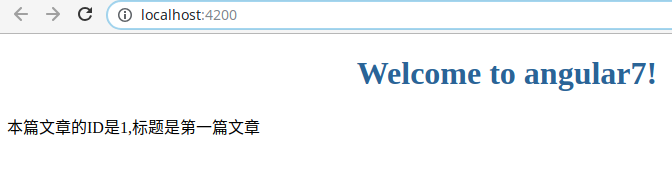
首先我们在article页面上添加需要显示的内容:
<p>
  本篇文章的ID是{{id}},标题是{{title}}
</p>
同时我们在article.component.ts中定义id和title。
export class ArticleComponent implements OnInit {
 id:number = 1;
 title:string = "第一篇文章";
}
页面显示效果如下:
属性绑定
在article.component.html中定义如下内容:
文章ID:<input type="text" [value]="id" >
文章标题:<input type="text" [value]="title">
页面显示效果如下:

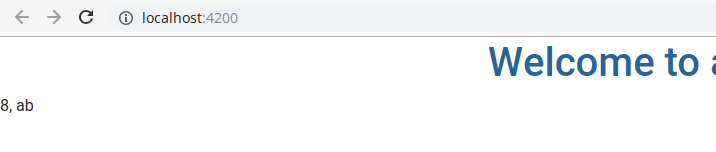
插值运算
article.component.html代码:
{{ 5 + 3}}, {{ "a" + "b"}}页面显示效果:
事件绑定
article.component.ts中设置一个状态,然后新建一个函数供页面调用,在函数中改变这个状态。
export class ArticleComponent implements OnInit {
 status = "隐藏状态";
 changeStatus(){
     this.status = "显示状态";
 }
}
article.component.html中定义一个按钮并绑定changeStatus()这个函数。
{{status}}
<button class="btn btn-info btn-sm" (click)="changeStatus()">改变状态</button>
按钮单击前和单击后页面显示效果分别如下:


事件绑定传递数据
现在我们实现当我们在input框中输入内容的时候,内容同时显示在输入框的下面,article.component.html文件内容:
<input type="text" (keyup) = "updateContent($event)"><br>
{{content}}
article.component.ts中共定义变量以及函数:
content = "";
updateContent(event:any){
    this.content = event.target.value;
}
页面显示效果:

延伸阅读: 手动创建组件
- 组件创建
在app目录下新建一个文件夹,名字叫article.在article目录下新建article.componnent.ts的空白文件,注意文件名字的命名,article是组件名称,component表示类型,即组件,.ts则是文件的后缀名,文件内容如下所示:
import {Component} from '@angular/core';

@Component({
    selector: 'app-article',
    templateUrl:'./article.component.html'
})

export class ArticleComponent{

}
文件内容说明:
第一行从@angular/core中引入Component装饰器,然后建立一个普通的类ArticleComponent,并用@Component装饰它,在@Component中,分别定义组件的选择器名称和模板文件。
然后在article中新建模板文件article.component.html文件内容与普通html文件无异。
- 组件的注册
打开app目录下的app.modules.ts文件,文件内容如下:
import { BrowserModule } from '@angular/platform-browser';
import { NgModule } from '@angular/core';

import { AppRoutingModule } from './app-routing.module';
import { AppComponent } from './app.component';

@NgModule({
  declarations: [
    AppComponent
  ],
  imports: [
    BrowserModule,
    AppRoutingModule
  ],
  providers: [],
  bootstrap: [AppComponent]
})
export class AppModule { }
文件内容的说明:
- 上面import部分是模块以及装饰器的引入。
- declarations部分是声明模块的内部成员。
- imports部分是导入其它模块。
- providers指定应用程序根级别需要使用的service。
- bootstrap是app启动的根组件。
- export控制将那些内部成员暴露给外部使用。
修改文件内容,添加import {ArticleComponent} from './article/article.component';将模块引入,然后在declarations中添加ArticleComponent. 修改后的内容如下所示:
//...省略部分代码...
import { AppComponent } from './app.component';
import {ArticleComponent} from './article/article.component';  //step1 引入

@NgModule({
  declarations: [
    AppComponent,
    ArticleComponent      //step2 声明
  ]
})
//...省略部分代码...