android下数据库的创建(重点)
在Android平台上,集成了一个轻量级嵌入式关系型数据库—SQLite,SQLite3支持 NULL、INTEGER、REAL(浮点数字)、TEXT(字符串文本)和BLOB(二进制对象)数据类型,也接受varchar(n)、char(n)、decimal(p,s) 等数据类型, SQLite最大的特点是你可以把各种类型的数据保存到任何字段中,而不用关心字段声明的数据类型是什么。例如:可以在Integer类型的字段中存放字符串,或者在布尔型字段中存放浮点数,或者在字符型字段中存放日期型值。 但有一种情况例外:定义为INTEGER PRIMARY KEY的字段只能存储64位整数, 当向这种字段保存除整数以外的数据时,将会产生错误。 另外,在编写CREATE TABLE 语句时,你可以省略跟在字段名称后面的数据类型信息,如下面语句你可以省略name字段的类型信息:
CREATE TABLE person (personid integer primary key autoincrement, name varchar(20))
SQLite可以解析大部分标准SQL语句,如:
查询语句:select * from 表名 where 条件子句 group by 分组字句 having … order by 排序子句
select * from person
select * from person order by id desc
select name from person group by name having count(*)>1
分页SQL与mysql类似,下面SQL语句获取5条记录,跳过前面3条记录
select * from Account limit 5 offset 3 或者 select * from Account limit 3,5
插入语句:insert into 表名(字段列表) values(值列表)。如: insert into person(name, age) values(‘lc’,3)
更新语句:update 表名 set 字段名=值 where 条件子句。如:update person set name=‘lc‘ where id=10
删除语句:delete from 表名 where 条件子句。如:delete from person where id=10
获取添加记录后自增长的ID值:SELECT last_insert_rowid()
SQLiteOpenHelper:管理数据库的版本
在android应用程序中创建按数据库的步骤:
1、写一个DBHelper,继承了SQLiteOpenHelper,重新写了父类的构造方法、onCreate、onUpGrade
View Code
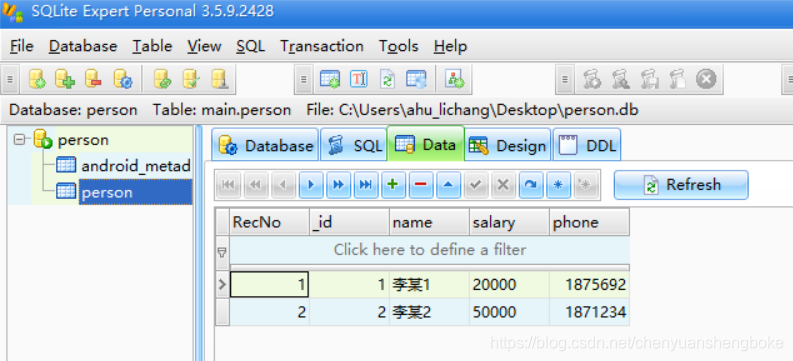
2、调用db = helper.getWritableDatabase(),得到数据库对象(data/data/包名/databases/person.db,将生成的数据库文件pull出来,然后拖入sqliteexpertpersonal软件中,就可以查看数据库表中的数据)
View Code
•数据库sql语句的增删改查
创建表结构:create table person (id integer primary key autoincrement,name varchar(20));
插入:insert into person (name)values(“lisi”);
查询:select * from person;
更新:update person set name=‘wangwu’ where id=1
删除:delete from person where id=1
•android下数据库的增删改查(重点)
在android应用程序中使用db.execSQL(“sql”,bindArgs)操作增删改查语句;
1、创建表结构
public void create(View v){
db.execSQL(“create table person (id integer primary key autoincrement,name varchar(20))”, new Object[]{});
Toast.makeText(this, “创建表结构成功”, 0).show();
}
2、插入
public void insert(View v){
db.execSQL(“insert into person(name) values(?)”, new String[]{“lisi”});
Toast.makeText(this, “插入数据成功”, 0).show();
}
3、查询:db.rawQuery,cursor类似于一个指针,当cursor指向一条记录时,就把当前记录的数据封装到cursor中,直接从cursor取数据
public void query(View v){
Cursor cursor = db.rawQuery(“select * from person”,null);
//移动游标,返回值为true表示没有移动到数据集的最后(空),如果为false已经数据集的最后(没有数据了)
while(cursor.moveToNext()){
int id = cursor.getInt(0);
String name = cursor.getString(1);
System.out.println(“id=”+id+"; name="+name);
}
Toast.makeText(this, “查询数据成功”, 0).show();
}
4、更新
public void update(View v){
db.execSQL(“update person set name=‘wangwu’ where id=?”, new Object[]{1});
Toast.makeText(this, “更新数据成功”, 0).show();
}
5、删除
public void delete(View v){
db.execSQL(“delete from person where id=?”, new Object[]{1});
Toast.makeText(this, “删除数据成功”, 0).show();
}
•数据库的另外一种增删改查方法(重点)
使用google提供的另外一种方式操作数据库表:
1、插入数据
public void insert(View v){
//db.execSQL(“insert into person (name)values(?)”, new String[]{“lisi”});
ContentValues values = new ContentValues();
Random r = new Random();
values.put(“name”, “zhangsan”+r.nextInt(100));
long rowId = db.insert(“person”, null, values);
System.out.println(“rowId=”+rowId);
Toast.makeText(this, “插入数据成功”, 0).show();
}
2、查询数据
public void query(View v){
/**
* table 表名
* columns 查询的列
* selection 查询条件"id=1"
* selectionArgs 查询条件的值
* String groupBy
* String having
* String orderBy
*
*/
Cursor cursor = db.query(“person”, new String[]{“id”,“name” }, null, null, null, null, null);
while(cursor.moveToNext()){
int id = cursor.getInt(0);
String name = cursor.getString(1);
System.out.println(“id=”+id+"; name="+name);
}
Toast.makeText(this, “查询数据成功”, 0).show();
}
public void update(View v){
// db.execSQL(“update person set name=‘wangwu’ where id=?”, new Object[]{1});
//用来封装要修改的列名和值
ContentValues values = new ContentValues();
values.put(“name”, “wangwu”);
db.update(“person”, values, “id=?”, new String[]{“1”});
Toast.makeText(this, “更新数据成功”, 0).show();
}
public void delete(View v){
// db.execSQL(“delete from person where id=?”, new Object[]{1});
db.delete(“person”, “id=?”, new String[]{“2”});
Toast.makeText(this, “删除数据成功”, 0).show();
}
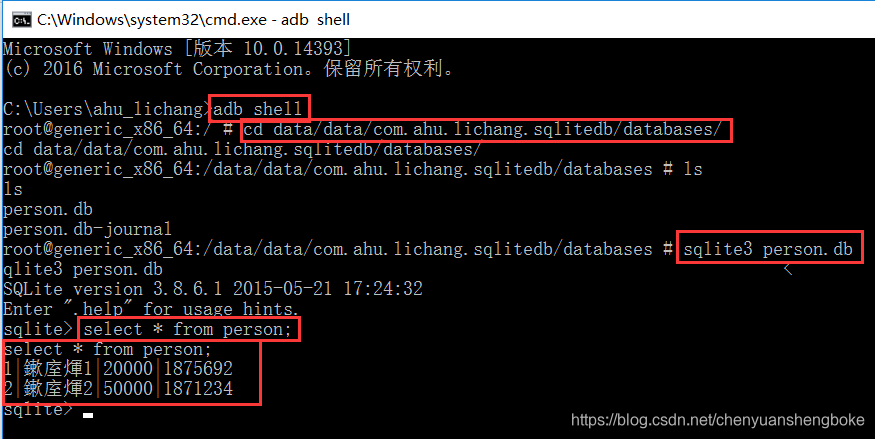
•命令行查看数据库
使用adb shell进入模拟器或者手机的控制台;
使用cd切换到数据库文件所在的目录;
使用sqlite3 数据库文件的名称打开数据;
使用增删改查语句操作数据库。
•数据库的事务(重点)
什么是事务:同一组操作要么同时成功,要么同时失败。 事务有四大特性:原子性、一致性、隔离性、持久性
zhangsan -> lisi 100yuan
1、zhangsan - 100
2、lisi + 100
- 在android应用程序中使用SQLite数据库事务的步骤:
try{
//1、在业务逻辑开始的时候开启事务:
db.beginTransaction();
//张三转出100
ContentValues values = new ContentValues();
values.put(“money”, “1900”);
db.update(“account”, values, “id=?”, new String[]{“1”});
//李四收到100
ContentValues values02 = new ContentValues();
values02.put(“money”, “102”);
db.update(“account”, values02, “id=?”, new String[]{“2”});
//2、 在业务逻辑结束的时候告诉系统数据库提交成功
db.setTransactionSuccessful();
} finally{
//3、告诉系统数据库结束
db.endTransaction();
}
•listview的使用(重点)
ListView :用来在界面上显示数据列表。一行一个条目,每一个条目都是一个View对象。
getCount
getView()
listview显示数据的原理:
MVC :
javaweb
mode: javabean
view: jsp
controller:servlet
对listview的优化
convertview:
MVC:
Model Person 数据
View ListView
Controle: Adapter 数据适配器
使用listview显示数据列表的步骤:(整个界面有个大的布局,然后每个item又要一个布局文件)
1、在布局文件中添加一个listview控件:lv
2、在代码中找到这个listview控件:findViewById(R.id.lv)
3、创建一个数据适配器为listview填充数据:lv.setAdapter(new MyAdapter())—ArrayAdapter、SimpleAdapter、BaseAdapter
•ArrayAdapter
使用ArrayAdapter为listview填充数据的步骤:
1、在布局文件中添加ListView
2、在代码中初始化这个listview控件
3、调用listview.setAdapter()填充数据
//使用适配器为listview填充数据
//new ArrayAdapter:context 上下文,resourceId 条目布局文件的资源ID,object[] 要显示的数据
lv.setAdapter(new ArrayAdapter(this, R.layout.item, new String[]{“王菲”,“谢霆锋”,“张柏芝”,“李亚鹏”}));
•SimpleAdapter
使用ArrayAdapter为listview填充数据的步骤:
1、在布局文件中添加ListView
2、在代码中初始化这个listview控件
3、调用listview.setAdapter()填充数据
//使用适配器为listview填充数据
//new SimpleAdapter:context 上下文,resourceId 条目布局文件的资源ID,String[] 要显示的列名,int[] 指定列显示在item布局文件的哪个控件上
lv.setAdapter(new SimpleAdapter(this, data, R.layout.item, new String[]{“id”,“name”}, new int[]{R.id.tv_id,R.id.tv_name}));
条目的布局文件:
<?xml version="1.0" encoding="utf-8"?><LinearLayout xmlns:android="http://schemas.android.com/apk/res/android"
android:layout_width=“match_parent”
android:layout_height=“match_parent”
android:orientation=“vertical” >
<TextView
android:layout_width=“match_parent”
android:layout_height=“wrap_content”
android:id="@+id/tv_name"
/>
</LinearLayout>
•复杂listview界面的显示BaseAdapter(重点)
步骤:
1、在布局文件中添加ListView
2、在代码中初始化这个listview控件
lv = (ListView) findViewById(R.id.lv);
3、自定义数据适配器,继承了BaseAdapter,重写4个方法,其中getCount、getView是我们关心的
private class MyAdapter extends BaseAdapter{
@Override
public int getCount() {
return 20;
}
@Override
public View getView(int position, View convertView, ViewGroup parent) {
View view = View.inflate(MainActivity.this, R.layout.item, null);
ImageView iv = (ImageView) view.findViewById(R.id.iv);
TextView tv_title = (TextView) view.findViewById(R.id.tv_title);
tv_title.setText(“111”);
TextView tv_desc = (TextView) view.findViewById(R.id.tv_desc);
tv_desc.setText(“2222”);
return view;
}
@Override
public Object getItem(int position) {
// TODO Auto-generated method stub
return null;
}
@Override
public long getItemId(int position) {
// TODO Auto-generated method stub
return 0;
}
}
4、调用lv.setAdapter(new MyAdapter())填充数据
•数据库listview界面的显示
public class MainActivity extends Activity {
private SQLiteDatabase db;
private ListView lv;
private List list;
@Override
protected void onCreate(Bundle savedInstanceState) {
super.onCreate(savedInstanceState);
setContentView(R.layout.activity_main);
//初始化listview控件
lv = (ListView) findViewById(R.id.lv);
DBHelper helper = new DBHelper(this, “persons.db”, null, 1);
db = helper.getWritableDatabase();
}
public void insert(View v){
//db.execSQL(“insert into person (name)values(?)”, new String[]{“lisi”});
ContentValues values = new ContentValues();
Random r = new Random();
values.put(“name”, “zhangsan”+r.nextInt(100));
long rowId = db.insert(“person”, null, values);
System.out.println(“rowId=”+rowId);
Toast.makeText(this, “插入数据成功”, 0).show();
}
public void query(View v){
list = new ArrayList();
/**
* table 表名
* columns 查询的列
* selection 查询条件"id=1"
* selectionArgs 查询条件的值
* String groupBy
* String having
* String orderBy)
*
*/
Cursor cursor = db.query(“person”, new String[]{“id”,“name” }, null, null, null, null, null);
while(cursor.moveToNext()){
Person p = new Person();
int id = cursor.getInt(0);
p.setId(id);
String name = cursor.getString(1);
p.setName(name);
list.add§;
System.out.println(“id=”+id+"; name="+name);
}
//把数据显示到列表
lv.setAdapter(new MyAdapter());
Toast.makeText(this, “查询数据成功”, 0).show();
}
/**
*创建一个数据适配器,为listview填充数据
*/
private class MyAdapter extends BaseAdapter{
@Override
public int getCount() {
return list.size();
}
@Override
public View getView(int position, View convertView, ViewGroup parent) {
View view = null;
if(convertView != null){
view = convertView;
}else{
view = View.inflate(MainActivity.this, R.layout.item, null);
}
TextView tv_id = (TextView) view.findViewById(R.id.tv_id);
TextView tv_name = (TextView) view.findViewById(R.id.tv_name);
Person p = list.get(position);

tv_id.setText(p.getId()+"");

tv_name.setText(p.getName());
return view;
}


@Override
public Object getItem(int position) {
// TODO Auto-generated method stub
return null;
}
@Override
public long getItemId(int position) {
// TODO Auto-generated method stub
return 0;
}
}
}