“少年易老学难成,一寸光阴不可轻”
Spring MVC中有几种转换和格式数据的类,它们分别是:
- ConversionService 这里需要实现Convert<S,T>接口;
- 使用@InitBinder注解转换数据;
- 使用@WebBindingInitializer注册全局自定义编辑器转换数据;
- 使用Formatter格式化数据
以上这几种都太过于复杂,要么就是要实现或者继承某类,要么就是要在Spring MVC的配置文件中配置……这里介绍一种最简单的使用注解的方法来转换和格式数据:使用AnnotationFormatterFactory< A extends Annotation>格式化数据。
在 org.springframework.format.annotation包下面定义了两个格式化的注解类型:
- Date Format
@DateTimeFormat注解可以对java.util.Date、java.util.Calendar等时间类型的属性进行标注。它支持以下几个互斥的属性。具体说明如下:
- iso。类型为 DateTimeformat.ISO。以下是几个常用的可选值:
- DateTimeFormat.ISO.DATE:格式为yyyy-MM-dd
- DateTimeFormat.ISO.DATE_TIME:格式为yyyy- MM-dd hh:mm:ss.SSSZ.
- DateTimeFormat. ISO.TIME:格式为hh:mm:ss.SSSZ
- DateTimeFormat. ISO.NONE:表示不适用ISO格式的时间
- pattern。类型为 String,使用自定义的时间格式化字符串,如“yyyy-MM-dd hh:mm:ss
- style。类型为String,通过样式指定日期时间的格式,由两位字符组成,第1位表示日期的样式,第2位表示时间的格式,以下是几个常用的可选值:
- S:短日期/时间的样式
- M:中日期时间的样式。
- L:长日期时间的样式。
- F:完整日期时间的样式。
- -:忽略日期/时间的样式。
- Numberformat
@Numberformat可对类似数字类型的属性进行标注,它拥有两个互斥的属性,具体说明如下:
- pattern。类型为 String,使用自定义的数字格式化串,如“##,###。##”。
- style。类型为 NumberFormat.Style,以下是几个常用的可选值:
- NumberFormat.CURRENCY:货币类型。
- NumberFormat.NUMBER:正常数字类型。
- NumberFormat.PERCENT:百分数类型。
介绍完之后,接下来用实例看结果:
- 定义页面用来输入数据和输出格式化后的数据:
输入页面
<form method="post" action="test">
    <table>
        <tr>
            <td><label>日期类型:</label></td>
            <td><input type="text" id="birthday" name="birthday"></td>
        </tr>
        <tr>
            <td><label>整数类型:</label></td>
            <td><input type="text" id="total" name="total"></td>
        </tr>
        <tr>
            <td><label>百分数类型:</label></td>
            <td><input type="text" id="discount" name="discount"></td>
        </tr>
        <tr>
            <td><label>货币类型:</label></td>
            <td><input type="text" id="money" name="money"></td>
        </tr>
        <tr>
            <td><input type="submit" id="submit" value="提交"/></td>
        </tr>
    </table>
</form>
输出页面:
//当然,你得先引入标签库:<%@taglib prefix="form" uri="http://www.springframework.org/tags/form" %>
<form:form modelAttribute="user" method="post" action="">
    <table>
        <tr>
            <td><label>日期类型:</label></td>
            <td><form:input path="birthday"/></td>
        </tr>
        <tr>
            <td><label>整数类型:</label></td>
            <td><form:input path="total"/></td>
        </tr>
        <tr>
            <td><label>百分数类型:</label></td>
            <td><form:input path="discount"/></td>
        </tr>
        <tr>
            <td><label>货币类型:</label></td>
            <td><form:input path="money"/></td>
        </tr>
    </table>
</form:form>
- 定义使用注解的实体类:
import org.springframework.format.annotation.DateTimeFormat;
import org.springframework.format.annotation.NumberFormat;
import java.io.Serializable;
import java.util.Date;

/**
 * @author aRunner
 * @date 2018/10/27
 */
public class User implements Serializable {
		//这里的注解,使用的就是上面介绍的那样
    //日期类型
    @DateTimeFormat(pattern = "yyyy-MM-dd")
    private Date birthday;
    //正常数字类型
    @NumberFormat(style = NumberFormat.Style.NUMBER,pattern = "#,###")
    private int total;
    //百分数类型
    @NumberFormat(style = NumberFormat.Style.PERCENT)
    private double discount;
    //货币类型
    @NumberFormat(style = NumberFormat.Style.CURRENCY)
    private double money;

    public Date getBirthday() {
        return birthday;
    }

    public void setBirthday(Date birthday) {
        this.birthday = birthday;
    }

    public int getTotal() {
        return total;
    }

    public void setTotal(int total) {
        this.total = total;
    }

    public double getDiscount() {
        return discount;
    }

    public void setDiscount(double discount) {
        this.discount = discount;
    }

    public double getMoney() {
        return money;
    }

    public void setMoney(double money) {
        this.money = money;
    }
}
- 定义页面跳转:
import org.apache.commons.logging.Log;
import org.apache.commons.logging.LogFactory;
import org.fkit.domain.User;
import org.springframework.stereotype.Controller;
import org.springframework.ui.Model;
import org.springframework.web.bind.annotation.*;

/**
 * @author aRunner
 * @date 2018/11/3
 */
@Controller
public class UserController {

    private static final Log logger = LogFactory.getLog(UserController.class);


    @RequestMapping(value = "/{formName}")
    public String loginForm(@PathVariable String formName) {
        //动态跳转页面
        return formName;
    }


    @RequestMapping(value = "/test",method = RequestMethod.POST)
    public String register(@ModelAttribute User user, Model model) {
        logger.info(user);
        model.addAttribute("user",user);
        return "success";
    }
}
- 附加一个springMVC的配置:
<?xml version="1.0" encoding="UTF-8"?>
<beans xmlns="http://www.springframework.org/schema/beans"
       xmlns:xsi="http://www.w3.org/2001/XMLSchema-instance"
       xmlns:context="http://www.springframework.org/schema/context"
       xmlns:mvc="http://www.springframework.org/schema/mvc" xmlns:p="http://www.springframework.org/schema/p"
       xmlns:c="http://www.springframework.org/schema/c"
       xsi:schemaLocation="http://www.springframework.org/schema/beans http://www.springframework.org/schema/beans/spring-beans.xsd http://www.springframework.org/schema/context http://www.springframework.org/schema/context/spring-context.xsd http://www.springframework.org/schema/mvc http://www.springframework.org/schema/mvc/spring-mvc.xsd">

    <!--spring可以自动去扫描base-pack 下面的包或者子包下面的java文件,如果扫描到有Spring的相关注解的类,则把这些类注册为Spring的bean-->
    <context:component-scan base-package="org.fkit.controller"/>
    <!--配置默认的servlet来相应静态文件-->
    <mvc:default-servlet-handler/>
    <!--默认装载-->
    <mvc:annotation-driven/>
    <!--配置annotation类型的处理映射器-->
    <bean class="org.springframework.web.servlet.mvc.method.annotation.RequestMappingHandlerMapping"/>
    <!--配置annotation类型的处理器适配器-->
    <bean class="org.springframework.web.servlet.mvc.method.annotation.RequestMappingHandlerAdapter"/>
    <!--视图解析器-->
    <bean id="viewResolver" class="org.springframework.web.servlet.view.InternalResourceViewResolver">
        <!--前缀-->
        <property name="prefix">
            <value>/WEB-INF/content/</value>
        </property>
        <!--后缀-->
        <property name="suffix">
            <value>.jsp</value>
        </property>
    </bean>

</beans>
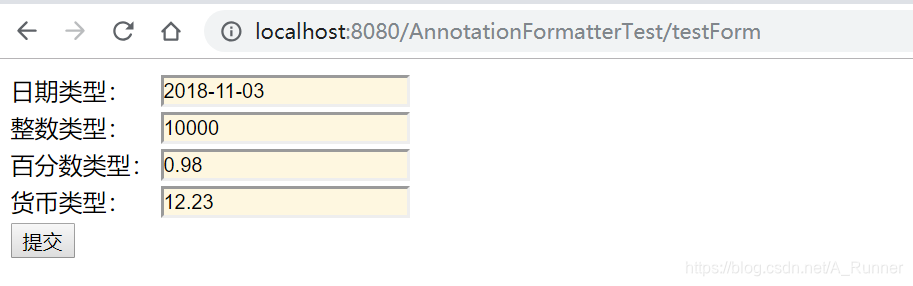
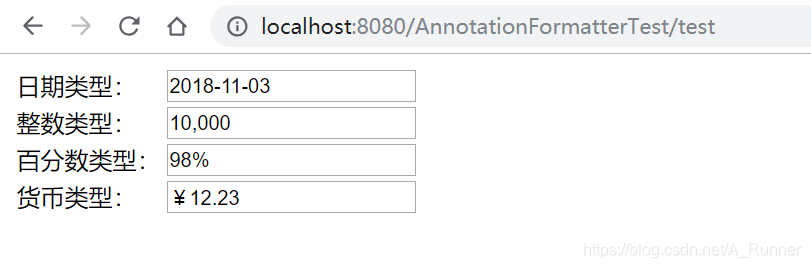
启动项目,看结果:
格式前页面:
格式后结果:
OK,这里介绍最简单的方法来格式参数到实体的bean。