这是本系列的第2部分。在这里我将讲解StackPanel和Grid元素。很多时候开发人员对于在何处放置包含StackPane或Grid元素的控制元件感到困惑。那么我们就来了解一些关于StackPane和Grid元素的东西。
StackPanel元素
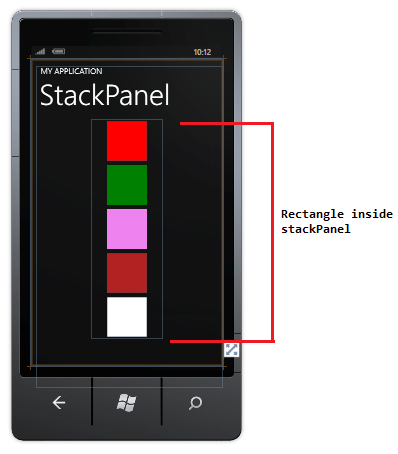
StackPanel元素主要用在网格的顶部或者底部。因此,当你打算设计一个简单的web应用程序时,你可以使用Windows Phone的StackPanel把页面名称放置在标题标签中。
在知晓页面名称和应用程序名称的情况下你可以就使用StackPanel了,简单地说就是使用StackPanel展示页面名称并对一个系列的子元素进行横向的或者纵向的排列。
|
1
2
3
4
5
6
7
8
9
10
11
12
13
14
15
16
17
18
19
20
|
<!--LayoutRoot
is
the root grid where all page content
is
placed-->
<grid x:name=
"LayoutRoot"
background=
"Transparent"
>
<grid.rowdefinitions>
<rowdefinition height=
"Auto"
>
<rowdefinition height=
"*"
>
</rowdefinition></rowdefinition></grid.rowdefinitions>
<!--TitlePanel contains the name of the application and page title-->
<stackpanel x:name=
"TitlePanel"
grid.row=
"0"
margin=
"12,17,0,28"
>
<textblock x:name=
"ApplicationTitle"
text=
"MY APPLICATION"
style=
"{StaticResource PhoneTextNormalStyle}"
>
<textblock x:name=
"PageTitle"
text=
"StackPanel"
margin=
"9,-7,0,0"
style=
"{StaticResource PhoneTextTitle1Style}"
>
</textblock></textblock></stackpanel>
<!--ContentPanel - place additional content here-->
<stackpanel margin=
"150"
>
<rectangle fill=
"Red"
width=
"100"
height=
"100"
margin=
"5"
>
<rectangle fill=
"Green"
width=
"100"
height=
"100"
margin=
"5"
>
<rectangle fill=
"Violet"
width=
"100"
height=
"100"
margin=
"5"
>
<rectangle fill=
"Firebrick"
width=
"100"
height=
"100"
margin=
"5"
>
<rectangle fill=
"White"
width=
"100"
height=
"100"
margin=
"5"
>
</rectangle></rectangle></rectangle></rectangle></rectangle></stackpanel>
</grid>
|
Grid元素
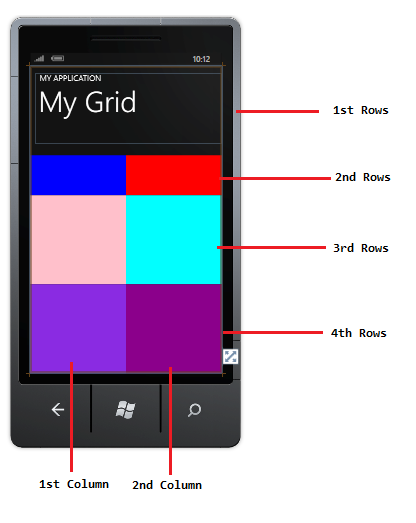
Grid元素提供了对于多个行列的排布的更加灵活的控制。对于Grid元素,你可以使用RowDefinition和ColumnDefinition这两个属性来对行和列设置;也可以在一个单元格中使用行和列的定义来设置如Textblock、TextBox、Hyperlinkbutton和Image这样的控制元件。
下面的XAML显示了如何创建一个有4行和2列的网格:
- 第一行包含文本的高度设置为自动。
- 第二行的高度设置为100px。
- 第三行和第四行设置为剩下的可用高度。
- 列的宽度使用“*”,设置为等于可用的容器宽度。
|
1
2
3
4
5
6
7
8
9
10
11
12
13
14
15
16
17
18
19
20
21
22
23
24
|
<grid x:name=
"LayoutRoot"
background=
"Transparent"
>
<grid.rowdefinitions>
<rowdefinition height=
"*"
>
<rowdefinition height=
"100"
>
<rowdefinition height=
"*"
>
<rowdefinition height=
"*"
></rowdefinition>
</rowdefinition></rowdefinition></rowdefinition></grid.rowdefinitions>
<grid.columndefinitions>
<columndefinition width=
"*"
></columndefinition>
<columndefinition width=
"*"
></columndefinition>
</grid.columndefinitions>
<!--TitlePanel contains the name of the application and page title-->
<stackpanel x:name=
"TitlePanel"
grid.columnspan=
"2"
grid.row=
"0"
margin=
"12,17,0,28"
>
<textblock x:name=
"ApplicationTitle"
text=
"MY APPLICATION"
style=
"{StaticResource PhoneTextNormalStyle}"
>
<textblock x:name=
"PageTitle"
text=
"page name"
margin=
"9,-7,0,0"
style=
"{StaticResource PhoneTextTitle1Style}"
>
</textblock></textblock></stackpanel>
<!--ContentPanel - place additional content here-->
<rectangle fill=
"BLUE"
grid.column=
"0"
grid.row=
"1"
></rectangle>
<rectangle fill=
"RED"
grid.column=
"1"
grid.row=
"1"
></rectangle>
<rectangle fill=
"pink"
grid.column=
"0"
grid.row=
"2"
></rectangle>
<rectangle fill=
"Aqua"
grid.column=
"1"
grid.row=
"2"
></rectangle>
<rectangle fill=
"BlueViolet"
grid.column=
"0"
grid.row=
"3"
></rectangle>
<rectangle fill=
"DarkMagenta"
grid.column=
"1"
grid.row=
"3"
></rectangle>
</grid>
|
本文翻译自c-sharpcorner.com,原文地址