项目地址:
Server端代码:Server端代码链接
Client端代码:Client端代码链接
1、IPC的基本要求
IPC(Inter-Process Communication)进程间通信是要在两个相互独立的进程之间进行信息的传递,在Android中每个进程都会被分配一个独立的虚拟机,以及内存空间,还会有自己的Application,所以进程间数据是不共享的,想要共享就只能通过一些方法来让这些数据在整两个进程间进行传递。关于如何传递就是要实现序列化(Parcelable、Serializable都可以)。
2、Android中IPC的几种方式
1)Bundle
也就是使用Intent携带Bundle信息在两个进程间进行传递,但是Intent一般只用来进行进程间的启动,如果要是用来进行两个进程间信息的传递的话就麻烦了,毕竟信息传递是双向的,Intent虽然也可以进行双向的信息传递,但过程繁琐,处理情况过多,很不方便。
2)文件共享
两个进程同时读/写同一个文件来实现数据的共享,但是文件共享这种方式有一个最大的问题就是并发读/写问题,当另一进程在读数据的同时另一个程序在写数据,这会让数据的同步出现问题。
3)Messenger信使
Messenger是Google提供的轻量级的IPC方案,底层实现也是AIDL,但是Messenger的最大问题是它以串行的方式来处理客户端发送来的消息,如果大量的消息同时发送到服务端,服务端应然只能一个个处理,如果有大量的并发请求,那么用Messenger就不合适了。
4)AIDL(Android interface definition language)
3、AIDL的使用
AIDL要求在使用的Client端与Server端有相同的AIDL文件,所以呢在工程中新建一个包,然后把所有的AIDL文件都放在这个包名下,然后再去进行拷贝,这样写会容易一些,但是还会有这样那样的问题,下面来看一下到底如何使用
1)Server端
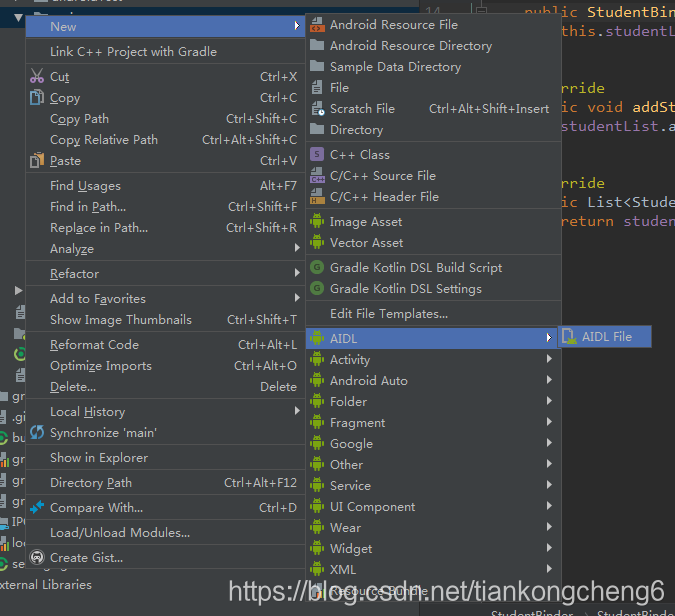
Android Studio会自动为AIDL文件创建新包,位置为app–>src–>main–>aidl
新建一个名为IStudentInterface的AIDL文件,并添加两个函数来进行示例操作
package com.example.administrator.ipc_server;
import com.example.administrator.ipc_server.aidl_entity.Student;

interface IStudentInterface {
    void addStudent(in Student s);
    List<Student> getAllStudent();
}
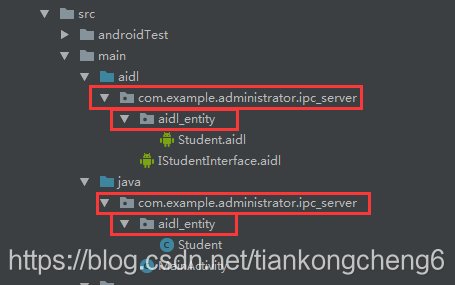
关于AIDL文件中实体类的使用,每一个在AIDL文件中使用的Bean类除了要实现Parcelable接口外都需要在AIDL包中创建相同包名相同文件名的AIDL文件,包名与文件名一定要相同,否则会包如下的错误
Process 'command 'D:\Android\androidstudio\3.0\SDK\build-tools\27.0.3\aidl.exe'' finished with non-zero exit value 1
上述代码中使用到的Bean类位置及代码
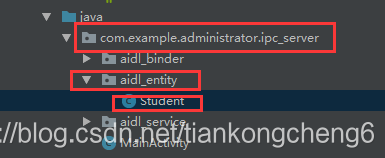
package com.example.administrator.ipc_server.aidl_entity;

import android.os.Parcel;
import android.os.Parcelable;

public class Student implements Parcelable{

    private String name;
    private int gender;
    private int age;

    public Student() {
    }

    public Student(String name, int gender, int age) {
        this.name = name;
        this.gender = gender;
        this.age = age;
    }

    public String getName() {
        return name;
    }

    public void setName(String name) {
        this.name = name;
    }

    public int getGender() {
        return gender;
    }

    public void setGender(int gender) {
        this.gender = gender;
    }

    public int getAge() {
        return age;
    }

    public void setAge(int age) {
        this.age = age;
    }

    @Override
    public int describeContents() {
        return 0;
    }

    @Override
    public void writeToParcel(Parcel parcel, int i) {
        parcel.writeString(name);
        parcel.writeInt(gender);
        parcel.writeInt(age);
    }

    protected Student(Parcel in) {
        name = in.readString();
        gender = in.readInt();
        age = in.readInt();
    }

    public static final Creator<Student> CREATOR = new Creator<Student>() {
        @Override
        public Student createFromParcel(Parcel in) {
            return new Student(in);
        }

        @Override
        public Student[] newArray(int size) {
            return new Student[size];
        }
    };
}
Bean类AIDL文件所处的位置及代码
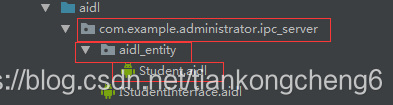
package com.example.administrator.ipc_server.aidl_entity;
parcelable Student;
该AIDL文件中只需要声明parcelable即可,但是注意Student.java与Student.aidl文件的位置要一模一样。
AIDL文件写好以后构建一下整个项目,系统会自动生成与AIDL文件相对应的java文件,位置在
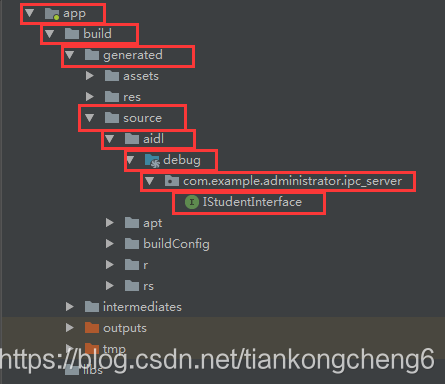
AIDL文件编写好以后就是具体业务逻辑的编写了
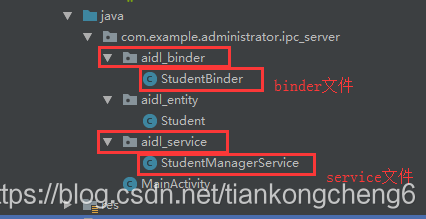
Binder代码
public class StudentBinder extends IStudentInterface.Stub {

    private List<Student> studentList;

    public StudentBinder(List<Student> studentList) {
        this.studentList = studentList;
    }

    @Override
    public void addStudent(Student s) throws RemoteException {
        studentList.add(s);
    }

    @Override
    public List<Student> getAllStudent() throws RemoteException {
        return studentList;
    }
}
具体的业务逻辑具体去写,这里写的简单只是为了测试
StudentManagerService代码
public class StudentManagerService extends Service {

    private static final String TAG = "StudentManagerService";
    private StudentBinder studentBinder;
    private List<Student> studentList = new ArrayList<>();

    @Override
    public void onCreate() {
        super.onCreate();
        Log.e(TAG, "onCreate: service start");
        initData();
        studentBinder = new StudentBinder(studentList);
    }

    private void initData() {
        for (int i = 0 ; i < 5 ; i ++){
            studentList.add(new Student("what-->"+i , 1 , 24+i));
        }
    }

    @Nullable
    @Override
    public IBinder onBind(Intent intent) {
        return studentBinder;
    }
2)Client端
注意:包名和文件名是完全一样的,一定要完全一样
如果是这样的包名
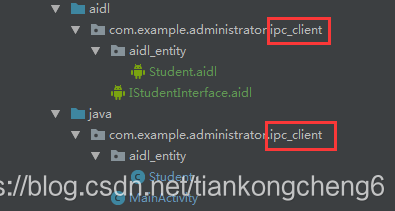
与服务端的包名不一致,在构建的时候不会报错,但是当进行数据共享的时候会报如下的错误
 java.lang.SecurityException: Binder invocation to an incorrect interface
        at android.os.Parcel.readException(Parcel.java:1693)
        at android.os.Parcel.readException(Parcel.java:1646)
        at com.example.administrator.ipc_client.IStudentInterface$Stub$Proxy.addStudent(IStudentInterface.java:99)
        at com.example.administrator.ipc_client.MainActivity.addStudentToServer(MainActivity.java:68)
        at com.example.administrator.ipc_client.MainActivity.onClick(MainActivity.java:49)
        at android.view.View.performClick(View.java:6205)
        at android.widget.TextView.performClick(TextView.java:11103)
        at android.view.View$PerformClick.run(View.java:23653)
        at android.os.Handler.handleCallback(Handler.java:751)
        at android.os.Handler.dispatchMessage(Handler.java:95)
        at android.os.Looper.loop(Looper.java:154)
        at android.app.ActivityThread.main(ActivityThread.java:6682)
        at java.lang.reflect.Method.invoke(Native Method)
        at com.android.internal.os.ZygoteInit$MethodAndArgsCaller.run(ZygoteInit.java:1520)
        at com.android.internal.os.ZygoteInit.main(ZygoteInit.java:1410)
AIDL文件写好以后现在要让Client端调起Server端的AIDL服务,因为是跨进程的调用所以要用Intent的隐式跳转
private void startAIDL() {
        Intent intent = new Intent();
        intent.setAction("tkc.connect.ipc.server");
        intent.setPackage("com.example.administrator.ipc_server");
        bindService(intent , serviceConnection , Context.BIND_AUTO_CREATE);
        Log.e(TAG, "startAIDL: 启动对应进程");
    }
客户端的ServiceConnection
private ServiceConnection serviceConnection = new ServiceConnection() {
        @Override
        public void onServiceConnected(ComponentName componentName, IBinder iBinder) {
            iStudentInterface = IStudentInterface.Stub.asInterface(iBinder);
        }

        @Override
        public void onServiceDisconnected(ComponentName componentName) {

        }
    };
通过ServiceConnection获取到binder后就可以调用AIDL中声明的函数了
private void addStudentToServer(){
        if (iStudentInterface == null)return;
        try {
            iStudentInterface.addStudent(new Student("what" , 1 , 24));
            Log.e(TAG, "添加学生");
        } catch (RemoteException e) {
            e.printStackTrace();
        }
    }

    private void getStudentFromServer(){
        if (iStudentInterface == null)return;
        try {
            List<Student> allStudent = iStudentInterface.getAllStudent();
            for (Student student : allStudent) {
                Log.e(TAG, "allStudent--->name:"+student.getName()+"...gender:"+student.getGender()+"...age:"+student.getAge());
            }
        } catch (RemoteException e) {
            e.printStackTrace();
        }
    }