分享一下我老师大神的人工智能教程!零基础,通俗易懂!http://blog.csdn.net/jiangjunshow
也欢迎大家转载本篇文章。分享知识,造福人民,实现我们中华民族伟大复兴!
Cocos2d-x 手游聊天系统Demo实现
转载请注明:IT_xiao小巫
本篇博客给大家分享的是一个手游聊天系统,笔者也是第一次使用Cocos2d-x来实现这样一个模块,其中有很多不清楚不明白的地方都是通过自己不断摸索实现的,前面笔者对聊天系统做的简单的需求分析,只是对聊天的一些元素进行的说明还不太够专业。本篇博客会给大家介绍如何实现一个手游聊天Demo,会从代码层面上给大家做相关的说明,如有不对或者错漏的地方请各位明确指出并纠正。
首先来给大家看一下动态效果图:
本篇博客内容大纲:
1. 加载Cocostudio制作的UI
2. Button的触摸事件监听
3. ListView添加列表项并设置列表点击事件
4. 富文本实现(可显示颜色文字和图片、动画)
5. 文本输入框实现(解决pc键盘无法删除字符的bug)
6. 动态往ListView添加列表项
一、加载Cocostudio制作的UI
笔者所分享的这个Demo是通过Cocostudio的UI编辑器制作的,童鞋们也可自己制作更加好看的UI,不过一般都会有美工帮我们做好让我使用的。如下图所示:
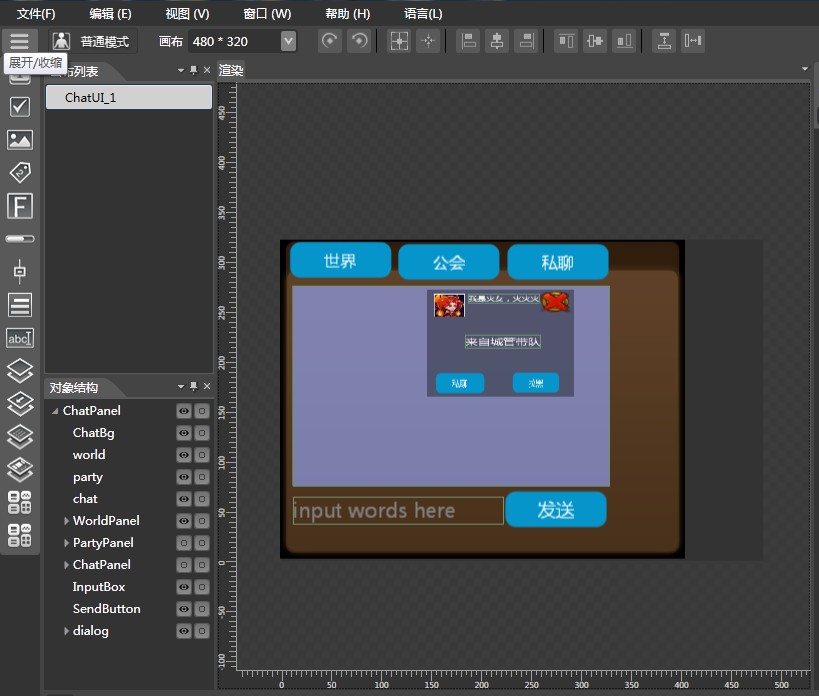
UI制作完之后,导出项目,然后把资源复制到我们项目的res目录下,笔者这里是把ChatUI_1复制到了res下,然后我们使用Lua代码实现加载json文件到我们的程序中去:
ChatScene.widget = ccs.GUIReader:getInstance():widgetFromJsonFile( "ChatUI_1/ChatUI_1.json" )我们在编辑器添加了多个对象:
WorldPanel、PartyPanel、ChatPanel分别对应世界、公会、私聊三个板块,板块下面对应其相应的子节点:WordList、PartyList、ChatList。
我们需要在程序中找到它们:
--[[============================findViews()找到UI控件============================]]--function ChatScene.findViews() ChatScene.widget = ccs.GUIReader:getInstance():widgetFromJsonFile( "ChatUI_1/ChatUI_1.json" ) ChatScene.widget:setPosition( cc.p( 40, 40 ) ) loadListViewItemFromJson() -- 获得UI界面上的3个按钮 worldButton = ChatScene.widget:getChildByTag(6) partyButton = ChatScene.widget:getChildByTag(7) chatButton = ChatScene.widget:getChildByTag(8) -- 获得三个每个按钮对应的三个面板 wordPanel = ChatScene.widget:getChildByTag(5) partyPanel = ChatScene.widget:getChildByTag(9) chatPanel = ChatScene.widget:getChildByTag(10) -- 获得每个面板的ListView worldList = wordPanel:getChildByTag(13) partyList = partyPanel:getChildByTag(14) chatList = chatPanel:getChildByTag(15) -- 获得输入框 inputBox = ChatScene.widget:getChildByTag(11) sendButton = ChatScene.widget:getChildByTag(12) dialog = ChatScene.widget:getChildByTag(20) chat = dialog:getChildByTag(21) lahei = dialog:getChildByTag(22) closeButton = dialog:getChildByTag(27)end每个UI对象有相应的Tag属性,我们可以通过找到其父节点,然后调用getChildByTag传进tag的值找到控件。只有找到这些控件,我们才能去使用它。
二、Button的触摸事件监听
笔者这个demo,通过监听“世界”、“公会”、“私聊”三个按钮来分别切换不同的板块,按钮的触摸监听事件很简单:
-- 设置按钮监听事件 worldButton:addTouchEventListener(touchEvent) partyButton:addTouchEventListener(touchEvent) chatButton:addTouchEventListener(touchEvent)--[[touchEvent触摸事件回调方法]]--local function touchEvent( sender, eventType ) if sender:getTag() == TAG_WORLD_BUTTON then wordPanel:setVisible(true) partyPanel:setVisible(false) chatPanel:setVisible(false) dialog:setVisible(false) ChatScene.setCurrentTag( TAG_WORLD ) elseif sender:getTag() == TAG_PARTY_BUTTON then partyPanel:setVisible(true) wordPanel:setVisible(false) chatPanel:setVisible(false) dialog:setVisible(false) ChatScene.setCurrentTag( TAG_PARTY ) elseif sender:getTag() == TAG_CHAT_BUTTON then partyPanel:setVisible(false) wordPanel:setVisible(false) chatPanel:setVisible(true) dialog:setVisible(false) ChatScene.setCurrentTag( TAG_CHAT )end以上面这种方式就可以实现切换三个板块了。
三、ListView添加列表项并设置列表点击事件
我们可以看到效果图里面每个板块下面有对应的列表,它是使用Cocos2d-x UI中的ListView所呈现的。
笔者感觉使用ListView比较麻烦,这里笔者给出相应的使用方法供大家参考:
--首先我们为ListView提供三组数据
-- 初始化三组数据 local array = {} for i = 1, 20 do array[i] = string.format("请叫我巫大大%d", i - 1) end local array1 = {} for i = 1, 20 do array1[i] = string.format("公会开放啦%d", i - 1 ) end local array2 = {} for i = 1, 20 do array2[i] = string.format("私聊列表项%d", i - 1 ) end--设置默认模型
-- 创建模型 local default_button = ccui.Button:create("cocosui/backtotoppressed.png", "cocosui/backtotopnormal.png") default_button:setName("Title Button") -- 创建默认item local default_itme = ccui.Layout:create() default_itme:setTouchEnabled(true) default_itme:setContentSize(default_button:getContentSize()) default_button:setPosition(cc.p( default_itme:getContentSize().width / 2.0, default_itme:getContentSize().height / 2.0 )) default_itme:addChild(default_button) -- 设置模型 worldList:setItemModel(default_itme)--添加自定义项
-- 获得数组的大小 local count = table.getn(array) print("count:"..count) -- 添加自定义item for i = 1, count do -- 创建一个Button local custom_button = ccui.Button:create("cocosui/button.png", "cocosui/buttonHighlighted.png") -- 设置Button名字 custom_button:setName("Title Button") -- 设置按钮使用九宫(scale9)渲染器进行渲染 custom_button:setScale9Enabled(true) -- 设置内容尺寸 custom_button:setContentSize(default_button:getContentSize()) -- 创建一个布局 local custom_item = ccui.Layout:create() -- 设置内容大小 custom_item:setContentSize(custom_button:getContentSize()) -- 设置位置 custom_button:setPosition(cc.p(custom_item:getContentSize().width / 2.0, custom_item:getContentSize().height / 2.0)) -- 往布局中添加一个按钮 custom_item:addChild(custom_button) -- 往ListView中添加一个布局 worldList:addChild(custom_item) end--每一项数据
-- 设置item data items_count = table.getn(worldList:getItems()) for i = 1, items_count do -- 返回一个索引和参数相同的项. local item = worldList:getItem( i - 1 ) local button = item:getChildByName("Title Button") local index = worldList:getIndex(item) button:setTitleText(array[index + 1]) end--设置ListView的点击事件和滚动事件
-- 设置ListView的监听事件 worldList:addScrollViewEventListener(scrollViewEvent) worldList:addEventListener(listViewEvent)
-- ListView点击事件回调local function listViewEvent(sender, eventType) -- 事件类型为点击结束 if eventType == ccui.ListViewEventType.ONSELECTEDITEM_END then print("select child index = ",sender:getCurSelectedIndex()) if dialog:isVisible() == true then dialog:setVisible(false) else ChatScene.showDialog() end endend-- 滚动事件方法回调local function scrollViewEvent(sender, eventType) -- 滚动到底部 if eventType == ccui.ScrollviewEventType.scrollToBottom then print("SCROLL_TO_BOTTOM") -- 滚动到顶部 elseif eventType == ccui.ScrollviewEventType.scrollToTop then print("SCROLL_TO_TOP") endend四、 富文本实现(可显示颜色文字和图片、动画)
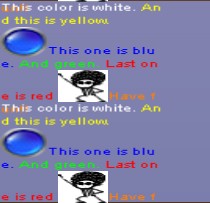
何为富文本?笔者的理解是有着丰富文本的展示方式,比如可以展示颜色文本、图片、动画、还有超链接的这种就叫富文本。以前旧的版本Cocos2d-x可能并未提供这方面的支持,至于是哪个版本支持的笔者也没有去深究,笔者这里使用版本是Cocos2d-x 3.2,它就提供了类似富文本的类,满足基本的需求。
代码实现:
--[[==================RichText富文本=================]]--function ChatScene.RichText() local richText = ccui.RichText:create() richText:ignoreContentAdaptWithSize(false) richText:setContentSize(cc.size(100, 100)) local re1 = ccui.RichElementText:create( 1, cc.c3b(255, 255, 255), 255, "This color is white. ", "Helvetica", 10 ) local re2 = ccui.RichElementText:create( 2, cc.c3b(255, 255, 0), 255, "And this is yellow. ", "Helvetica", 10 ) local re3 = ccui.RichElementText:create( 3, cc.c3b(0, 0, 255), 255, "This one is blue. ", "Helvetica", 10 ) local re4 = ccui.RichElementText:create( 4, cc.c3b(0, 255, 0), 255, "And green. ", "Helvetica", 10 ) local re5 = ccui.RichElementText:create( 5, cc.c3b(255, 0, 0), 255, "Last one is red ", "Helvetica", 10 ) local reimg = ccui.RichElementImage:create( 6, cc.c3b(255, 255, 255), 255, "cocosui/sliderballnormal.png" ) -- 添加ArmatureFileInfo, 由ArmatureDataManager管理 ccs.ArmatureDataManager:getInstance():addArmatureFileInfo( "cocosui/100/100.ExportJson" ) local arr = ccs.Armature:create( "100" ) arr:getAnimation():play( "Animation1" ) local recustom = ccui.RichElementCustomNode:create( 1, cc.c3b(255, 255, 255), 255, arr ) local re6 = ccui.RichElementText:create( 7, cc.c3b(255, 127, 0), 255, "Have fun!! ", "Helvetica", 10 ) richText:pushBackElement(re1) richText:insertElement(re2, 1) richText:pushBackElement(re3) richText:pushBackElement(re4) richText:pushBackElement(re5) richText:insertElement(reimg, 2) richText:pushBackElement(recustom) richText:pushBackElement(re6) richText:setLocalZOrder(10) return richTextend五、文本输入框实现(解决pc键盘无法删除字符的bug)
CocostudioUI编辑器提供TextField(输入框),笔者在这里也对它进行了实现,聊天系统一般需要玩家输入信息,所以这里提供了一个输入框。但笔者在使用这个UI的时候,发现在win32平台不能对输入的文本进行删除,但在移动设备可以使用输入法对它进行编辑,所以笔者在这里做了相关的处理把这个bug修正了。
--- 键盘事件监听回调方法 local function onkeyPressed(keycode, event) print("keypress") if keycode == cc.KeyCode.KEY_BACKSPACE then local str = inputBox:getStringValue() str = string.sub( str, 0, string.len( str ) - 1 ) inputBox:setText( str ) end end -- 键盘监听事件 local keyListener = cc.EventListenerKeyboard:create() keyListener:registerScriptHandler(onkeyPressed,cc.Handler.EVENT_KEYBOARD_PRESSED) local eventDispatcher = ChatScene.uiLayer:getEventDispatcher() eventDispatcher:addEventListenerWithSceneGraphPriority(keyListener, ChatScene.uiLayer)通过以上方式,我们就可以使用简拼的BackSpace对字符进行删除了。大家请叫我活雷锋。
六、动态往ListView添加列表项
笔者想到聊天系统的列表是不断刷新的,所以可能需要实现动态添加列表项,其实这个实现很简单的,只需要在代码中监听相应的事件,然后往ListView添加一项就可以了。
这里我监听了发送按钮的点击事件,然后获取到输入框的文本,在把文本添加到列表项中去。
if sender:getTag() == TAG_SEND_BUTTON then print("sendText...") -- 获得输入框的文本 local value = inputBox:getStringValue() local textView = ccui.Text:create(value,"Arial",20) print("value:"..value) if eventType == ccui.TouchEventType.began then-- local custom_text = ChatScene.RichText() local custom_item = ccui.Layout:create() custom_item:setContentSize( textView:getContentSize() ) textView:setPosition( cc.p( custom_item:getContentSize().width / 2.0, custom_item:getContentSize().height / 2.0 ) ) custom_item:addChild( textView ) -- 如果当前Tag为世界 if ChatScene.getCurrentTag() == TAG_WORLD then -- 插入自定义项 worldList:insertCustomItem( custom_item, 0 ) -- worldList:addChild(custom_item) elseif ChatScene.getCurrentTag() == TAG_PARTY then -- partyList:addChild(custom_item) partyList:insertCustomItem( custom_item, 0 ) elseif ChatScene.getCurrentTag() == TAG_CHAT then -- chatList:addChild(custom_item) chatList:insertCustomItem( custom_item, 0 ) end end以上基本是笔者这个聊天系统的重要内容,下面把完整的实现代码给大家:
--[[===============ChatSence聊天系统模块===============]]---- 类local ChatScene = {}ChatScene.uiLayer = nilChatScene.widget = nil-- 窗口大小local winSize = nil-- 获得UI界面上的3个按钮local worldButton = nillocal partyButton = nillocal chatButton = nil-- 获得三个每个按钮对应的三个面板local wordPanel = nillocal partyPanel = nillocal chatPanel = nil-- 获得每个面板的ListViewlocal worldList = nillocal partyList = nillocal chatList = nil-- 列表项local listview_item = nillocal head_icon = nillocal level = nillocal name = nillocal text = nil-- 列表项个数local items_count = nil-- 获得输入框local inputBox = nillocal sendButton = nil-- 弹出对话框local dialog = nillocal chat = nillocal lahei = nillocal closeButton = nil-- 三个标记local flag = nillocal TAG_WORLD = 1 -- 标识世界local TAG_PARTY = 2 -- 标识公会local TAG_CHAT = 3 -- 标识私聊-- 一些按钮的Taglocal TAG_WORLD_BUTTON = 1local TAG_PARTY_BUTTON = 2local TAG_CHAT_BUTTON = 3local TAG_SEND_BUTTON = 4local TAG_CHAT_BUTTON2 = 5local TAG_LAHEI_BUTTON = 6local TAG_CLOSE_BUTTON = 7-- 场景创建ChatScene.create = function() local scene = cc.Scene:create() scene:addChild( ChatScene.createChatLayer() ) return sceneend--[[touchEvent触摸事件回调方法]]--local function touchEvent( sender, eventType ) if sender:getTag() == TAG_WORLD_BUTTON then wordPanel:setVisible(true) partyPanel:setVisible(false) chatPanel:setVisible(false) dialog:setVisible(false) ChatScene.setCurrentTag( TAG_WORLD ) elseif sender:getTag() == TAG_PARTY_BUTTON then partyPanel:setVisible(true) wordPanel:setVisible(false) chatPanel:setVisible(false) dialog:setVisible(false) ChatScene.setCurrentTag( TAG_PARTY ) elseif sender:getTag() == TAG_CHAT_BUTTON then partyPanel:setVisible(false) wordPanel:setVisible(false) chatPanel:setVisible(true) dialog:setVisible(false) ChatScene.setCurrentTag( TAG_CHAT ) elseif sender:getTag() == TAG_SEND_BUTTON then print("sendText...") -- 获得输入框的文本 local value = inputBox:getStringValue() local textView = ccui.Text:create(value,"Arial",20) print("value:"..value) if eventType == ccui.TouchEventType.began then-- local custom_text = ChatScene.RichText() local custom_item = ccui.Layout:create() custom_item:setContentSize( textView:getContentSize() ) textView:setPosition( cc.p( custom_item:getContentSize().width / 2.0, custom_item:getContentSize().height / 2.0 ) ) custom_item:addChild( textView ) -- 如果当前Tag为世界 if ChatScene.getCurrentTag() == TAG_WORLD then -- 插入自定义项 worldList:insertCustomItem( custom_item, 0 ) -- worldList:addChild(custom_item) elseif ChatScene.getCurrentTag() == TAG_PARTY then -- partyList:addChild(custom_item) partyList:insertCustomItem( custom_item, 0 ) elseif ChatScene.getCurrentTag() == TAG_CHAT then -- chatList:addChild(custom_item) chatList:insertCustomItem( custom_item, 0 ) end end elseif sender:getTag() == TAG_CHAT_BUTTON2 then partyPanel:setVisible(false) wordPanel:setVisible(false) chatPanel:setVisible(true) dialog:setVisible(false) elseif sender:getTag() == TAG_LAHEI_BUTTON then print("我就把你拉黑,逗比") elseif sender:getTag() == TAG_CLOSE_BUTTON then dialog:setVisible(false) elseif sender:getTag() == 8 then if eventType == ccui.TouchEventType.ended then ChatScene.widget:setVisible( not ChatScene.widget:isVisible() ) end endendlocal function onExit(strEventName) ChatScene.uiLayer:release() ChatScene.uiLayer = nilend--[[=================addOpenButton添加一个打开的按钮=================]]--function ChatScene.addOpenButton() local openButton = ccui.Button:create() -- 创建一个按钮 openButton:setTouchEnabled(true)-- 设置可触摸 openButton:loadTextures( "cocosui/animationbuttonnormal.png", "cocosui/animationbuttonpressed.png", "" )--加载纹理 openButton:setAnchorPoint( cc.p( 0, 0 ) ) openButton:setPosition( cc.p( winSize.width -100, winSize.height - 50 ) ) ChatScene.uiLayer:addChild(openButton, 1) openButton:setTag(8) openButton:addTouchEventListener(touchEvent)end--[[==============textFieldEvent输入框监听事件回调方法==============]]--local function textFieldEvent(sender, eventType) if eventType == ccui.TextFiledEventType.attach_with_ime then print("attach_with_ime") elseif eventType == ccui.TextFiledEventType.detach_with_ime then print("detach_with_ime") elseif eventType == ccui.TextFiledEventType.insert_text then print("insert_text") elseif eventType == ccui.TextFiledEventType.delete_backward then print("delete_backward") endend-- ListView点击事件回调local function listViewEvent(sender, eventType) -- 事件类型为点击结束 if eventType == ccui.ListViewEventType.ONSELECTEDITEM_END then print("select child index = ",sender:getCurSelectedIndex()) if dialog:isVisible() == true then dialog:setVisible(false) else ChatScene.showDialog() end endend-- 滚动事件方法回调local function scrollViewEvent(sender, eventType) -- 滚动到底部 if eventType == ccui.ScrollviewEventType.scrollToBottom then print("SCROLL_TO_BOTTOM") -- 滚动到顶部 elseif eventType == ccui.ScrollviewEventType.scrollToTop then print("SCROLL_TO_TOP") endend--[[====================createChatLayer创建聊天层====================]]--function ChatScene.createChatLayer() ChatScene.uiLayer = cc.Layer:create()-- 创建ui层 print("getReferenceCount1:"..ChatScene.uiLayer:getReferenceCount()) winSize = cc.Director:getInstance():getWinSize()-- 获得屏幕大小 ChatScene.setCurrentTag(TAG_WORLD) ChatScene.addOpenButton() ChatScene.findViews() ChatScene.setTouchEnabled() ChatScene.setTags() ChatScene.addTouchEventListener() -- 初始化三组数据 local array = {} for i = 1, 20 do array[i] = string.format("请叫我巫大大%d", i - 1) end local array1 = {} for i = 1, 20 do array1[i] = string.format("公会开放啦%d", i - 1 ) end local array2 = {} for i = 1, 20 do array2[i] = string.format("私聊列表项%d", i - 1 ) end -- 创建模型 local default_button = ccui.Button:create("cocosui/backtotoppressed.png", "cocosui/backtotopnormal.png") default_button:setName("Title Button") -- 创建默认item local default_itme = ccui.Layout:create() default_itme:setTouchEnabled(true) default_itme:setContentSize(default_button:getContentSize()) default_button:setPosition(cc.p( default_itme:getContentSize().width / 2.0, default_itme:getContentSize().height / 2.0 )) default_itme:addChild(default_button) -- 设置模型 worldList:setItemModel(default_itme) -- 这里是5项 -- for i = 1, math.floor( count / 4 ) do -- print("i:"..i) -- -- 压栈一个默认项(通过克隆创建的)进listView. -- worldList:pushBackDefaultItem() -- end -- -- -- 插入默认项 -- for i = 1, math.floor( count / 4 ) do -- -- 插入一个默认项(通过克隆创建的)进listView. -- worldList:insertDefaultItem(0) -- end --使用cleanup清空容器(container)中的所有子节点(children) -- worldList:removeAllChildren() -- local testSprite = cc.Sprite:create("cocosui/backtotoppressed.png") -- testSprite:setPosition(cc.p(200,200)) -- worldList:addChild(testSprite) -- 获得数组的大小 local count = table.getn(array) print("count:"..count) -- 添加自定义item for i = 1, count do -- 创建一个Button local custom_button = ccui.Button:create("cocosui/button.png", "cocosui/buttonHighlighted.png") -- 设置Button名字 custom_button:setName("Title Button") -- 设置按钮使用九宫(scale9)渲染器进行渲染 custom_button:setScale9Enabled(true) -- 设置内容尺寸 custom_button:setContentSize(default_button:getContentSize()) -- 创建一个布局 local custom_item = ccui.Layout:create() -- 设置内容大小 custom_item:setContentSize(custom_button:getContentSize()) -- 设置位置 custom_button:setPosition(cc.p(custom_item:getContentSize().width / 2.0, custom_item:getContentSize().height / 2.0)) -- 往布局中添加一个按钮 custom_item:addChild(custom_button) -- 往ListView中添加一个布局 worldList:addChild(custom_item) end -- local function customButtonListener(sender, touchType) -- if sender:getTag() == 1 then -- dialog:setVisible(true) -- end -- end for i = 1, 20 do local custom_button = ccui.Button:create("cocosui/button.png", "cocosui/buttonHighlighted.png") custom_button:setName("wwj") custom_button:setScale9Enabled(true) custom_button:setContentSize(default_button:getContentSize()) local custom_item = ccui.Layout:create() custom_item:setContentSize(custom_button:getContentSize()) custom_button:setPosition(cc.p(custom_item:getContentSize().width / 2.0, custom_item:getContentSize().height / 2.0) ) custom_item:addChild(custom_button) partyList:addChild(custom_item) end for i = 1, 20 do local custom_button = ccui.Button:create( "cocosui/button.png", "cocosui/buttonHighlighted.png" ) custom_button:setName("wwj") custom_button:setScale9Enabled(true) custom_button:setContentSize( default_button:getContentSize() ) local custom_item = ccui.Layout:create() custom_item:setContentSize( custom_button:getContentSize() ) custom_button:setPosition( cc.p( custom_item:getContentSize().width / 2.0, custom_item:getContentSize().height / 2.0 ) ) custom_item:addChild( custom_button ) chatList:addChild( custom_item ) end for i = 1, 5 do local custom_text = ChatScene.RichText() local custom_item = ccui.Layout:create() custom_item:setTouchEnabled(true) custom_item:setContentSize( custom_text:getContentSize() ) custom_text:setPosition( cc.p( custom_item:getContentSize().width / 2.0, custom_item:getContentSize().height / 2.0) ) custom_item:addChild( custom_text ) chatList:addChild( custom_item )-- local custom_button = ccui.Button:create("cocosui/button.png", "cocosui/buttonHighlighted.png")-- custom_button:setName("wwj")-- custom_button:setScale9Enabled(true)-- custom_button:setContentSize(default_button:getContentSize()) -- local custom_item2 = ccui.Layout:create() -- custom_item2:setContentSize(custom_button:getContentSize()) -- custom_button:setPosition(cc.p(custom_item2:getContentSize().width / 0.6, custom_item2:getContentSize().height / 0.6) ) -- custom_item2:addChild(custom_button) -- custom_button:setTag(i) -- custom_button:addTouchEventListener(customButtonListener) -- chatList:addChild(custom_item2) end -- 插入自定义item local items = worldList:getItems()--返回项的集合 -- 获得项的个数 local items_count = table.getn(items) -- for i = 1, math.floor( count / 4 ) do -- local custom_button = ccui.Button:create("cocosui/button.png", "cocosui/buttonHighlighted.png") -- custom_button:setName("Title Button")--改变widget的名字,使用名字可以更轻松地识别出该widget -- custom_button:setScale9Enabled(true)-- 设置按钮使用九宫(scale9)渲染器进行渲染 -- custom_button:setContentSize(default_button:getContentSize()) -- -- local custom_item = ccui.Layout:create() -- custom_item:setContentSize(custom_button:getContentSize()) -- custom_button:setPosition(cc.p(custom_item:getContentSize().width / 2.0, custom_item:getContentSize().height / 2.0)) -- custom_item:addChild(custom_button) -- custom_item:setTag(1) -- worldList:insertCustomItem(custom_item, items_count) -- end -- 设置item data items_count = table.getn(worldList:getItems()) for i = 1, items_count do -- 返回一个索引和参数相同的项. local item = worldList:getItem( i - 1 ) local button = item:getChildByName("Title Button") local index = worldList:getIndex(item) button:setTitleText(array[index + 1]) end local partyListItems_count = table.getn(partyList:getItems()) for i = 1, partyListItems_count do local item = partyList:getItem( i - 1 ) local button = item:getChildByName("wwj") local index = partyList:getIndex(item) button:setTitleText(array1[index + 1]) end local chatListItems_count = table.getn(chatList:getItems()) for i = 1, 20 do local item = chatList:getItem( i - 1 ) local button = item:getChildByName( "wwj" ) local index = chatList:getIndex( item ) button:setTitleText( array2[ index + 1 ] ) end -- 移除Tag=1的子节点 -- worldList:removeChildByTag(1) -- 移除项by index -- items_count = table.getn(worldList:getItems()) -- worldList:removeItem(items_count - 1) -- 设置ListView对齐方式为横向居中 worldList:setGravity(ccui.ListViewGravity.centerVertical) --set items margin worldList:setItemsMargin(2.0) worldList:setBounceEnabled(true) -- 设置ListView对齐方式为横向居中 partyList:setGravity(ccui.ListViewGravity.centerVertical) --set items margin partyList:setItemsMargin(2.0) inputBox:addEventListener(textFieldEvent) ChatScene.uiLayer:addChild(ChatScene.widget) ChatScene.widget:setVisible(false) -- ChatScene.uiLayer:registerScriptHandler(onExit) return ChatScene.uiLayerendlocal function ListViewItem() local layout = ccui.Layout:create() layout:setSizePercent( cc.p( 200, 200 ) ) layout:setBackGroundColorType( ccui.LayoutBackGroundColorType.solid ) layout:setBackGroundColor(cc.c3b(255,0,0)) local image = ccui.ImageView:create("") layout:addChild(image) return layoutendlocal function loadListViewItemFromJson() listview_item = ccs.GUIReader:getInstance():widgetFromJsonFile( "res/listview_item/listview_item.ExportJson" ) head_icon = listview_item:getChildByTag( 6 ) level = listview_item:getChildByTag( 7 ) name = listview_item:getChildByTag( 8 ) text = listview_item:getChildByTag( 9 )end--[[===================设置相关标记===================]]--function ChatScene.setTags() worldButton:setTag(TAG_WORLD_BUTTON) partyButton:setTag(TAG_PARTY_BUTTON) chatButton:setTag(TAG_CHAT_BUTTON) sendButton:setTag(TAG_SEND_BUTTON) chat:setTag(TAG_CHAT_BUTTON2) lahei:setTag(TAG_LAHEI_BUTTON) closeButton:setTag(TAG_CLOSE_BUTTON)end--[[============================findViews()找到UI控件============================]]--function ChatScene.findViews() ChatScene.widget = ccs.GUIReader:getInstance():widgetFromJsonFile( "ChatUI_1/ChatUI_1.json" ) ChatScene.widget:setPosition( cc.p( 40, 40 ) ) loadListViewItemFromJson() -- 获得UI界面上的3个按钮 worldButton = ChatScene.widget:getChildByTag(6) partyButton = ChatScene.widget:getChildByTag(7) chatButton = ChatScene.widget:getChildByTag(8) -- 获得三个每个按钮对应的三个面板 wordPanel = ChatScene.widget:getChildByTag(5) partyPanel = ChatScene.widget:getChildByTag(9) chatPanel = ChatScene.widget:getChildByTag(10) -- 获得每个面板的ListView worldList = wordPanel:getChildByTag(13) partyList = partyPanel:getChildByTag(14) chatList = chatPanel:getChildByTag(15) -- 获得输入框 inputBox = ChatScene.widget:getChildByTag(11) sendButton = ChatScene.widget:getChildByTag(12) dialog = ChatScene.widget:getChildByTag(20) chat = dialog:getChildByTag(21) lahei = dialog:getChildByTag(22) closeButton = dialog:getChildByTag(27)end--[[==================addTouchEventListener添加触摸事件==================]]--function ChatScene.addTouchEventListener() -- 设置按钮监听事件 worldButton:addTouchEventListener(touchEvent) partyButton:addTouchEventListener(touchEvent) chatButton:addTouchEventListener(touchEvent) sendButton:addTouchEventListener(touchEvent) chat:addTouchEventListener(touchEvent) lahei:addTouchEventListener(touchEvent) closeButton:addTouchEventListener(touchEvent) -- 设置ListView的监听事件 worldList:addScrollViewEventListener(scrollViewEvent) worldList:addEventListener(listViewEvent) partyList:addScrollViewEventListener(scrollViewEvent) partyList:addEventListener(listViewEvent) chatList:addScrollViewEventListener(scrollViewEvent) chatList:addEventListener(listViewEvent) --- 键盘事件监听回调方法 local function onkeyPressed(keycode, event) print("keypress") if keycode == cc.KeyCode.KEY_BACKSPACE then local str = inputBox:getStringValue() str = string.sub( str, 0, string.len( str ) - 1 ) inputBox:setText( str ) end end -- 键盘监听事件 local keyListener = cc.EventListenerKeyboard:create() keyListener:registerScriptHandler(onkeyPressed,cc.Handler.EVENT_KEYBOARD_PRESSED) local eventDispatcher = ChatScene.uiLayer:getEventDispatcher() eventDispatcher:addEventListenerWithSceneGraphPriority(keyListener, ChatScene.uiLayer)end--[[==================RichText富文本=================]]--function ChatScene.RichText() local richText = ccui.RichText:create() richText:ignoreContentAdaptWithSize(false) richText:setContentSize(cc.size(100, 100)) local re1 = ccui.RichElementText:create( 1, cc.c3b(255, 255, 255), 255, "This color is white. ", "Helvetica", 10 ) local re2 = ccui.RichElementText:create( 2, cc.c3b(255, 255, 0), 255, "And this is yellow. ", "Helvetica", 10 ) local re3 = ccui.RichElementText:create( 3, cc.c3b(0, 0, 255), 255, "This one is blue. ", "Helvetica", 10 ) local re4 = ccui.RichElementText:create( 4, cc.c3b(0, 255, 0), 255, "And green. ", "Helvetica", 10 ) local re5 = ccui.RichElementText:create( 5, cc.c3b(255, 0, 0), 255, "Last one is red ", "Helvetica", 10 ) local reimg = ccui.RichElementImage:create( 6, cc.c3b(255, 255, 255), 255, "cocosui/sliderballnormal.png" ) -- 添加ArmatureFileInfo, 由ArmatureDataManager管理 ccs.ArmatureDataManager:getInstance():addArmatureFileInfo( "cocosui/100/100.ExportJson" ) local arr = ccs.Armature:create( "100" ) arr:getAnimation():play( "Animation1" ) local recustom = ccui.RichElementCustomNode:create( 1, cc.c3b(255, 255, 255), 255, arr ) local re6 = ccui.RichElementText:create( 7, cc.c3b(255, 127, 0), 255, "Have fun!! ", "Helvetica", 10 ) richText:pushBackElement(re1) richText:insertElement(re2, 1) richText:pushBackElement(re3) richText:pushBackElement(re4) richText:pushBackElement(re5) richText:insertElement(reimg, 2) richText:pushBackElement(recustom) richText:pushBackElement(re6) richText:setLocalZOrder(10) return richTextendlocal function textFieldCompleteHandler()end--[[=====================setTouchEnabled设置一些控件可触摸====================]]--function ChatScene.setTouchEnabled() -- 设置可触摸 worldButton:setTouchEnabled(true) partyButton:setTouchEnabled(true) chatButton:setTouchEnabled(true) sendButton:setTouchEnabled(true) chat:setTouchEnabled(true) lahei:setTouchEnabled(true) closeButton:setTouchEnabled(true) inputBox:setTouchEnabled(true)end--[[=================setCurrentTag设置当前Tag=================]]--function ChatScene.setCurrentTag(tag) flag = tag;end--[[================获得当前Tag===============]]--function ChatScene.getCurrentTag() return flagend--[[===============显示dialog===============]]--function ChatScene.showDialog() local popup = cc.Sequence:create(cc.ScaleTo:create( 0.0, 0.0 ), cc.ScaleTo:create( 0.06, 1.05 ), cc.ScaleTo:create( 0.08, 0.95 ), cc.ScaleTo:create( 0.08, 1.0 ), nil) dialog:我们对Markdown编辑器进行了一些功能拓展与语法支持,除了标准的Markdown编辑器功能,我们增加了如下几点新功能,帮助你用它写博客:
- 全新的界面设计 ,将会带来全新的写作体验;
- 在创作中心设置你喜爱的代码高亮样式,Markdown 将代码片显示选择的高亮样式 进行展示;
- 增加了 图片拖拽 功能,你可以将本地的图片直接拖拽到编辑区域直接展示;
- 全新的 KaTeX数学公式 语法;
- 增加了支持甘特图的mermaid语法1 功能;
- 增加了 多屏幕编辑 Markdown文章功能;
- 增加了 焦点写作模式、预览模式、简洁写作模式、左右区域同步滚轮设置 等功能,功能按钮位于编辑区域与预览区域中间;
- 增加了 检查列表 功能。
功能快捷键
撤销:Ctrl/Command + Z
重做:Ctrl/Command + Y
加粗:Ctrl/Command + B
斜体:Ctrl/Command + I
标题:Ctrl/Command + Shift + H
无序列表:Ctrl/Command + Shift + U
有序列表:Ctrl/Command + Shift + O
检查列表:Ctrl/Command + Shift + C
插入代码:Ctrl/Command + Shift + K
插入链接:Ctrl/Command + Shift + L
插入图片:Ctrl/Command + Shift + G
合理的创建标题,有助于目录的生成
直接输入1次#,并按下space后,将生成1级标题。
输入2次#,并按下space后,将生成2级标题。
以此类推,我们支持6级标题。有助于使用TOC语法后生成一个完美的目录。
如何改变文本的样式
强调文本 强调文本
加粗文本 加粗文本
标记文本
删除文本
引用文本
H2O is是液体。
210 运算结果是 1024.
插入链接与图片
链接: link.
图片: 
带尺寸的图片: ![]()
当然,我们为了让用户更加便捷,我们增加了图片拖拽功能。
如何插入一段漂亮的代码片
去博客设置页面,选择一款你喜欢的代码片高亮样式,下面展示同样高亮的 代码片.
// An highlighted block var foo = 'bar'; 生成一个适合你的列表
- 项目
- 项目
- 项目
- 项目
- 项目1
- 项目2
- 项目3
- 计划任务
- 完成任务
创建一个表格
一个简单的表格是这么创建的:
| 项目 | Value |
|---|---|
| 电脑 | $1600 |
| 手机 | $12 |
| 导管 | $1 |
设定内容居中、居左、居右
使用:---------:居中
使用:----------居左
使用----------:居右
| 第一列 | 第二列 | 第三列 |
|---|---|---|
| 第一列文本居中 | 第二列文本居右 | 第三列文本居左 |
SmartyPants
SmartyPants将ASCII标点字符转换为“智能”印刷标点HTML实体。例如:
| TYPE | ASCII | HTML |
|---|---|---|
| Single backticks | 'Isn't this fun?' |
‘Isn’t this fun?’ |
| Quotes | "Isn't this fun?" |
“Isn’t this fun?” |
| Dashes | -- is en-dash, --- is em-dash |
– is en-dash, — is em-dash |
创建一个自定义列表
- Markdown
- Text-to- HTML conversion tool
- Authors
- John
- Luke
如何创建一个注脚
一个具有注脚的文本。2
注释也是必不可少的
Markdown将文本转换为 HTML。
KaTeX数学公式
您可以使用渲染LaTeX数学表达式 KaTeX:
Gamma公式展示 是通过欧拉积分
你可以找到更多关于的信息 LaTeX 数学表达式here.
新的甘特图功能,丰富你的文章
gantt
        dateFormat  YYYY-MM-DD
        title Adding GANTT diagram functionality to mermaid
        section 现有任务
        已完成               :done,    des1, 2014-01-06,2014-01-08
        进行中               :active,  des2, 2014-01-09, 3d
        计划一               :         des3, after des2, 5d
        计划二               :         des4, after des3, 5d
- 关于 甘特图 语法,参考 这儿,
UML 图表
可以使用UML图表进行渲染。 Mermaid. 例如下面产生的一个序列图::
这将产生一个流程图。:
- 关于 Mermaid 语法,参考 这儿,
FLowchart流程图
我们依旧会支持flowchart的流程图:
- 关于 Flowchart流程图 语法,参考 这儿.
导出与导入
导出
如果你想尝试使用此编辑器, 你可以在此篇文章任意编辑。当你完成了一篇文章的写作, 在上方工具栏找到 文章导出 ,生成一个.md文件或者.html文件进行本地保存。
导入
如果你想加载一篇你写过的.md文件或者.html文件,在上方工具栏可以选择导入功能进行对应扩展名的文件导入,
继续你的创作。
注脚的解释 ↩︎