第一部分: web.xml的配置
使用过SpringSecurity的朋友都知道,首先需要在web.xml进行以下配置:
<filter>
  <filter-name>springSecurityFilterChain</filter-name>
  <filter-class>org.springframework.web.filter.DelegatingFilterProxy</filter-class>
</filter>

<filter-mapping>
  <filter-name>springSecurityFilterChain</filter-name>
  <url-pattern>/*</url-pattern>
</filter-mapping></span>
第二部分: applicationContext-security.xml的配置
1. 配置一些不需要安全验证的资源
<sec:http pattern="/login" security="none"></sec:http>
<sec:http pattern="/register" security="none"></sec:http>
<sec:http pattern="/**/*.js" security="none"></sec:http>
2. 配置AuthenticationManager
<sec:authentication-manager alias="authenticationManager">
	<sec:authentication-provider ref="authenticationProvider"/>
</sec:authentication-manager>

<bean id="authenticationProvider" class="org.springframework.security.authentication.dao.DaoAuthenticationProvider">
	<property name="userDetailsService" ref="userService" />
</bean>

<bean id="userService" class="com.demo.service.impl.UserService"/>
在Spring Security 3.0之前, AuthenticationManager会被自动创建. 但在3.0之后, 我们需要手动配置<authentication-manager>标签. 这个标签会创建一个ProviderManager实例. ProviderManager可以有一个或多个AuthenticationProvider(如: dao,ldap,cas等等). 如果我们把权限信息都存在数据库里, 那这里就需要配置一个DaoAuthenticationProvider实例.
DaoAuthenticationProvider里需要配置一个实现了UserDetailsService接口的实例, 重写loadUserByUsername方法. 这其实就是我们经常要在业务层里写的东西. 例子如下:
@Service
public class UserService implements IUserService, UserDetailsService {

	@Autowired
	private SqlSessionTemplate template;

	@Override
	public User loadUserByUsername(String username) throws UsernameNotFoundException {
		User user = template.selectOne("getUserByName", username);
		Collection<GrantedAuthority> auths = getUserRoles(username);
		user.setAuthorities(auths);
		return user;
	}

	@Override
	public Collection<GrantedAuthority> getUserRoles(String username) {
		List<String> roleList = template.selectList("getUserRoles", username);
		Collection<GrantedAuthority> auths = new ArrayList<GrantedAuthority>();
		for (String role : roleList) {
			auths.add(new SimpleGrantedAuthority(role));
		}
		return auths;
	}
	...
}
要注意的的是:
1) User要实现org.springframework.security.core.userdetails.UserDetails接口;
2) User里面要有一个权限集合的属性, 如: private Collection<? extends GrantedAuthority> authorities;
3) loadUserByUsername()方法除了要从数据库里拿出用户的具体信息之外, 还要拿出用户的权限信息, 这样后面的AbstractSecurityInterceptor.beforeInvocation(object)方法才能对用户作权限验证.
3. 配置收到HTTP请求时的安全验证配置:
<sec:http entry-point-ref="myAuthenticationEntryPoint">
	<sec:intercept-url pattern="/**" access="ROLE_USER"/>

	<sec:access-denied-handler ref="accessDeniedHandler"/>

	<sec:custom-filter ref="loginAuthenticationFilter" position="FORM_LOGIN_FILTER"/>
	<sec:custom-filter ref="filterSecurityInterceptor" before="FILTER_SECURITY_INTERCEPTOR"/>
</sec:http>
3.1 entry-point-ref
配置一个AuthenticationEntryPoint的实现类. 这个类的作用是, 当一个未授权的用户请求非公有资源时, 这个类的commence方法将会被调用, 定义如何处理这个请求. 常用的有LoginUrlAuthenticationEntryPoint实现类, 把请求重定向到登录页面. 也可以自定义一个实现类, 处理具体的操作, 如记录日志, 返回到自定义的403页面等等.
3.2 <sec:intercept-url pattern="/**" access="ROLE_USER"/>
这个用来配置访问哪些资源需要哪些权限/角色, 不多说明.
3.3 access-denied-handler
配置一个AccessDeniedHandler的实现类. 这个类的作用是, 当一个已授权(或已登陆)的用户请求访问他权限之外的资源时, 这个类的handle方法将会被调用, 定义如何处理这个请求.
注意AccessDeniedHandler与AuthenticationEntryPoint的区别:
AccessDeniedHandler: 已授权的用户请求权限之外的资源时会交给这个类处理.
AuthenticationEntryPoint: 未授权的用户请求非公共资源时会交给这个类处理.
3.4 custom-filter (重点)
配置自定义的过滤器, 一般要自己配置UsernamePasswordAuthenticationFilter和FilterSecurityInterceptor.
Spring Security的安全验证是通过过滤器来处理的. 默认情况下Spring会帮我们注册了很多过滤器, 注册的顺序如下(打星星的是重点):
ChannelProcessingFilter
* SecurityContextPersistenceFilter
ConcurrentSessionFilter
LogoutFilter
* UsernamePasswordAuthenticationFilter/CasAuthenticationFilter/BasicAuthenticationFilter
SecurityContextHolderAwareRequestFilter
JaasApiIntegrationFilter
RememberMeAuthenticationFilter
AnonymousAuthenticationFilter
* ExceptionTranslationFilter
* FilterSecurityInterceptor
SecurityContextPersistenceFilter
用来建立和保存SecurityContext, 在整个request过程中跟踪请求者的认证信息. 当一个request完成时, 它也负责删除SecurityContextHolder里的内容.
UsernamePasswordAuthenticationFilter
用来处理表单(通常是登录表单)提交时的验证. 这个过滤器一般要自己手动配置一下, 如下:
<sec:custom-filter ref="loginAuthenticationFilter" position="FORM_LOGIN_FILTER"/>

<bean id="loginAuthenticationFilter" class="org.springframework.security.web.authentication.UsernamePasswordAuthenticationFilter">
	<property name="filterProcessesUrl" value="/my_login"></property> <!-- 表单提交的url, 默认是/j_spring_security_check -->
	<property name="usernameParameter" value="my_username"></property> <!-- 表单里用户名字段的name, 默认是j_username -->
	<property name="passwordParameter" value="my_password"></property> <!-- 表单里密码字段的name, 默认是j_password -->
	<property name="authenticationManager" ref="authenticationManager"/> <!-- 一定要配置, 这里使用上面定义的authenticationManager -->
	<property name="authenticationFailureHandler" ref="authenticationFailureHandler"/> <!-- 验证失败时的处理器 -->
	<property name="authenticationSuccessHandler" ref="authenticationSuccessHandler"/> <!-- 验证成果时的处理器 -->
</bean>

<bean id="authenticationSuccessHandler" class="org.springframework.security.web.authentication.SavedRequestAwareAuthenticationSuccessHandler">
	<property name="defaultTargetUrl" value="/index"/> <!-- 验证成功时跳到哪个请求 -->
	<property name="alwaysUseDefaultTargetUrl" value="true"/>
</bean>

<bean id="authenticationFailureHandler" class="org.springframework.security.web.authentication.SimpleUrlAuthenticationFailureHandler">
	<property name="defaultFailureUrl" value="/login"/> <!-- 验证失败时跳到哪个请求 -->
</bean>
上面的配置比较繁琐, 可以用<form-login>标签简化配置:
<sec:http auto-config="true" entry-point-ref="authenticationEntryPointAdapter">
	...

	<sec:form-login login-page="login.ftl" username-parameter="my_username" password-parameter ="my_password"
		authentication-failure-url="/login"
		login-processing-url="/my_login"
		always-use-default-target="true"
		authentication-success-handler-ref="authenticationSuccessHandler"
		authentication-failure-handler-ref="authenticationFailureHandler"/>

	...
</sec:http>
ExceptionTranslationFilter
这个过滤器不作具体的验证操作. 它用来处理Spring Security框架抛出的异常. 如上文提到, 当抛出一个AccessDeniedException时, 是交给AuthenticationEntryPoint还是AccessDeniedHandler来处理, 就是由ExceptionTranslationFilter决定.
FilterSecurityInterceptor
这个过滤器非常重要. 它负责处理对所有非公有资源请求的安全验证. 配置如下:
<sec:custom-filter ref="filterSecurityInterceptor" <span style="color:#ff0000;"><strong>before="FILTER_SECURITY_INTERCEPTOR"</strong></span>/>

<bean id="filterSecurityInterceptor" class="org.springframework.security.web.access.intercept.FilterSecurityInterceptor">
	<property name="authenticationManager" ref="authenticationManager"/>
	<property name="accessDecisionManager" ref="accessDecisionManager"/>
	<property name="securityMetadataSource" ref="mySecurityMetadataSource"/>
</bean>

<bean id="accessDecisionManager" class="org.springframework.security.access.vote.AffirmativeBased">
	<property name="decisionVoters">
		<list>
			<bean class="org.springframework.security.access.vote.RoleVoter">
				<property name="rolePrefix" value=""/>
			</bean>
			<bean class="org.springframework.security.access.vote.AuthenticatedVoter"/>
		</list>
	</property>
</bean>

<bean id="mySecurityMetadataSource" class="com.demo.security.MySecurityMetadataSource"></bean>
它的三个属性必须要配置:
authenticationManager: 使用上面定义的authenticationManager
accessDecisionManager: 使用默认的投票器
securityMetadataSource: 用来储存请求与权限的对应关系. 一般要自己重写, 要实现FilterInvocationSecurityMetadataSource接口. 可参考DefaultFilterInvocationSecurityMetadataSource.
FilterInvocationSecurityMetadataSource接口有3个方法:
boolean supports(Class<?> clazz);
Collection<ConfigAttribute> getAllConfigAttributes();
Collection<ConfigAttribute> getAttributes(Object object);
第一个方法不清楚其作用, 一般返回true.
第二个方法是Spring容器启动时自动调用的, 返回所有权限的集合. 一般把所有请求与权限的对应关系也要在这个方法里初始化, 保存在一个属性变量里.
第三个是当接收到一个http请求时, filterSecurityInterceptor会调用的方法. 参数object是一个包含url信息的HttpServletRequest实例. 这个方法要返回请求该url所需要的所有权限集合.
下面来看看filterSecurityInterceptor具体做了些什么吧:
doFilter()方法没什么好说的, 它调用了invoke()方法.
public void doFilter(ServletRequest request, ServletResponse response, FilterChain chain)
		throws IOException, ServletException {
	FilterInvocation fi = new FilterInvocation(request, response, chain);
	invoke(fi);
}
invoke()方法主要看super.beforeInvocation(fi), 它把请求交给下一个filter之前, 验证当前用户有没有权限访问这个请求. 如果没有, 则抛出AccessDeniedException.
public void invoke(FilterInvocation fi) throws IOException, ServletException {
	if ((fi.getRequest() != null) && (fi.getRequest().getAttribute(FILTER_APPLIED) != null)
			&& observeOncePerRequest) {
		// filter already applied to this request and user wants us to observe
		// once-per-request handling, so don't re-do security checking
		fi.getChain().doFilter(fi.getRequest(), fi.getResponse());
	} else {
		// first time this request being called, so perform security checking
		if (fi.getRequest() != null) {
			fi.getRequest().setAttribute(FILTER_APPLIED, Boolean.TRUE);
		}

		InterceptorStatusToken token = super.beforeInvocation(fi);

		try {
			fi.getChain().doFilter(fi.getRequest(), fi.getResponse());
		} finally {
			super.finallyInvocation(token);
		}

		super.afterInvocation(token, null);
	}
}
beforeInvocation()方法主要有三步:
第一步找出该请求所需要的全部权限;
第二步找出当前用户的的全部权限;
第三步验证用户是否满足权限要求.
protected InterceptorStatusToken beforeInvocation(Object object) {
	Assert.notNull(object, "Object was null");
	final boolean debug = logger.isDebugEnabled();

	if (!getSecureObjectClass().isAssignableFrom(object.getClass())) {
		throw new IllegalArgumentException("Security invocation attempted for object "
				+ object.getClass().getName()
				+ " but AbstractSecurityInterceptor only configured to support secure objects of type: "
				+ getSecureObjectClass());
	}

	<strong><span style="color:#ff0000;">// 第一步</span>
	<span style="color:#ff0000;">Collection<ConfigAttribute> attributes = this.obtainSecurityMetadataSource().getAttributes(object);</span></strong>

	if (attributes == null || attributes.isEmpty()) {
		if (rejectPublicInvocations) {
			throw new IllegalArgumentException("Secure object invocation " + object +
					" was denied as public invocations are not allowed via this interceptor. "
							+ "This indicates a configuration error because the "
							+ "rejectPublicInvocations property is set to 'true'");
		}

		if (debug) {
			logger.debug("Public object - authentication not attempted");
		}

		publishEvent(new PublicInvocationEvent(object));

		return null; // no further work post-invocation
	}

	if (debug) {
		logger.debug("Secure object: " + object + "; Attributes: " + attributes);
	}

	if (SecurityContextHolder.getContext().getAuthentication() == null) {
		credentialsNotFound(messages.getMessage("AbstractSecurityInterceptor.authenticationNotFound",
				"An Authentication object was not found in the SecurityContext"), object, attributes);
	}

	<strong><span style="color:#ff0000;">// 第二步</span>
	<span style="color:#ff0000;">Authentication authenticated = authenticateIfRequired();</span></strong>

	// Attempt authorization
	try {
		<strong><span style="color:#ff0000;">// 第三步</span></strong>
		<span style="color:#ff0000;">this.accessDecisionManager.decide(authenticated, object, attributes);</span>
	}
	catch (AccessDeniedException accessDeniedException) {
		publishEvent(new AuthorizationFailureEvent(object, attributes, authenticated, accessDeniedException));

		throw accessDeniedException;
	}

	if (debug) {
		logger.debug("Authorization successful");
	}

	if (publishAuthorizationSuccess) {
		publishEvent(new AuthorizedEvent(object, attributes, authenticated));
	}

	// Attempt to run as a different user
	Authentication runAs = this.runAsManager.buildRunAs(authenticated, object, attributes);

	if (runAs == null) {
		if (debug) {
			logger.debug("RunAsManager did not change Authentication object");
		}

		// no further work post-invocation
		return new InterceptorStatusToken(SecurityContextHolder.getContext(), false, attributes, object);
	} else {
		if (debug) {
			logger.debug("Switching to RunAs Authentication: " + runAs);
		}

		SecurityContext origCtx = SecurityContextHolder.getContext();
		SecurityContextHolder.setContext(SecurityContextHolder.createEmptyContext());
		SecurityContextHolder.getContext().setAuthentication(runAs);

		// need to revert to token.Authenticated post-invocation
		return new InterceptorStatusToken(origCtx, true, attributes, object);
	}
}
注意上面红色粗体的部分: before="FILTER_SECURITY_INTERCEPTOR"
它的意思是我们这个自定义的filterSecurityInterceptor是加在系统默认的filterSecurityInterceptor之前的. 意思是说现在Spring里有两个filterSecurityInterceptor. 通过debug我们也看到filterChain里确实有两个:
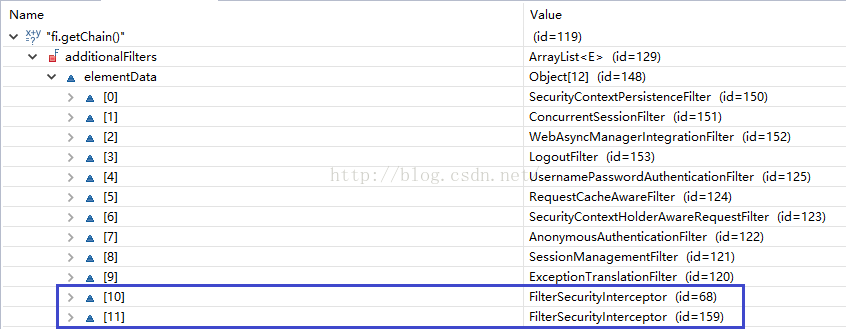
其中第10个是我们自定义的, 第11个是系统默认的. 在上面的例子中, 系统自动加的filterSecurityInterceptor没有任何用处, 应该删除, 但暂时找不到方法删. 如果把配置改成position="FILTER_SECURITY_INTERCEPTOR"的话, Spring启动时会报错, 错误信息如下:
Configuration problem: Filter beans '<filterSecurityInterceptor>' and '<org.springframework.security.web.access.intercept.FilterSecurityInterceptor#0>' have the same 'order' value. When using custom filters, please make sure the positions do not conflict with default filters. Alternatively you can disable the default filters by removing the corresponding child elements from <http> and avoiding the use of <http auto-config='true'>.