Selinux的设置
1.概述
selinux :内核级加强型火墙(Security-Enhanced Linux)是美国国家安全局(NAS)对于强制访问控 制的实现,
在这种访问控制体系的限制下,进程只能访问那些在他的任务中所需要文件。最大限度的保证了linux系统的安全
2.特点
1.MAC

对访问的控制彻底化,对所有的文件、目录、端口的访问都是基于策略设定的,可由管理员时行设定。

2.RBAC

对于用户只赋予最小权限。用户被划分成了一些role(角色),即使是root用户,如果不具有sysadm_r角色的话,也不是执行相关的管理。哪里role可以执行哪些domain,也是可以修改的。

3.安全上下文

当启动selinux的时候,所有文件与对象都有安全上下文。进程的安全上下文是域,安全上下文由用户:角色:类型表示。

(1)系统根据pam子系统中的pam_selinux.so模块设定登录者运行程序的安全上下文

(2)rpm包安装会根据rpm包内记录来生成安全上下文,

(3)如果是手工他建的,会根据policy中规定来设置安全上下文,

(4)如果是cp,会重新生成安全上下文。

(5)如果是mv,安全上下文不变。
3 安全上下文格式
安全上下文由user:role:type三部分组成,下面分别说明其作用:

1.user identity:类似linux系统中的UID,提供身份识别,安全上下文中的一部分。

三种常见的user:

user_u-:   普通用户登录系统后预设;

system_u-:开机过程中系统进程的预设;

root-:    root登录后预设;

在targeted policy中users不是很重要;

在strict policy中比较重要,的有预设的selinuxusers都以 "_u"结尾,root除外。

2.role

文件与目录的role,通常是object_r;

程序的role,通常是system_r;

用户的role,targetedpolicy为system_r;

strict policy为sysadm_r,staff_r,user_r

用户的role,类似于系统中的GID,不同的角色具备不同的权限;用户可以具备多个role;但是同一时间内只能使用一role;

role是RBAC的基础;

3.type

type:用来将主体与客体划分为不同的组,组每个主体和系统中的客体定义了一个类型;为进程运行提供最低的权限环境。

当一个类型与执行的进程关联时,该type也称为domain,也叫安全上下文。

域或安全上下文是一个进程允许操作的列表,决字一个进程可以对哪种类型进行操作。
4.主要功能:
 对于文件来说加载标签,程序的安全上下文和文件的安全上下文必须匹配才能被允许
 对于程序来说控制功能开关, 用setsebool设定布尔值 ,把程序的功能加了开关,并且把开关全部关掉
,
配置实验环境:
(1)做实验之前,最好先重置虚拟机,以保持纯净的实验环境(注意:重置虚拟机后需要设定ip以及配置yum源)
(2)部署ftp服务
##1.安装vsftpd和lftp,让这个虚拟机既是服务器又是客户端,便于操作
[root@localhost ~]# yum install -y vsftpd lftp -y
##2.开启服务
[root@localhost ~]# systemctl start vsftpd
[root@localhost ~]# systemctl enable vsftpd
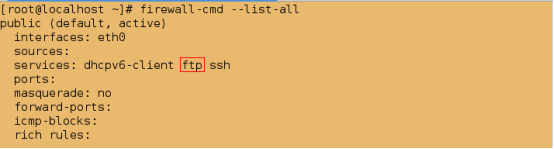
##3.添加火墙策略(或者直接关闭火墙)
[root@localhost ~]# firewall-cmd --permanent --add-service=ftp
success
[root@localhost ~]# firewall-cmd --reload
success
[root@localhost ~]# firewall-cmd --list-all
1.selinux的状态设定
(1)selinux的状态
1)开启状态
enforing    #强制模式(警告并且拒绝)
permissive  #警告模式(警告但不拒绝)
2)关闭状态
disabled    ##关闭模式(禁用模式)
(2)selinux的状态的修改
1).临时性修改
getenforce      #查看selinux的状态
setenforce 0     #设置selinux的状态为警告模式(permissive)
setenforce 1     #设置selinux的状态为强制模式(Enforcing)
注意:此方法只能实现 permissive 状态 和 Enforcing 状态之间的转换
即当selinux的状态为 Disabled 时,用此方法不能更改selinux的状态
实验:
##查看selinux的状态
[root@localhost ~]# getenforce
Enforcing
[root@localhost ~]# setenforce 0
[root@localhost ~]# getenforce
Permissive
[root@localhost ~]# setenforce 1
[root@localhost ~]# getenforce
Enforcing

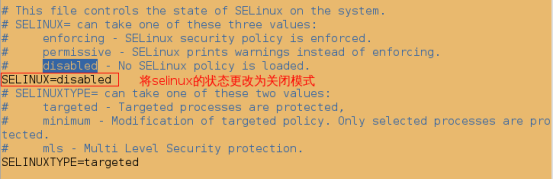
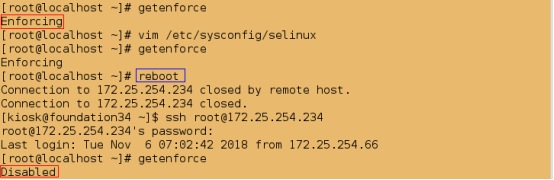
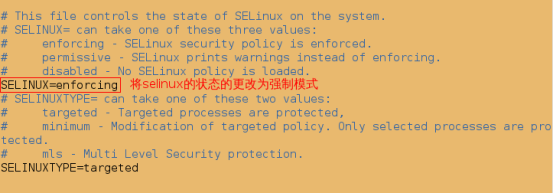
2).永久性修改:
通过修改配置文件/etc/sysconfig/selinux的参数来更改selinux的状态
实验:
[root@localhost ~]# getenforce
Enforcing
[root@localhost ~]# vim /etc/sysconfig/selinux
###############
SELINUX=disabled
[root@localhost ~]# getenforce
Enforcing
[root@localhost ~]# reboot
[root@localhost ~]# getenforce
Disabled
2.selinux安全上下文的管理
ls -Z  filename                        #查看文件的安全上下文
chcon -t public_content_t filename     #临时更改文件的安全上下文的类型

semanage fcontext -a -t public_content_t '/westos(/.*)?'    #永久更改文件的安全上下文的类型; -a 添加,-t 类型,(/ 本身内容;.* 所有隐藏文件;)
实验1:selinux对文件的影响
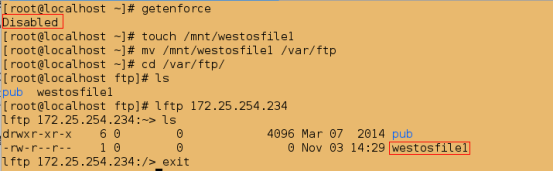
@1.当selinux的状态为Disabled时,lftp连接后可以查看到外来文件
##查看selinux的状态
[root@localhost ~]# getenforce
Disabled
[root@localhost ~]# touch /mnt/westosfile1
##将外来文件移动到ftp服务的默认发布目录/var/ftp中
[root@localhost ~]# mv /mnt/westosfile1 /var/ftp
[root@localhost ~]# cd /var/ftp
[root@localhost ftp]# ls
pub  westosfile1
##可以查看到外来文件
[root@localhost ~]# lftp 172.25.254.234
lftp 172.25.254.234:~> ls
drwxr-xr-x    3 0        0              69 Aug 03  2015 pub
-rw-r--r--    1 0        0               0 Nov 03 06:12 westosfile1
lftp 172.25.254.234:/> exit
@2.默认本地用户可以登陆,上传,建立目录,下载(不能下载自己创建的文件,但可以下载自己上传的文件),删除(不能删除自己创建的文件,但可以删除自己上传的文件)
##建立用户
[root@localhost ~]# useradd westos
##设定用户密码
[root@localhost ~]# passwd westos

[root@localhost ~]# lftp 172.25.254.234 -u westos
Password:
lftp [email protected]:~> ls
lftp [email protected]:~> put /etc/passwd
2101 bytes transferred
lftp [email protected]:~> ls
-rw-r--r--    1 1001     1001         2101 Nov 06 16:11 passwd
lftp [email protected]:~> mkdir linux
mkdir ok, `linux' created
lftp [email protected]:~> ls
drwxr-xr-x    2 1001     1001            6 Nov 06 16:11 linux
-rw-r--r--    1 1001     1001         2101 Nov 06 16:11 passwd
lftp [email protected]:~> get /etc/passwd
2101 bytes transferred
lftp [email protected]:~> get linux/
get: Access failed: 550 Failed to open file. (linux/)
lftp [email protected]:~> rm linux/
rm: Access failed: 550 Delete operation failed. (linux/)
lftp [email protected]:~> rm passwd
rm ok, `passwd' removed
lftp [email protected]:~> ls
drwxr-xr-x    2 1001     1001            6 Nov 06 16:11 linux
lftp [email protected]:~> put /etc/passwd
2101 bytes transferred
lftp [email protected]:~> ls
drwxr-xr-x    2 1001     1001            6 Nov 06 16:11 linux
-rw-r--r--    1 1001     1001         2101 Nov 06 16:12 passwd
lftp [email protected]:~> exit

排错1:如果此时报错:550服务认证失败,说明一定是vsftpd服务未开启,
因为我这里的主配置文件是重新生成的,是一份全新的文件。而默认本地用户可以登陆的
@@当selinux的状态为关闭模式时,文件和程序的安全上下文都会被隐藏起来
查看 /var/ftp里的所有文件的安全上下文
[root@localhost ~]# ls -Z /var/ftp

[root@localhost ~]# ps auxZ | grep ftp

@3.当selinux的状态更改为enforcing时,此时lftp连接便无法访问外来文件,并且有警告信息
##更改selinux的状态
[root@localhost ~]# vim /etc/sysconfig/selinux
###############
SELINUX=enforcing   ##强制模式(警告并拒绝)
[root@localhost ~]# getenforce
Disabled
##必须重启,否则不生效
[root@localhost ~]# reboot
##查看selinux的状态
[root@localhost ~]# getenforce
Enforcing

##将外来文件移动到ftp服务的默认发布目录/var/ftp中
[root@localhost ~]# touch /mnt/westosfile2
[root@localhost ~]# mv /mnt/westosfile2 /var/ftp
[root@localhost ~]# cd /var/ftp/
[root@localhost ftp]# ls
pub  westosfile1  westosfile2

##先清空日志
[root@localhost ~]# > /var/log/messages
[root@localhost ~]# cat /var/log/messages
##此时无法访问外来文件!!!
[root@localhost ~]# lftp 172.25.254.234
lftp 172.25.254.234:~> ls
drwxr-xr-x    3 0        0              69 Aug 03  2015 pub
-rw-r--r--    1 0        0               0 Nov 03 06:12 westosfile1
lftp 172.25.254.234:/> exit

 ##查看日志,发现有警告信息
 [root@localhost ~]# cat /var/log/messages

@4.并且本地用户不能删除,上传,下载,建立目录
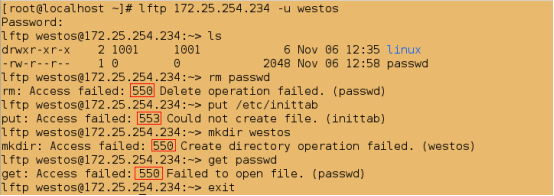
[root@localhost ~]# lftp 172.25.254.234 -u westos
Password:
lftp [email protected]:~> ls
drwxr-xr-x    2 1001     1001            6 Nov 06 12:35 linux
-rw-r--r--    1 0        0            2048 Nov 06 12:58 passwd
lftp [email protected]:~> rm passwd
rm: Access failed: 550 Delete operation failed. (passwd)
lftp [email protected]:~> put /etc/inittab
put: Access failed: 553 Could not create file. (inittab)
lftp [email protected]:~> mkdir westos
mkdir: Access failed: 550 Create directory operation failed. (westos)
lftp [email protected]:~> get passwd
get: Access failed: 550 Failed to open file. (passwd)
lftp [email protected]:~> exit
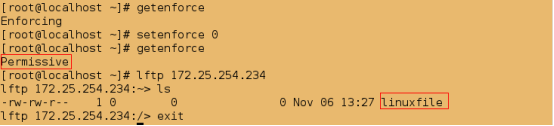
@5.当selinux的状态为Permissive时,可以访问外来文件但有警告
[root@localhost ~]# getenforce
Enforcing
##更改selinux的为警告状态
[root@localhost ~]# setenforce 0
[root@localhost ~]# getenforce
Permissive
[root@localhost ~]# > /var/log/messages
[root@localhost ~]# cat /var/log/messages
[root@localhost ~]# lftp 172.25.254.234
lftp 172.25.254.234:~> ls
drwxr-xr-x    2 0        0               6 Mar 07  2014 pub
-rw-r--r--    1 0        0               0 Nov 06 12:29 westosfile1
-rw-r--r--    1 0        0               0 Nov 06 12:49 westosfile2
lftp 172.25.254.234:/> exit

##查看日志,发现有警告信息
[root@localhost ~]# cat /var/log/messages

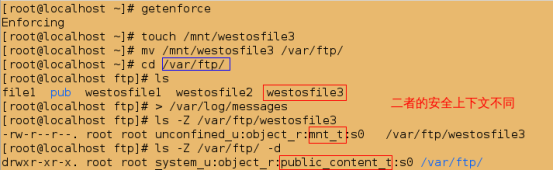
@6.文件的安全上下文
[root@localhost ~]# cd /var/ftp
##查看所有文件的安全上下文
[root@localhost ftp]# ls -Z
drwxr-xr-x. root root system_u:object_r:public_content_t:s0 pub
-rw-r--r--. root root system_u:object_r:public_content_t:s0 westosfile1
-rw-r--r--. root root unconfined_u:object_r:mnt_t:s0   westosfile2

[root@localhost ftp]# pwd
/var/ftp
[root@localhost ftp]# touch file1
[root@localhost ftp]# ls -Z file1
-rw-r--r--. root root unconfined_u:object_r:public_content_t:s0 file1

[root@localhost ftp]# cd /mnt
[root@localhost mnt]# touch file2
[root@localhost mnt]# ls -Z file2
-rw-r--r--. root root unconfined_u:object_r:mnt_t:s0   file2

[root@localhost mnt]# cd /var/ftp
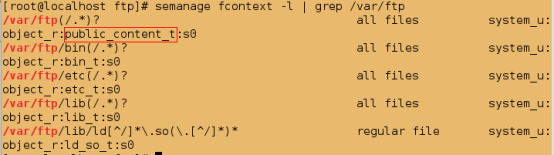
##内核记录过的安全上下文
[root@localhost ftp]# semanage fcontext -l | grep /var/ftp
1.临时更改安全上下文
[root@localhost ftp]# chcon -t public_content_t westosfile2
##查看单个文件的安全上下文
[root@localhost ftp]# ls -Z westosfile2
-rw-r--r--. root root unconfined_u:object_r:public_content_t:s0 westosfile2

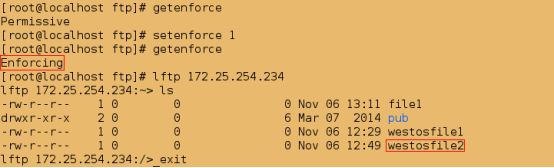
##此时即使selinux的状态为enforecing仍然可查看到外来文件
[root@localhost ftp]# getenforce
Permissive
[root@localhost ftp]# setenforce 1
[root@localhost ftp]# getenforce
Enforcing
[root@localhost ftp]# lftp 172.25.254.234
lftp 172.25.254.234:~> ls
-rw-r--r--    1 0        0               0 Nov 06 13:11 file1
drwxr-xr-x    2 0        0               6 Mar 07  2014 pub
-rw-r--r--    1 0        0               0 Nov 06 12:29 westosfile1
-rw-r--r--    1 0        0               0 Nov 06 12:49 westosfile2
lftp 172.25.254.234:/> exit
[root@localhost ~]# mkdir /linux
[root@localhost ~]# touch /linux/linuxfile
##匿名用户登陆默认在ftp的默认发布目录/var/ftp下
[root@localhost ~]# lftp 172.25.254.234
lftp 172.25.254.234:~> ls
-rw-r--r--    1 0        0               0 Nov 06 13:11 file1
drwxr-xr-x    2 0        0               6 Mar 07  2014 pub
-rw-r--r--    1 0        0               0 Nov 06 12:29 westosfile1
-rw-r--r--    1 0        0               0 Nov 06 12:49 westosfile2
lftp 172.25.254.234:/> exit
##更改匿名用户家目录
[root@localhost ~]# vim /etc/vsftpd/vsftpd.conf
###############
anon_root=/linux

[root@localhost ~]# systemctl restart vsftpd
[root@localhost ~]# lftp 172.25.254.234
lftp 172.25.254.234:~> ls
lftp 172.25.254.234:/> exit

[root@localhost ~]# getenforce
Enforcing
##将slinux的状态更改为警告模式
[root@localhost ~]# setenforce 0
[root@localhost ~]# getenforce
Permissive
[root@localhost ~]# lftp 172.25.254.234
lftp 172.25.254.234:~> ls
-rw-rw-r--    1 0        0               0 Nov 06 13:27 linuxfile
lftp 172.25.254.234:/> exit
##查看目录的安全上下文
[root@localhost ~]# ls -Z /linux -d
drwxr-xr-x. root root unconfined_u:object_r:default_t:s0 /linux
##临时更改 /linux目录的安全上下文为public_content_t类型
[root@localhost ~]# chcon -t public_content_t /linux -R
[root@localhost ~]# ls -Z /linux -d
drwxr-xr-x. root root unconfined_u:object_r:public_content_t:s0 /linux

测试:
##重启selinux
[root@localhost ftp]# vim /etc/sysconfig/selinux
################
SELINUX=disabled

[root@localhost ftp]# reboot
[root@localhost ~]# vim /etc/sysconfig/selinux
###############
SELINUX=enforcing

[root@localhost ~]# reboot

[root@localhost ftp]# ls -Z westosfile1
-rw-r--r--. root root unconfined_u:object_r:default_t:s0 westosfile1

2.永久性更改安全上下文
[root@localhost ~]# ls -Zd /linux/
drwxr-xr-x. root root unconfined_u:object_r:default_t:s0 /linux/
[root@localhost ~]# ls -Zd /var/ftp/
drwxr-xr-x. root root system_u:object_r:public_content_t:s0 /var/ftp/

[root@localhost ~]# semanage fcontext -l | grep /var/ftp
[root@localhost ~]# semanage fcontext -l | grep /linux/

##永久性更改安全上下文
[root@localhost ~]# semanage fcontext -a -t public_content_t '/linux(/.*)?'
[root@localhost ~]# restorecon -FvvR /linux/
[root@localhost ~]# ls -Zd /linux/
drwxr-xr-x. root root system_u:object_r:public_content_t:s0 /linux/

测试:
##此时即使selinux的状态为强制模式,仍然可以看到家目录里的文件
[root@localhost ~]# getenforce
Enforcing
[root@localhost ~]# lftp 172.25.254.234
lftp 172.25.254.234:~> ls
-rw-rw-r--    1 0        0               0 Nov 06 13:27 linuxfile
lftp 172.25.254.234:/> exit

##建立/.autorelabel文件,相当于重启selinux
[root@localhost ~]# touch /.autorelabel
[root@localhost ~]# reboot
[root@localhost ~]# ls -Zd /linux/
drwxr-xr-x. root root system_u:object_r:public_content_t:s0 /linux/

还原:
[root@localhost ~]# vim /etc/vsftpd/vsftpd.conf
#anon_root=/linux

[root@localhost ~]# systemctl restart vsftpd.service
3.管理linux布尔值
setenforce 0      #强制模式,有警告,但操作不会被阻止
setenforce 1      #禁止模式,有警告,且操作会被阻止
getsebool -a |grep ftp           #查看目前系统上面ftp服务的所有布尔值条款
setsebool -P ftp_home_dir on     #打开ftp的布尔值
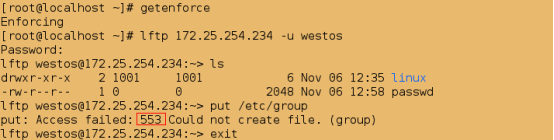
实验2:selinux对程序的影响
@@当selinux处于强制模式时,本地用户将无法put上传文件
[root@localhost ~]# getenforce
Enforcing
[root@localhost ~]# lftp 172.25.254.234 -u westos
Password:
lftp [email protected]:~> ls
drwxr-xr-x    2 1001     1001            6 Nov 06 12:35 linux
-rw-r--r--    1 0        0            2048 Nov 06 12:58 passwd
lftp [email protected]:~> put /etc/group
put: Access failed: 553 Could not create file. (group)
lftp [email protected]:~> exit
解决方案:
1)直接将selinux的状态更改为警告模式即可,但用在这种模式下上传文件不安全
2)直接打开ftp的布尔值
#查看ftp服务的布尔值条款
[root@localhost ~]# getsebool -a | grep ftp

##打开ftp家目录的布尔值
[root@localhost ~]# setsebool -P ftp_home_dir on
[root@localhost ~]# getsebool -a | grep ftp

测试:
[root@localhost ~]# lftp 172.25.254.234 -u westos
Password:
lftp [email protected]:~> ls
drwxr-xr-x    2 1001     1001            6 Nov 06 12:35 linux
-rw-r--r--    1 0        0            2048 Nov 06 12:58 passwd
lftp [email protected]:~> put /etc/group
865 bytes transferred
lftp [email protected]:~> ls
-rw-r--r--    1 1001     1001          865 Nov 06 14:55 group
drwxr-xr-x    2 1001     1001            6 Nov 06 12:35 linux
-rw-r--r--    1 0        0            2048 Nov 06 12:58 passwd
lftp [email protected]:~> exit

4.selinux日志的管理
/var/log/audit/audit.log    #记录selinux的日志,只会说明错误,但不会提供解决方法,且阅读复杂
/var/log/messages           #记录selinux的日志,会详细的记录错误,并且可提供解决方法
实验:
##查看selinux的状态
[root@localhost ~]# getenforce
Enforcing
[root@localhost ~]# touch /mnt/westosfile3
[root@localhost ~]# mv /mnt/westosfile3 /var/ftp/
[root@localhost ~]# cd /var/ftp/
[root@localhost ftp]# ls
file1  pub  westosfile1  westosfile2  westosfile3
[root@localhost ftp]# > /var/log/messages
##发现westosfile3文件与/var/ftp/目录的安全上下文不同
[root@localhost ftp]# ls -Z /var/ftp/westosfile3
-rw-r--r--. root root unconfined_u:object_r:mnt_t:s0   /var/ftp/westosfile3
[root@localhost ftp]# ls -Z /var/ftp/ -d
drwxr-xr-x. root root system_u:object_r:public_content_t:s0 /var/ftp/
测试:
由于westosfile3的安全上下文与/var/ftp的安全上下文不同,所以网页上无法访问到此文件

##查看日志,只会说明错误
[root@localhost ~]# cat /var/log/audit/audit.log
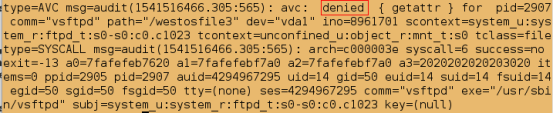
##查看日志,不仅有错误说明还有解决方案
[root@localhost ~]# cat /var/log/messages

[root@localhost ~]# restorecon -v /var/ftp/*
##查看安全上下文
[root@localhost ~]# ls -Z /var/ftp/westosfile3

测试:
刷新网页;此时便可以查看到westosfile3,因为这时它的安全上文与/var/ftp的安全上文一样

@@此解决方案来自 setroubleshoot-server-3.2.17-2.el7.x86_64
##卸载此软件
[root@localhost ~]# yum remove -y setroubleshoot-server-3.2.17-2.el7.x86_64
[root@localhost ~]# touch /mnt/westosfile4
[root@localhost ~]# mv /mnt/westosfile4 /var/ftp
[root@localhost ~]# > /var/log/messages
[root@localhost ~]# > /var/log/audit/audit.log
测试:

##此时仍然可以看到错误信息
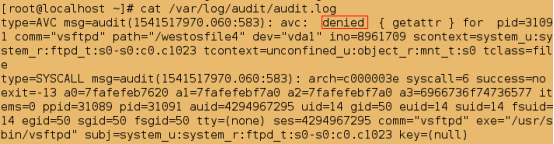
[root@localhost ~]# cat /var/log/audit/audit.log
##但无法再查看到解决方案
[root@localhost ~]# cat /var/log/messages
##安装setroubleshoot
[root@localhost ~]# yum install -y setroubleshoot-server-3.2.17-2.el7.x86_64
[root@localhost ~]# >  /var/log/messages
##先刷新网页;此时便又可以查看到解决方案
[root@localhost ~]# cat /var/log/messages

5.修改进程访问的端口号
semanage port -l | grep 服务名称                #查看某个服务的端口
semanage port -a -t 类型 -p 协议 端口号          #添加某个端口号为指定服务的访问端口
例如:
semanage port -l | grep http                   #查看http服务的端口
semanage port -a -t http_port_t -p tcp 6666    #添加6666为http_port_t服务的访问端口
实验:selinux对服务所使用的资源的影响
[root@localhost ~]# yum install -y httpd
Loaded plugins: langpacks
[root@localhost ~]# getenforce
Enforcing
##修改apache的默认端口
[root@localhost ~]# vim /etc/httpd/conf/httpd.conf
###############
Listen 6666      ##此端口必须是系统中不存在的端口
##强制模式下无法重启apache
[root@localhost ~]# systemctl restart httpd
Job for httpd.service failed. See 'systemctl status httpd.service' and 'journalctl -xn' for details.

##将selinux的状态更改为警告模式
[root@localhost ~]# setenforce 0
[root@localhost ~]# getenforce
Permissive
[root@localhost ~]# systemctl restart httpd

##查看http的端口;发现并没有端口号为6666的
[root@localhost ~]# semanage port -l | grep http
##添加6666为http_port_t服务的访问端口
[root@localhost ~]# semanage port -a -t http_port_t -p tcp 666
##此时便可以查看到6666端口
[root@localhost ~]# semanage port -l | grep http
