笔者介绍:姜雪伟,IT公司技术合伙人,IT高级讲师,CSDN社区专家,特邀编辑,畅销书作者,已出版书籍:《手把手教你架构3D游戏引擎》电子工业出版社和《Unity3D实战核心技术详解》电子工业出版社等。
CSDN视频网址:http://edu.csdn.net/lecturer/144
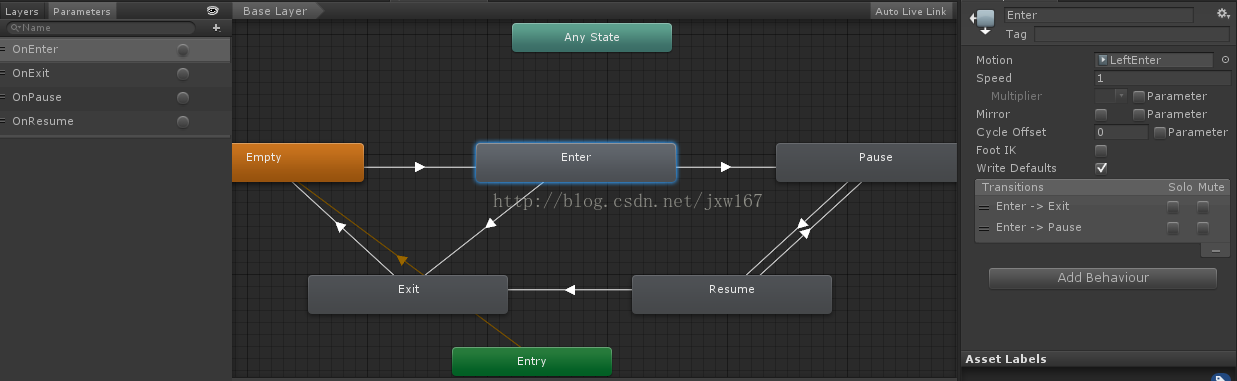
利用Unity3D引擎开发游戏,经常会使用各种架构设计,网上关于这方面的架构设计也很多,比如MVC,FSM等,架构设计没有好坏之分,使用方便就可以。这里给读者介绍一种新的设计方式,在这里给读者介绍一种利用新动画状态机对UI进行的架构设计,UI之间的切换是通过新动画状态机实现的,新动画状态机的实现效果如图所示:
对应的实现代码如下所示:
public abstract class BaseView : MonoBehaviour
    {

        public virtual void OnEnter(BaseContext context)
        {

        }

        public virtual void OnExit(BaseContext context)
        {

        }

        public virtual void OnPause(BaseContext context)
        {

        }

        public virtual void OnResume(BaseContext context)
        {

        }

        public void DestroySelf()
        {
            Destroy(gameObject);
        }
	}
这个是作为基类使用的,具体实现类是在它们的子类中实现的,代码如下所示:
  public abstract class AnimateView : BaseView
    {
        [SerializeField]
        protected Animator _animator;

        public override void OnEnter(BaseContext context)
        {
            _animator.SetTrigger("OnEnter");
        }

        public override void OnExit(BaseContext context)
        {
            _animator.SetTrigger("OnExit");
        }

        public override void OnPause(BaseContext context)
        {
            _animator.SetTrigger("OnPause");
        }

        public override void OnResume(BaseContext context)
        {
            _animator.SetTrigger("OnResume");
        }

	}
在参数中使用了BaseContext类,该类是承接上下文的,具体的UI类动作设计如下所示:
public class OptionMenuView : AnimateView
    {

        public override void OnEnter(BaseContext context)
        {
            base.OnEnter(context);
        }

        public override void OnExit(BaseContext context)
        {
            base.OnExit(context);
        }

        public override void OnPause(BaseContext context)
        {
            base.OnPause(context);
        }

        public override void OnResume(BaseContext context)
        {
            base.OnResume(context);
        }

		public void BackCallBack()
        {
            Singleton<ContextManager>.Instance.Pop();
        }

        public void NextCallBack()
        {
            Singleton<ContextManager>.Instance.Push(new NextMenuContext());
        }
    }
在此调用了两个接口,BackCallBack函数和NextCallBack函数,目的是将显示的类放到堆栈中便于统一管理,函数实现如下所示:
public class ContextManager
{
private Stack<BaseContext> _contextStack = new Stack<BaseContext>();
private ContextManager()
{
Push(new MainMenuContext());
}
public void Push(BaseContext nextContext)
{
if (_contextStack.Count != 0)
{
BaseContext curContext = _contextStack.Peek();
BaseView curView = Singleton<UIManager>.Instance.GetSingleUI(curContext.ViewType).GetComponent<BaseView>();
curView.OnPause(curContext);
}
_contextStack.Push(nextContext);
BaseView nextView = Singleton<UIManager>.Instance.GetSingleUI(nextContext.ViewType).GetComponent<BaseView>();
nextView.OnEnter(nextContext);
}
public void Pop()
{
if (_contextStack.Count != 0)
{
BaseContext curContext = _contextStack.Peek();
_contextStack.Pop();
BaseView curView = Singleton<UIManager>.Instance.GetSingleUI(curContext.ViewType).GetComponent<BaseView>();
curView.OnExit(curContext);
}
if (_contextStack.Count != 0)
{
BaseContext lastContext = _contextStack.Peek();
BaseView curView = Singleton<UIManager>.Instance.GetSingleUI(lastContext.ViewType).GetComponent<BaseView>();
curView.OnResume(lastContext);
}
}
public BaseContext PeekOrNull()
{
if (_contextStack.Count != 0)
{
return _contextStack.Peek();
}
return null;
}
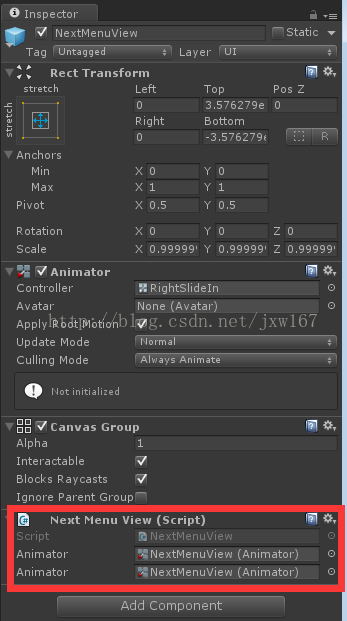
}将该脚本挂接到对象上的效果如下所示:
在这里只是给读者提供一种思路,代码下载地址:链接:http://pan.baidu.com/s/1pLLoUKF 密码:xxy0