tensorflow保存模型和加载模型的方法(Python和Android)
一、tensorflow保存模型的几种方法:
(1) tf.train.saver()保存模型
使用 tf.train.saver()保存模型,该方法保存模型文件的时候会产生多个文件,会把计算图的结构和图上参数取值分成了不同的文件存储。这种方法是在TensorFlow中是最常用的保存方式。
例如:
import tensorflow as tf
# 声明两个变量
v1 = tf.Variable(tf.random_normal([1, 2]), name="v1")
v2 = tf.Variable(tf.random_normal([2, 3]), name="v2")
init_op = tf.global_variables_initializer() # 初始化全部变量
saver = tf.train.Saver() # 声明tf.train.Saver类用于保存模型
with tf.Session() as sess:
    sess.run(init_op)
    print("v1:", sess.run(v1)) # 打印v1、v2的值一会读取之后对比
    print("v2:", sess.run(v2))
    saver_path = saver.save(sess, "save/model.ckpt")  # 将模型保存到save/model.ckpt文件
    print("Model saved in file:", saver_path)
运行后,会在save目录下保存了四个文件:
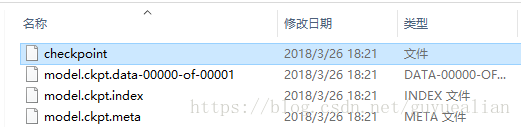
其中checkpoint是检查点文件,文件保存了一个目录下所有的模型文件列表;model.ckpt.meta文件保存了TensorFlow计算图的结构,可以理解为神经网络的网络结构,该文件可以被 tf.train.import_meta_graph 加载到当前默认的图来使用。
    参考资料:
    【1】https://blog.csdn.net/lwplwf/article/details/62419087
(2)tf.train.write_graph()
使用 tf.train.write_graph()保存模型,该方法只是保存了模型的结构,并不保存训练完毕的参数值。
(3)convert_variables_to_constants固化模型结构
很多时候,我们需要将TensorFlow的模型导出为单个文件(同时包含模型结构的定义与权重),方便在其他地方使用(如在Android中部署网络)。利用tf.train.write_graph()默认情况下只导出了网络的定义(没有权重),而利用tf.train.Saver().save()导出的文件graph_def与权重是分离的,因此需要采用别的方法。 我们知道,graph_def文件中没有包含网络中的Variable值(通常情况存储了权重),但是却包含了constant值,所以如果我们能把Variable转换为constant,即可达到使用一个文件同时存储网络架构与权重的目标。
TensoFlow为我们提供了convert_variables_to_constants()方法,该方法可以固化模型结构,将计算图中的变量取值以常量的形式保存。而且保存的模型可以移植到Android平台。
    参考资料:
    【1】https://blog.csdn.net/sinat_29957455/article/details/78511119
这里主要实现第三种方法,因为该方法保存的模型可以移植到Android平台运行。以下Python代码,都共享在Github:https://github.com/PanJinquan/MNIST-TensorFlow-Python;移植Android的详细过程可参考本人的另一篇博客资料《将tensorflow MNIST训练模型移植到Android》:https://blog.csdn.net/guyuealian/article/details/79672257
二、训练和保存模型
以MNIST手写数字识别为例,这里首先使用Python版的TensorFlow实现SoftMax Regression分类器,并将训练好的模型的网络拓扑结构和参数保存为pb文件,其中convert_variables_to_constants函数,会将计算图中的变量取值以常量的形式保存:https://blog.csdn.net/sinat_29957455/article/details/78511119
#coding=utf-8
from tensorflow.examples.tutorials.mnist import input_data
import tensorflow as tf
from tensorflow.python.framework import graph_util
print('tensortflow:{0}'.format(tf.__version__))

mnist = input_data.read_data_sets("Mnist_data/", one_hot=True)

#create model
with tf.name_scope('input'):
    x = tf.placeholder(tf.float32,[None,784],name='x_input')#输入节点名:x_input
    y_ = tf.placeholder(tf.float32,[None,10],name='y_input')
with tf.name_scope('layer'):
    with tf.name_scope('W'):
        #tf.zeros([3, 4], tf.int32) ==> [[0, 0, 0, 0], [0, 0, 0, 0], [0, 0, 0, 0]]
        W = tf.Variable(tf.zeros([784,10]),name='Weights')
    with tf.name_scope('b'):
        b = tf.Variable(tf.zeros([10]),name='biases')
    with tf.name_scope('W_p_b'):
        Wx_plus_b = tf.add(tf.matmul(x, W), b, name='Wx_plus_b')

    y = tf.nn.softmax(Wx_plus_b, name='final_result')

# 定义损失函数和优化方法
with tf.name_scope('loss'):
    loss = -tf.reduce_sum(y_ * tf.log(y))
with tf.name_scope('train_step'):
    train_step = tf.train.GradientDescentOptimizer(0.01).minimize(loss)
    print(train_step)
# 初始化
sess = tf.InteractiveSession()
init = tf.global_variables_initializer()
sess.run(init)
# 训练
for step in range(100):
    batch_xs,batch_ys =mnist.train.next_batch(100)
    train_step.run({x:batch_xs,y_:batch_ys})
    # variables = tf.all_variables()
    # print(len(variables))
    # print(sess.run(b))

# 测试模型准确率
pre_num=tf.argmax(y,1,output_type='int32',name="output")#输出节点名:output
correct_prediction = tf.equal(pre_num,tf.argmax(y_,1,output_type='int32'))
accuracy = tf.reduce_mean(tf.cast(correct_prediction,tf.float32))
a = accuracy.eval({x:mnist.test.images,y_:mnist.test.labels})
print('测试正确率:{0}'.format(a))

# 保存训练好的模型
#形参output_node_names用于指定输出的节点名称,output_node_names=['output']对应pre_num=tf.argmax(y,1,name="output"),
output_graph_def = graph_util.convert_variables_to_constants(sess, sess.graph_def,output_node_names=['output'])
with tf.gfile.FastGFile('model/mnist.pb', mode='wb') as f:#’wb’中w代表写文件,b代表将数据以二进制方式写入文件。
    f.write(output_graph_def.SerializeToString())
sess.close()

# 注:
# convert_variables_to_constants函数,会将计算图中的变量取值以常量的形式保存:https://blog.csdn.net/sinat_29957455/article/details/78511119
三、加载和测试
批量测试:
import tensorflow as tf
import numpy as np
from tensorflow.examples.tutorials.mnist import input_data
from PIL import Image
import matplotlib
import matplotlib.pyplot as plt

#模型路径
model_path = 'model/mnist.pb'
#测试数据
mnist = input_data.read_data_sets("Mnist_data/", one_hot=True)
x_test = mnist.test.images
x_labels = mnist.test.labels;

with tf.Graph().as_default():
    output_graph_def = tf.GraphDef()
    with open(model_path, "rb") as f:
        output_graph_def.ParseFromString(f.read())
        tf.import_graph_def(output_graph_def, name="")

    with tf.Session() as sess:
        tf.global_variables_initializer().run()
        # x_test = x_test.reshape(1, 28 * 28)
        input_x = sess.graph.get_tensor_by_name("input/x_input:0")
        output = sess.graph.get_tensor_by_name("output:0")

        # 【1】下面是进行批量测试----------------------------------------------------------
        pre_num = sess.run(output, feed_dict={input_x: x_test})#利用训练好的模型预测结果
        #结果批量测试的准确率
        correct_prediction = tf.equal(pre_num, tf.argmax(x_labels, 1,output_type='int32'))
        accuracy = tf.reduce_mean(tf.cast(correct_prediction, tf.float32))
        acc = sess.run(accuracy, feed_dict={input_x: x_test})
        # a = accuracy.eval({x: mnist.test.images, y_: mnist.test.labels})
        print('测试正确率:{0}'.format(acc))

        #【2】下面是进行单张图片的测试-----------------------------------------------------
        testImage=x_test[0];
        test_input = testImage.reshape(1, 28 * 28)

        pre_num = sess.run(output, feed_dict={input_x: test_input})#利用训练好的模型预测结果
        print('模型预测结果为:',pre_num)
        #显示测试的图片
        testImage = testImage.reshape(28, 28)
        testImage=np.array(testImage * 255, dtype="int32")
        fig = plt.figure(), plt.imshow(testImage, cmap='binary')  # 显示图片
        plt.title("prediction result:"+str(pre_num))
        plt.show()
        #保存测定的图片
        testImage = Image.fromarray(testImage)
        testImage = testImage.convert('L')
        testImage.save("data/test_image.jpg")
        # matplotlib.image.imsave('data/name.jpg', im)
        sess.close()
单个样本测试:
import tensorflow as tf
import numpy as np
from PIL import Image
import matplotlib.pyplot as plt

#模型路径
model_path = 'model/mnist.pb'
#测试图片
testImage = Image.open("data/test_image.jpg");

with tf.Graph().as_default():
    output_graph_def = tf.GraphDef()
    with open(model_path, "rb") as f:
        output_graph_def.ParseFromString(f.read())
        tf.import_graph_def(output_graph_def, name="")

    with tf.Session() as sess:
        tf.global_variables_initializer().run()
        # x_test = x_test.reshape(1, 28 * 28)
        input_x = sess.graph.get_tensor_by_name("input/x_input:0")
        output = sess.graph.get_tensor_by_name("output:0")

        #对图片进行测试
        testImage=testImage.convert('L')
        testImage = testImage.resize((28, 28))
        test_input=np.array(testImage)
        test_input = test_input.reshape(1, 28 * 28)
        pre_num = sess.run(output, feed_dict={input_x: test_input})#利用训练好的模型预测结果
        print('模型预测结果为:',pre_num)
        #显示测试的图片
        # testImage = test_x.reshape(28, 28)
        fig = plt.figure(), plt.imshow(testImage,cmap='binary')  # 显示图片
        plt.title("prediction result:"+str(pre_num))
        plt.show()
读取图片进行测试:
import tensorflow as tf
import numpy as np
import matplotlib.pyplot as plt
import cv2 as cv
#模型路径
model_path = 'model/mnist.pb'
#测试图片
testImage = cv.imread("data/test_image.jpg");

with tf.Graph().as_default():
    output_graph_def = tf.GraphDef()
    with open(model_path, "rb") as f:
        output_graph_def.ParseFromString(f.read())
        tf.import_graph_def(output_graph_def, name="")

    with tf.Session() as sess:
        tf.global_variables_initializer().run()
        # x_test = x_test.reshape(1, 28 * 28)
        input_x = sess.graph.get_tensor_by_name("input/x_input:0")
        output = sess.graph.get_tensor_by_name("output:0")

        #对图片进行测试
        testImage=cv.cvtColor(testImage, cv.COLOR_BGR2GRAY)
        testImage=cv.resize(testImage,dsize=(28, 28))
        test_input=np.array(testImage)
        test_input = test_input.reshape(1, 28 * 28)
        pre_num = sess.run(output, feed_dict={input_x: test_input})#利用训练好的模型预测结果
        print('模型预测结果为:',pre_num)
        # cv.imshow("image",testImage)
        # cv.waitKey(0)
        #显示测试的图片
        fig = plt.figure(), plt.imshow(testImage,cmap='binary')  # 显示图片
        plt.title("prediction result:"+str(pre_num))
        plt.show()
源码Github:https://github.com/PanJinquan/MNIST-TensorFlow-Python
上面TensorFlow保存训练好的模型,可以移植到Android,详细过程可以参考另一篇博客资料《将tensorflow MNIST训练模型移植到Android》:https://blog.csdn.net/guyuealian/article/details/79672257