前面我们完成了与商品类别相关的业务逻辑,接下来我们开始做具体商品部分。
1. 数据库建表并映射Model
首先我们在数据库中新建一张表,然后使用逆向工程将表映射成Model类,表如下:

 1 /*=============================*/
 2 /* Table: 商品表结构                */
 3 /*=============================*/
 4 create table product
 5 (
 6    /* 商品编号,自动增长 */
 7    id                  int primary key not null auto_increment,
 8    /* 商品名称 */
 9    name                varchar(20),
10    /* 商品价格 */
11    price               decimal(8,2),
12    /* 商品图片 */
13    pic                 varchar(200),
14    /* 商品简单介绍 */
15    remark              longtext,
16    /* 商品详细介绍 */
17    xremark             longtext,
18    /* 商品生产日期 */
19    date                timestamp default CURRENT_TIMESTAMP,
20    /* 是否为推荐商品,推荐商品才有可能显示在商城首页 */
21    commend             bool,
22    /* 是否为有效商品,有效商品才有可能显示在商城首页 */
23    open                bool,
24    /* 商品所在的类别编号*/
25    cid                  int,
26    constraint cid_FK foreign key(cid) references category(id)
27 );
使用逆向工程映射为Model类就不赘述了,前面有提到如何使用逆向工程生成Model。
2. 完成商品类的Service层和Action的架构
2.1 商品类的Service层架构
与前面category一样,product也得有个service来操作与商品相关的业务逻辑,所以我们得写一个ProductService和ProductServiceImpl的架构出来,具体如下:
 1 //ProductService接口继承BaseService<Product>
 2 public interface ProductService extends BaseService<Product> {
 3
 4 }
 5
 6 //ProductServiceImpl实现类继承BaseServiceImpl<Product>,并实现上面的ProductService接口
 7 @Service("productService")
 8 public class ProductServiceImpl extends BaseServiceImpl<Product> implements ProductService {
 9
10 }
2.2 商品类的Action架构
首先得完善一下BaseAction中关于Service层的注解
1 @Controller("baseAction")
2 @Scope("prototype")
3 public class BaseAction<T> extends ActionSupport implements RequestAware,SessionAware,ApplicationAware,ModelDriven<T> {
4
5     @Resource
6     protected ProductService productService;
7
8         //其他代码省略,还是原来的代码……
9 }
然后我们写一个ProductAction继承该方法:
1 public class ProductAction extends BaseAction<Product> { 2 3 }
至此,关于商品的后台架构就基本搭建好了,接下来就是完善里面的具体功能和业务逻辑了。
3. 完成前台的基本结构
前台的基本结构和商品类的一样,我们看一下已经完成的商品类的前台都有哪些文件:

我们先根据其商品类的前台文件,拷贝一份到product文件夹中,然后我们再做相应的修改。先来分析一下流程:首先index.jsp到aindex.jsp显示左侧菜单栏,当点击类别管理时,进入category/query.jsp页面右侧显示所有商品类别信息,搜索和删除功能均在此页面,不需要弹出新的窗口,添加弹出save.jsp窗口,更新弹出update.jsp窗口。当点击商品管理的时候,进入product/query.jsp页面右侧显示所有商品信息,搜索和删除功能均在此页面完成,添加和更新分别弹出save.jsp和update.jsp。接下来我们把各个页面的框架搭建好,然后往相应的部分填东西即可。
首先在aindex.jsp中添加如下代码: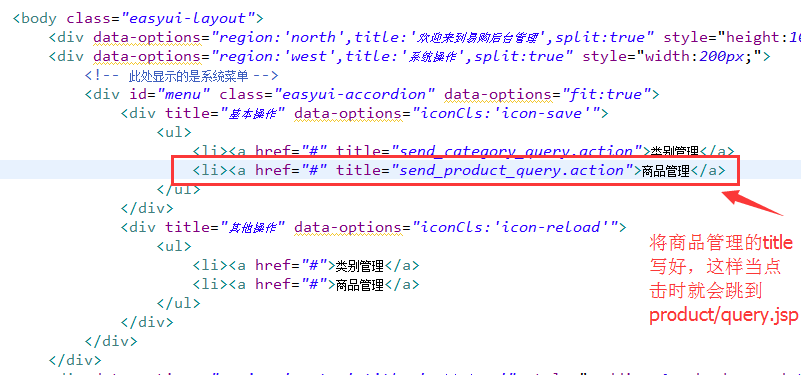
接下来,我们完成query.jsp的框架:
  1 <%@ page language="java" import="java.util.*" pageEncoding="UTF-8"%>
  2 <!DOCTYPE HTML PUBLIC "-//W3C//DTD HTML 4.01 Transitional//EN">
  3 <html>
  4   <head>
  5     <%@ include file="/public/head.jspf" %>
  6     <style type="text/css">
  7         body {
  8             margin: 1px;
  9         }
 10         .searchbox {
 11           margin: -3;
 12         }
 13     </style>
 14     <script type="text/javascript">
 15         $(function(){
 16             $('#dg').datagrid({
 17                 //url地址改为请求productAction中的queryJoinCategory方法
 18                 url:'product_queryJoinCategory.action',
 19                  loadMsg:'Loading......',
 20                 queryParams:{name:''},//这里参数改成name,参数值为空,表示我们要显示所有商品,后台是根据商品name属性查询的
 21                 //width:300,
 22                 fitColumns:true,
 23                 striped:true,
 24                 nowrap:true,
 25                 singleSelect:false,
 26                 pagination:true,
 27                 pageSize:5,
 28                 pageList:[5,10,15,20],
 29                 idField:'id',//指定id为标识字段,在删除,更新的时候有用,如果配置此字段,在翻页时,换页不会影响选中的项
 30
 31                 //toolbar定义添加、删除、更新按钮以及搜索框
 32                 toolbar: [{
 33                     iconCls: 'icon-add',
 34                      text:'添加商品',
 35                     handler: function(){
 36                         //添加触发代码
 37                     }
 38                  },'-',{
 39                      iconCls: 'icon-edit',
 40                     text:'更新商品',
 41                     handler: function(){
 42                                             //添加触发代码
 43                     }
 44                  },'-',{
 45                     iconCls: 'icon-remove',
 46                      text:'删除商品',
 47                     handler: function(){
 48                         //添加触发代码
 49                     }
 50                  },'-',{ //查询按钮不是LinkButton,它有语法,但是也支持解析HTML标签
 51                     text:"<input id='ss' name='serach' />"
 52                  }],
 53                 rowStyler: function(index,row){
 54                      console.info("index" + index + "," + row)
 55                     if(index % 2 == 0) {
 56                          return '';
 57                     } else {
 58                          return '';
 59                     }
 60
 61                  },
 62                 frozenColumns:[[
 63                      {field:'checkbox',checkbox:true},
 64                     {field:'id',title:'商品编号',width:100}
 65                  ]],
 66                 columns:[[
 67                      {field:'name',title:'商品名称',width:100},
 68                     {field:'price',title:'商品价格',width:100},
 69                      {field:'remark',title:'简单描述',width:100},
 70                     {field:'xremark',title:'详细描述',width:100},
 71                      {field:'date',title:'上架时间',width:100},
 72                     {field:'commend',title:'推荐商品',width:100,
 73                          formatter: function(value,row,index){
 74                             if(value) {
 75                                  return "<input type='checkbox' checked='checked' disabled='true'";
 76                             } else {
 77                                  return "<input type='checkbox' disabled='true'";
 78                             }
 79                          }
 80                      },
 81                      {field:'open',title:'有效商品',width:100,
 82                         formatter: function(value,row,index){
 83                              if(value) {
 84                                  return "<input type='checkbox' checked='checked' disabled='true'";
 85                             } else {
 86                                  return "<input type='checkbox' disabled='true'";
 87                             }
 88                          }
 89                      },
 90                      {field:'category.type',title:'所属商品类别',width:200, //category.type是商品类别
 91                          formatter: function(value,row,index){
 92                              if(row.category != null && row.category.type != null) {
 93                                  return row.category.type; //如果商品类别不为空,返回商品类别
 94                              } else {
 95                                  return "此商品暂时未分类";
 96                             }
 97                          }
 98                     }
 99                 ]]
100              });
101             //把普通的文本框转化为查询搜索文本框
102             $('#ss').searchbox({
103                  //触发查询事件
104                  searcher:function(value,name){ //value表示输入的值
105                     //添加触发代码
106                 },
107                 prompt:'请输入搜索关键字'
108              });
109         });
110     </script>
111   </head>
112
113   <body>
114       <table id="dg"></table>
115
116   </body>
117 </html>
接下来我们完成productAction中的queryJoinCategory方法,在这之前,先要完成service部分,我们都是先从底层慢慢往上开发的:
 1 //ProductService接口
 2 public interface ProductService extends BaseService<Product> {
 3
 4     //查询商品信息,级联类别
 5     public List<Product> queryJoinCategory(String type, int page, int size); //使用商品的名称查询
 6     //根据关键字查询总记录数
 7     public Long getCount(String type);
 8 }
 9
10 @SuppressWarnings("unchecked")
11 @Service("productService")
12 public class ProductServiceImpl extends BaseServiceImpl<Product> implements ProductService {
13
14     @Override
15     public List<Product> queryJoinCategory(String name, int page, int size) {
16         String hql = "from Product p left join fetch p.category where p.name like :name";
17         return getSession().createQuery(hql)
18                 .setString("name", "%" + name + "%")
19                 .setFirstResult((page-1) * size) //从第几个开始显示
20                 .setMaxResults(size) //显示几个
21                 .list();
22     }
23
24     @Override
25     public Long getCount(String name) {
26         String hql = "select count(p) from Product p where p.name like :name";
27         return (Long) getSession().createQuery(hql)
28             .setString("name", "%" + name + "%")
29             .uniqueResult(); //返回一条记录:总记录数
30     }
31
32 }
下面可以完成productAction中的queryJoinCategory方法了:
 1 @Controller("productAction")
 2 @Scope("prototype")
 3 public class ProductAction extends BaseAction<Product> {
 4
 5     public String queryJoinCategory() {
 6         System.out.println("name:" + model.getName());
 7         System.out.println("page:" + page);
 8         System.out.println("rows:" + rows);
 9
10         //用来存储分页的数据
11         pageMap = new HashMap<String, Object>();
12
13         //根据关键字和分页的参数查询相应的数据
14         List<Product> productList = productService.queryJoinCategory(model.getName(), page, rows);
15         pageMap.put("rows", productList); //存储为JSON格式
16         //根据关键字查询总记录数
17         Long total = productService.getCount(model.getName());
18 //        System.out.println(total);
19         pageMap.put("total", total); //存储为JSON格式
20         return "jsonMap";
21     }
22
23 }
接下来在struts.xml中进行配置,跟之前的商品类一样的流程,到这里可以看出,开发好了一个,下面一个就快了:
1 <action name="product_*" class="productAction" method="{1}">
2     <result name="jsonMap" type="json">
3         <param name="root">pageMap</param>
4         <param name="excludeProperties">
5             <!-- rows[0].category.account -->
6             <!-- 把所有account过滤掉,否则会出现懒加载问题,该部分下面截图 -->
7         </param>
8     </result>
9 </action>

这样后台程序写好了,然后开启tomcat,测试一下,当我们点击左侧菜单栏的商品管理时,会弹出右边如下窗口:
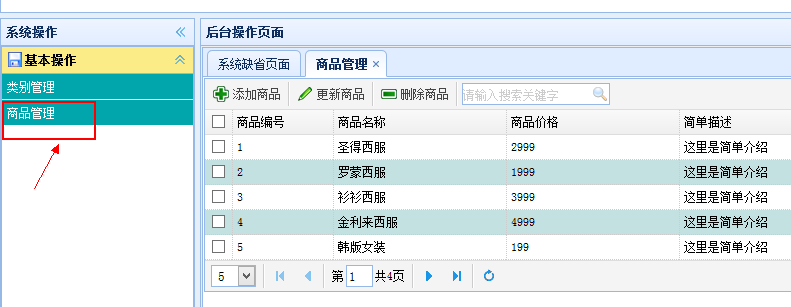
这样我们就完成了商品管理窗口的框架了。
前面我们完成了与商品类别相关的业务逻辑,接下来我们开始做具体商品部分。
1. 数据库建表并映射Model
首先我们在数据库中新建一张表,然后使用逆向工程将表映射成Model类,表如下:
 1 /*=============================*/
 2 /* Table: 商品表结构                */
 3 /*=============================*/
 4 create table product
 5 (
 6    /* 商品编号,自动增长 */
 7    id                  int primary key not null auto_increment,
 8    /* 商品名称 */
 9    name                varchar(20),
10    /* 商品价格 */
11    price               decimal(8,2),
12    /* 商品图片 */
13    pic                 varchar(200),
14    /* 商品简单介绍 */
15    remark              longtext,
16    /* 商品详细介绍 */
17    xremark             longtext,
18    /* 商品生产日期 */
19    date                timestamp default CURRENT_TIMESTAMP,
20    /* 是否为推荐商品,推荐商品才有可能显示在商城首页 */
21    commend             bool,
22    /* 是否为有效商品,有效商品才有可能显示在商城首页 */
23    open                bool,
24    /* 商品所在的类别编号*/
25    cid                  int,
26    constraint cid_FK foreign key(cid) references category(id)
27 );
使用逆向工程映射为Model类就不赘述了,前面有提到如何使用逆向工程生成Model。
2. 完成商品类的Service层和Action的架构
2.1 商品类的Service层架构
与前面category一样,product也得有个service来操作与商品相关的业务逻辑,所以我们得写一个ProductService和ProductServiceImpl的架构出来,具体如下:
 1 //ProductService接口继承BaseService<Product>
 2 public interface ProductService extends BaseService<Product> {
 3
 4 }
 5
 6 //ProductServiceImpl实现类继承BaseServiceImpl<Product>,并实现上面的ProductService接口
 7 @Service("productService")
 8 public class ProductServiceImpl extends BaseServiceImpl<Product> implements ProductService {
 9
10 }
2.2 商品类的Action架构
首先得完善一下BaseAction中关于Service层的注解
1 @Controller("baseAction")
2 @Scope("prototype")
3 public class BaseAction<T> extends ActionSupport implements RequestAware,SessionAware,ApplicationAware,ModelDriven<T> {
4
5     @Resource
6     protected ProductService productService;
7
8         //其他代码省略,还是原来的代码……
9 }
然后我们写一个ProductAction继承该方法:
1 public class ProductAction extends BaseAction<Product> { 2 3 }
至此,关于商品的后台架构就基本搭建好了,接下来就是完善里面的具体功能和业务逻辑了。
3. 完成前台的基本结构
前台的基本结构和商品类的一样,我们看一下已经完成的商品类的前台都有哪些文件:
我们先根据其商品类的前台文件,拷贝一份到product文件夹中,然后我们再做相应的修改。先来分析一下流程:首先index.jsp到aindex.jsp显示左侧菜单栏,当点击类别管理时,进入category/query.jsp页面右侧显示所有商品类别信息,搜索和删除功能均在此页面,不需要弹出新的窗口,添加弹出save.jsp窗口,更新弹出update.jsp窗口。当点击商品管理的时候,进入product/query.jsp页面右侧显示所有商品信息,搜索和删除功能均在此页面完成,添加和更新分别弹出save.jsp和update.jsp。接下来我们把各个页面的框架搭建好,然后往相应的部分填东西即可。
首先在aindex.jsp中添加如下代码:
接下来,我们完成query.jsp的框架:
  1 <%@ page language="java" import="java.util.*" pageEncoding="UTF-8"%>
  2 <!DOCTYPE HTML PUBLIC "-//W3C//DTD HTML 4.01 Transitional//EN">
  3 <html>
  4   <head>
  5     <%@ include file="/public/head.jspf" %>
  6     <style type="text/css">
  7         body {
  8             margin: 1px;
  9         }
 10         .searchbox {
 11           margin: -3;
 12         }
 13     </style>
 14     <script type="text/javascript">
 15         $(function(){
 16             $('#dg').datagrid({
 17                 //url地址改为请求productAction中的queryJoinCategory方法
 18                 url:'product_queryJoinCategory.action',
 19                  loadMsg:'Loading......',
 20                 queryParams:{name:''},//这里参数改成name,参数值为空,表示我们要显示所有商品,后台是根据商品name属性查询的
 21                 //width:300,
 22                 fitColumns:true,
 23                 striped:true,
 24                 nowrap:true,
 25                 singleSelect:false,
 26                 pagination:true,
 27                 pageSize:5,
 28                 pageList:[5,10,15,20],
 29                 idField:'id',//指定id为标识字段,在删除,更新的时候有用,如果配置此字段,在翻页时,换页不会影响选中的项
 30
 31                 //toolbar定义添加、删除、更新按钮以及搜索框
 32                 toolbar: [{
 33                     iconCls: 'icon-add',
 34                      text:'添加商品',
 35                     handler: function(){
 36                         //添加触发代码
 37                     }
 38                  },'-',{
 39                      iconCls: 'icon-edit',
 40                     text:'更新商品',
 41                     handler: function(){
 42                                             //添加触发代码
 43                     }
 44                  },'-',{
 45                     iconCls: 'icon-remove',
 46                      text:'删除商品',
 47                     handler: function(){
 48                         //添加触发代码
 49                     }
 50                  },'-',{ //查询按钮不是LinkButton,它有语法,但是也支持解析HTML标签
 51                     text:"<input id='ss' name='serach' />"
 52                  }],
 53                 rowStyler: function(index,row){
 54                      console.info("index" + index + "," + row)
 55                     if(index % 2 == 0) {
 56                          return '';
 57                     } else {
 58                          return '';
 59                     }
 60
 61                  },
 62                 frozenColumns:[[
 63                      {field:'checkbox',checkbox:true},
 64                     {field:'id',title:'商品编号',width:100}
 65                  ]],
 66                 columns:[[
 67                      {field:'name',title:'商品名称',width:100},
 68                     {field:'price',title:'商品价格',width:100},
 69                      {field:'remark',title:'简单描述',width:100},
 70                     {field:'xremark',title:'详细描述',width:100},
 71                      {field:'date',title:'上架时间',width:100},
 72                     {field:'commend',title:'推荐商品',width:100,
 73                          formatter: function(value,row,index){
 74                             if(value) {
 75                                  return "<input type='checkbox' checked='checked' disabled='true'";
 76                             } else {
 77                                  return "<input type='checkbox' disabled='true'";
 78                             }
 79                          }
 80                      },
 81                      {field:'open',title:'有效商品',width:100,
 82                         formatter: function(value,row,index){
 83                              if(value) {
 84                                  return "<input type='checkbox' checked='checked' disabled='true'";
 85                             } else {
 86                                  return "<input type='checkbox' disabled='true'";
 87                             }
 88                          }
 89                      },
 90                      {field:'category.type',title:'所属商品类别',width:200, //category.type是商品类别
 91                          formatter: function(value,row,index){
 92                              if(row.category != null && row.category.type != null) {
 93                                  return row.category.type; //如果商品类别不为空,返回商品类别
 94                              } else {
 95                                  return "此商品暂时未分类";
 96                             }
 97                          }
 98                     }
 99                 ]]
100              });
101             //把普通的文本框转化为查询搜索文本框
102             $('#ss').searchbox({
103                  //触发查询事件
104                  searcher:function(value,name){ //value表示输入的值
105                     //添加触发代码
106                 },
107                 prompt:'请输入搜索关键字'
108              });
109         });
110     </script>
111   </head>
112
113   <body>
114       <table id="dg"></table>
115
116   </body>
117 </html>
接下来我们完成productAction中的queryJoinCategory方法,在这之前,先要完成service部分,我们都是先从底层慢慢往上开发的:
 1 //ProductService接口
 2 public interface ProductService extends BaseService<Product> {
 3
 4     //查询商品信息,级联类别
 5     public List<Product> queryJoinCategory(String type, int page, int size); //使用商品的名称查询
 6     //根据关键字查询总记录数
 7     public Long getCount(String type);
 8 }
 9
10 @SuppressWarnings("unchecked")
11 @Service("productService")
12 public class ProductServiceImpl extends BaseServiceImpl<Product> implements ProductService {
13
14     @Override
15     public List<Product> queryJoinCategory(String name, int page, int size) {
16         String hql = "from Product p left join fetch p.category where p.name like :name";
17         return getSession().createQuery(hql)
18                 .setString("name", "%" + name + "%")
19                 .setFirstResult((page-1) * size) //从第几个开始显示
20                 .setMaxResults(size) //显示几个
21                 .list();
22     }
23
24     @Override
25     public Long getCount(String name) {
26         String hql = "select count(p) from Product p where p.name like :name";
27         return (Long) getSession().createQuery(hql)
28             .setString("name", "%" + name + "%")
29             .uniqueResult(); //返回一条记录:总记录数
30     }
31
32 }
下面可以完成productAction中的queryJoinCategory方法了:
 1 @Controller("productAction")
 2 @Scope("prototype")
 3 public class ProductAction extends BaseAction<Product> {
 4
 5     public String queryJoinCategory() {
 6         System.out.println("name:" + model.getName());
 7         System.out.println("page:" + page);
 8         System.out.println("rows:" + rows);
 9
10         //用来存储分页的数据
11         pageMap = new HashMap<String, Object>();
12
13         //根据关键字和分页的参数查询相应的数据
14         List<Product> productList = productService.queryJoinCategory(model.getName(), page, rows);
15         pageMap.put("rows", productList); //存储为JSON格式
16         //根据关键字查询总记录数
17         Long total = productService.getCount(model.getName());
18 //        System.out.println(total);
19         pageMap.put("total", total); //存储为JSON格式
20         return "jsonMap";
21     }
22
23 }
接下来在struts.xml中进行配置,跟之前的商品类一样的流程,到这里可以看出,开发好了一个,下面一个就快了:
1 <action name="product_*" class="productAction" method="{1}">
2     <result name="jsonMap" type="json">
3         <param name="root">pageMap</param>
4         <param name="excludeProperties">
5             <!-- rows[0].category.account -->
6             <!-- 把所有account过滤掉,否则会出现懒加载问题,该部分下面截图 -->
7         </param>
8     </result>
9 </action>
这样后台程序写好了,然后开启tomcat,测试一下,当我们点击左侧菜单栏的商品管理时,会弹出右边如下窗口:
这样我们就完成了商品管理窗口的框架了。