Ubuntu使用日常
记录使用
Ubuntu过程中遇到的问题,总结一些常用工具,归纳一些小技巧。本文永久更新地址:Ubuntu.md
文章目录
- Ubuntu使用日常
- 1、redshift色温调节工具
- 2、无道词典
- 3、pip指向问题
- 4、更换pip源
- 5、GitHub源
- 6、查看Linux本地IP地址
- 7、ubuntu本地开启微型服务器
- 8、ECS与本地主机互传文件
- 9、小书匠和Evernote
- 10、Windows 中 Chromium 缺少 Google API 密钥
- 11、博客音乐外链
- 12、Debian/Ubuntu中管理多版本Node.js
- 13、虚拟终端(Ctrl+Alt+F1)下显示菱形中文乱码
- 14、彻底卸载mysql重新安装
- 15、MySQL5.7设置utf8编码格式
- 16、WIndows的Linux子系统
- 17、文件管理器左侧快捷方式管理
- 18、访问磁盘
- 19、Grub启动图形界面美化
- 20、开机自启动
- 21、Pycharm汉化
- 22、Notepad++配置
- 23、Windows10 Python配置
- 24、MAC OS 主题
- 25、垃圾清理
- 26、暴力关机导致蓝屏问题
- 27、mentohust联网
- 28、彻底卸载Firefox
- 29、安装chromium
- 30、终端图片显示工具
- 31、经典菜单指示器
- 32、文件编码转换
- 33、字符串logo工具
- 34、百度网盘相关
- 35、类似`QQ`的截图工具
- 36、`dot`画图
- 37、`htop`进程管理工具
- 38、`fuck`终端工具
- 39、查看电脑完整配置
- 40、标题栏实时显示上下行网速
- 41、万能解压工具`unar`
- 42、安装`aira2`及开机启动配置
1、redshift色温调节工具
安装
# 只安装Redshift发现没有界面,所以安装了三个包
sudo apt install gtk-redshift redshift python-appindicator
# 执行
gtk-redshift
配置
touch ~/.config/redshift.conf
sudo gedit ~/.config/redshift.conf
# 加上以下内容
; Global settings for redshift
[redshift]
; Set the day and night screen temperatures
temp-day=4500
temp-night=3500

; Enable/Disable a smooth transition between day and night
; 0 will cause a direct change from day to night screen temperature.
; 1 will gradually increase or decrease the screen temperature.
transition=1

; Set the screen brightness. Default is 1.0.
;brightness=0.9
; It is also possible to use different settings for day and night
; since version 1.8.
;brightness-day=0.7
;brightness-night=0.4
; Set the screen gamma (for all colors, or each color channel
; individually)
gamma=0.8
;gamma=0.8:0.7:0.8
; This can also be set individually for day and night since
; version 1.10.
;gamma-day=0.8:0.7:0.8
;gamma-night=0.6

; Set the location-provider: 'geoclue', 'geoclue2', 'manual'
; type 'redshift -l list' to see possible values.
; The location provider settings are in a different section.
location-provider=manual

; Set the adjustment-method: 'randr', 'vidmode'
; type 'redshift -m list' to see all possible values.
; 'randr' is the preferred method, 'vidmode' is an older API.
; but works in some cases when 'randr' does not.
; The adjustment method settings are in a different section.
adjustment-method=randr

; Configuration of the location-provider:
; type 'redshift -l PROVIDER:help' to see the settings.
; ex: 'redshift -l manual:help'
; Keep in mind that longitudes west of Greenwich (e.g. the Americas)
; are negative numbers.
[manual]
lat=36.10
lon=103.80

; Configuration of the adjustment-method
; type 'redshift -m METHOD:help' to see the settings.
; ex: 'redshift -m randr:help'
; In this example, randr is configured to adjust screen 1.
; Note that the numbering starts from 0, so this is actually the
; second screen. If this option is not specified, Redshift will try
; to adjust _all_ screens.
; [randr]
; screen=1
2、无道词典
环境
sudo apt-get install python3
sudo apt-get install python3-pip
sudo pip3 install bs4
sudo pip3 install lxml
安装
git clone https://github.com/chestnutheng/wudao-dict
cd ./wudao-dict/wudao-dict
sudo bash setup.sh #或者sudo ./setup.sh
3、pip指向问题
第一次安装pip
sudo apt-get install python-pip python-dev build-essential
sudo pip install --upgrade pip
sudo pip install --upgrade virtualenv
sudo apt-get install python-setuptools python-dev build-essential
安装分别pip
sudo apt-get install python3-pip
sudo apt-get install python-pip
指向问题
编辑这三个文件,将第一行注释分别改为python\python2\python3
~ $which pip
/usr/local/bin/pip
21:36 alien@alien-Inspiron-3443:
~ $which pip2
/usr/local/bin/pip2
21:36 alien@alien-Inspiron-3443:
~ $which pip3
/usr/local/bin/pip3
改好之后便升级pip
sudo pip3 install --upgrade pip
sudo pip2 install --upgrade pip
sudo pip install --upgrade pip
4、更换pip源
pip国内的一些镜像,换源之后出现python2版本过低的情况导致以前的包下载不了,那就直接将文件夹删除就行。
- 阿里云 http://mirrors.aliyun.com/pypi/simple/
- 中国科技大学 https://pypi.mirrors.ustc.edu.cn/simple/
- 豆瓣(douban) http://pypi.douban.com/simple/
- 清华大学 https://pypi.tuna.tsinghua.edu.cn/simple/
- 中国科学技术大学 http://pypi.mirrors.ustc.edu.cn/simple/
linux:
cat > ~/.pip/pip.conf
[global]
index-url = https://pypi.tuna.tsinghua.edu.cn/simple
windows:
直接在user目录中创建一个pip目录,如:C:\Users\xx\pip,新建文件pip.ini,内容如下
[global]
index-url = https://pypi.tuna.tsinghua.edu.cn/simple
另外npm,yarn也可以通过换源提高速度,网上很多教程,稍微提一下。
5、GitHub源
sudo gedit /etc/hosts
219.76.4.4 github-cloud.s3.amazonaws.com
151.101.72.249 http://global-ssl.fastly.Net
192.30.253.112 http://github.com
6、查看Linux本地IP地址
ifconfig -a
inet addr:172.18.166.207  Bcast:172.18.166.255  Mask:255.255.255.0
7、ubuntu本地开启微型服务器
python -m SimpleHTTPServer 8888 #Python2
python -m http.server #python3
之后可以通过ip:端口远程访问本地主机文件。
传输文件
8、ECS与本地主机互传文件
通过ssh协议实现:
- 传输文件
scp ~/cert/* [email protected]:/usr/local/nginx/cert
scp [email protected]:/usr/local/nginx/cert ~/cert/*
- 传输文件夹的话就直接加个
r参数。
9、小书匠和Evernote
小书匠基础模板:
---
title: 2018-10-27未命名文件
tags: tag1,tag2
grammar_cjkRuby: true
---
[Edit](http://markdown.xiaoshujiang.com/)
脚注[^1x]
[^1x]: 脚注用法测试
10、Windows 中 Chromium 缺少 Google API 密钥
在CMD中执行:
setx GOOGLE_API_KEY AIzaSyCkfPOPZXDKNn8hhgu3JrA62wIgC93d44k
setx GOOGLE_DEFAULT_CLIENT_ID 811574891467.apps.googleusercontent.com
setx GOOGLE_DEFAULT_CLIENT_SECRET kdloedMFGdGla2P1zacGjAQh
11、博客音乐外链
12、Debian/Ubuntu中管理多版本Node.js
安装nvm:
git clone https://github.com/creationix/nvm.git ~/.nvm
cd ~/.nvm
git checkout `git describe --abbrev=0 --tags`
激活nvm:
. ~/.nvm/nvm.sh
登录后自动激活nvm,在~/.bashrc加
export NVM_DIR=~/.nvm
[ -s "$NVM_DIR/nvm.sh" ] && . "$NVM_DIR/nvm.sh"
[ -r $NVM_DIR/bash_completion ] && . $NVM_DIR/bash_completion
卸载node和nvm
rm -rf ~/.nvm
13、虚拟终端(Ctrl+Alt+F1)下显示菱形中文乱码
系统全用英文吧:
sudo gedit /etc/default/locale
将内容改为:
LANG="en_US.UTF-8"
LANGUAGE="en_US:en"
再运行:
sudo locale-gen
然后重启reboot,会提示是否将文件夹改成英文的,此时选择“Update…”即可。
14、彻底卸载mysql重新安装
1.命令apt-get删除mysql
sudo apt-get remove --purge mysql-\*
2.手动删除mysql剩余文件
执行命令
sudo find / -name mysql -print
会显示出所有的含有mysql文件名的路径,如下:
/var/lib/mysql
/var/lib/mysql/mysql
/var/log/mysql
/usr/bin/mysql
/usr/lib/mysql
/usr/share/mysql
/etc/mysql
/etc/init.d/mysql
都删除掉
3.重新安装
sudo apt-get install mysql-server mysql-client
如果报错执行下面命令再安装
sudo apt-get remove --purge mysql-\*
sudo apt-get install mysql-server mysql-client
15、MySQL5.7设置utf8编码格式
16、WIndows的Linux子系统
17、文件管理器左侧快捷方式管理
sudo gedit ~/.config/user-dirs.dirs
# 默认的内容是文档,图片,下载等目录
# This file is written by xdg-user-dirs-update
# If you want to change or add directories, just edit the line you're
# interested in. All local changes will be retained on the next run
# Format is XDG_xxx_DIR="$HOME/yyy", where yyy is a shell-escaped
# homedir-relative path, or XDG_xxx_DIR="/yyy", where /yyy is an
# absolute path. No other format is supported.
#
XDG_DESKTOP_DIR="$HOME/Desktop"
XDG_DOWNLOAD_DIR="$HOME/Downloads"
XDG_TEMPLATES_DIR="$HOME/Templates"
XDG_PUBLICSHARE_DIR="$HOME/Public"
XDG_DOCUMENTS_DIR="$HOME/Documents"
XDG_MUSIC_DIR="$HOME/Music"
XDG_PICTURES_DIR="$HOME/Pictures"
XDG_VIDEOS_DIR="$HOME/Videos"
# 再创建一个文件,直接执行:
echo”enabled = false“>〜/ .config / user-dirs.conf
18、访问磁盘
sudo apt-get install ntfs-3g
# 修复不能访问的磁盘
sudo ntfsfix /dev/sda6
19、Grub启动图形界面美化
查看博文
更新Grub:
sudo update-grub
sudo grub-install /dev/sda
20、开机自启动
以plank为例
sudo ln -s /usr/share/applications/plank.desktop /etc/xdg/autostart/
21、Pycharm汉化
22、Notepad++配置
23、Windows10 Python配置
24、MAC OS 主题
sudo apt-get install unity-tweak-tool
sudo add-apt-repository ppa:noobslab/macbuntu


sudo apt-get update


sudo apt-get install macbuntu-os-icons-lts-v7


sudo apt-get install macbuntu-os-ithemes-lts-v7


cd && wget -O Mac.po http://drive.noobslab.com/data/Mac/change-name-on-panel/mac.po


cd /usr/share/locale/en/LC_MESSAGES; sudo msgfmt -o unity.mo ~/Mac.po;rm ~/Mac.po;cd


wget -O launcher_bfb.png http://drive.noobslab.com/data/Mac/launcher-logo/apple/launcher_bfb.png
sudo mv launcher_bfb.png /usr/share/unity/icons/
gsettings set com.canonical.unity-greeter draw-grid false;exit


sudo add-apt-repository ppa:noobslab/themes
sudo apt-get update
sudo apt-get install macbuntu-os-bscreen-lts-v7
25、垃圾清理
sudo apt-get autoclean 清理旧版本的软件缓存
sudo apt-get clean 清理所有软件缓存
sudo apt-get autoremove 删除系统不再使用的孤立软件
sudo apt-get install gtkorphan -y清理Linux下孤立的包
sudo apt-get remove tracker
26、暴力关机导致蓝屏问题
sudo dpkg --configure -a
sudo apt-get install xserver-xorg-lts-utopic
sudo dpkg-reconfigure xserver-xorg-lts-utopic
reboot
27、mentohust联网
下载地址:http://c7.gg/aCFu4
sudo apt-get install mentohust
sudo mentohust -k
sudo mentohust -uusername -p123456 -a1 -d2 -b2 -v4.10 -w
28、彻底卸载Firefox
dpkg --get-selections |grep firefox
sudo apt-get purge firefox
sudo apt-get purge firefox-locale-en
sudo apt-get purge firefox-locale-zh-hans
sudo apt-get purge unity-scope-firefoxbookmarks
29、安装chromium
sudo add-apt-repository ppa:a-v-shkop/chromium
sudo apt-get update
sudo apt-get install chromium-browser
30、终端图片显示工具
sudo apt-get install aview
- 用 ASCII 模式在终端查看:
asciiview elephant.jpg -driver curses
31、经典菜单指示器
32、文件编码转换
安装enca、iconv:
sudo apt-get enca iconv
#enca查看文件编码
enca filename
#iconv将一个GBK编码的文件转换成UTF-8编码
enconv -L zh_CN -x UTF-8 filename
33、字符串logo工具
- 安装:
sudo apt-get install figlet
- 用法:
figlet JupyterLab
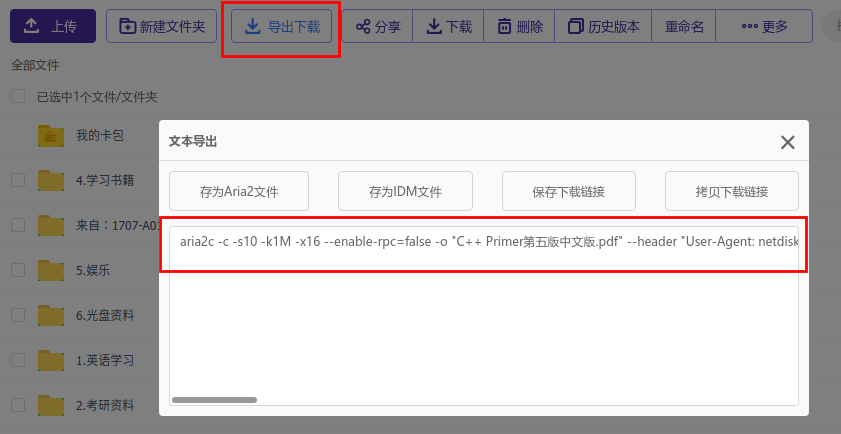
34、百度网盘相关
- Baidu Exporter: 导出aria2c下载链接,之后就可以直接在终端执行命令下载。
- baidu-dl,同上,不过最近好像用不了了。
35、类似QQ的截图工具
wget http://packages.linuxdeepin.com/deepin/pool/main/d/deepin-scrot/deepin-scrot_2.0-0deepin_all.deb
sudo dpkg -i deepin-scrot_2.0-0deepin_all.deb
# 修复依赖问题
sudo apt install -f
rm deepin-scrot_2.0-0deepin_all.deb
然后去系统设置-键盘-快捷键-自定义快捷键,之后就可以体验QQ那样的截图方式了。
当然shutter也很优秀,不过我更喜欢deepin-scrot
sudo apt-get install shutter
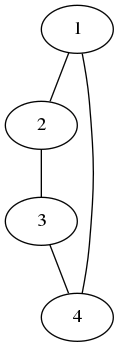
36、dot画图
- 安装:
sudo apt install graphviz
- 简单用法:创建一个文件
vim demo.dot并编写:
graph demo{
	1 -- 2
	2 -- 3
	3 -- 4
	1 -- 4
}
- 生成
png文件:
dot demo.dot -Tpng -o demo.png
- 效果
37、htop进程管理工具
可以查看后台进程PID,方便kill进程.
sudo apt install htop
38、fuck终端工具
sudo pip3 install thefuck
39、查看电脑完整配置
lshw
40、标题栏实时显示上下行网速
下载安装运行indicator-sysmonito:
sudo apt-get install python3-psutil curl git gir1.2-appindicator3-0.1
git clone https://github.com/fossfreedom/indicator-sysmonitor.git
cd indicator-sysmonitor
sudo make install
nohup indicator-sysmonitor &
41、万能解压工具unar
通杀
7z zip tar rar gz等等
- 安装
sudo apt-get install unar
-
简单使用:
lsar test.zip: 列出压缩包内容unar test.zip: 解压压缩包unar test.zip -o /home/dir/: 指定解压结果保存的位置unar -e GBK test.zip: 指定编码unar -p 123456 test.zip: 指定解压密码
-
使用过程中出现中文文件乱码,先
lsar -e GB18030 test.zip,看能不能列出文件名,再unar -e GB18030 test.zip执行解压