项目搭建
工具介绍:
IDE: idea 2018.2
gradle版本:
C:\Users\Administrator>gradle -v

------------------------------------------------------------
Gradle 4.6
------------------------------------------------------------

Build time:   2018-02-28 13:36:36 UTC
Revision:     8fa6ce7945b640e6168488e4417f9bb96e4ab46c

Groovy:       2.4.12
Ant:          Apache Ant(TM) version 1.9.9 compiled on February 2 2017
JVM:          1.8.0_171 (Oracle Corporation 25.171-b11)
OS:           Windows 7 6.1 amd64
jdk版本:
C:\Users\Administrator>java -version
java version "1.8.0_171"
Java(TM) SE Runtime Environment (build 1.8.0_171-b11)
Java HotSpot(TM) 64-Bit Server VM (build 25.171-b11, mixed mode)
创建eureka-server单机版
创建过程参考:https://www.cnblogs.com/lplshermie/p/9105329.html
build.gradle配置信息如下:
这里springboot的版本为:2.0.6.RELEASE
springcloud的版本为: Finchley.SR2
buildscript {
    ext {
        springBootVersion = '2.0.6.RELEASE'
    }
    repositories {
        mavenCentral()
    }
    dependencies {
        classpath("org.springframework.boot:spring-boot-gradle-plugin:${springBootVersion}")
    }
}

apply plugin: 'java'
apply plugin: 'eclipse'
apply plugin: 'org.springframework.boot'
apply plugin: 'io.spring.dependency-management'

group = 'com.ghq.cloud'
version = '0.0.1-SNAPSHOT'
sourceCompatibility = 1.8

repositories {
    mavenCentral()
}


ext {
    springCloudVersion = 'Finchley.SR2'
}

dependencies {
    implementation('org.springframework.cloud:spring-cloud-starter-netflix-eureka-server')
    testImplementation('org.springframework.boot:spring-boot-starter-test')
}

dependencyManagement {
    imports {
        mavenBom "org.springframework.cloud:spring-cloud-dependencies:${springCloudVersion}"
    }
}
application.yml的配置信息如下:
server:
  port: 8761
eureka:
  instance:
    hostname: localhost
  client:
 	//这里配置为false 是防止自己注册自己
    register-with-eureka: false
    fetch-registry: false
    service-url:
      defaultZone: http://${eureka.instance.hostname}:${server.port}/eureka/
  server:
    wait-time-in-ms-when-sync-empty: 0
    enable-self-preservation: false
启动类EurekaServerApplication的代码如下:
import org.springframework.boot.SpringApplication;
import org.springframework.boot.autoconfigure.SpringBootApplication;
import org.springframework.cloud.netflix.eureka.server.EnableEurekaServer;

@SpringBootApplication
@EnableEurekaServer
public class EurekaServerApplication {

    public static void main(String[] args) {
        SpringApplication.run(EurekaServerApplication.class, args);
    }
}
注意:这里需要添加 @EnableEurekaServer 的注解
启动,并在浏览器访问:http://localhost:8761/ 显示内容如下:
创建eureka-client单机版
创建过程忽略
jar包依赖如下:
dependencies {
    compile('org.springframework.boot:spring-boot-starter-web')
    implementation('org.springframework.cloud:spring-cloud-starter-netflix-eureka-client')
    testImplementation('org.springframework.boot:spring-boot-starter-test')
}
application.yml 配置信息如下:
server:
  port: 8081  #这里指定端口号

eureka:
  client:
    serviceUrl:
      defaultZone: http://localhost:8761/eureka/
      #注册中心的地址
defaultZone 为默认的Zone,来源于AWS的概念,区域(Region)和可用区(Availabolity Zone.AZ) 是AWS的另外两个概念。区域是指服务器所在的区域,比如北美洲,南美洲等。每个区域一般由多个可用区组成。本例中,defaultZone 是指Eureka Server的注册地址

spring:
  application:
    name: demo-client1 #应用的名字,不写为UNKNOWN
启动类EurekaClientApplication 代码如下:
扫描二维码关注公众号,回复:
3923830 查看本文章


import org.springframework.boot.SpringApplication;
import org.springframework.boot.autoconfigure.SpringBootApplication;
import org.springframework.cloud.client.discovery.EnableDiscoveryClient;

@SpringBootApplication
@EnableDiscoveryClient
public class EurekaClientApplication {

    public static void main(String[] args) {
        SpringApplication.run(EurekaClientApplication.class, args);
    }
}
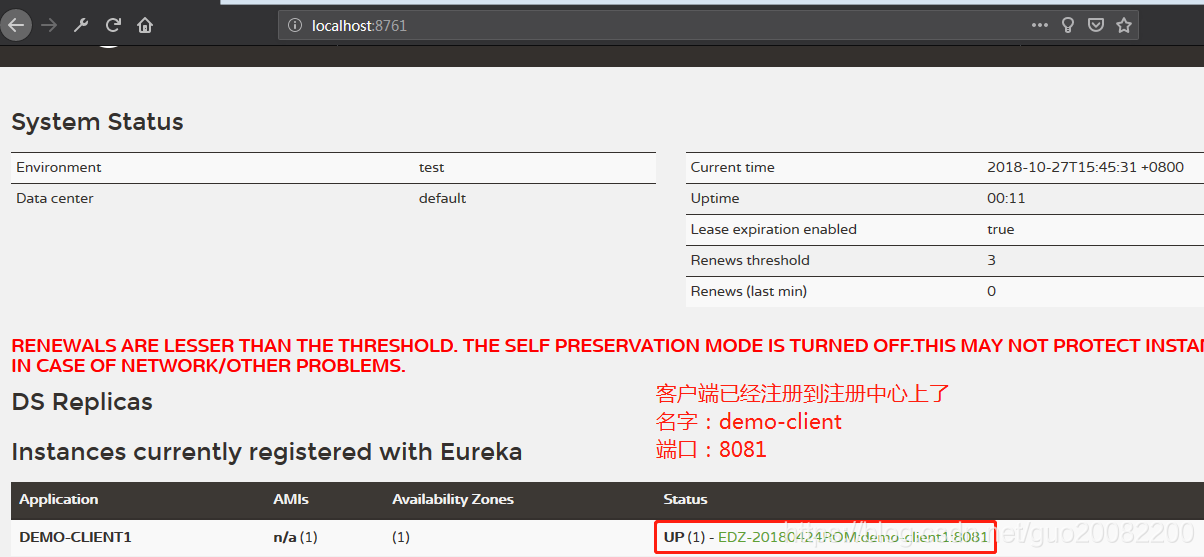
启动,并刷新 http://localhost:8761/ 页面

创建包controller,并在包下面创建一个HiController,代码如下:
package com.ghq.cloud.controller;

import org.springframework.beans.factory.annotation.Value;
import org.springframework.web.bind.annotation.GetMapping;
import org.springframework.web.bind.annotation.RequestParam;
import org.springframework.web.bind.annotation.RestController;

@RestController
public class HiController {

    @Value("${server:port}")
    String port;

    @GetMapping("/hi")
    public String home(@RequestParam String name){

        return "hi "+name+", I am from port: "+port;
    }
}
浏览器访问:http://localhost:8081/hi?name=zhangsan
结果如下:
hi zhangsan, I am from port: 8081
