这里总结下用springboot实现shiro的几个要点,如果要下载完整的项目,请到https://download.csdn.net/download/howard789/10740550(下载后先在本地创建test_shiro数据库,然后运行resources的sql包下的5个sql文件),启动项目即可看到网页并且测试
说一下要点:
数据库一般至少有五张表(本项目是用mybaits)
1- user:用户账号密码
2-role:角色ID,一个账户可以有很多角色
3. permission权限ID,一个角色可以有很多权限
4-user_role关系对照表:记录每个userID有的角色
5-role_permission关系对照表,记录每个role有的permission
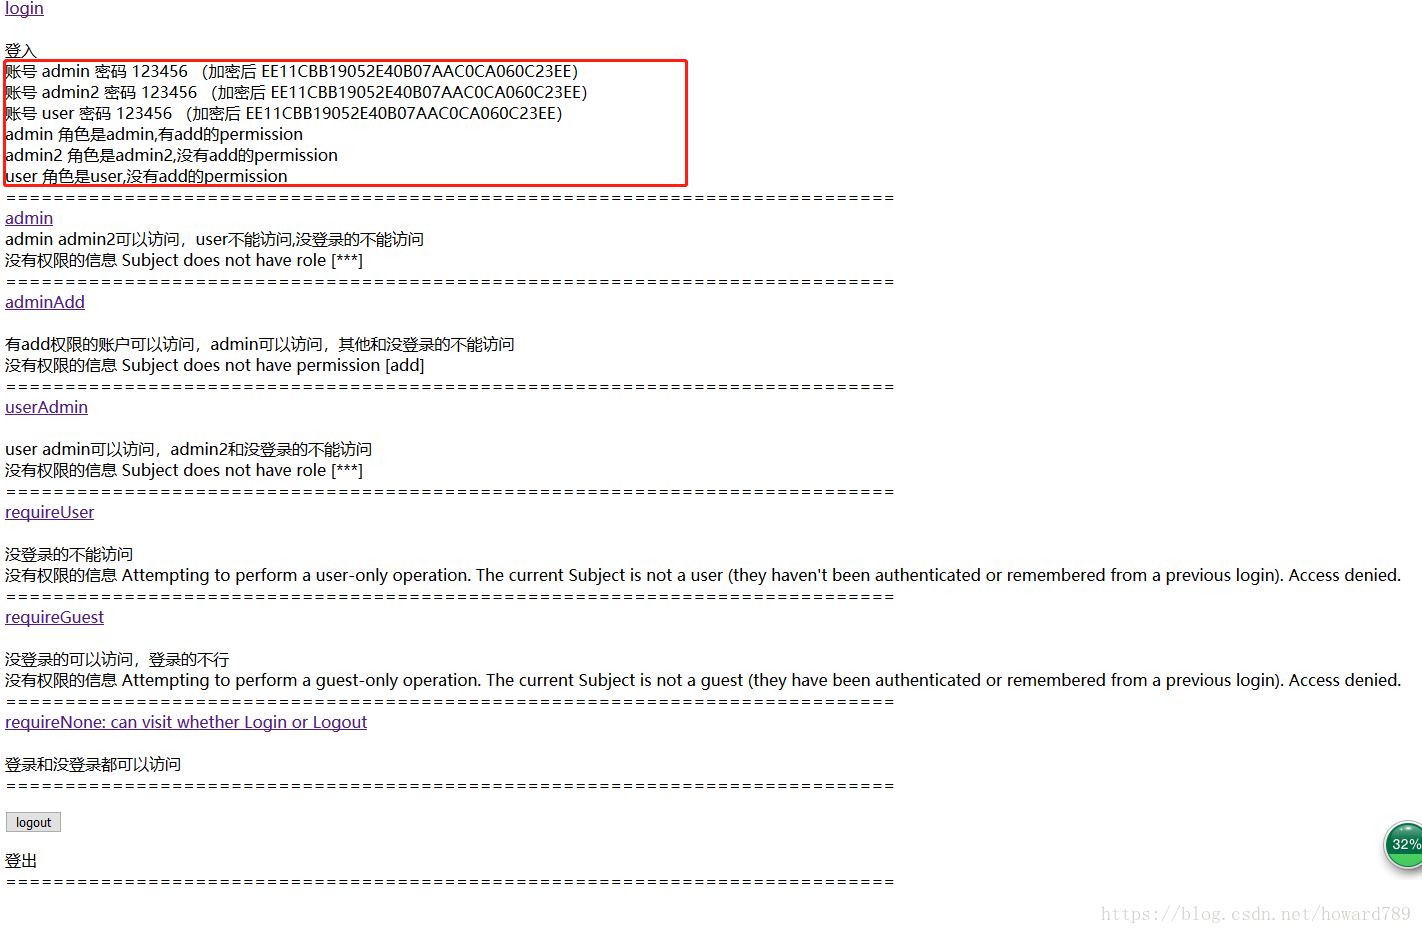
shiro授权的时候,就是先配置那些url需要授权,那些是某个角色可以访问的,那些是拥有某个权限可以访问的,另外还有不需要登录不需要权限就可以访问的路径(包含静态资源)。然后遇到需要权限的url,就循环登录的userId,查出他的所有角色和所有权限,验证是否可以访问这个url,如果不能就会说没有角色或权限,例如以下

1. ShiroConfig类的配置,替代之前xml
其中很多配置可以用注解实现,不一定要在config里设置
@Configuration
public class ShiroConfig {
/*无需再另外设置filter*/

    @Bean
    public ShiroFilterFactoryBean shirFilter(SecurityManager securityManager) {
        System.err.println("ShiroConfiguration.shirFilter()");
        ShiroFilterFactoryBean shiroFilterFactoryBean = new ShiroFilterFactoryBean();

        // 必须设置 SecurityManager
        shiroFilterFactoryBean.setSecurityManager(securityManager);

        //添加shiro内置过滤器
        /* 具体参考shiro的enum DefaultFilter
         * anon:表示可以匿名使用。
           authc:表示需要认证(登录)才能使用,没有参数
           roles:参数可以写多个,多个时必须加上引号,并且参数之间用逗号分割,当有多个参数时,例如admins/user/**=roles["admin,guest"],每个参数通过才算通过,相当于hasAllRoles()方法。
           perms:参数可以写多个,多个时必须加上引号,并且参数之间用逗号分割,例如/admins/user/**=perms["user:add:*,user:modify:*"],当有多个参数时必须每个参数都通过才通过,想当于isPermitedAll()方法。
           rest:根据请求的方法,相当于/admins/user/**=perms[user:method] ,其中method为post,get,delete等。
           port:当请求的url的端口不是8081是跳转到schemal://serverName:8081?queryString,其中schmal是协议http或https等,serverName是你访问的host,8081是url配置里port的端口,queryString是你访问的url里的?后面的参数。
           authcBasic:没有参数表示httpBasic认证
           ssl:表示安全的url请求,协议为https
           user:当登入操作时不做检查
         */

        Map<String, String> fMap = new HashMap<String, String>();
        /*user:必须登录才能访问的页面 效力同@RequiresUser*/
//        fMap.put("/users", "user");

        /*authc:表示需要认证(登录)才能使用,这里不能包含anon的部分,否则anno的设置无效,导致静态资源无法访问*/
//        fMap.put("/admin", "authc");
//        fMap.put("/user", "authc");

        /*anon:表示可以匿名使用*/
        /*静态资源*/
        fMap.put("/assets/**", "anon");
        fMap.put("/css/**", "anon");
        fMap.put("/images/**", "anon");
        fMap.put("/img/**", "anon");
        fMap.put("/js/**", "anon");

        /*登录接口*/
        fMap.put("/getGifCode", "anon");//验证码
        fMap.put("/ajaxLogin", "anon");//ajax登录接口
        fMap.put("/main", "anon");//for test
        fMap.put("/logout", "anon");
        fMap.put("/login", "anon");
//        fMap.put("/*", "anon");
//        fMap.put("/**/*", "anon");

        /*设置可以登录的人员 可用注解配置*/
//        fMap.put("/admin", "perms[admin:*]");
//        fMap.put("/add", "perms[*:add]");
//        fMap.put("/user", "perms[user:*]");

        /*设置可以登录的角色,可用注解配置,效力同@RequiresRoles("admin")*/
//        fMap.put("/user", "roles[user,admin]");
//        fMap.put("/admin", "roles[admin]");


//        Shiro拦截器工厂类注入
        shiroFilterFactoryBean.setFilterChainDefinitionMap(fMap);

        //被拦截返回登录页面
        shiroFilterFactoryBean.setLoginUrl("/login");
        // 登录成功后要跳转的链接
        shiroFilterFactoryBean.setSuccessUrl("/main");
        //未授权界面;
        shiroFilterFactoryBean.setUnauthorizedUrl("/noAuth");

        return shiroFilterFactoryBean;
    }


    @Bean
    public SecurityManager securityManager() {
        DefaultWebSecurityManager securityManager = new DefaultWebSecurityManager();
        //设置realm.,必须是@Bean
        securityManager.setRealm(myShiroRealm());
        //注入缓存管理器;
        securityManager.setCacheManager(ehCacheManager());//这个如果执行多次,也是同样的一个对象;
        securityManager.setRememberMeManager(rememberMeManager());

        /*把securityManager注入SecurityUtils*/
        SecurityUtils.setSecurityManager(securityManager);
        return securityManager;
    }

    /**
     * 身份认证realm;
     * (这个需要自己写,账号密码校验;权限等)
     *
     * @return
     */
    @Bean
    public UserAuthenticationRealm myShiroRealm() {
        UserAuthenticationRealm myShiroRealm = new UserAuthenticationRealm();
		myShiroRealm.setCredentialsMatcher(hashedCredentialsMatcher());;
        return myShiroRealm;
    }

    /**
     * shiro缓存管理器;
     * 需要注入对应的其它的实体类中:
     * 1、安全管理器:securityManager
     * 可见securityManager是整个shiro的核心;
     *
     * @return
     */
    @Bean
    public EhCacheManager ehCacheManager() {
        System.out.println("ShiroConfiguration.getEhCacheManager()");
        EhCacheManager cacheManager = new EhCacheManager();
        cacheManager.setCacheManagerConfigFile("classpath:config/ehcache-shiro.xml");
        return cacheManager;
    }


    /**
     * cookie管理对象;
     *
     * @return
     */
    @Bean
    public CookieRememberMeManager rememberMeManager() {
        System.out.println("ShiroConfiguration.rememberMeManager()");
        CookieRememberMeManager cookieRememberMeManager = new CookieRememberMeManager();
        cookieRememberMeManager.setCookie(rememberMeCookie());
        return cookieRememberMeManager;
    }

    /**
     * cookie对象;
     *
     * @return
     */
    @Bean
    public SimpleCookie rememberMeCookie() {
        System.out.println("ShiroConfiguration.rememberMeCookie()");
        //这个参数是cookie的名称,对应前端的checkbox的name = rememberMe
        SimpleCookie simpleCookie = new SimpleCookie("rememberMe");
        //<!-- 记住我cookie生效时间30天 ,单位秒;-->
        simpleCookie.setMaxAge(259200);
        return simpleCookie;
    }


    /**
     * 凭证匹配器
     * (由于我们的密码校验交给Shiro的SimpleAuthenticationInfo进行处理了
     * 所以我们需要修改下doGetAuthenticationInfo中的代码;
     * )
     *
     * @return
     */
	@Bean
	public HashedCredentialsMatcher hashedCredentialsMatcher(){
		HashedCredentialsMatcher hashedCredentialsMatcher = new HashedCredentialsMatcher();

		hashedCredentialsMatcher.setHashAlgorithmName(Md5Hash.ALGORITHM_NAME);//散列算法:这里使用MD5算法;
		hashedCredentialsMatcher.setHashIterations(1);//散列的次数,比如散列两次,相当于 md5(md5(""));

//        hashedCredentialsMatcher.setHashAlgorithmName("SHA-256");
//        hashedCredentialsMatcher.setHashIterations(1024);

//        hashedCredentialsMatcher.setStoredCredentialsHexEncoded(false); // 这一行决定hex还是base64,true=Hex,false=base64
        hashedCredentialsMatcher.setStoredCredentialsHexEncoded(true); // 这一行决定hex还是base64,true=Hex,false=base64
        hashedCredentialsMatcher.setHashSalted(false);

		return hashedCredentialsMatcher;
	}

    @Bean
    public LifecycleBeanPostProcessor lifecycleBeanPostProcessor() {
        return new LifecycleBeanPostProcessor();
    }

    @Bean
    @DependsOn({"lifecycleBeanPostProcessor"})
    public DefaultAdvisorAutoProxyCreator advisorAutoProxyCreator() {
//	    <!-- 配置是否启动过虑器的init/destory方法 -->
//        <!-- 保证实现了Shiro内部lifecycle函数的bean执行 -->
        DefaultAdvisorAutoProxyCreator advisorAutoProxyCreator = new DefaultAdvisorAutoProxyCreator();
        advisorAutoProxyCreator.setProxyTargetClass(true);
        return advisorAutoProxyCreator;
    }

    /**
     * 开启shiro aop注解支持.
     * 使用代理方式;所以需要开启代码支持;
     *
     * @param securityManager
     * @return
     */
    @Bean
    public AuthorizationAttributeSourceAdvisor authorizationAttributeSourceAdvisor(SecurityManager securityManager) {
        AuthorizationAttributeSourceAdvisor authorizationAttributeSourceAdvisor = new AuthorizationAttributeSourceAdvisor();
        authorizationAttributeSourceAdvisor.setSecurityManager(securityManager);
        return authorizationAttributeSourceAdvisor;
    }

}
ehcache-shiro.xml档案里的配置
<?xml version="1.0" encoding="UTF-8"?>
<ehcache name="es">
    <diskStore path="java.io.tmpdir"/>
    <defaultCache
            maxElementsInMemory="10000"
            eternal="false"
            timeToIdleSeconds="120"
            timeToLiveSeconds="120"
            overflowToDisk="false"
            diskPersistent="false"
            diskExpiryThreadIntervalSeconds="120"
    />
    <!-- 登录记录缓存锁定10分钟 -->
    <cache name="passwordRetryCache"
           maxEntriesLocalHeap="2000"
           eternal="false"
           timeToIdleSeconds="3600"
           timeToLiveSeconds="0"
           overflowToDisk="false"
           statistics="true">
    </cache>
</ehcache>
2. relm的加密,数据库密码必须加密,加密方式在Config里配置要注意到是,实现AuthorizingRealm类的登录认证里要和自己加密方式搭配,以下是用Hex,不加盐的情况
SimpleAuthenticationInfo simpleAuthenticationInfo = new SimpleAuthenticationInfo(userInfo.getUserId(),
      userInfo.getPassword(), userInfo.getUserName());
3. 注解和ShiroFilterFactoryBean的config都可以配置权限,个人觉得注解好用一点
4. 实现AuthorizingRealm的类里有两个方法doGetAuthenticationInfo是登录验证,在SecurityUtils.getSubject().login(token);的时候调用,另外一个doGetAuthorizationInfo是有验证要求的时候才会执行,例如加了@RequiresAuthentication注解的Controller
如果要下载完整的项目,请到https://download.csdn.net/download/howard789/10740550(下载后先在本地创建test_shiro数据库,然后运行resources的sql包下的5个sql文件),启动项目即可看到网页并且测试