我们使用Keil一般使用ARMCC编译MCU工程代码.其实,Keil也是支持内嵌GCC编译器的.我们可以使用GCC来编译我们的工程代码.
一、下载GCC编译器
二、安装GCC
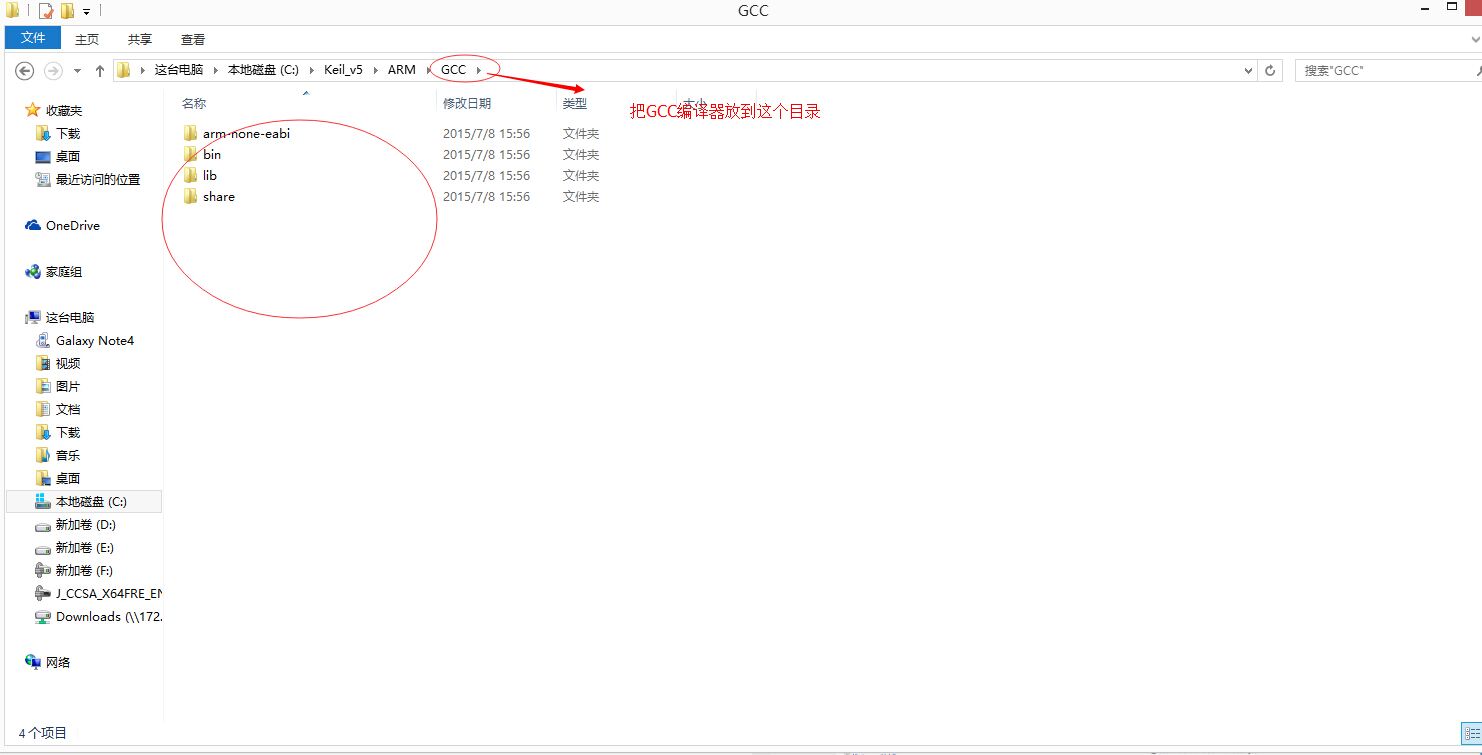
我们可以把GCC解压到keil的安装目录下面.如下图
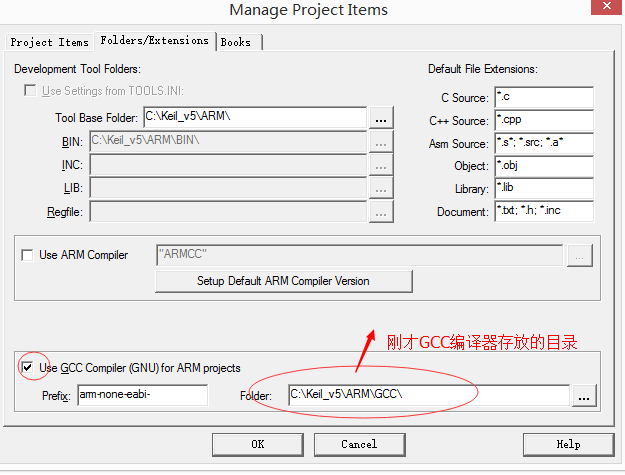
三、配置Keil使用GCC编译器
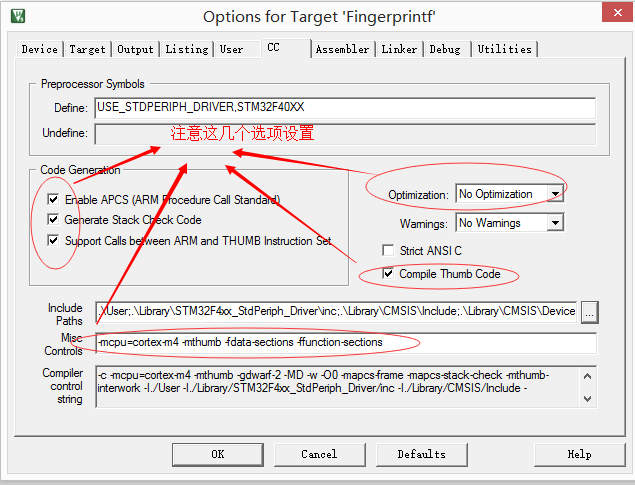
1、配置CC编译规则,Misc Controls 填写
-mcpu=cortex-m4 -mthumb -fdata-sections -ffunction-sections
2、Assembler中规则,Misc Controls 填写
-mcpu=cortex-m4 -mthumb
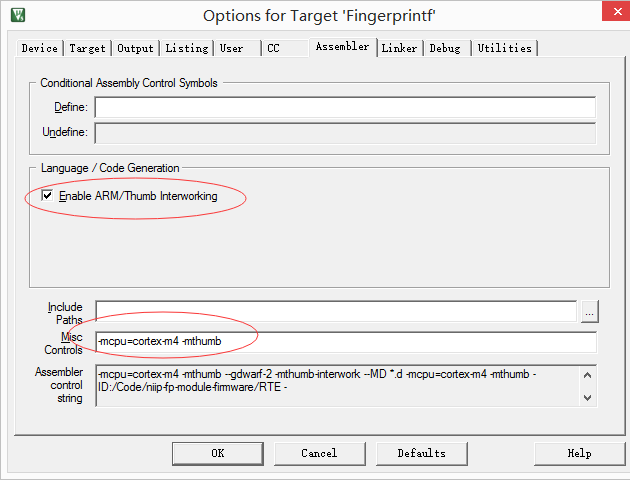
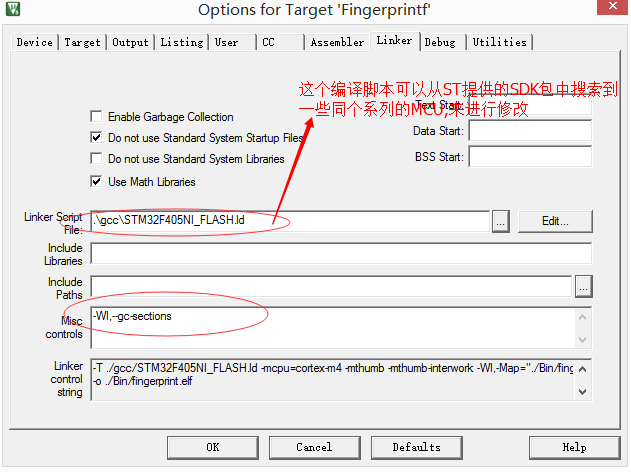
3、Linker中填写,Misc Controls 填写
-Wl,–gc-sections
-Wl,–gc-sections 这个主要是要把没有调用的函数不编译到hex中
注意:对于-mcpu=cortex-m4这个,如果你使用的是m3的芯片,则修改成-mcpu=cortex-m3
4、STM32F405NI_FLASH.ld的代码参考
/*
*****************************************************************************
**
**  File        : stm32_flash.ld
**
**  Abstract    : Linker script for STM32F407VG Device with
**                1024KByte FLASH, 128KByte RAM
**
**                Set heap size, stack size and stack location according
**                to application requirements.
**
**                Set memory bank area and size if external memory is used.
**
**  Target      : STMicroelectronics STM32
**
**  Environment : Atollic TrueSTUDIO(R)
**
**  Distribution: The file is distributed 揳s is,?without any warranty
**                of any kind.
**
**  (c)Copyright Atollic AB.
**  You may use this file as-is or modify it according to the needs of your
**  project. This file may only be built (assembled or compiled and linked)
**  using the Atollic TrueSTUDIO(R) product. The use of this file together
**  with other tools than Atollic TrueSTUDIO(R) is not permitted.
**
*****************************************************************************
*/

/* Entry Point */
ENTRY(Reset_Handler)

/* Highest address of the user mode stack */
_estack = 0x2001FFFF;    /* end of RAM */

/* Generate a link error if heap and stack don't fit into RAM */
_Min_Heap_Size = 0x400;      /* required amount of heap  */
_Min_Stack_Size = 0x800; /* required amount of stack */

/* Specify the memory areas */
MEMORY
{
FLASH (rx)      : ORIGIN = 0x8000000, LENGTH = 1024K
RAM (xrw)      : ORIGIN = 0x20000000, LENGTH = 128K
CCMRAM (rw)      : ORIGIN = 0x10000000, LENGTH = 64K
}

/* Define output sections */
SECTIONS
{
  /* The startup code goes first into FLASH */
  .isr_vector :
  {
    . = ALIGN(4);
    KEEP(*(.isr_vector)) /* Startup code */
    . = ALIGN(4);
  } >FLASH

  /* The program code and other data goes into FLASH */
  .text :
  {
    . = ALIGN(4);
    *(.text)           /* .text sections (code) */
    *(.text*)          /* .text* sections (code) */
    *(.glue_7)         /* glue arm to thumb code */
    *(.glue_7t)        /* glue thumb to arm code */
    *(.eh_frame)

    KEEP (*(.init))
    KEEP (*(.fini))

    . = ALIGN(4);
    _etext = .;        /* define a global symbols at end of code */
  } >FLASH

  /* Constant data goes into FLASH */
  .rodata :
  {
    . = ALIGN(4);
    *(.rodata)         /* .rodata sections (constants, strings, etc.) */
    *(.rodata*)        /* .rodata* sections (constants, strings, etc.) */
    . = ALIGN(4);
  } >FLASH

  .ARM.extab   : { *(.ARM.extab* .gnu.linkonce.armextab.*) } >FLASH
  .ARM : {
    __exidx_start = .;
    *(.ARM.exidx*)
    __exidx_end = .;
  } >FLASH

  .preinit_array     :
  {
    PROVIDE_HIDDEN (__preinit_array_start = .);
    KEEP (*(.preinit_array*))
    PROVIDE_HIDDEN (__preinit_array_end = .);
  } >FLASH
  .init_array :
  {
    PROVIDE_HIDDEN (__init_array_start = .);
    KEEP (*(SORT(.init_array.*)))
    KEEP (*(.init_array*))
    PROVIDE_HIDDEN (__init_array_end = .);
  } >FLASH
  .fini_array :
  {
    PROVIDE_HIDDEN (__fini_array_start = .);
    KEEP (*(SORT(.fini_array.*)))
    KEEP (*(.fini_array*))
    PROVIDE_HIDDEN (__fini_array_end = .);
  } >FLASH

  /* used by the startup to initialize data */
  _sidata = LOADADDR(.data);

  /* Initialized data sections goes into RAM, load LMA copy after code */
  .data :
  {
    . = ALIGN(4);
    _sdata = .;        /* create a global symbol at data start */
    *(.data)           /* .data sections */
    *(.data*)          /* .data* sections */

    . = ALIGN(4);
    _edata = .;        /* define a global symbol at data end */
  } >RAM AT> FLASH

  _siccmram = LOADADDR(.ccmram);

  /* CCM-RAM section
  *
  * IMPORTANT NOTE!
  * If initialized variables will be placed in this section,
  * the startup code needs to be modified to copy the init-values.
  */
  .ccmram :
  {
    . = ALIGN(4);
    _sccmram = .;       /* create a global symbol at ccmram start */
    *(.ccmram)
    *(.ccmram*)

    . = ALIGN(4);
    _eccmram = .;       /* create a global symbol at ccmram end */
  } >CCMRAM AT> FLASH


  /* Uninitialized data section */
  . = ALIGN(4);
  .bss :
  {
    /* This is used by the startup in order to initialize the .bss secion */
    _sbss = .;         /* define a global symbol at bss start */
    __bss_start__ = _sbss;
    *(.bss)
    *(.bss*)
    *(COMMON)

    . = ALIGN(4);
    _ebss = .;         /* define a global symbol at bss end */
    __bss_end__ = _ebss;
  } >RAM

  /* User_heap_stack section, used to check that there is enough RAM left */
  ._user_heap_stack :
  {
    . = ALIGN(4);
    PROVIDE ( end = . );
    PROVIDE ( _end = . );
    . = . + _Min_Heap_Size;
    . = . + _Min_Stack_Size;
    . = ALIGN(4);
  } >RAM


  /* Remove information from the standard libraries */
  /DISCARD/ :
  {
    libc.a ( * )
    libm.a ( * )
    libgcc.a ( * )
  }

  .ARM.attributes 0 : { *(.ARM.attributes) }
}
从我粘贴的代码中,可以知道我是从STM32F407VG这个芯片的配置文件中拷贝过来的.
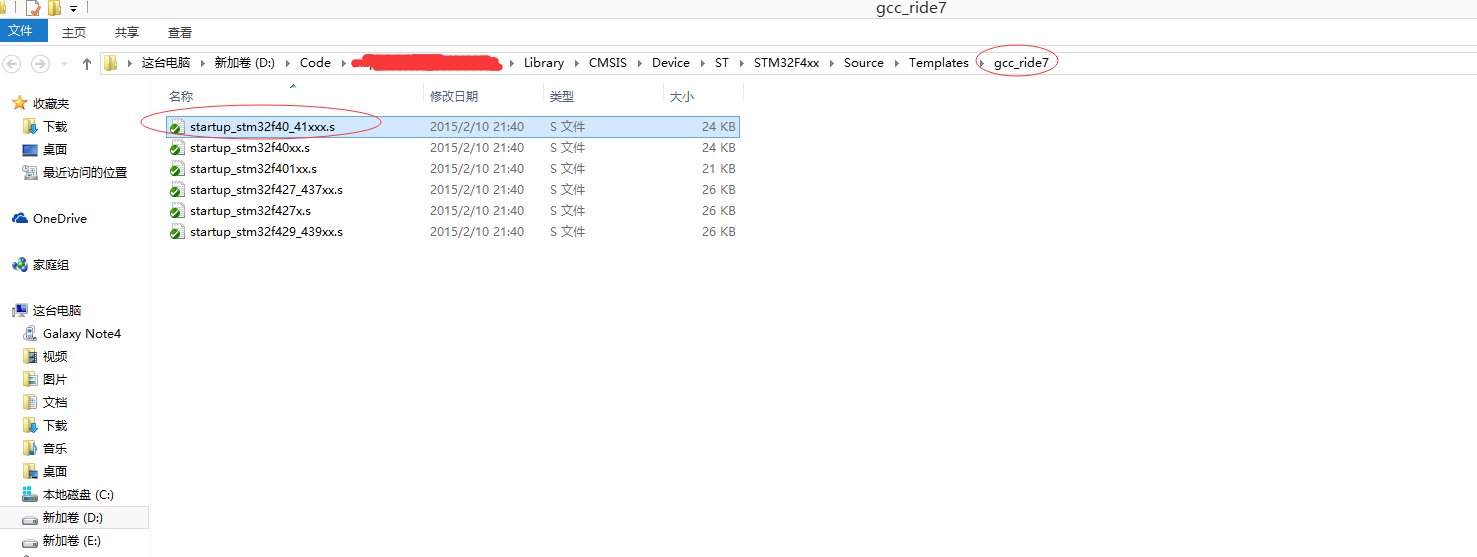
四、修改启动代码,使用GCC专用的.S文件
由于GCC与ARMCC的汇编代码格式不相同,不信你可以用比较工具看一下支持GCC的.S与支持ARMCC的.S写法是否一样.
那么我们需要重新写支持GCC的.S的启动代码吗?当然不需要,因为ST的已经为我们写好了.
如,我使用的gcc路径
D:\Code\project\Library\CMSIS\Device\ST\STM32F4xx\Source\Templates\gcc_ride7

五、配置完毕,编译程序排除解决相关错误
如果你使用到一些标准的C 库函数,如spirntf这些东西,或者你会报如下错误.
C:/Keil_v5/ARM/GCC/bin/../lib/gcc/arm-none-eabi/4.7.4/../../../../arm-none-eabi/lib/armv7e-m\libg.a(lib_a-sbrkr.o): In function
_sbrk_r':_sbrk’
sbrkr.c:(.text._sbrk_r+0xc): undefined reference to
collect2.exe: error: ld returned 1 exit status
对与该问题的解决方法可以参考如下链接: 解决`_sbrk’错误的方法
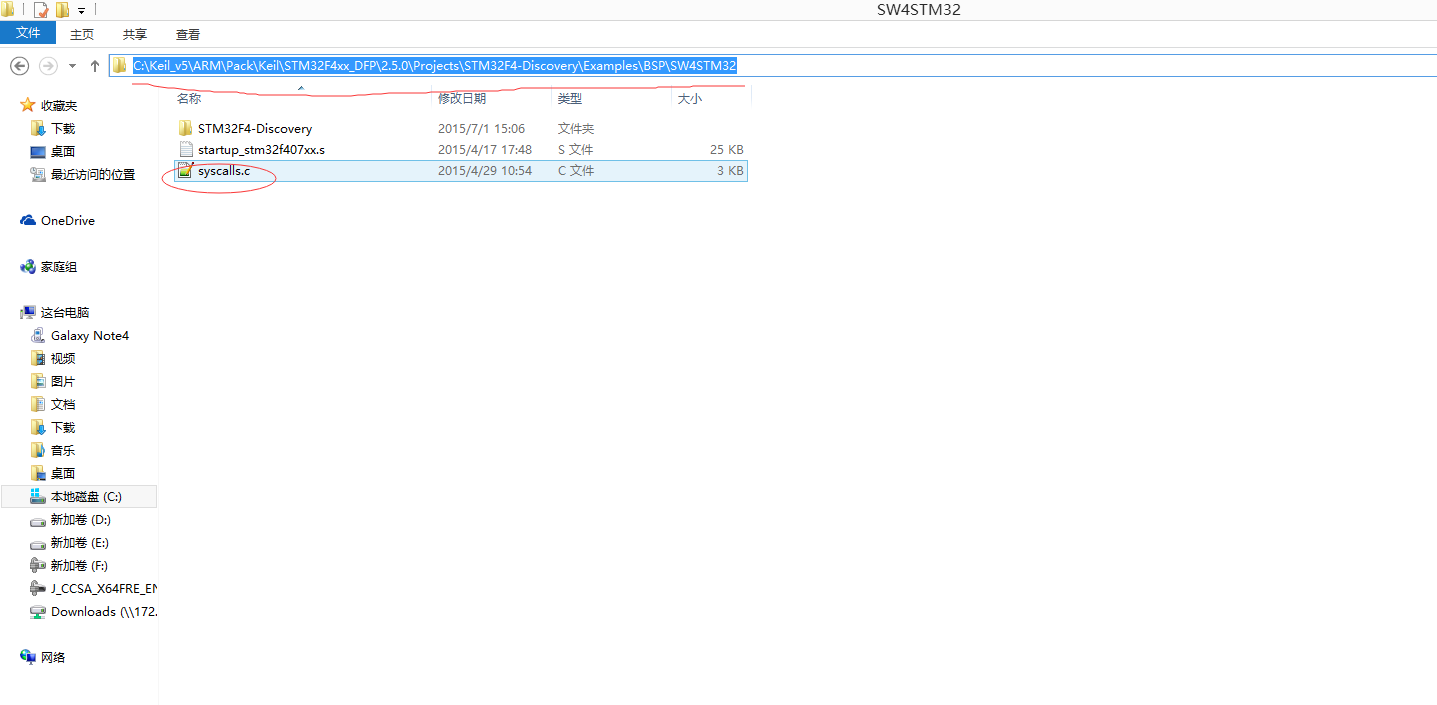
这个链接主要告诉我们,如果有使用标准的C 函数,则要包含syscall.c 这个文件.
那么这个文件在哪里可以找到呢?
在Keil的pack文件目录下可以根据自己的芯片类型找到.如我的路径:
C:\Keil_v5\ARM\Pack\Keil\STM32F4xx_DFP\2.5.0\Projects\STM32F4-Discovery\Examples\BSP\SW4STM32
那么此时,编译代码即可,原来的错误已经没有了.

至于如何设置JLINK及ST-LINK作为调试,这个跟使用ARMCC一样设置.这里大家可以在网上找一些教程,这里就不再介绍了.