为了完成这个应用功能花了三天,代码倒不多就是比较坑!
环境:Android SDK API 22,Android Studio 1.2.2,arcgis android SDK 10.2.7
如何基于Arcgis API for android在Android Studio新建一个项目就不再赘述了,大家可以参考以下网址:
使用Android Studio与Arcgis android SDK的开发环境部署和HelloWorld:http://www.cnblogs.com/cannel/p/4302232.html
在顶部加了一个名为“定位”的button按钮,作用是点击一下便定位并放大到位置,布局文件如下:
<?xml version="1.0" encoding="utf-8"?>
<LinearLayout
    xmlns:android="http://schemas.android.com/apk/res/android"
    android:orientation="vertical"
    android:layout_width="fill_parent"
    android:layout_height="fill_parent">

    <Button
        android:layout_width="fill_parent"
        android:layout_height="80px"
        android:text="定     位"
        android:id="@+id/button"
        android:onClick="clickHandler" />

    <!-- MapView layout, including basemap layer, initial center point, and zoom level -->
    <com.esri.android.map.MapView
        android:id="@+id/map"
        android:layout_width="fill_parent"
        android:layout_height="fill_parent" />

</LinearLayout>
与上文对比就是在MapView中少了几行代码,由于默认提供的地图是ESRI的,在中国境内不够详细,所以采用OpenStreetMap作为底图,当然ESRI也已经为我们准备好了,位于com.esri.android.map.osm。
以下便是加载OpenStreetMap
<span style="font-size:10px;"><span style="color:#333333;">MapView mMapView;
  Point center=null;
  @Override
  protected void onCreate(Bundle savedInstanceState) {
      super.onCreate(savedInstanceState);
      setContentView(R.layout.activity_main);
      ArcGISRuntime.setClientId("1eFHW78avlnRUPHm");
      mMapView = (MapView) findViewById(R.id.map);
      //加载OpenStreetMap底图
      OpenStreetMapLayer streetlayer=new OpenStreetMapLayer();
      mMapView.addLayer(streetlayer);
  }</span></span>
就是最后两行代码,直接 将OpenStreetMap底图引入,是不是很简单,其上的一句ArcGISRuntime.setClientID();作用是去除水印“Licensed for Developer Use Only”
下面是完成定位,我的主要时间就花在了定位上。
由于是新手,在网上也看了不少资料,绝大多数都是用LocationManager 这个方法做的,ESRI前期的开发文档也是采用的这个手法,这个方法目前为止也可以用。按上述所言Button作用是点击一下便定位并放大到位置,采用LocationManager 的大多数是监听位置是否发生变化的事件,要是移动了地图却没有移动位置,MapView是没有变化的,当然你也可以重写一些代码来完善。不止如此,采用LocationManager 放大到指定位置是没有标记的,需要自己添加,相对于下面的方法不够完善。
Arcgis API for android在10.2.2之前是采用LocationService类,之后的是LocationDisplayManger类,我们要采用的就是这个,具体内容大家可以取官网看文档说明。这里直接上代码
public void clickHandler(View source){
        mMapView.setScale(50000);//设置地图比例尺
        LocationDisplayManager ls=mMapView.getLocationDisplayManager();
        ls.start();//启动
        ls.setAutoPanMode(LocationDisplayManager.AutoPanMode.LOCATION);//自动滑动至位置
        Button b=(Button)findViewById(R.id.button);
        b.setText("OK");
        }
采用Emulator Control模拟GPS信号发送到模拟器
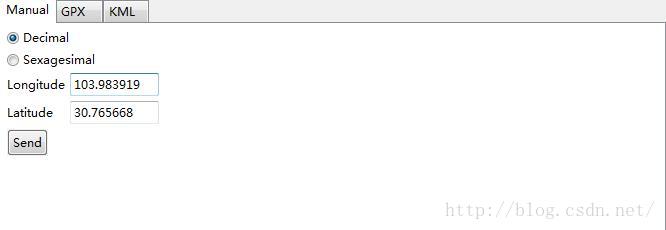
则成果图如下,这个方法也是可以监听到位置变化的,你可以试试再发送一个GPS位置。

需要说明的是在真机上进行试验也是需要打开GPS的,我之前用LocationManager 方法进行定位也是如此,但是GPS定位方法需要的时间过长,至于网络定位方法完全无反应。我猜测LocationDisplayManger应该也是如此,不知道有没有什么好的解决方法。
其次的一个问题是单独采用LocationDisplayManger方法时不会将地图放大的,我试了很多方法,如CenterAt()等毫无反应,只得采用setScale();,而且这句代码放在LocationDisplayManger后面会报错,只能放在前面,也就是说实际上是先放大再定位,也希望有人能解答这个问题。