版权声明:本文为博主原创文章,未经博主允许不得转载。 https://blog.csdn.net/wangjianno2/article/details/78617182
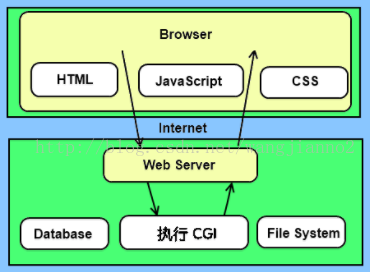
1.Apache + CGI的架构图
2.Apache + Python CGI的开发和配置方法
(1)安装apache
执行命令yum install httpd即可完成apache的安装,确保apache配置/etc/httpd/conf/httpd.conf中包含如下配置:
ScriptAlias /cgi-bin/ "/var/www/cgi-bin/"

<Directory "/var/www/cgi-bin">
    AllowOverride None
    Options +ExecCGI
    Order allow,deny
    Allow from all
</Directory>

AddHandler cgi-script .cgi .pl .py
备注:ScriptAlias指定了python cgi脚本的存放目录为/var/www/cgi-bin/,且用户访问的方式为http://ip:port/cgi-bin/XXX;<Directory "/var/www/cgi-bin">配置了cgi脚本目录的可执行权限;AddHandler cgi-script指令配置可以支持的cgi脚本文件的后缀。
(2)编写Python CGI脚本
举例来说,
#!/usr/bin/env python
# -*- coding: utf-8 -*-
"""
Desc:   python common cgi
Date:   2017-11-23
Author: xxxx
"""
import time

#定义全局变量
nowtime = ''

def initData():
    """用来获取填充html页面的数据
    """
    global nowtime
    nowtime = time.strftime("%Y-%m-%d %H:%M:%S", time.localtime())

def genHtml2():
    """生成HTML页面, 使用三个双引号,使Python中的HTML页面更美观
    """
    print 'Content-type:text/html'
    print
    print """
<html>
    <head>
        <meta charset="utf-8">
        <title>Python CGI DEMO程序</title>
    </head>
    <body>
        <h1>This is DEMO~~~~</h1>
    </body>
</html>
"""

def genHtml():
    """生成HTML页面
    """
    print "Content-type:text/html"
    print
    print '<html>'
    print '<head>'
    print '<meta charset="utf-8">'
    print '<title>Python CGI DEMO程序</title>'
    print '</head>'
    print '<body>'
    print '<h2>当前时间为: %s</h2>' % nowtime
    print '</body>'
    print '</html>'

def main():
    """CGI入口
    """
    #初始化环境
    initData()

    #生成页面
    genHtml()

if __name__ == '__main__':
    main()
备注:可以将该文件命名为xxx.cgi,xxx.py等等都是可以的。这个脚本可以成任何的脚本语言哦,例如perl,shell,C以及C++等等。
学习资料参考于: