C语言学习:iOS开发分分钟搞定C语言
OC语言学习:iOS开发核心语言Objective C
无偿分享400G iOS学习资料。
获取途径:新浪微博 关注➕私信极客James
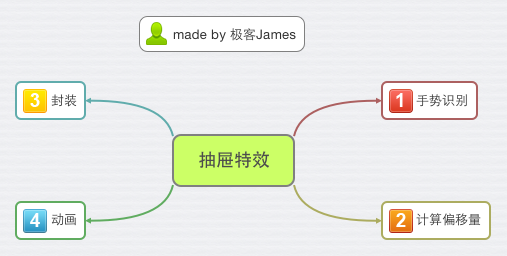
简单抽屉效果实现:
主要功能:
向左向右拖动图片显示不同的视图,当向右拖动大于屏幕一半时,视图停留在右边,当视图拖动小于屏幕一半时,返回原位置,当停靠在左右边时,点击任意视图会恢复位置.
实现核心思路:
本项目需要通过UI的手势识别来完成。
拖动视图需要用到UIPanGestureRecognizer 滑动手势和UITapGestureRecognizer 点按手势。
滑动图片的时候需要通过偏移量等来确定位置。
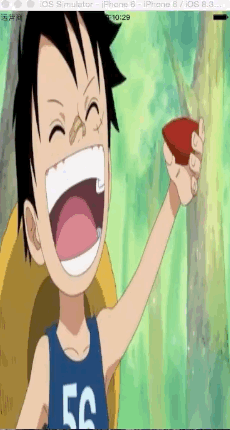
最终效果图:
项目实现步骤:
抽屉效果实现:
主要用到的知识点:
1.手势识别 拖动手势 点按手势
2.通过偏移量来计算视图移动的位置
实现步骤:
1.先声明和定义三个UIView属性 mainV LeftV RightV
2.在viewDidLoad中定义主视图mainV的拖动手势
添加滑动手势
UIPanGestureRecognizer *pan = [[UIPanGestureRecognizer
alloc]initWithTarget:self action:@selector(pan:)];
[_mainV addGestureRecognizer:pan];
添加点按手势:
UITapGestureRecognizer *tap = [[UITapGestureRecognizer
alloc]initWithTarget:self action:@selector(tap)];
[self.view addGestureRecognizer:tap];
3.判断显示左视图还是右视图
通过main.x 的值 大于零 显示左视图
小于零 显示右视图
4.拖动手势识别方法中 pan: 方法的实现
点按手势识别方法中 tap方法的的实现
(1)先获取mainV中x的偏移量
CGFloat offsetX = [pan translationInView:_mainV].x;
(2)修改mainV的frame值
self.mainV.frame = [self frameWithOffSet:offsetX];
(3)判断显示哪个视图
(4)判断手指离开的时候
if (pan.state == UIGestureRecongnizeStateEnded){
当frame.x > screen.width * 0.5 的时候定位到右边
当frame.x < screen.width * 0.5的时候 定位到左边
先算出屏幕的宽度
CGFloat scree = [UIScreen mainScreen].bounds.size.width;
定义一个target 为0
判断mainV的x值 大于一半还是小于一半
根据不同的判断给出相应的target值
}
(5)计算偏移量;
CGFloat offset = target - _mainV.frame.origin.x
(6)将偏移量赋值给mainV的frame上并加上动画
(7) 复位
[pan setTransLation:CGPointZero inView:_mainV];
(8) 判断显示哪个视图的 isShowLeftView方法的实现
通过_mainV的frame的origin的x值的正负来判断右边视图是否隐藏
(9)先给定一个偏移量,计算出新的偏移量方法实现
// 伪代码
- (CGRect)frameWithOffset:(CGFloat)offset{
  1.获取屏幕的宽度
  2.获取屏幕的高度
  3.定义一个frame值与_mainV的frame值相等
  4. 求x值 : frame的origin的x值 + 偏移量 offset
  5. 求y值:x的值乘以50除以屏幕的宽度 然后求绝对值
  6. 求h值:屏幕的高度 减去 两倍的y值
  7. 求w值: 因为向左右滑动要改变视图的宽度,为了等比例缩放,需要按照比例来算视图的宽度
   高度比例 = 高度h 除以屏幕的高度
   w等于 屏幕的宽度乘以高度的比例
   8.返回一个CGRectMake值
   9.返回frame
}
5.子视图的 setAllChildView 的封装
通过代码来实现:
#import "ZJViewController.h"
@interface ZJViewController ()
@property (nonatomic , weak)UIView *mainV;
@property (nonatomic , weak)UIView *leftV;
@property (nonatomic , weak)UIView *rightV;
@end
@implementation ZJViewController

- (void)viewDidLoad {
    [super viewDidLoad];
    // 添加所有的视图
    [self setAllChileView];
    // 开启滑动手势识别
    UIPanGestureRecognizer *pan = [[UIPanGestureRecognizer alloc]initWithTarget:self action:@selector(pan:)];
    // 将手势识别赋给视图控制
    [_mainV addGestureRecognizer:pan];

    // 点按手势
    UITapGestureRecognizer *tap = [[UITapGestureRecognizer alloc]initWithTarget:self action:@selector(tap)];
    [self.view addGestureRecognizer:tap];

}
// 手势响应方法pan:的实现
- (void)pan:(UIPanGestureRecognizer *)pan{
    // 屏幕的高度
    //CGFloat screenH = [UIScreen mainScreen].bounds.size.height;
    // 滑动手势中mainV中x的偏移量
    CGFloat offsetX = [pan translationInView:_mainV].x;
    // 修改mainV中的frame值
    self.mainV.frame = [self frameWithOffset:offsetX];
    // 判断显示哪个视图 (三目运算)
    [self isShowLeftView];
    // 离开手指时候做的判断 做定位和复位功能
    if(pan.state == UIGestureRecognizerStateEnded){
            // 屏幕的宽度
        CGFloat screenW = [UIScreen mainScreen].bounds.size.width;
        CGFloat target = 0;
        if (_mainV.frame.origin.x > screenW * 0.5) {

            // 定位到右边
            target = 300;
        }
        else if(CGRectGetMaxX(_mainV.frame) < screenW * 0.5){
            // 定位到左边
            target = -300;
        }
        // 计算偏移量
        CGFloat offsetX = target - _mainV.frame.origin.x;
        // 增加动画
        [UIView animateWithDuration:0.25 animations:^{
            _mainV.frame = [self frameWithOffset:offsetX];
        }];
    }
    // 复位
    [pan setTranslation:CGPointZero inView:_mainV];
}

// 点按手势tap:的实现方法
- (void)tap{
    if (_mainV.frame.origin.x != 0) {
        // 复位
        [UIView animateWithDuration:0.25 animations:^{
            _mainV.frame = self.view.bounds;
        }];
    }

}
// 判断显示哪个视图
- (void)isShowLeftView{
    if (_mainV.frame.origin.x > 0) {
        _rightV.hidden = YES;
    }
    else if (_mainV.frame.origin.x < 0){
        _rightV.hidden = NO;
    }

}

// 通过给定的偏移量,计算出新的偏移量方法的封装
- (CGRect)frameWithOffset:(CGFloat)offset{
    // 屏幕的高度
    CGFloat screenH = [UIScreen mainScreen].bounds.size.height;
    // 屏幕的宽度
    CGFloat screenW = [UIScreen mainScreen].bounds.size.width;
    // 定义一个frame值与_main的frame值相同
    CGRect frame = _mainV.frame;
    CGFloat x = frame.origin.x + offset;
    CGFloat y = fabs(x * 50/screenW);
    CGFloat h = screenH - 2 * y;
    // 宽度的比例
    CGFloat scare = h/screenH;
    CGFloat w = screenW * scare;
    return CGRectMake(x, y, w, h);
    return  frame;
}
// 所有子视图的view
- (void)setAllChileView{
    // 左边视图
    UIView *left = [[UIView alloc]initWithFrame:self.view.bounds];
    left.backgroundColor = [UIColor yellowColor];
    // 增加到视图上
    [self.view addSubview:left];
    // 视图赋值声明的属性 (相当于SB中的连线)
    _leftV = left;

    // 右边视图
    UIView *right = [[UIView alloc]initWithFrame:self.view.bounds];
    right.backgroundColor = [UIColor blueColor];
    // 增加到视图上
    [self.view addSubview:right];
    _rightV = right;

    // 中间视图
    UIView *main = [[UIView alloc]initWithFrame:self.view.bounds];
    main.backgroundColor = [UIColor redColor];
    // 增加到视图上
    [self.view  addSubview:main];
    _mainV = main;
}
@end