版权声明:本文为博主原创文章,未经博主允许不得转载。 https://blog.csdn.net/bendanban/article/details/71758766
LaTeX采用编译方式来生成排版文档,现有的专用于LaTeX的编辑器也有不少,但是我一个也不喜欢。我更喜欢使用Notepad++,特别是它的列编辑功能!!
一番研究之后,我搭建了一个简单的开发环境用于编辑+编译LaTeX源文件。
下面一步步介绍下,如何做到这一步:
必备软件
你必须已经安装好了texlive,附上HUST的镜像 http://mirrors.hust.edu.cn/CTAN/
安装个轻量级的pdf阅读器,https://www.sumatrapdfreader.org/download-free-pdf-viewer.html
我将这个pdf阅读器放在D盘根目录下,命名为SumatraPDF.exe必须已经安装了Notepad++,并且添加Run Me和Auto Save两个插件。
设置tex默认打开软件
新建一个文本文件,重命名为pdftex_compile.bat,向该文件中添加如下代码:
:: [path/to/this/bat/file] "$(CURRENT_DIRECTO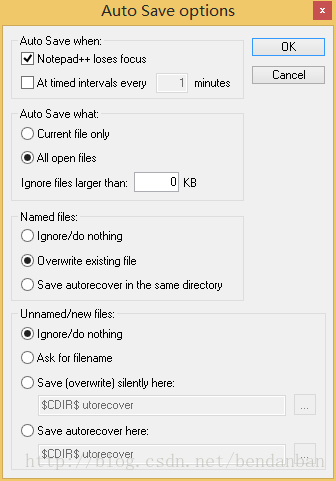RY)" "$(NAME_PART)"
@echo off
:: uncomment to deleted the previous pdf and aux files.
:: del %~n1.pdf %~n1.aux
pdflatex -interaction=errorstopmode %1
if exist %~n1.aux (
bibtex %~n1
pdflatex -interaction=errorstopmode %1
)
::pdflatex -interaction=errorstopmode %1
start "" "D:\SumatraPDF" %~n1.pdf -reuse-instance设置run me
设置run me插件的选项如下:

改变shell execute current file快捷键
快捷键配置如下(我设置的Ctrl+F5):

写段代码,按下快捷键
使用Notepad++编译一个文件,随便起个名字,但是要以tex为后缀名。
扫描二维码关注公众号,回复:
3798128 查看本文章

我的代码如下:
\documentclass{article}
\usepackage{tikz}
\usetikzlibrary{matrix,chains,positioning,decorations.pathreplacing,arrows}

\begin{document}

\begin{tikzpicture}
[
  plain/.style={draw=none,fill=none,},
  net/.style={matrix of nodes,nodes={draw,circle,inner sep=10pt},nodes in empty cells,column sep=2cm,row sep=-9pt},
  >=latex
]

\matrix[net] (mat)
{
  |[plain]| \parbox{1.3cm}{\centering Input\\layer} & |[plain]| \parbox{1.3cm}{\centering Hidden\\layer} & |[plain]| \parbox{1.3cm}{\centering Output\\layer} \\
  & |[plain]| \\
  |[plain]| & \\
  & |[plain]| \\
    |[plain]| & |[plain]| \\
  & & \\
    |[plain]| & |[plain]| \\
  & |[plain]| \\
    |[plain]| & \\
  & |[plain]| \\
};

\foreach \ai [count=\mi ]in {2,4,...,10}
  \draw[<-] (mat-\ai-1) -- node[above] {Input \mi} +(-2cm,0);
\foreach \ai in {2,4,...,10}{
  \foreach \aii in {3,6,9}
    \draw[->] (mat-\ai-1) -- (mat-\aii-2);
}
\foreach \ai in {3,6,9}
  \draw[->] (mat-\ai-2) -- (mat-6-3);

\draw[->] (mat-6-3) -- node[above] {Ouput} +(2cm,0);
\end{tikzpicture}

\begin{tikzpicture}
[
  init/.style={draw,circle,inner sep=2pt,font=\Huge,join = by -latex},
  squa/.style={draw,inner sep=2pt,font=\Large,join = by -latex},
  start chain=2,node distance=13mm
]
\node[on chain=2] (x2) {$x_2$};
\node[on chain=2,join=by o-latex] {$w_2$};
\node[on chain=2,init] (sigma) {$\displaystyle\Sigma$};
\node[on chain=2,squa,label=above:{\parbox{2cm}{\centering Activate \\ function}}] {$f$};
\node[on chain=2,label=above:Output,join=by -latex] {$y$};
\begin{scope}[start chain=1]
  \node[on chain=1] at (0,1.5cm) (x1) {$x_1$};
  \node[on chain=1,join=by o-latex] (w1) {$w_1$};
\end{scope}
\begin{scope}[start chain=3]
  \node[on chain=3] at (0,-1.5cm) (x3) {$x_3$};
  \node[on chain=3,label=below:Weights,join=by o-latex] (w3) {$w_3$};
\end{scope}
\node[label=above:\parbox{2cm}{\centering Bias \\ $b$}] at (sigma|-w1) (b) {};

\draw[-latex] (w1) -- (sigma);
\draw[-latex] (w3) -- (sigma);
\draw[o-latex] (b) -- (sigma);

\draw[decorate,decoration={brace,mirror}] (x1.north west) -- node[left=10pt] {Inputs} (x3.south west);
\end{tikzpicture}

\end{document}按下Ctrl+F5之后,会生成一个pdf,显示如下:
