1 简介
Eureka是Netfilx开元的服务发现组件,本身是一个基于REST的服务。它包含EurekaServer(以下简称ES)和EurekaClient(以下简称EC)两部分,SpringCloud将它集成在子项目SpringCloudNetfilx中,实现了微服务的注册与发现
2 原理
我们可以直接看Eureka的架构图
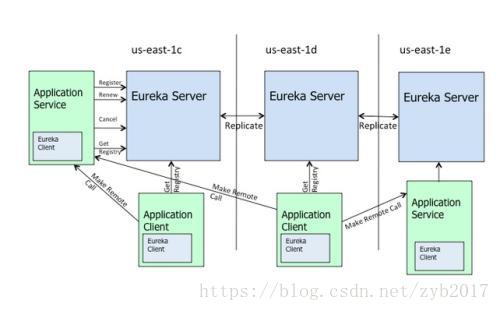
上面说了 Eureka分为Server和Client两部分,解释一下,我们拿us-east-1c来说:
- us-east-1c里面的ApplicationService为我们微服务的提供方,ApplicationClient为服务的调用地方,他们通过MakeRemoteCall通讯,可以理解为RESTful API行为。
- 他们同时都与ES保持联系,通过EC向ES发送心跳来续约自己在ES中的注册。
- ES提供服务发现的能力,会存储各个微服务启动时发送来的信息。
- 当ES在一定时间内没有接收到某个微服务实例的心跳时,ES将会注销该实例。
- ES同时也可以是EC,当有多个节点时,如上图1d,1e,1c之间的ES通过互相复制来同步自己的服务注册表。
- EC也会缓存服务注册表中的信息,这样不用每次请求都查询ES,降低ES的压力,同时当所有ES都宕了,消费者仍然可以根据缓存来完成调用。
3 代码
示例代码为SpringBoot项目,采用Maven管理依赖,数据库使用了H2,项目同时整合了Actuator
3.1 编写单节点EurekaServer
创建一个Maven项目,完整POM如下
<?xml version="1.0" encoding="UTF-8"?>
<project xmlns="http://maven.apache.org/POM/4.0.0"
         xmlns:xsi="http://www.w3.org/2001/XMLSchema-instance"
         xsi:schemaLocation="http://maven.apache.org/POM/4.0.0 http://maven.apache.org/xsd/maven-4.0.0.xsd">
    <modelVersion>4.0.0</modelVersion>

    <groupId>com.transientBa.cloud</groupId>
    <artifactId>microservice-discovery-eureka</artifactId>
    <version>1.0-SNAPSHOT</version>

    <!-- 引入spring boot的依赖 -->
    <parent>
        <groupId>org.springframework.boot</groupId>
        <artifactId>spring-boot-starter-parent</artifactId>
        <version>1.4.3.RELEASE</version>
    </parent>

    <properties>
        <project.build.sourceEncoding>UTF-8</project.build.sourceEncoding>
        <java.version>1.8</java.version>
    </properties>

    <dependencies>
        <!-- 提供了SpringMVC的支持 -->
        <dependency>
            <groupId>org.springframework.boot</groupId>
            <artifactId>spring-boot-starter-web</artifactId>
        </dependency>
        <!-- 提供了Spring Data JpA -->
        <dependency>
            <groupId>org.springframework.boot</groupId>
            <artifactId>spring-boot-starter-data-jpa</artifactId>
        </dependency>
        <!--H2数据库支持-->
        <dependency>
            <groupId>com.h2database</groupId>
            <artifactId>h2</artifactId>
        </dependency>
        <!--整合Spring Boot Actuator-->
        <dependency>
            <groupId>org.springframework.boot</groupId>
            <artifactId>spring-boot-starter-actuator</artifactId>
        </dependency>
        <!--Eureka server依赖-->
        <dependency>
            <groupId>org.springframework.cloud</groupId>
            <artifactId>spring-cloud-starter-eureka-server</artifactId>
            <version>1.1.3.RELEASE</version>
        </dependency>
    </dependencies>

    <!-- 引入spring cloud的依赖 -->
    <dependencyManagement>
        <dependencies>
            <dependency>
                <groupId>org.springframework.cloud</groupId>
                <artifactId>spring-cloud-dependencies</artifactId>
                <version>Camden.SR4</version>
                <type>pom</type>
                <scope>import</scope>
            </dependency>
        </dependencies>
    </dependencyManagement>

    <!-- 添加spring-boot的maven插件 -->
    <build>
        <plugins>
            <plugin>
                <groupId>org.springframework.boot</groupId>
                <artifactId>spring-boot-maven-plugin</artifactId>
            </plugin>
        </plugins>
    </build>


</project>
在resource下新建一个application.yml文件作为配置文件
server:
  port: 8761
eureka:
  client:
    #是否将自己这个服务注册到EurekaServer中  默认True 此服务为Server  所以为False
    registerWithEureka: false
    #是否从EurekaServer获取注册信息 默认True 单点ES不存在其他的EurkaServer 所以为False
    fetchRegistry: false
    serviceUrl:
      #与ES交互的地址 查询注册都依赖此地址 默认为http://localhost:8761/eureka 多个地址使用","分割
      defaultZone: http://localhost:8761/eureka
编写启动类:
在启动类上面加上@EnableEurekaServer注解来标识这是一个ES服务
@SpringBootApplication
@EnableEurekaServer
public class EurekaApplication {
    public static void main(String[] args) {
        SpringApplication.run(EurekaApplication.class,args);
    }
}
跑一下测试看看:
浏览器输入:http://localhost:8761/

我们可以看到Instances currently registered with Eureka下是没有实例的 因为现在只有ES,接下来我们来编写EC的代码
3.2 编写微服务提供者
同样新建一个Maven项目,此项目简单的提供一个查询用户的接口
完整POM如下
<?xml version="1.0" encoding="UTF-8"?>
<project xmlns="http://maven.apache.org/POM/4.0.0"
         xmlns:xsi="http://www.w3.org/2001/XMLSchema-instance"
         xsi:schemaLocation="http://maven.apache.org/POM/4.0.0 http://maven.apache.org/xsd/maven-4.0.0.xsd">
    <modelVersion>4.0.0</modelVersion>

    <groupId>com.TransientBa.cloud</groupId>
    <artifactId>microservice-provider-user</artifactId>
    <version>1.0-SNAPSHOT</version>
    <packaging>jar</packaging>

    <!-- 引入spring boot的依赖 -->
    <parent>
        <groupId>org.springframework.boot</groupId>
        <artifactId>spring-boot-starter-parent</artifactId>
        <version>1.4.3.RELEASE</version>
    </parent>

    <properties>
        <project.build.sourceEncoding>UTF-8</project.build.sourceEncoding>
        <java.version>1.8</java.version>
    </properties>

    <dependencies>
        <!-- 提供了SpringMVC的支持 -->
        <dependency>
            <groupId>org.springframework.boot</groupId>
            <artifactId>spring-boot-starter-web</artifactId>
        </dependency>
        <!-- 提供了Spring Data JpA -->
        <dependency>
            <groupId>org.springframework.boot</groupId>
            <artifactId>spring-boot-starter-data-jpa</artifactId>
        </dependency>
        <!--整合Spring Boot Actuator-->
        <dependency>
            <groupId>org.springframework.boot</groupId>
            <artifactId>spring-boot-starter-actuator</artifactId>
        </dependency>
        <!--Eureka server依赖-->
        <dependency>
            <groupId>org.springframework.cloud</groupId>
            <artifactId>spring-cloud-starter-eureka-server</artifactId>
            <version>1.1.3.RELEASE</version>
        </dependency>
        <!--H2数据库支持-->
        <dependency>
            <groupId>com.h2database</groupId>
            <artifactId>h2</artifactId>
        </dependency>
    </dependencies>

    <!-- 引入spring cloud的依赖 -->
    <dependencyManagement>
        <dependencies>
            <dependency>
                <groupId>org.springframework.cloud</groupId>
                <artifactId>spring-cloud-dependencies</artifactId>
                <version>Camden.SR4</version>
                <type>pom</type>
                <scope>import</scope>
            </dependency>
        </dependencies>
    </dependencyManagement>

    <!-- 添加spring-boot的maven插件 -->
    <build>
        <plugins>
            <plugin>
                <groupId>org.springframework.boot</groupId>
                <artifactId>spring-boot-maven-plugin</artifactId>
            </plugin>
        </plugins>
    </build>
</project>
resources下的application.yml如下:
server:
  port: 8000
  tomcat:
    uri-encoding: UTF-8

spring:
  application:
    name: microserviece-provider-user           # 用于指定注册到Eureka Server上的应用名称
  jpa:
    generate-ddl: false           # 是否生成ddl语句
    show-sql: true          # 是否打印sql语句
    hibernate:
      ddl-auto: none
  datasource:                 # 指定数据源
    platform: h2              # 指定数据源类型
    schema: classpath:schema.sql    # 指定h2数据库的建表脚本
    data: classpath:data.sql        # 指定h2数据库的数据脚本
  http:
    encoding:
      charset: UTF-8
      enabled: true
      force: true
  messages:
    encoding: UTF-8

logging:            # 配置日志级别,让hibernate打印执行的SQL
  level:
    root: INFO
    org.hibernate: DEBUG
    org.hibernate.type.descriptor.sql.BasicBinder: TRACE
    org.hibernate.type.descriptor.sql.BasicExtractor: TRACE
    com.TransientBa: DEBUG

eureka:
  client:
    serviceUrl:
      defaultZone: http://localhost:8761/eureka/
  instance:
    prefer-ip-address: true     # 将自己的ip注册到Eureka Server上   如果不配置该属性  则默认为false且表示注册微服务所在操作系统的hostname到Eureka Server
创建两个sql文件扔在resource下作为我们的数据库
data.sql:
insert into user(id,username,name,age,balance) values(1,'account1','张三',20,100.00);
insert into user(id,username,name,age,balance) values(2,'account2','李四',28,180.00);
insert into user(id,username,name,age,balance) values(3,'account3','王五',32,280.00);
schema.sql:
drop table user if exists;
create table user(id bigint generated by default as identity,username varchar(40),name varchar(20) ,age int(3),balance decimal(10,2),primary key(id));
有了表我们来创建User类
package com.TransientBa.cloud.entity;

import javax.persistence.*;
import java.math.BigDecimal;

/**
 * User class
 *
 * @author TransientBa
 * @date 2018/5/4
 */
@Entity
public class User {
    @Id
    @GeneratedValue(strategy = GenerationType.AUTO)
    private Long id;

    @Column
    private String username;
    @Column
    private String name;
    @Column
    private Integer age;
    @Column
    private BigDecimal balance;
    // 省略getset
}
创建dao
package com.TransientBa.cloud.dao;

import com.TransientBa.cloud.entity.User;
import org.springframework.data.jpa.repository.JpaRepository;
import org.springframework.stereotype.Repository;

/**
 * UserRepository class
 *
 * @author TransientBa
 * @date 2018/5/4
 */
@Repository
public interface  UserRepository extends JpaRepository<User,Long> {
}
创建controller
package com.TransientBa.cloud.controller;

import com.TransientBa.cloud.dao.UserRepository;
import com.TransientBa.cloud.entity.User;
import org.springframework.beans.factory.annotation.Autowired;
import org.springframework.web.bind.annotation.GetMapping;
import org.springframework.web.bind.annotation.PathVariable;
import org.springframework.web.bind.annotation.RestController;

/**
 * UserController class
 *
 * @author TransientBa
 * @date 2018/5/4
 */
@RestController
public class UserController {
    @Autowired
    private UserRepository userRepository;

    @GetMapping("/{id}")
    public User findById(@PathVariable Long id){
        User findOne = this.userRepository.findOne(id);
        return findOne;
    }
}
编写启动类
package com.TransientBa.cloud;

import org.springframework.boot.SpringApplication;
import org.springframework.boot.autoconfigure.SpringBootApplication;
import org.springframework.cloud.client.discovery.EnableDiscoveryClient;

/**
 * ProviderUserApplication class
 *
 * @author TransientBa
 * @date 2018/5/4
 */
@EnableDiscoveryClient
@SpringBootApplication
public class ProviderUserApplication {
    public static void main(String[] args) {
        SpringApplication.run(ProviderUserApplication.class,args);
    }
}
完整的项目结构如下:

同样我们测试下

可以看到Instances currently registered with Eureka下有了一个叫做MICROSERVIECE-PROVIDER-USER的实例
同样我们在创建一个微服务消费者

3.3 编写消费者微服务
POM
POM和提供者一样 只需要改一下artifactId换成消费者的ID,添加一个依赖
  <groupId>com.transientBa.cloud</groupId>
  <artifactId>microservice-simple-consumer-movie</artifactId>
  <version>1.0-SNAPSHOT</version>
  <packaging>jar</packaging>
   <dependency>
       <groupId>org.springframework.boot</groupId>
       <artifactId>spring-boot-starter-web</artifactId>
   </dependency>
写一个POJO用户类
package com.TransientBa.cloud.pojo;

import java.math.BigDecimal;

/**
 * User class
 *
 * @author TransientBa
 * @date 2018/5/5
 */
public class User {
    private Long id;
    private String username;
    private String name;
    private Integer age;
    private BigDecimal balance;
    //GetSet..
}
Controller
package com.TransientBa.cloud.controller;

import com.TransientBa.cloud.pojo.User;
import org.springframework.beans.factory.annotation.Autowired;
import org.springframework.beans.factory.annotation.Value;
import org.springframework.web.bind.annotation.GetMapping;
import org.springframework.web.bind.annotation.PathVariable;
import org.springframework.web.bind.annotation.RestController;
import org.springframework.web.client.RestTemplate;

/**
 * MovieController class
 *
 * @author TransientBa
 * @date 2018/5/5
 */
@RestController
public class MovieController {
    //使用restTemplate请求User服务
    @Autowired
    private RestTemplate restTemplate;

    //读取配置文件Url路径
    @Value("${user.userServiceUrl}")
    private String userServiceUrl;


    @GetMapping("/user/{id}")
    public User findById(@PathVariable Long id){
        return this.restTemplate.getForObject(userServiceUrl+id,User.class);
    }
}
application启动类
package com.TransientBa.cloud;

import org.springframework.boot.SpringApplication;
import org.springframework.boot.autoconfigure.EnableAutoConfiguration;
import org.springframework.boot.autoconfigure.SpringBootApplication;
import org.springframework.boot.autoconfigure.jdbc.DataSourceAutoConfiguration;
import org.springframework.context.annotation.Bean;
import org.springframework.web.client.RestTemplate;

/**
 * ConsumerMovieApplication class
 *
 * @author TransientBa
 * @date 2018/5/5
 */
@SpringBootApplication
public class ConsumerMovieApplication {

    //以下写法等价于 RestTemplate restTemplate = new RestTemplate();
    @Bean
    public RestTemplate restTemplate(){
        return new RestTemplate();
    }

    public static void main(String[] args) {
        SpringApplication.run(ConsumerMovieApplication.class,args);
    }
}
application.ymi
server:
  port: 8010
user:
  userServiceUrl: http://localhost:8000/
spring:
  application:
    name: microserviece-consumer-movie           # 用于指定注册到Eureka Server上的应用名称
eureka:
  client:
    serviceUrl:
#      defaultZone: http://peer1:8761/eureka/
      defaultZone: http://localhost:8761/eureka/
  instance:
    prefer-ip-address: true     # 将自己的ip注册到Eureka Server上   如果不配置该属性  则默认为false且表示注册微服务所在操作系统的hostname到Eureka Server
测试一下

这样在Instances currently registered with Eureka下 ,我们就有了两个服务
高可用Eureka集群
通过上面我们完成了一个单节点的Eureka,消费者和提供者与ES保持联系,ES提供发现注册的功能,看起来很美好,但很明显并不适用生产环境,同样不高可用
我们可以思考一个问题,当Eureka Server宕掉之后会发生什么?消费服务仍然靠着缓存来消费远程API,若提供者正常服务这当然没有问题,但如果提供者也出现了不可用的情况,整个系统就会受到了影响,我们采用EurekaServer集群来解决这个问题
我们修改Eureka Server这个服务
通过用spring.profiles来配置两个环境,模拟两个Server
首先修改系统的hosts文件
windows系统的hosts文件在:C:\Windows\System32\drivers\etc下
修改为127.0.0.1 peer1 peer2
修改EurekaServer下的application.yml文件如下
这样来让两个Server启动后相互注册
spring:
  application:
    name: microservice-discovery-eureka-ha
---
spring:
  #指定profile = peer1
  profiles: peer1
server:
  port: 8761
eureka:
  instance:
    #指定当profile=peer1时,主机名是peer1
    hostname: peer1
  client:
    serviceUrl:
      #将自己注册到peer2这个Eureka上去
      defaultZone: http://peer2:8762/eureka/
---
spring:
  profiles: peer2
server:
  port: 8762
eureka:
  instance:
    hostname: peer2
  client:
    serviceUrl:
      defaultZone: http://peer1:8761/eureka/
修改消费者和提供者的application.yml文件
defaultZone: http://peer1:8761/eureka/,http://peer2:8762/eureka/将Eureka Server打包后,我们用两个命令启动两个Server:
java -jar microservice-discovery-eureka-ha-1.0-SNAPSHOT.jar --spring.profiles.active=peer1
java -jar microservice-discovery-eureka-ha-1.0-SNAPSHOT.jar --spring.profiles.active=peer2
然后再启动消费者和服务者两个微服务,然后访问peer1:8761或者peer2:8762

能看到Instances currently registered with Eureka下分别有:
MICROSERVICE-DISCOVERY-EUREKA-HA    n/a (2) (2) UP (2) - DESKTOP-TBLJVIP:microservice-discovery-eureka-ha:8762 , DESKTOP-TBLJVIP:microservice-discovery-eureka-ha:8761
MICROSERVIECE-CONSUMER-MOVIE    n/a (1) (1) UP (1) - DESKTOP-TBLJVIP:microserviece-consumer-movie:8010
MICROSERVIECE-PROVIDER-USER n/a (1) (1) UP (1) - DESKTOP-TBLJVIP:microserviece-provider-user:8000
这三个实例
4 总结
两个EurekaServer通过复制的方式实现注册表的同步,这样我们就完成了一个高可用的EurekaServer集群了,多节点Server也是一个道理。当EurekaServer集群中某个服务宕掉了,消费服务就可以通过其他节点来同步注册表信息,如果你要问我所有的Server全部宕掉了怎么办,很简单,像bilibili一样请个道士做个法吧。