应用程序卡顿原因
在Android应用程序中,运行着一个主线程,也被称为UI线程,它处理界面交互的相关的逻辑。四大基本组件以及各种控件都运行在这个线程中,如果在这个线程中做耗时的操作,就容易引起页面卡顿,也就是掉帧,甚至引起用户最不想看到的ANR。
在Android系统中,想要应用程序画面达到流畅,就必须是60fps。系统每隔16ms发出VSYNC信号,触发对UI进行渲染,要达到60fps,意味着程序的大多数操作都必须在16ms内完成。
所以,Android应用程序卡顿,通常是在主线程中做了耗时操作导致的。
Looper
关于消息机制
在了解Looper前,先了解一下系统的消息机制,也就是在主线程和子线程中是如何进行通讯的。
在Android系统中,提供了一种消息机制,
既Handler,Looper,MessageQueue,Message一起组成的消息机制,它们的作用分别是:
- Handler:将一个任务切换到某个指定的线程中去执行,负责发送和处理Message。
- Looper:负责创建MessageQueue,并从MessageQueue取出Message。
- MessageQueue:管理Message。
- Message:消息实体,携带消息数据。
Looper的初始化
在应用程序中,程序的入口是ActivityThread的main方法:
    public static void main(String[] args) {
        Trace.traceBegin(Trace.TRACE_TAG_ACTIVITY_MANAGER, "ActivityThreadMain");

        // CloseGuard defaults to true and can be quite spammy.  We
        // disable it here, but selectively enable it later (via
        // StrictMode) on debug builds, but using DropBox, not logs.
        CloseGuard.setEnabled(false);

        Environment.initForCurrentUser();

        // Set the reporter for event logging in libcore
        EventLogger.setReporter(new EventLoggingReporter());

        // Make sure TrustedCertificateStore looks in the right place for CA certificates
        final File configDir = Environment.getUserConfigDirectory(UserHandle.myUserId());
        TrustedCertificateStore.setDefaultUserDirectory(configDir);

        Process.setArgV0("<pre-initialized>");

        Looper.prepareMainLooper();//初始化当前线程的Looper

        ActivityThread thread = new ActivityThread();
        thread.attach(false);

        if (sMainThreadHandler == null) {
            sMainThreadHandler = thread.getHandler();
        }

        if (false) {
            Looper.myLooper().setMessageLogging(new
                    LogPrinter(Log.DEBUG, "ActivityThread"));//设置Looper分发消息时的log打印
        }

        // End of event ActivityThreadMain.
        Trace.traceEnd(Trace.TRACE_TAG_ACTIVITY_MANAGER);
        Looper.loop();//从MessageQueue取出消息

        throw new RuntimeException("Main thread loop unexpectedly exited");
    }
在main方法中,调用了Looper的初始化方法prepareMainLooper()和取出并分发消息给Handler的loop()方法。
关于prepareMainLooper()方法:
   public static void prepareMainLooper() {
        prepare(false);
        synchronized (Looper.class) {
            if (sMainLooper != null) {
                throw new IllegalStateException("The main Looper has already been prepared.");
            }
            sMainLooper = myLooper();
        }
    }
在这个方法中主要初始化了一个应用程序用的Looper,也就是主线程用的Looper。这个方法并不是给程序员调用的,因为该方法是应用程序内部调用,也就是上面main方法调用,所以在其它地方不要调用该方法。
关于loop()方法:
  /**
     * Run the message queue in this thread. Be sure to call
     * {@link #quit()} to end the loop.
     */
    public static void loop() {
        final Looper me = myLooper();
        if (me == null) {
            throw new RuntimeException("No Looper; Looper.prepare() wasn't called on this thread.");
        }
        final MessageQueue queue = me.mQueue;

        // Make sure the identity of this thread is that of the local process,
        // and keep track of what that identity token actually is.
        Binder.clearCallingIdentity();
        final long ident = Binder.clearCallingIdentity();

        for (;;) {
            Message msg = queue.next(); // might block
            if (msg == null) {
                // No message indicates that the message queue is quitting.
                return;
            }

            // This must be in a local variable, in case a UI event sets the logger
            final Printer logging = me.mLogging;
            if (logging != null) {
                logging.println(">>>>> Dispatching to " + msg.target + " " +
                        msg.callback + ": " + msg.what);
            }

            final long slowDispatchThresholdMs = me.mSlowDispatchThresholdMs;

            final long traceTag = me.mTraceTag;
            if (traceTag != 0 && Trace.isTagEnabled(traceTag)) {
                Trace.traceBegin(traceTag, msg.target.getTraceName(msg));
            }
            final long start = (slowDispatchThresholdMs == 0) ? 0 : SystemClock.uptimeMillis();
            final long end;
            try {
                msg.target.dispatchMessage(msg);
                end = (slowDispatchThresholdMs == 0) ? 0 : SystemClock.uptimeMillis();
            } finally {
                if (traceTag != 0) {
                    Trace.traceEnd(traceTag);
                }
            }
            if (slowDispatchThresholdMs > 0) {
                final long time = end - start;
                if (time > slowDispatchThresholdMs) {
                    Slog.w(TAG, "Dispatch took " + time + "ms on "
                            + Thread.currentThread().getName() + ", h=" +
                            msg.target + " cb=" + msg.callback + " msg=" + msg.what);
                }
            }

            if (logging != null) {
                logging.println("<<<<< Finished to " + msg.target + " " + msg.callback);
            }

            // Make sure that during the course of dispatching the
            // identity of the thread wasn't corrupted.
            final long newIdent = Binder.clearCallingIdentity();
            if (ident != newIdent) {
                Log.wtf(TAG, "Thread identity changed from 0x"
                        + Long.toHexString(ident) + " to 0x"
                        + Long.toHexString(newIdent) + " while dispatching to "
                        + msg.target.getClass().getName() + " "
                        + msg.callback + " what=" + msg.what);
            }

            msg.recycleUnchecked();
        }
    }
该方法的方法实体是一个无限循环。先通过myLooper()方法得到当前线程的Looper对象,再通过Looper对象得到MessageQueue对象,然后再通过
MessageQueue对象取出Message,最后将Message交给Handler发送出去并处理。这段流程简化代码大概如下:
Looper me = myLooper();
MessageQueue queue = me.mQueue;
for (;;) {
   Message msg = queue.next();// might block
   msg.target.dispatchMessage(msg);
}可以看出,loop()方法是不断的从MessageQueue中取出消息,然后交给Handler去处理。那么可以得出结论:两个消息之间的时间间隔就是前一个消息的执行时间。因此,通过检测消息的执行时间,就可以看出是不是有阻塞主线程的耗时方法。
如何检测主线程中的耗时方法 ?
再看loop()方法中的for循环:
Printer logging = me.mLogging;
if (logging != null) {
   logging.println(">>>>> Dispatching to " + msg.target + " " +
                        msg.callback + ": " + msg.what);
}

msg.target.dispatchMessage(msg);//分发和处理消息

if (logging != null) {
                logging.println("<<<<< Finished to " + msg.target + " " + msg.callback);
 }
上面会在分发和处理消息开始前和结束后打印相关log,因此,就可以通过这个log来计算执行消息时间。
关于mLogging对象的赋值:
   public void setMessageLogging(@Nullable Printer printer) {
        mLogging = printer;
    }
所以,只需外部给mLogging赋值就行了。
检测主线程中的耗时方法
设置打印log回调监听:
public class BlockDetectByPrinter {

    public static void start() {

        Looper.getMainLooper().setMessageLogging(new Printer() {
            //分发和处理消息开始前的log
            private static final String START = ">>>>> Dispatching";
             //分发和处理消息结束后的log
            private static final String END = "<<<<< Finished";

            @Override
            public void println(String x) {
                if (x.startsWith(START)) {
                    //开始计时
                    LogMonitor.getInstance().startMonitor();
                }
                if (x.startsWith(END)) {
                    //结束计时,并计算出方法执行时间
                    LogMonitor.getInstance().removeMonitor();
                }
            }
        });

    }
}
通过log计算执行消息的时间:
public final class LogMonitor {
    private static final String TAG = "LogMonitor";
    private static LogMonitor sInstance = new LogMonitor();
    private Handler mIoHandler;
    //方法耗时的卡口,300毫秒
    private static final long TIME_BLOCK = 300L;

    private LogMonitor() {
        HandlerThread logThread = new HandlerThread("log");
        logThread.start();
        mIoHandler = new Handler(logThread.getLooper());
    }

    private static Runnable mLogRunnable = new Runnable() {
        @Override
        public void run() {
            //打印出执行的耗时方法的栈消息
            StringBuilder sb = new StringBuilder();
            StackTraceElement[] stackTrace = Looper.getMainLooper().getThread().getStackTrace();
            for (StackTraceElement s : stackTrace) {
                sb.append(s.toString());
                sb.append("\n");
            }
            Log.e(TAG, sb.toString());
        }
    };

    public static LogMonitor getInstance() {
        return sInstance;
    }


    /**
     * 开始计时
     */
    public void startMonitor() {
        mIoHandler.postDelayed(mLogRunnable, TIME_BLOCK);
    }

    /**
     * 停止计时
     */
    public void removeMonitor() {
        mIoHandler.removeCallbacks(mLogRunnable);
    }

}
上面利用了HandlerThread来检测耗时方法,在分发和处理消息开始前,发送一个延迟300毫秒的消息,如果分发和处理消息结束后还不到300毫秒,也就是消息处理时间小于300毫秒就会移除这个延迟300毫秒的消息,否则就会打印出这个耗时消息的栈轨迹。
在 application中,初始化:
public class YourApplication extends Application {
    @Override
    public void onCreate() {
        super.onCreate();
        BlockDetectByPrinter.start();
    }
}
测试耗时方法,例如:
public class MainActivity extends AppCompatActivity {

    @Override
    protected void onCreate(Bundle savedInstanceState) {
        super.onCreate(savedInstanceState);
        method1();
    }

    public void method1() {
        try {
            Thread.sleep(400L);
        } catch (InterruptedException e) {
            e.printStackTrace();
        }
    }

}
查看打印的log消息:
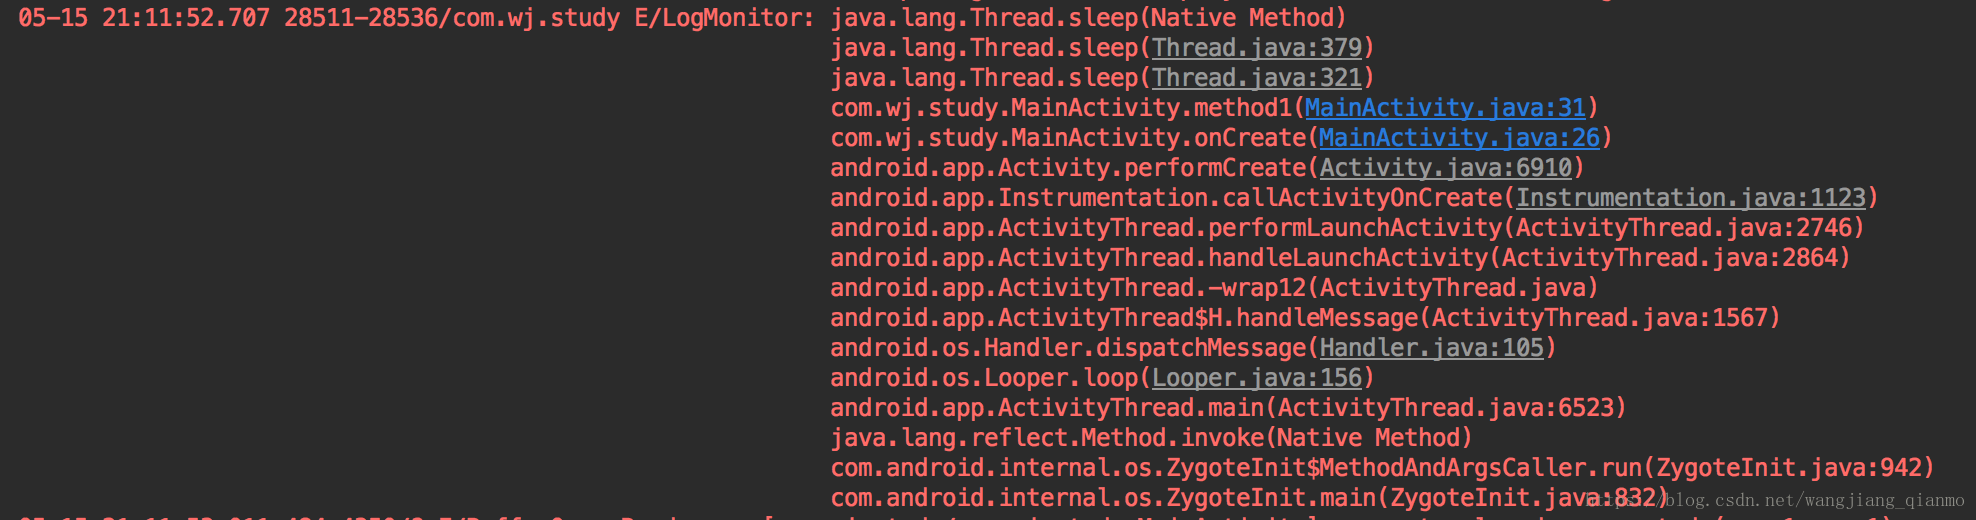
可以看到具体耗时方法在代码的哪一行,找到了method1方法中
Thread.sleep(400L)。
总结
通过主线程中Looper的loop()方法,在分发处理消息开始前和结束后的打印log回调接口,可以检测出执行的耗时方法。在应用程序中,应该严格定义耗时方法的执行时间的卡口,这样才能保证程序质量。