简介
颜色用8bit来表示就可以了,但是光强呢?
High dynamic range is the science ofrecognizing the different intensity levels of light.Under normal rendering circumstances, wherethe average level of lighting is similar throughout the scene, eight bits of colorprecision are enough to represent the different colors and light intensities. However, inreal life, there are many situations where the levels of lighting varysignificantly throughout the scene, leading to a scenario where there isn’t enough precision to represent all thephenomena that occur from differences in intensities.
在图形学中,实现HDR的流程如下
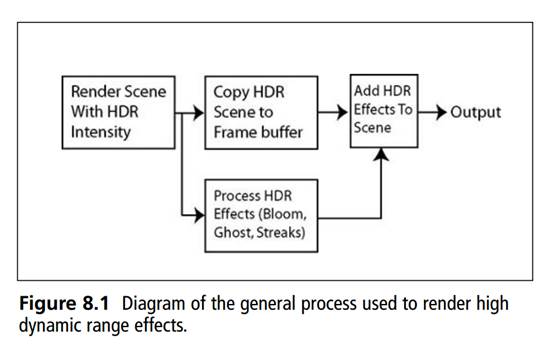
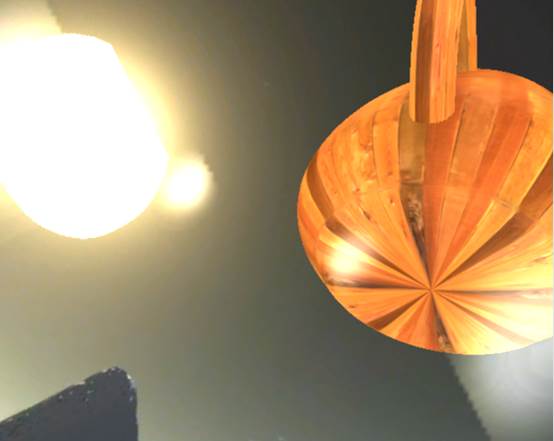
效果如下

floating point texture
为了实现HDR渲染,我们需要避免颜色值在片段着色处理时被截断。当framebuffer使用标准化的 fixed-point的颜色格式(比如 GL_RGB)作为colorbuffer的内置格式时,OpenGL会在保存颜色值到framebuffer前,自动截断颜色值到0.0 到 1.0。这个截断操作对大部分的颜色格式都会执行,floating point格式除外,这样它可以用来保存HDR值。
看StackOverFlow上面的一个人的解释
Basically floating point texture is atexture in which data is of floating point type :) That is it is not clamped.So if you have 3.14f in your texture you will read the same value in theshader.
You may create them with differentnumbers of channels. Also you may crate 16 or 32 bit textures depending on theformat. e.g.
// create 32bit 4 component texture, eachcomponent has type float
glTexImage2D(GL_TEXTURE_2D, 0, GL_RGBA32F, 16,16, 0, GL_RGBA, GL_FLOAT, data);
where data could be like this:
float data[16][16];
for(int i=0;i<16*16;++i) data[i] =sin(i*M_PI/180.0f); // whatever
then in shader you can get exactly same(if you use FLOAT32 texture) value.
e.g.
uniform sampler2D myFloatTex;
float value = texture2D(myFloatTex, texcoord.xy);
If you were using 16bit format, sayGL_RGBA16F, then whenever you read in shader you will have a convertion. So, toavoid this you may use half4 type: half4 value = texture2D(my16BitTex,texcoord.xy);
曝光控制
high dynamic range environment map 就是在天空盒中添加光照强度的信息,这里用最简单的方法,就是用天空盒贴图的alpha通道来存光照强度,alpha = 0表示强度为0 ,1是最大光强。
我们用精度更高的值来保存大范围的黑到亮的区间对应的颜色值,最后图像输出时把HDR值转换回低动态范围(LDR)[ 0.0, 1.0]范围。这个转换过程称为色调映射(tone mapping),而且目前已经有大量的tone mapping算法使得转换过程尽可能的保留更多的HDR细节。
实时渲染中的HDR不仅可以使用超出LDR的[0.0, 1.0]的值范围和保留更多的细节,而且还可以指定光源的真实亮度。比如,太阳比其他的东西比如闪电来得亮,那么可以指定太阳的亮度为10.0。这样我们可以在场景中设置更加真实的光照参数,而这些参数是没法在LDR渲染中用的,因为它们被直接截断到1.0。
曝光控制主要用到了一个值来控制,在工程中添加一个

在ps中,最终获得的颜色是
return color * ((1.0+(color.a*64.0))*Exposure_Level);
这里假设光照强度0-64级。
由采样所得颜色和纹理alpha通道(光照强度),Exposure_Level来决定的。
天空盒的ps如下
float Exposure_Level;
sampler Environment;
float4 ps_main(float3 dir: TEXCOORD0) : COLOR
{
   // Read texture and determine HDR color based on alpha
   // channel and exposure level
   float4 color = texCUBE(Environment, dir);
   return color * ((1.0+(color.a*64.0))* Exposure_Level);
}
茶壶的vs如下
float4x4 view_proj_matrix;
float4x4 matWorldInverseTranspose;
float4x4 matWorld;
float4 view_position;

struct VS_INPUT
{
      float4 Position : POSITION0;
      float4 Normal   : NORMAL0;
};

struct VS_OUTPUT
{
   float4 Pos:       POSITION;
   float2 TexCoord:   TEXCOORD0;
   float3 Normal   : TEXCOORD0;
   float3 Eye      : TEXCOORD1;
};

VS_OUTPUT vs_main(VS_INPUT Input )
{
   VS_OUTPUT Out;

   // Compute the projected position and send out the texture coordinates
   Out.Pos = mul(view_proj_matrix, Input.Position);
   Out.Normal = mul(matWorldInverseTranspose, Input.Normal);
   Out.Eye = view_position - mul(matWorld, Input.Position);

   return Out;
}
ps如下
float3 vLight;
float AmbientIntensity;
float DiffuseIntensity;
float SpecularIntensity;
float4 AmbientColor;
float4 DiffuseColor;
float4 SpecularColor;
float SpecularPow;
float Exposure_Level;
samplerCUBE Environment;

struct PS_INPUT
{
      float3 Normal   : TEXCOORD0;
      float3 Eye      : TEXCOORD1;
};

float4 ps_main( PS_INPUT Input ) : COLOR0
{
      float3 light = normalize(vLight);
      float3 eye = normalize(Input.Eye);
      float3 normal = normalize(Input.Normal);

      float ndl = saturate(dot(light, normal));
      //光线的反射方向
      //float3 r = normalize(reflect(-light, normal));
          float3 r = normalize(reflect(normal, -light));
      float rdv = pow(saturate(dot(r, eye)), SpecularPow);

      //环境贴图
      float3 reflectEye = reflect(-eye, normal);
      float4 reflectColor = texCUBE(Environment, reflectEye);

      //光照方程
      float4 color = AmbientColor * AmbientIntensity + DiffuseColor * DiffuseIntensity * ndl + SpecularColor * SpecularIntensity * rdv;

      reflectColor = reflectColor * ((1.0+(reflectColor.a*64.0))* Exposure_Level);
     // return reflectColor * color;
      return reflectColor + color;
}
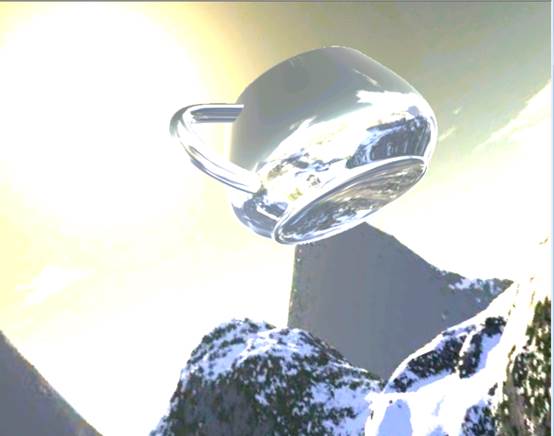
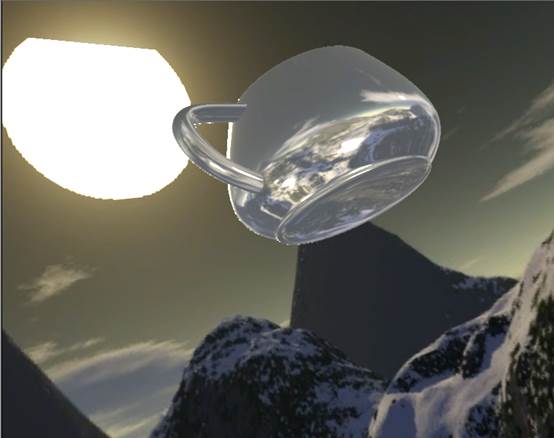
通过控制Exposure_Level可以获得不同的曝光
自动曝光控制
理论上0.5的曝光就是最好的曝光,假设已经知道平均的亮度,则曝光值可以计算为
Exposure = 0.5 / Average_Brightness;
当然可以用lerp来做平滑
Exposure = lerp(Exposure, 0.5 / Average_Brightness,Exposure_Adjust_Speed);
怪物猎人就用到了这个技术。
而计算Average_Brightness需要实时遍历每个像素去计算。
另一种方法是利用硬件的来处理。
If you have a successive set of renderable textures, each onebeing half the size of the preceding one, you can use a simple box filter to copy the initial scene from render target to render target. Afteryou reach a one-by-one render target, the single pixel remaining will be the average valuefor the initial scene. You can then use this final one-pixel texture as aninput to your shader to doyour automatic exposure control.
Glare
原理就是光外泄到其他的像素去了,用一个模糊的滤波器扫一遍就可以了。书上的做法是用高斯模糊。
首先把rt缩放到128*128,这样采样的消耗会小一些。在vs中是这样处理
struct VS_OUTPUT
{
   float4 Pos: POSITION;
   float2 texCoord: TEXCOORD0;
};

VS_OUTPUT vs_main(float4 Pos: POSITION)
{
   VS_OUTPUT Out;

   // Simply output the position without transforming it
   Out.Pos = float4(Pos.xy, 0, 1);

   // Texture coordinates are setup so that the full texture
   // is mapped completeley onto the screen
   Out.texCoord.x = 0.5 * (1 + Pos.x - 1/128);
   Out.texCoord.y = 0.5 * (1 - Pos.y - 1/128);

   return Out;
}
然后用了6个pass来做三次gass blur,最后将blue的结果进行混合
最终pass混合的ps如下
float Glow_Factor;
float Glow_Factor2;
float Glow_Factor3;
sampler Texture0;
sampler Texture1;
sampler Texture2;
float4 ps_main(float2 texCoord: TEXCOORD0) : COLOR
{
   // Sample 3 glow blurring levels and combine them together
   return
     float4((tex2D(Texture0,texCoord).xyz)*Glow_Factor,1.0) +
     float4((tex2D(Texture1,texCoord).xyz)*Glow_Factor2,0) +
     float4((tex2D(Texture2,texCoord).xyz)*Glow_Factor3,0);
}
Steak
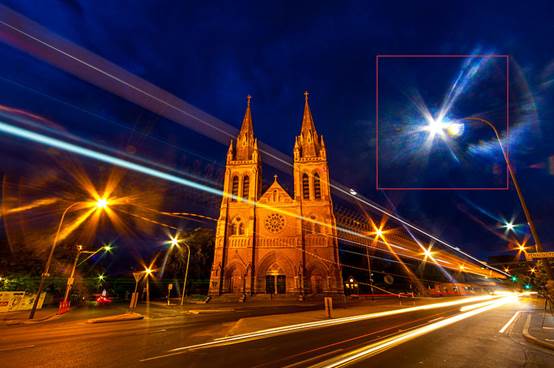
所谓的Streak就是下图中星星形状的效果
这里要用到的一个东西叫diagonal filter
float viewport_inv_width;
float viewport_inv_height;
sampler Texture0;
const float  blurFactor = 0.96;
const float  offsetFactor = 1;
const float4 samples[4] = {
    0.0,    -0.0, 0,    0,
    1.0,    -1.0, 0,    1,
    2.0,    -2.0, 0,    2,
    3.0,    -3.0, 0,    3
};


float4 ps_main(float2 texCoord: TEXCOORD0) : COLOR
{
   float4 color = float4(0,0,0,0);

   // Sample and output the averaged colors
   for(int i=0;i<4;i++)
   {
      float4 col = pow(blurFactor,offsetFactor*samples[i].w)*tex2D(Texture0,texCoord+
             offsetFactor*float2(samples[i].x*viewport_inv_width,
                 samples[i].y*viewport_inv_height));
      color += col;
   }
   return color;
}
用四个pass来绘制,调整offsetFactor, 就可以得到
再在其他四个方向处理一下,就可以得到下面的效果,最后进行叠加。
float Glow_Factor;
sampler Texture0;
sampler Texture1;
sampler Texture2;
sampler Texture3;
float4 ps_main(float2 texCoord: TEXCOORD0) : COLOR
{

return
   // Combine 4 streak directions

     min(1.0,
     float4((tex2D(Texture0,texCoord).xyz)*Glow_Factor,0.20) +
     float4((tex2D(Texture1,texCoord).xyz)*Glow_Factor,0.20) +
     float4((tex2D(Texture2,texCoord).xyz)*Glow_Factor,0.20) +
     float4((tex2D(Texture3,texCoord).xyz)*Glow_Factor,0.20)
     );
}
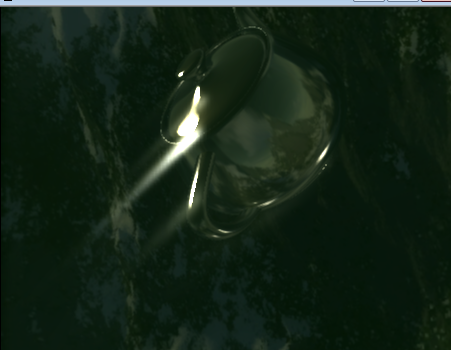
Lens Flare
也叫Ghost,形成的原因是相机镜片之间的反射。最简单的做法就是先提取高光的位置,然后缩放RT
texCoord = (texCoord-0.5)*(Scale) + 0.5;
如果是要flip的话,scale设置为负的就可以了。这里要注意一点,rt的纹理采样的addressing要设置为clamp,这样就超过的地方就不会repeat了。

在经历了这三个pass之后,rt上的alpha通道上存储了之前的曝光信息。
先画四个ghost出来。
Vs中
struct VS_OUTPUT
{
   float4 Pos: POSITION;
   float2 texCoord:  TEXCOORD0;
   float2 texCoord1: TEXCOORD1;
   float2 texCoord2: TEXCOORD2;
   float2 texCoord3: TEXCOORD3;
   float2 texCoord4: TEXCOORD4;
};

VS_OUTPUT vs_main(float4 Pos: POSITION)
{
   VS_OUTPUT Out;

   // Simply output the position without transforming it
   Out.Pos = float4(Pos.xy, 0, 1);

   // Texture coordinates are setup so that the full texture
   // is mapped completeley onto the screen
   float2 texCoord;
   texCoord.x = 0.5 * (1 + Pos.x - 1/128);
   texCoord.y = 0.5 * (1 - Pos.y - 1/128);
   Out.texCoord = texCoord;

   // Compute the scaled texture coordinates for the ghost images
   Out.texCoord1 = (texCoord-0.5)*(-2.0) + 0.5;
   Out.texCoord2 = (texCoord-0.5)*(2.0) + 0.5;
   Out.texCoord3 = (texCoord-0.5)*(-0.6) + 0.5;
   Out.texCoord4 = (texCoord-0.5)*(0.6) + 0.5;


   return Out;
}
首先还是将屏幕坐标变换到纹理坐标,然后计算四个ghost的位置,Ps中
float viewport_inv_height;
float viewport_inv_width;
float Glow_Factor;
sampler Texture0;
sampler Texture1;
float4 ps_main(float2 texCoord:  TEXCOORD0,
               float2 texCoord1: TEXCOORD1,
         float2 texCoord2: TEXCOORD2,
         float2 texCoord3: TEXCOORD3,
         float2 texCoord4: TEXCOORD4) : COLOR
{
   // Sample all ghost pictures
   float4 col1 = tex2D(Texture0, texCoord1)*tex2D(Texture1, texCoord1).a;
   float4 col2 = tex2D(Texture0, texCoord2)*tex2D(Texture1, texCoord2).a;
   float4 col3 = tex2D(Texture0, texCoord3)*tex2D(Texture1, texCoord3).a;
   float4 col4 = tex2D(Texture0, texCoord4)*tex2D(Texture1, texCoord4).a;

   // Combine the ghost images together
   return (col1+col2+col3+col4)*Glow_Factor;
}
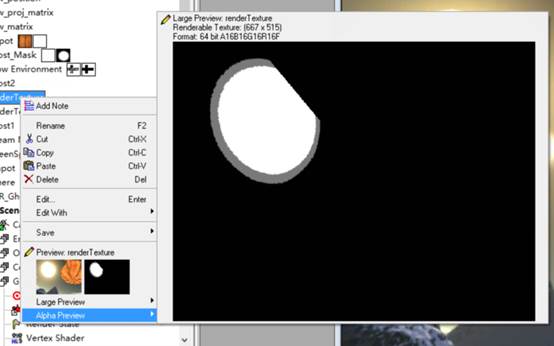
这里的texture1是一个32*32的alpha蒙板用来把边缘给模糊掉,一个pass之后是这样的
三个pass之后就是这样

将前面的东西整合在一起,PS如下
loat Streak_Factor;
float Ghost_Factor;
float Glow_Factor;
float Glow_Factor2;
float Glow_Factor3;
sampler Texture0;
sampler Texture1;
sampler Texture2;
sampler Texture3;
sampler Texture4;
sampler Texture5;
sampler Texture6;
sampler Texture7;
float4 ps_main(float2 texCoord: TEXCOORD0) : COLOR
{
   float4 col;

   // Glow
   col =   float4((tex2D(Texture1,texCoord).xyz)*Glow_Factor,1.0) +
           float4((tex2D(Texture2,texCoord).xyz)*Glow_Factor2,0) +
           float4((tex2D(Texture3,texCoord).xyz)*Glow_Factor3,0);

   // Ghost
   col += float4((tex2D(Texture0,texCoord).xyz),0);

   // Streak
   col +=
     float4((tex2D(Texture4,texCoord).xyz)*Streak_Factor,0) +
     float4((tex2D(Texture5,texCoord).xyz)*Streak_Factor,0) +
     float4((tex2D(Texture6,texCoord).xyz)*Streak_Factor,0) +
     float4((tex2D(Texture7,texCoord).xyz)*Streak_Factor,0);

   return col;
}

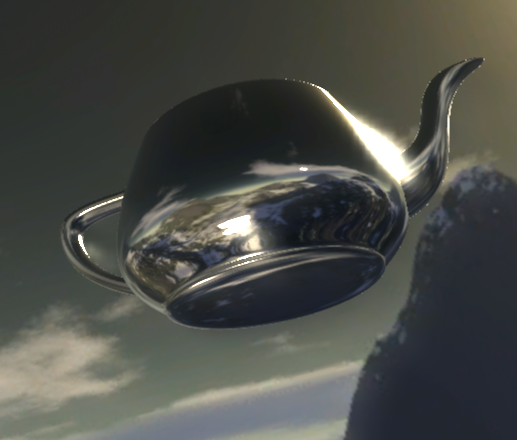
画面有点脏,因为在算ghost的时候把茶壶的高光也算进去了
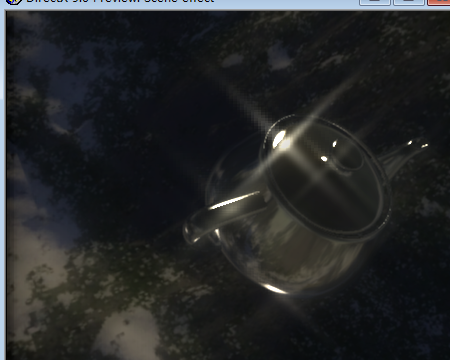
调整一下pass的顺序,先绘制环境贴图,然后直接绘制Ghost,在画水壶,再之后画Glow,最后画streak。
结果如下。

注意
并不是所有硬件都支持float point texture,所以要想一个通用的方法,比如把亮度信息放到alpha通道中去,虽然精度没有那么高。