一、什么是Mybatis?
在介绍Mybatis之前,抛出一个问题,什么是Mybatis呢?这里引用Mybatis官网http://www.mybatis.org/mybatis-3/的一段话来介绍什么是Mybatis。
What is MyBatis?
1、MyBatis is a first class persistence framework with support for custom SQL, stored procedures and advanced mappings.
2、MyBatis eliminates almost all of the JDBC code and manual setting of parameters and retrieval of results.
3、MyBatis can use simple XML or Annotations for configuration and map primitives, Map interfaces and Java POJOs (Plain Old Java Objects) to database records.
官网的介绍言简意赅,从三个出发点介绍了什么是Mybatis,首先Mybatis是一个优秀的持久化框架,它支持自定义SQL查询、存储过程,和很好的一个映射。第二点Mybatis减少了大部分JDBC的代码,避免了手动设置参数和结果集的映射。第三点Mybatis用简单的XML配置文件或注解来配置映射关系,将接口和POJO对象映射到数据库记录中。
在使用传统JDBC时,我们往往需要写很多JDBC代码,需要自己写SQL语句以及自己装配参数,然后自己对结果集进行封装处理,而Mybatis帮我们简化了以上功能,只需要一些配置文件(xml)或是注解的方式即可完成对数据库的查询以及结果的映射封装。
二、使用Mybatis
在使用Mybatis时有两种方式,一种是编程式,一种是集成Spring,大部分项目中用到的都是集成Spring来使用,这里也讲一下编程式使用Mybatis,可以帮助我们更好的理解底层原理。
1.编程式
首先先配置Mybtis的配置文件,然后配置对应的mapper.xml与mapper接口,写好POJO实体类,然后将Mybatis配置文件作为流传入SqlSessionFactoryBuilder去build一个SqlSessionFactory,然后调用SqlSessionFactory的openSession方法获取到一个SqlSession,从这个Session中可以
Mybatis配置文件
<?xml version="1.0" encoding="UTF-8" ?>
<!DOCTYPE configuration
        PUBLIC "-//mybatis.org//DTD Config 3.0//EN"
        "http://mybatis.org/dtd/mybatis-3-config.dtd">
<configuration>
    <settings>
        <setting name="logImpl" value="SLF4J"/>
        <!--<setting name="cacheEnabled" value="true" />-->
    </settings>
    <!--<plugins>-->
        <!--<plugin interceptor="com.mybatis.plugins.TestPlugin">-->
        <!--</plugin>-->
    <!--</plugins>-->
    <environments default="development">
        <environment id="development">
            <transactionManager type="JDBC"/>
            <dataSource type="POOLED">
                <property name="driver" value="com.mysql.cj.jdbc.Driver"/>
                <property name="url" value="jdbc:mysql://127.0.0.1:3306/test?serverTimezone=UTC"/>
                <property name="username" value="root"/>
                <property name="password" value="admin"/>
            </dataSource>
        </environment>
    </environments>
    <mappers>
        <mapper resource="xml/TestMapper.xml"/>
        <mapper resource="xml/PostsMapper.xml"/>
    </mappers>
</configuration>
这里只需要注意<environments/>环境配置(配置数据源)<mappers/>mapper配置文件的路径配置
public class Demo {
    public static SqlSession getSqlSession() throws FileNotFoundException {
        //配置文件
        InputStream configFile = new FileInputStream(
                "D:\\IdeaProjects\\mybatissrc\\main\\java\\com\\mybatis\\demo\\mybatis-config.xml");
        SqlSessionFactory sqlSessionFactory = new SqlSessionFactoryBuilder().build(configFile);
        //加载配置文件得到SqlSessionFactory
        return sqlSessionFactory.openSession();
    }

    public static void main(String[] args) throws FileNotFoundException {
        TestMapper testMapper = getSqlSession().getMapper(TestMapper.class);
        Test test = testMapper.selectByPrimaryKey(1);
        System.out.println(test);
    }
}
mapper接口声明各种SQL方法,然后在mapper.xml中写出具体SQL,在编程式使用时只需要从SqlSessionFactory中取出SqlSession,然后取出需要用的Mapper,即可完成对数据库的查询与结果的映射。
2.与Spring集成
不同点在于Spring帮我们省去了创建SqlSessionFactory与SqlSession的过程,装配Mapper让我们直接可以调用mapper类做对应的CRUD,其中是因为Spring帮我们去管理SqlSessionFactory(需要注入DataSource),然后要在Spring中配置dao包(mapper接口路径),来完成对mapper接口代理出各个实现类,我们只需要用@Autowired或是其他注入的注解来注入对应的mapper(底层是把扫描到的mapper接口实现的代理类存放在IOC容器中,我们需要用到的时候再去取),即可使用mapper完成对数据库的CRUD,Spring帮助我们对许多类进行解耦。具体的底层原理会在目录的最后一栏进行分析。这里只是简单带过一下Spring集成方式使用Mybatis。
3.使用Generator生成代码
一般在项目开发时都会使用generator插件去自动生成实体类、dao层(mapper接口)、mapper.xml的简单增删改查方法,这可以替我们省去大量重复工作,如有复杂查询再去mapper添加即可。在项目中一般不用到Example,如果是个人快速项目,建议使用Example可以加速项目的开发,如有需要Example需在generatorConfig.xml中<table/>标签中对应属性设为true即可生成Example文件。
首先需要引入mybatis-generator-core.jar包,然后编写generatorConifg.xml配置文件,在配置文件中指定数据源、生成实体、mapper接口、mapper.xml文件生成位置,然后配置数据库中某个表和文件名即可。
然后在一个类中写一个main方法去读取配置文件进行生成对应mapper、pojo、xml。
List<String> warnings = new ArrayList<String>();
        boolean overwrite = false;
        InputStream is= MybatisGenerator.class.getClassLoader().getResource("mybatis/generatorConfig.xml").openStream();
        ConfigurationParser cp = new ConfigurationParser(warnings);
        Configuration config = cp.parseConfiguration(is);
        is.close();
        DefaultShellCallback callback = new DefaultShellCallback(overwrite);
        MyBatisGenerator myBatisGenerator = new MyBatisGenerator(config, callback, warnings);
        myBatisGenerator.generate(null);

        System.out.println("生成代码成功,以后执行会覆盖掉mapper,pojo,xml 等文件上做的修改");
4.主要类的作用于SCOPE(生命周期)
SqlSessionFactoryBuilder:method ->用于生成SqlSessionFactory,所以为method级别
SqlSessionFactory:application ->用于生成SqlSession,每次查询都要从factory生成SqlSesion,所以为容器级别
SqlSession:request/method ->用于调用对应查询方法,查询结束之后关闭,所以为method级别(也可以认为是线程级)
Mapper:method ->用于对应某个具体的查询方法,查询一次之后消失,所以为method级别
5.Mapper映射查询方法的xml形式与annotation形式对比
两种形式可结合使用,Mapper.xml形式优点在于它与接口分离,即使编写复杂的SQL语句也可以保持很好的可读性,缺点在于会产生大量文件,即一个mapper接口就要生成对应mapper.xml。
而annotation形式的优点在于在mapper接口方法上即可看到sql语句,不需要再创建xml或者再去配置文件编写对应SQL语句,但缺点在于复杂的SQL语句不易维护,可读性很差。
在项目中很少用到annotation形式,mapper.xml是大部分企业项目用到的形式。
6.TypeHandle
Mybatis在底层JDBC操作时,无论是设置一个参数或是从ResultSet结果集中取出一个值,都会用一个typeHandle将取出的值转换成JAVA类型,Mybatis有各种自带的typeHandle,来完成各种类型的映射,我们也可以自定义typeHandle,将数据库中取出来的值做处理放到结果中展示,也可以将参数做处理存放到数据库中,下面展示一个Demo来实现这种功能。
场景:查询数据库时,数据库中的字段值如果为1将其转化成"是",如果为0将其转换成"否"。
存入数据库时,将“是”转换成1,将“否“转换成0
首先自定义一个TypeHandle,实现BaseTypeHandler抽象类(这里使用了模板方法模式,方便了代码的编写,当然也可以实现TypeHandler接口),泛型为String,注解MapperJdbcType(JdbcType.VARCHAR)表示要对数据库类型VARCHAR和JAVA类型为String的字段做处理。实现setNonNullParameter方法,这里会在填充设置了自定义typeHandle的字段时进入这个方法,在方法里对PreparedStatement做处理即可。getNullableResult方法也是同理,对从结果集ResultSet取出的值做处理即可。
@MappedJdbcTypes(JdbcType.VARCHAR)
public class TestTypeHandle extends BaseTypeHandler<String> {
    public TestTypeHandle() {
    }

    public void setNonNullParameter(PreparedStatement ps, int i, String parameter, JdbcType jdbcType) throws SQLException {
        switch (parameter){
            case "是":
                ps.setString(i, "1");
                return;
            case "否":
                ps.setString(i, "0");
                return;
            default:
                ps.setString(i, parameter);
        }
    }

    public String getNullableResult(ResultSet rs, String columnName) throws SQLException {
        String name = rs.getString(columnName);
        switch (name){
            case "1":
                return "是";
            case "0":
                return "否";
            default:
                return name;
        }
    }

    public String getNullableResult(ResultSet rs, int columnIndex) throws SQLException {
        return rs.getString(columnIndex);
    }

    public String getNullableResult(CallableStatement cs, int columnIndex) throws SQLException {
        return cs.getString(columnIndex);
    }
}
然后在mapper.xml中配置指定字段使用typeHandle
  <resultMap id="BaseResultMap" type="com.mybatis.beans.Test">
    <id column="id" jdbcType="INTEGER" property="id" />
    <result column="nums" jdbcType="INTEGER" property="nums" />
    <result column="name" jdbcType="VARCHAR" property="name" typeHandler="com.gupaoedu.mybatis.typeHandle.TestTypeHandle"/>
  </resultMap>
<insert id="insert" parameterType="com.mybatis.beans.Test">
insert into test (id, nums, name
)
values (#{id,jdbcType=INTEGER}, #{nums,jdbcType=INTEGER}, #{name,jdbcType=VARCHAR,typeHandler=com.gupaoedu.mybatis.typeHandle.TestTypeHandle}
)
</insert>这里我将insert和select使用到的resultMap中的name字段设置了自定义的typeHandler
表内数据如下:

运行测试代码:
TestMapper testMapper = getSqlSession().getMapper(TestMapper.class);

System.out.println(testMapper.selectByPrimaryKey(3));
System.out.println(testMapper.selectByPrimaryKey(1));
Test test1 = new Test();
test1.setId(3);
test1.setName("否");
test1.setNums(3);
testMapper.insert(test1);

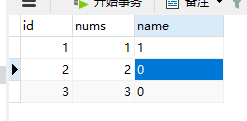
可以看到,从数据库查询的1变为了”是“,0变为了”否“,插入时设置为”否“,数据库中存放的为0。
7.Plugin插件原理与使用
先来介绍如何自定义一个plugin插件,首先实现Interceptor接口,实现三个方法,第一个方法intercept会拦截sql执行之前,在这里可以修改Sql语句或是参数,第二个方法plugin固定写Plugin.wrap(target, this);,原理是把我们自定义的这个插件包装起来,用代理模式实现对SQL的处理,第三个方法setProperties是可以取到一些设置的属性,这个属性在mybatis配置文件配置插件时可以设置<properties/>取出。然后打上注解,说明是在SQL语句执行过程中哪个点进行拦截调用。以下说明摘抄自Mybatis官网。

@Intercepts({@Signature(type = Executor.class,
        method = "query",
        args = {MappedStatement.class, Object.class, RowBounds.class, ResultHandler.class}),
        @Signature(type = ParameterHandler.class,
                method = "query",
                args = {MappedStatement.class, Object.class, RowBounds.class, ResultHandler.class})})
public class TestPlugin implements Interceptor {
    public Object intercept(Invocation invocation) throws Throwable {
        MappedStatement mappedStatement = (MappedStatement) invocation.getArgs()[0];
        BoundSql boundSql = mappedStatement.getBoundSql(invocation.getArgs()[1]);
        System.out.println(String.format("plugin output sql = %s , param=%s", boundSql.getSql(),boundSql.getParameterObject()));
        return invocation.proceed();
    }

    public Object plugin(Object target) {
        return Plugin.wrap(target, this);
    }

    public void setProperties(Properties properties) {

    }
}
然后在Mybatis配置文件中配置<plugins/>
    <plugins>
        <plugin interceptor="com.mybatis.plugins.CustomPlugin">
        </plugin>
    </plugins>
然后写个测试类随便调用一个mapper的查询方法。

控制台打印可以看出来,在插件中的intercept方法拦截到对应的Sql语句。
分页插件的底层原理也是这样,根据分页信息对查询的Sql语句进行拦截,在查询语句后面加上一些查询条件,修改SQL执行语句达到分页的效果。
8.分页
分页的方式分为两种,一种为逻辑分页,一种为物理分页。
逻辑分页(全部查询出来):Mybatis自带逻辑分页查询,底层原理是在数据库中全部查询之后对ResultSet映射结果集的时候进行分页,这种分页感觉是在骗自己,不合理,不建议使用。
物理分页(分页多少查询多少):推荐一个分页插件https://github.com/pagehelper/Mybatis-PageHelper,上面的插件也提到了物理分页的原理,这里不多赘述。推荐使用物理分页。