版权声明:本文为博主原创文章,未经博主允许不得转载。 https://blog.csdn.net/zhaihaohao1/article/details/82740871
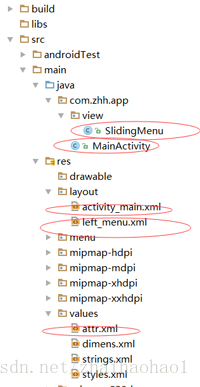
项目结构:
实现思路:
1在values文件加下的attr.xml文件中定义属性名称(桥梁)
2在SlidingMenu的构造方法中拿到attr.xml中定义的属性,并赋值变量
3在布局文件中使用此属性hyman:rightPadding=”150dp”,注意要命名空间 xmlns:zhh
在values/attr.xml中
<?xml version="1.0" encoding="utf-8"?>
<resources>
    <!-- 此文件链接SlidingMenu类和布局文件-->
    <!--rightPadding 属性名称-->
    <!-- format 格式支持px,dp,ps-->
    <attr name="rightPadding" format="dimension"></attr>

    <!-- SlidingMenu 控件名称-->
    <!-- rightPadding 属性名称-->
    <declare-styleable name="SlidingMenu">
        <attr name="rightPadding"></attr>
    </declare-styleable>

</resources>
自定义控件SlidingMenu中
package com.zhh.app.view;

import android.content.Context;
import android.content.res.TypedArray;
import android.util.AttributeSet;
import android.util.DisplayMetrics;
import android.util.TypedValue;
import android.view.MotionEvent;
import android.view.ViewGroup;
import android.view.WindowManager;
import android.widget.HorizontalScrollView;
import android.widget.LinearLayout;

import com.zhh.app.R;

/**
 * 给普通侧滑菜单添加自定义属性
 * 思路:
 * 1在values文件加下的attr.xml文件中定义属性定义属性名称(桥梁)
 * 2在SlidingMenu的构造方法中拿到attr.xml中定义的属性,并赋值变量
 * 3在布局文件中使用此属性hyman:rightPadding="150dp",注意要命名空间 xmlns:zhh
 */
public class SlidingMenu extends HorizontalScrollView {
    //  里面的线性布局
    private LinearLayout mWapper;
    //  菜单布局
    private ViewGroup mMenu;
    //  内容布局
    private ViewGroup mContent;
    //  屏幕宽度
    private int mScreenWidth;
    //  菜单宽度
    private int mMenuWidth;
    //  菜单里右边的距离   dp
    private int mMenuRightPadding = 50;
    // 宽高只设置一次
    private boolean once = false;

    private boolean isOpen;

    /**
     * 在代码中new的时候调用此构造方法
     *
     * @param context
     */
    public SlidingMenu(Context context) {
//      调两个参数的构造方法
        this(context, null);
    }

    /**
     * 布局文件中引用时,调用此构造方法
     *
     * @param context
     * @param attrs
     */
    public SlidingMenu(Context context, AttributeSet attrs) {
//      调三个参数的构造方法
        this(context, attrs, 0);
    }

    /**
     * 使用了自定义属性时,调用此构造方法
     *
     * @param context
     * @param attrs
     * @param defStyle
     */
    public SlidingMenu(Context context, AttributeSet attrs, int defStyle) {
        super(context, attrs, defStyle);
        // 获取我们定义的属性
        TypedArray a = context.getTheme().obtainStyledAttributes(attrs,
                R.styleable.SlidingMenu, defStyle, 0);
//      拿到自定义属性的个数
        int n = a.getIndexCount();
//      循环
        for (int i = 0; i < n; i++) {
            int attr = a.getIndex(i);
            switch (attr) {
//              判断我们自定义的属性
                case R.styleable.SlidingMenu_rightPadding:
//                 默认值,把50dp装化成px
                    int defaultValue = (int) TypedValue.applyDimension(TypedValue.COMPLEX_UNIT_DIP, 50, context.getResources().getDisplayMetrics());
                    mMenuRightPadding = a.getDimensionPixelSize(attr, defaultValue);
                    break;
            }
        }
        a.recycle();


//     拿到屏幕的宽度,并赋值
        WindowManager wm = (WindowManager) context
                .getSystemService(Context.WINDOW_SERVICE);
        DisplayMetrics outMetrics = new DisplayMetrics();
        wm.getDefaultDisplay().getMetrics(outMetrics);
        mScreenWidth = outMetrics.widthPixels;
    }

    /**
     * 设置子view的宽高,和设置自己的宽高
     *
     * @param widthMeasureSpec
     * @param heightMeasureSpec
     */
    @Override
    protected void onMeasure(int widthMeasureSpec, int heightMeasureSpec) {
        super.onMeasure(widthMeasureSpec, heightMeasureSpec);
        if (!once) {
            //      拿到水平线性布局
            mWapper = (LinearLayout) getChildAt(0);
//      拿到水平线性布局中的菜单布局
            mMenu = (ViewGroup) mWapper.getChildAt(0);
//      拿到水平线性布局中的内容布局
            mContent = (ViewGroup) mWapper.getChildAt(1);
//      设置菜单宽度
            mMenuWidth = mMenu.getLayoutParams().width = mScreenWidth - mMenuRightPadding;
//      设置内容布局的宽度
            mContent.getLayoutParams().width = mScreenWidth;
            once = true;
        }

    }


    /**
     * 设置子View的位置
     * 通过设置偏移量,将menu隐藏
     */
    @Override
    protected void onLayout(boolean changed, int l, int t, int r, int b) {
        super.onLayout(changed, l, t, r, b);
        if (changed) {
//          正值是向左滑动,负值是向右滑动
            this.scrollTo(mMenuWidth, 0);
        }
    }

    /**
     * 事件处理
     *
     * @param event
     * @return
     */
    @Override
    public boolean onTouchEvent(MotionEvent event) {
        switch (event.getAction()) {
//          当手指离开时
            case MotionEvent.ACTION_UP:
//             隐藏在左边的宽度
                int scrollX = getScrollX();
//              隐藏在左边的宽度大于菜单宽度的1/2时,让菜单隐藏
                if (scrollX >= mMenuWidth / 2) {
//                  带有动画效果
                    this.smoothScrollTo(mMenuWidth, 0);
                } else {
                    this.smoothScrollTo(0, 0);
                }
                return true;

        }
        return super.onTouchEvent(event);
    }
}
在activity_main.xml 中使用
<RelativeLayout xmlns:android="http://schemas.android.com/apk/res/android"
    xmlns:tools="http://schemas.android.com/tools"
    xmlns:zhh="http://schemas.android.com/apk/res-auto"
    android:layout_width="match_parent"
    android:layout_height="match_parent"
    tools:context=".MainActivity">
    <!--HorizontalScrollView中只有一个子类-->
    <com.zhh.app.view.SlidingMenu
        android:layout_width="match_parent"
        android:layout_height="match_parent"
        zhh:rightPadding="150dp"
        >
        <!--左边是菜单,右边是内容 -->
        <LinearLayout
            android:layout_width="wrap_content"
            android:layout_height="match_parent"
            android:orientation="horizontal">
            <!-- 左边菜单-->
            <include layout="@layout/left_menu" />
            <!-- 右边内容-->
            <LinearLayout
                android:layout_width="match_parent"
                android:layout_height="match_parent"
                android:background="@mipmap/qq">

                <Button
                    android:layout_width="wrap_content"
                    android:layout_height="wrap_content"
                    android:text="切换菜单" />
            </LinearLayout>

        </LinearLayout>
    </com.zhh.app.view.SlidingMenu>


</RelativeLayout>
菜单布局 left_menu.xml
<?xml version="1.0" encoding="utf-8"?>
<RelativeLayout xmlns:android="http://schemas.android.com/apk/res/android"
    android:layout_width="match_parent"
    android:layout_height="match_parent"
    android:background="@mipmap/img_frame_background" >

    <LinearLayout
        android:layout_width="match_parent"
        android:layout_height="wrap_content"
        android:layout_centerInParent="true"
        android:orientation="vertical" >

        <RelativeLayout
            android:layout_width="fill_parent"
            android:layout_height="wrap_content" >

            <ImageView
                android:id="@+id/id_img1"
                android:layout_width="50dp"
                android:layout_height="50dp"
                android:layout_centerVertical="true"
                android:layout_marginLeft="20dp"
                android:layout_marginTop="20dp"
                android:src="@mipmap/img_1" />

            <TextView
                android:layout_width="wrap_content"
                android:layout_height="wrap_content"
                android:layout_centerVertical="true"
                android:layout_marginLeft="20dp"
                android:layout_toRightOf="@id/id_img1"
                android:text="第一个Item"
                android:textColor="#ffffff"
                android:textSize="20sp" />
        </RelativeLayout>

        <RelativeLayout
            android:layout_width="fill_parent"
            android:layout_height="wrap_content" >

            <ImageView
                android:id="@+id/id_img2"
                android:layout_width="50dp"
                android:layout_height="50dp"
                android:layout_centerVertical="true"
                android:layout_marginLeft="20dp"
                android:layout_marginTop="20dp"
                android:src="@mipmap/img_2" />

            <TextView
                android:layout_width="wrap_content"
                android:layout_height="wrap_content"
                android:layout_centerVertical="true"
                android:layout_marginLeft="20dp"
                android:layout_toRightOf="@id/id_img2"
                android:text="第二个Item"
                android:textColor="#ffffff"
                android:textSize="20sp" />
        </RelativeLayout>

        <RelativeLayout
            android:layout_width="fill_parent"
            android:layout_height="wrap_content" >

            <ImageView
                android:id="@+id/id_img3"
                android:layout_width="50dp"
                android:layout_height="50dp"
                android:layout_centerVertical="true"
                android:layout_marginLeft="20dp"
                android:layout_marginTop="20dp"
                android:src="@mipmap/img_3" />

            <TextView
                android:layout_width="wrap_content"
                android:layout_height="wrap_content"
                android:layout_centerVertical="true"
                android:layout_marginLeft="20dp"
                android:layout_toRightOf="@id/id_img3"
                android:text="第三个Item"
                android:textColor="#ffffff"
                android:textSize="20sp" />
        </RelativeLayout>

        <RelativeLayout
            android:layout_width="fill_parent"
            android:layout_height="wrap_content" >

            <ImageView
                android:id="@+id/id_img4"
                android:layout_width="50dp"
                android:layout_height="50dp"
                android:layout_centerVertical="true"
                android:layout_marginLeft="20dp"
                android:layout_marginTop="20dp"
                android:src="@mipmap/img_4" />

            <TextView
                android:layout_width="wrap_content"
                android:layout_height="wrap_content"
                android:layout_centerVertical="true"
                android:layout_marginLeft="20dp"
                android:layout_toRightOf="@id/id_img4"
                android:text="第四个Item"
                android:textColor="#ffffff"
                android:textSize="20sp" />
        </RelativeLayout>

        <RelativeLayout
            android:layout_width="fill_parent"
            android:layout_height="wrap_content" >

            <ImageView
                android:id="@+id/id_img5"
                android:layout_width="50dp"
                android:layout_height="50dp"
                android:layout_centerVertical="true"
                android:layout_marginLeft="20dp"
                android:layout_marginTop="20dp"
                android:src="@mipmap/img_5" />

            <TextView
                android:layout_width="wrap_content"
                android:layout_height="wrap_content"
                android:layout_centerVertical="true"
                android:layout_marginLeft="20dp"
                android:layout_toRightOf="@id/id_img5"
                android:text="第五个Item"
                android:textColor="#ffffff"
                android:textSize="20sp" />
        </RelativeLayout>

    </LinearLayout>

</RelativeLayout>
源码下载:
https://download.csdn.net/download/zhaihaohao1/10671937
参考视频:
http://www.imooc.com/learn/211
参考文章:
https://blog.csdn.net/lmj623565791/article/details/39185641
Android自带控件DrawerLayout,实现侧滑
https://blog.csdn.net/student9128/article/details/53247491