前面我们介绍了如何使用Apache的HttpClient发送HTTP请求,这里我们介绍Spring的Rest客户端(即:RestTemplate)
如何发送HTTP、HTTPS请求。注:HttpClient如何发送HTTPS请求,有机会的话也会再给出示例。
声明:本人一些内容摘录自其他朋友的博客,链接在本文末给出!
基础知识
微服务都是以HTTP接口的形式暴露自身服务的,因此在调用远程服务时就必须使用HTTP客户端。我们可以使用JDK原生的URLConnection、Apache的Http Client、Netty的异步HTTP Client,最方便、最优雅的Feign, Spring的RestTemplate等。
- RestTemplate简述
RestTemplate是Spring提供的用于访问Rest服务(Rest风格、Rest架构)的客户端。
RestTemplate提供了多种便捷访问远程Http服务的方法,能够大大提高客户端的编写效率。
- 调用RestTemplate的默认构造函数,RestTemplate对象在底层通过使用java.net包下的实现创建HTTP 请求;我们也可以通过使用ClientHttpRequestFactory指定不同的请求方式:

- ClientHttpRequestFactory接口主要提供了两种实现方式:
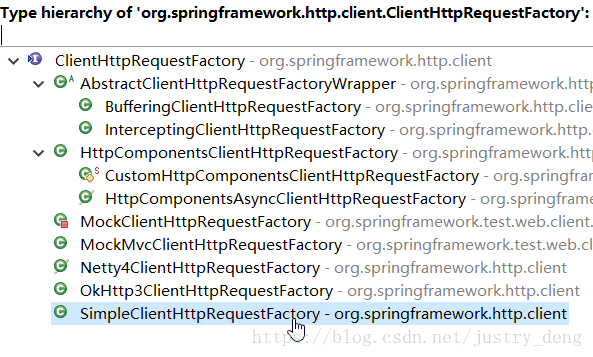
1.常用的一种是SimpleClientHttpRequestFactory,使用J2SE提供的方式(既java.net包提供的方式)创建底层
的Http请求连接。
2.常用的另一种方式是使用HttpComponentsClientHttpRequestFactory方式,底层使用HttpClient访问远程的
Http服务,使用HttpClient可以配置连接池和证书等信息。
软硬件环境: Windows10、Eclipse、JDK1.8、SpringBoot
准备工作:引入相关依赖
<dependency>
	<groupId>org.springframework.boot</groupId>
	<artifactId>spring-boot-starter-web</artifactId>
</dependency>
HTTP之GET请求(示例)
import java.io.UnsupportedEncodingException;
import java.net.URI;
import java.net.URLEncoder;
import java.nio.charset.StandardCharsets;
import java.util.List;
import org.junit.Test;
import org.junit.runner.RunWith;
import org.springframework.boot.test.context.SpringBootTest;
import org.springframework.http.HttpEntity;
import org.springframework.http.HttpHeaders;
import org.springframework.http.HttpMethod;
import org.springframework.http.ResponseEntity;
import org.springframework.http.converter.HttpMessageConverter;
import org.springframework.http.converter.StringHttpMessageConverter;
import org.springframework.test.context.junit4.SpringRunner;
import org.springframework.web.client.RestTemplate;
import com.google.gson.Gson;
/**
* 单元测试
*
* @author JustryDeng
* @DATE 2018年9月7日 下午6:37:05
*/
@RunWith(SpringRunner.class)
@SpringBootTest
public class AbcHttpsTestApplicationTests {
/**
* RestTemplate 发送 HTTP GET请求 --- 测试
* @throws UnsupportedEncodingException
*
* @date 2018年7月13日 下午4:18:50
*/
@Test
public void doHttpGetTest() throws UnsupportedEncodingException {
// -------------------------------> 获取Rest客户端实例
RestTemplate restTemplate = new RestTemplate();
// -------------------------------> 解决(响应数据可能)中文乱码 的问题
List<HttpMessageConverter<?>> converterList = restTemplate.getMessageConverters();
converterList.remove(1); // 移除原来的转换器
// 设置字符编码为utf-8
HttpMessageConverter<?> converter = new StringHttpMessageConverter(StandardCharsets.UTF_8);
converterList.add(1, converter); // 添加新的转换器(注:convert顺序错误会导致失败)
restTemplate.setMessageConverters(converterList);
// -------------------------------> (选择性设置)请求头信息
// HttpHeaders实现了MultiValueMap接口
HttpHeaders httpHeaders = new HttpHeaders();
// 给请求header中添加一些数据
httpHeaders.add("JustryDeng", "这是一个大帅哥!");
// -------------------------------> 注:GET请求 创建HttpEntity时,请求体传入null即可
// 请求体的类型任选即可;只要保证 请求体 的类型与HttpEntity类的泛型保持一致即可
String httpBody = null;
HttpEntity<String> httpEntity = new HttpEntity<String>(httpBody, httpHeaders);
// -------------------------------> URI
StringBuffer paramsURL = new StringBuffer("http://127.0.0.1:9527/restTemplate/doHttpGet");
// 字符数据最好encoding一下;这样一来,某些特殊字符才能传过去(如:flag的参数值就是“&”,不encoding的话,传不过去)
paramsURL.append("?flag=" + URLEncoder.encode("&", "utf-8"));
URI uri = URI.create(paramsURL.toString());
// -------------------------------> 执行请求并返回结果
// 此处的泛型 对应 响应体数据 类型;即:这里指定响应体的数据装配为String
ResponseEntity<String> response =
restTemplate.exchange(uri, HttpMethod.GET, httpEntity, String.class);
// -------------------------------> 响应信息
//响应码,如:401、302、404、500、200等
System.err.println(response.getStatusCodeValue());
Gson gson = new Gson();
// 响应头
System.err.println(gson.toJson(response.getHeaders()));
// 响应体
if(response.hasBody()) {
System.err.println(response.getBody());
}
}
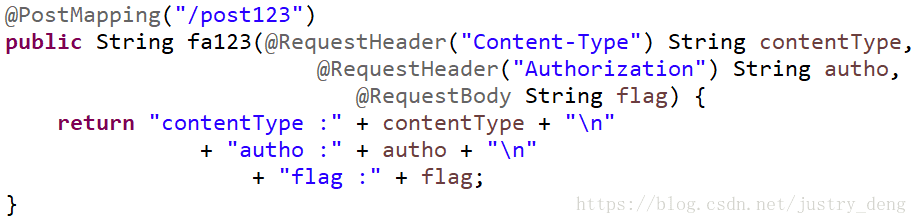
}被http请求的对应的方法逻辑为:

注:我们也可以使用@RequestHeader()来获取到请求头中的数据信息,如:
结果(效果)展示
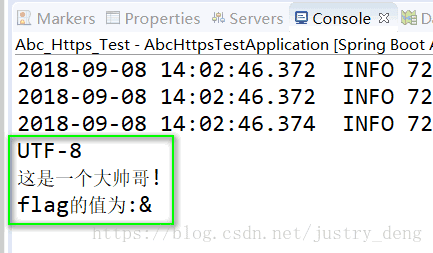
1.进行HTTP请求的方法获得响应后输出结果为:

2.被HTTP请求的方法被请求后的输出结果为:
HTTP之POST请求(示例)
/**
* RestTemplate 发送 HTTP POST请求 --- 测试
* @throws UnsupportedEncodingException
*
* @date 2018年9月8日 下午2:12:50
*/
@Test
public void doHttpPostTest() throws UnsupportedEncodingException {
// -------------------------------> 获取Rest客户端实例
RestTemplate restTemplate = new RestTemplate();
// -------------------------------> 解决(响应数据可能)中文乱码 的问题
List<HttpMessageConverter<?>> converterList = restTemplate.getMessageConverters();
converterList.remove(1); // 移除原来的转换器
// 设置字符编码为utf-8
HttpMessageConverter<?> converter = new StringHttpMessageConverter(StandardCharsets.UTF_8);
converterList.add(1, converter); // 添加新的转换器(注:convert顺序错误会导致失败)
restTemplate.setMessageConverters(converterList);
// -------------------------------> (选择性设置)请求头信息
// HttpHeaders实现了MultiValueMap接口
HttpHeaders httpHeaders = new HttpHeaders();
// 设置contentType
httpHeaders.setContentType(MediaType.APPLICATION_JSON_UTF8);
// 给请求header中添加一些数据
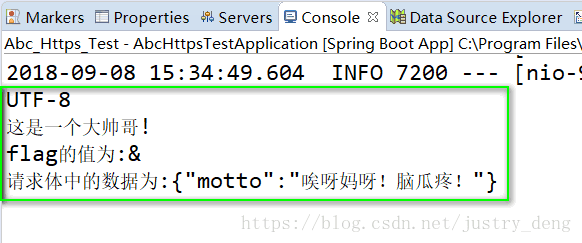
httpHeaders.add("JustryDeng", "这是一个大帅哥!");
// ------------------------------->将请求头、请求体数据,放入HttpEntity中
// 请求体的类型任选即可;只要保证 请求体 的类型与HttpEntity类的泛型保持一致即可
// 这里手写了一个json串作为请求体 数据 (实际开发时,可使用fastjson、gson等工具将数据转化为json串)
String httpBody = "{\"motto\":\"唉呀妈呀!脑瓜疼!\"}";
HttpEntity<String> httpEntity = new HttpEntity<String>(httpBody, httpHeaders);
// -------------------------------> URI
StringBuffer paramsURL = new StringBuffer("http://127.0.0.1:9527/restTemplate/doHttpPost");
// 字符数据最好encoding一下;这样一来,某些特殊字符才能传过去(如:flag的参数值就是“&”,不encoding的话,传不过去)
paramsURL.append("?flag=" + URLEncoder.encode("&", "utf-8"));
URI uri = URI.create(paramsURL.toString());
// -------------------------------> 执行请求并返回结果
// 此处的泛型 对应 响应体数据 类型;即:这里指定响应体的数据装配为String
ResponseEntity<String> response =
restTemplate.exchange(uri, HttpMethod.POST, httpEntity, String.class);
// -------------------------------> 响应信息
//响应码,如:401、302、404、500、200等
System.err.println(response.getStatusCodeValue());
Gson gson = new Gson();
// 响应头
System.err.println(gson.toJson(response.getHeaders()));
// 响应体
if(response.hasBody()) {
System.err.println(response.getBody());
}
}被http请求的对应的方法逻辑为:
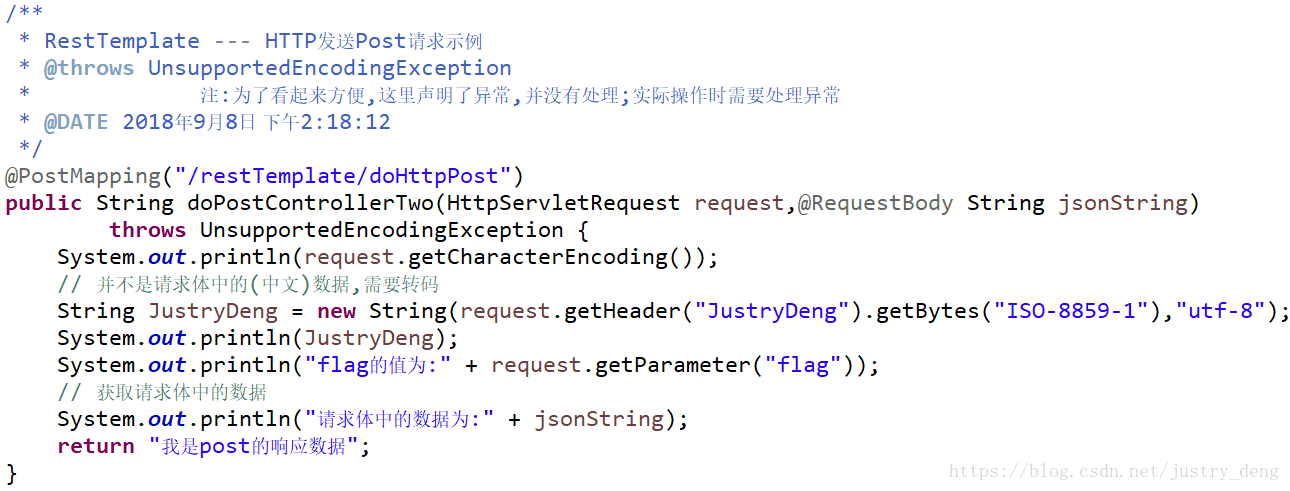
注:我们也可以使用@RequestHeader()来获取到请求头中的数据信息,如:

结果(效果)展示
进行HTTP请求的方法获得响应后输出结果为:

被HTTP请求的方法被请求后的输出结果为:
HTTPS请求的准备工作
HTTPS请求 = 超文本传输协议HTTP + 安全套接字层SSL。
先给出等下需要用到的一个SimpleClientHttpRequestFactory的实现类
/**
 * 声明:此代码摘录自https://blog.csdn.net/wltsysterm/article/details/80977455
 * 声明:关于Socket的相关知识,本人会在后面的闲暇时间进行学习整理,请持续关注博客更新
 *
 * @author JustryDeng
 * @DATE 2018年9月8日 下午4:34:02
 */
public class HttpsClientRequestFactory extends SimpleClientHttpRequestFactory {

    @Override
    protected void prepareConnection(HttpURLConnection connection, String httpMethod) {
        try {
            if (!(connection instanceof HttpsURLConnection)) {
                throw new RuntimeException("An instance of HttpsURLConnection is expected");
            }

            HttpsURLConnection httpsConnection = (HttpsURLConnection) connection;

            TrustManager[] trustAllCerts = new TrustManager[]{
                    new X509TrustManager() {
                        @Override
                        public java.security.cert.X509Certificate[] getAcceptedIssuers() {
                            return null;
                        }
                        @Override
                        public void checkClientTrusted(X509Certificate[] certs, String authType) {
                        }
                        @Override
                        public void checkServerTrusted(X509Certificate[] certs, String authType) {
                        }

                    }
            };
            SSLContext sslContext = SSLContext.getInstance("TLS");
            sslContext.init(null, trustAllCerts, new java.security.SecureRandom());
            httpsConnection.setSSLSocketFactory(new MyCustomSSLSocketFactory(sslContext.getSocketFactory()));

            httpsConnection.setHostnameVerifier(new HostnameVerifier() {
                @Override
                public boolean verify(String s, SSLSession sslSession) {
                    return true;
                }
            });

            super.prepareConnection(httpsConnection, httpMethod);
        } catch (Exception e) {
            e.printStackTrace();
        }
    }

    /**
     * We need to invoke sslSocket.setEnabledProtocols(new String[] {"SSLv3"});
     * see http://www.oracle.com/technetwork/java/javase/documentation/cve-2014-3566-2342133.html (Java 8 section)
     */
    // SSLSocketFactory用于创建 SSLSockets
    private static class MyCustomSSLSocketFactory extends SSLSocketFactory {

        private final SSLSocketFactory delegate;

        public MyCustomSSLSocketFactory(SSLSocketFactory delegate) {
            this.delegate = delegate;
        }

        // 返回默认启用的密码套件。除非一个列表启用,对SSL连接的握手会使用这些密码套件。
        // 这些默认的服务的最低质量要求保密保护和服务器身份验证
        @Override
        public String[] getDefaultCipherSuites() {
            return delegate.getDefaultCipherSuites();
        }

        // 返回的密码套件可用于SSL连接启用的名字
        @Override
        public String[] getSupportedCipherSuites() {
            return delegate.getSupportedCipherSuites();
        }


        @Override
        public Socket createSocket(final Socket socket, final String host, final int port,
        		final boolean autoClose) throws IOException {
            final Socket underlyingSocket = delegate.createSocket(socket, host, port, autoClose);
            return overrideProtocol(underlyingSocket);
        }


        @Override
        public Socket createSocket(final String host, final int port) throws IOException {
            final Socket underlyingSocket = delegate.createSocket(host, port);
            return overrideProtocol(underlyingSocket);
        }

        @Override
        public Socket createSocket(final String host, final int port, final InetAddress localAddress,
        		final int localPort) throws
                IOException {
            final Socket underlyingSocket = delegate.createSocket(host, port, localAddress, localPort);
            return overrideProtocol(underlyingSocket);
        }

        @Override
        public Socket createSocket(final InetAddress host, final int port) throws IOException {
            final Socket underlyingSocket = delegate.createSocket(host, port);
            return overrideProtocol(underlyingSocket);
        }

        @Override
        public Socket createSocket(final InetAddress host, final int port, final InetAddress localAddress,
        		final int localPort) throws
                IOException {
            final Socket underlyingSocket = delegate.createSocket(host, port, localAddress, localPort);
            return overrideProtocol(underlyingSocket);
        }

        private Socket overrideProtocol(final Socket socket) {
            if (!(socket instanceof SSLSocket)) {
                throw new RuntimeException("An instance of SSLSocket is expected");
            }
            ((SSLSocket) socket).setEnabledProtocols(new String[]{"TLSv1"});
            return socket;
        }
    }
}
HTTPS之GET请求
说明:RestTemplate发送HTTPS与发送HTTP的代码,除了在创建RestTemplate时不一样以及协议不一样
(一个URL是http开头,一个是https开头)外,其余的都一样。
HTTP获取RestTemplate实例

HTTPS获取RestTemplate实例

给出具体HTTPS发送GET请求代码示例(HTTPS发送POST请求类比即可)
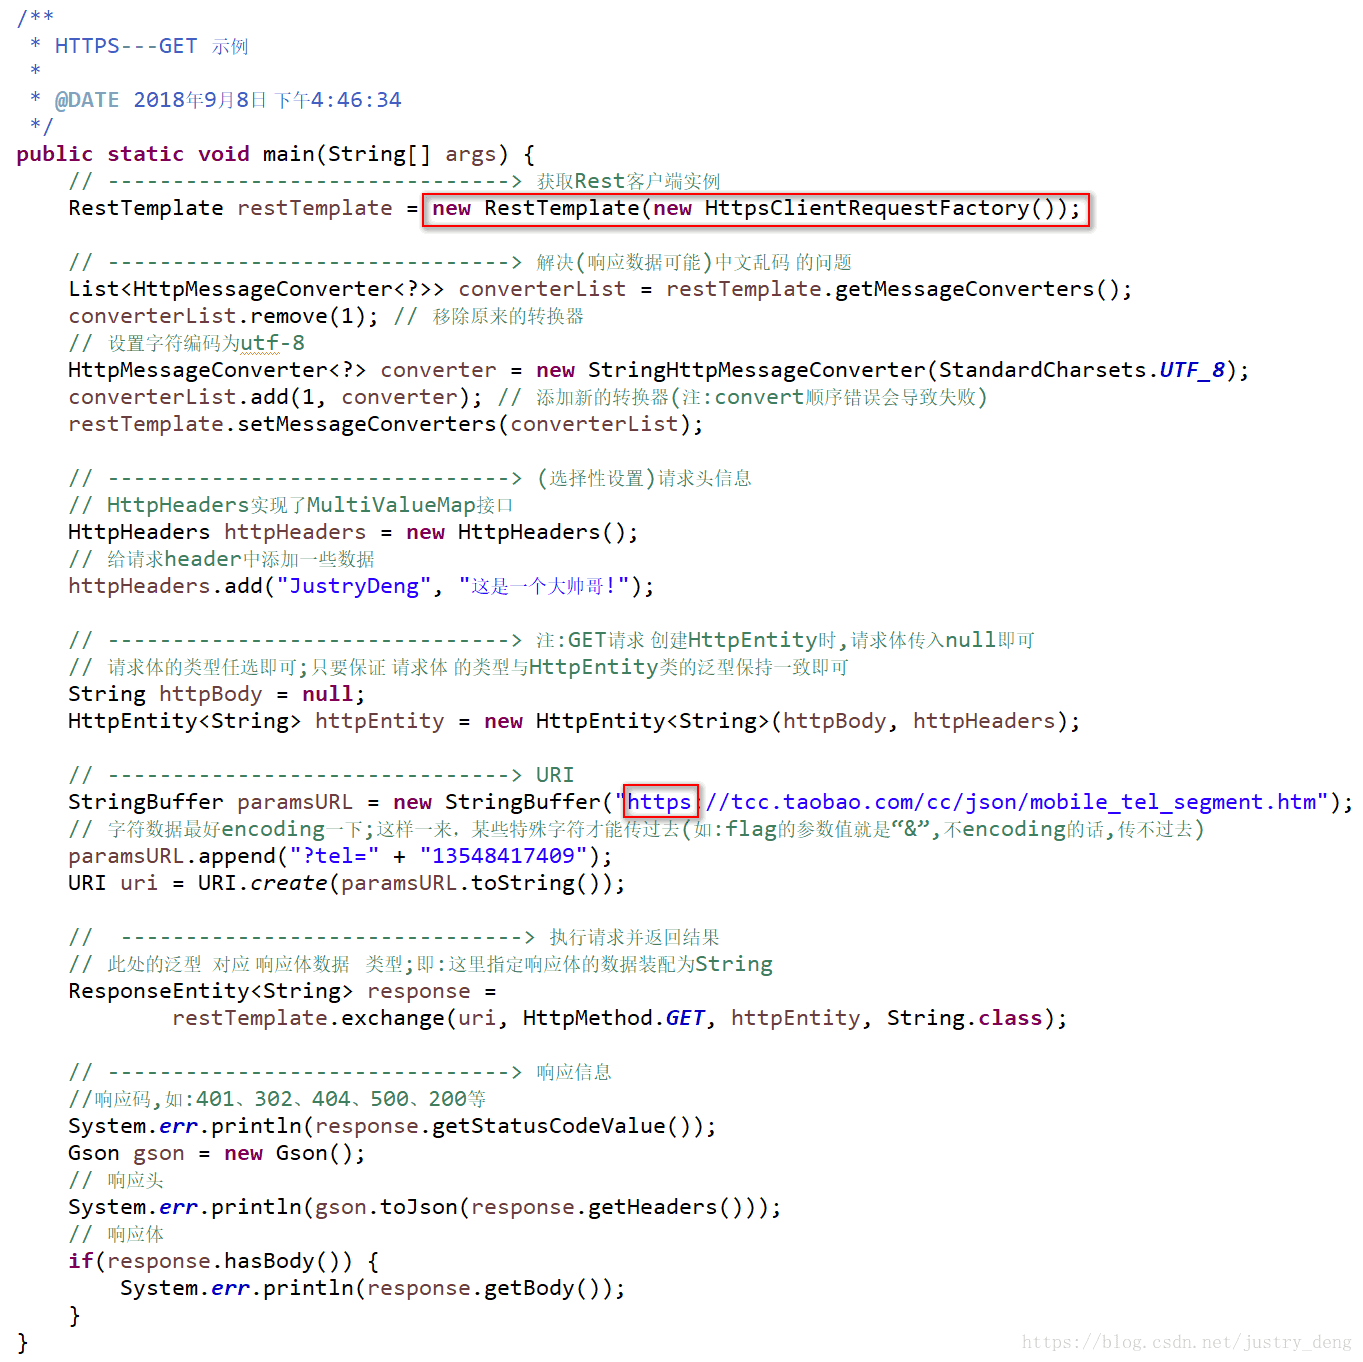
注:HTTPS与HTTP的使用不同之处,在途中已经圈出了。
注:上图中请求的https://tcc.taobao.com/cc/json/mobile_tel_segment.htm是阿里提供的一个简单查询手机信息的地址。
运行该主函数,控制台打印出的结果为:

注:如果用HTTP协议开头的URL去访问HTTPS开头的URL的话(这两个URL除了协议不同其它都相同),是访问不了的;除非服
务端有相应的设置。
注:发送HTTPS的逻辑代码是可以拿来发送HTTP的。但是根据我们写得HttpsClientRequestFactory类中的代码可知,会打
印出异常(异常抛出后被catch了):

如果用HTTPS访问HTTP时不想抛出异常,那么把对应的这个逻辑去掉即可。
提示:“发送HTTPS的逻辑代码是可以拿来发送HTTP的”这句话的意思是:拿来做发HTTPS请求的逻辑,可以复用来作发HTTP请
求的逻辑。并不是说说一个API能被HTTPS协议的URL访问,就一定能被HTTP协议的URL访问。
HTTPS之GET请求
注:关于HTTPS这里只给出了一个GET示例,使用HTTPS进行POST请求也是与HTTP进行POST请求也只是创建
RestTemplate实例和协议不一样,其余的都一样;类比GET即可,这里就不再给出示例了。
 参考链接、摘录内容出处