在WebForm项目中使用Web API
原文更新日期:2012.04.03
导航页面
http://blog.csdn.net/wf824284257/article/details/79475115
上一步
Web API 2 中 Action的返回值:
http://blog.csdn.net/wf824284257/article/details/79437495
开始
尽管 ASP.NET Web API 是跟 ASP.NET MVC 一起使用的,但在传统的WebForm项目中加入WebAPI也是非常简单的。这篇教程将会一步一步的带你学习。
概述
为了在WebForm项目中使用Web API,我们主要需要以下两步:
添加一个继承于 ApiController 的 Web API controller.
向 Application_Start 方法内添加一个路由表(route table)。
创建一个WebForm项目
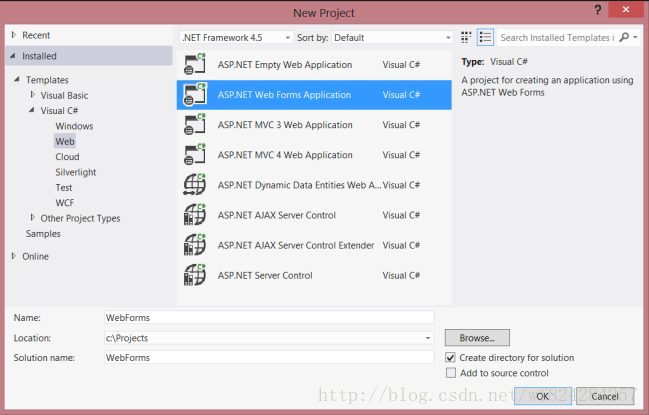
打开 Visual Studio,从开始页面选择“新建项目”。或者从“文件”里面选择“新建”,再选择“项目”。
在项目模板窗口,左边选择已安装模板(Installed Templates),并展开C#节点。在C#节点下,选择Web,然后在项目模板列表中选择 ASP.NET WebForm项目(ASP.NET Web Forms Application)。输入项目名后点击确定。
创建Model和Controller
这篇教程所使用的model以及ontroller的类名与《Web API 2 入门教程》相同。http://blog.csdn.net/wf824284257/article/details/79417272
首先,添加一个model。在解决方案资源管理器(Solution Explorer)中,右键点击项目名并选择“添加”->“类”,命名为“Product”,并添加4个属性:
public class Product
{
    public int Id { get; set; }
    public string Name { get; set; }
    public decimal Price { get; set; }
    public string Category { get; set; }
}
接下来,向项目中添加一个 Web API controller,这个controller是一个用来处理Web API 的 HTTP请求的实体类。
在 Solution Explorer 中,右键点击项目名,选择“添加”->”新项”。
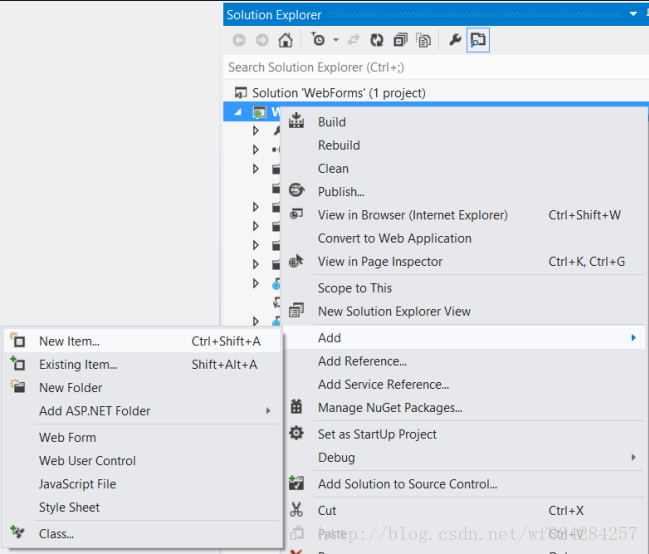
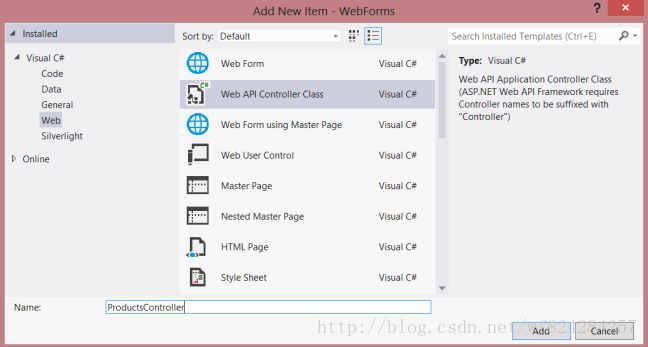
在 已安装模板下,展开C# -> web 节点,然后从模板列表里面选择 Web API 控制器(Web API Controller Class),命名为“ProductsController” 并添加。
VS将会创建一个名为 ProductsController.cs 的文件。将改文件中内容替换为以下内容:
namespace WebForms
{
    using System;
    using System.Collections.Generic;
    using System.Linq;
    using System.Net;
    using System.Net.Http;
    using System.Web.Http;

    public class ProductsController : ApiController
    {

        Product[] products = new Product[]
        {
            new Product { Id = 1, Name = "Tomato Soup", Category = "Groceries", Price = 1 },
            new Product { Id = 2, Name = "Yo-yo", Category = "Toys", Price = 3.75M },
            new Product { Id = 3, Name = "Hammer", Category = "Hardware", Price = 16.99M }
        };

        public IEnumerable<Product> GetAllProducts()
        {
            return products;
        }

        public Product GetProductById(int id)
        {
            var product = products.FirstOrDefault((p) => p.Id == id);
            if (product == null)
            {
                throw new HttpResponseException(HttpStatusCode.NotFound);
            }
            return product;
        }

        public IEnumerable<Product> GetProductsByCategory(string category)
        {
            return products.Where(
                (p) => string.Equals(p.Category, category,
                    StringComparison.OrdinalIgnoreCase));
        }
    }
}
若对以上代码不理解,可以阅读 《Web API 2入门教学》。http://blog.csdn.net/wf824284257/article/details/79417272
添加路由信息
接下来,我们将会添加一个uri路由规则,来将”/api/products/”路由到我们的controller。
在 Solution Explorer 中,双击Global.asax来打开它的后台代码文件Global.asax.cs。添加以下using:
using System.Web.Http;
将以下代码添加到 Application_Start 方法中:
RouteTable.Routes.MapHttpRoute(
    name: "DefaultApi",
    routeTemplate: "api/{controller}/{id}",
    defaults: new { id = System.Web.Http.RouteParameter.Optional }
);
要想了解更多关于路由表(routing tables)的信息,可以阅读:
https://docs.microsoft.com/en-us/aspnet/web-api/overview/web-api-routing-and-actions/routing-in-aspnet-web-api
添加客户端的AJAX
为了让客户端可以访问我们创建的web API,添加AJAX请求是必需的。现在让我们添加一个HTML页面,并使用JQuery来调用我们的web API。
确认一下你的母版页(master page),比如Site.Master,包含了一个ID=“HeadContent” 的 ContentPlaceHolder。
<asp:ContentPlaceHolder runat="server" ID="HeadContent"></asp:ContentPlaceHolder>
打开 Default.aspx,将已有代码替换为以下代码:
<%@ Page Title="Home Page" Language="C#" MasterPageFile="~/Site.Master"
    AutoEventWireup="true" CodeBehind="Default.aspx.cs" Inherits="WebForms._Default" %>

<asp:Content ID="HeaderContent" runat="server" ContentPlaceHolderID="HeadContent">
</asp:Content>

<asp:Content ID="BodyContent" runat="server" ContentPlaceHolderID="MainContent">
    <h2>Products</h2>
    <table>
    <thead>
        <tr><th>Name</th><th>Price</th></tr>
    </thead>
    <tbody id="products">
    </tbody>
    </table>
</asp:Content>
然后,在HeaderContent里添加对JQuery的引用:
<asp:Content ID="HeaderContent" runat="server" ContentPlaceHolderID="HeadContent">
    <script src="Scripts/jquery-1.10.2.min.js" type="text/javascript"></script>
</asp:Content>
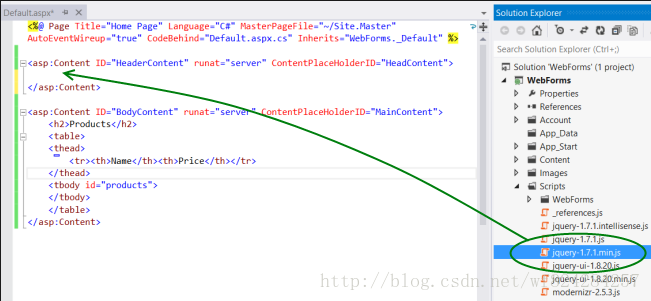
注意:你可以直接从 Solution Explorer中将需要引用的文件拖放到HTML的代码编辑页面,这样就可以简单的完成对该文件的引用了。
将以下脚本添加到HTML页面上JQuery引用下面:
<script type="text/javascript">
    function getProducts() {
        $.getJSON("api/products",
            function (data) {
                $('#products').empty(); // Clear the table body.

                // Loop through the list of products.
                $.each(data, function (key, val) {
                    // Add a table row for the product.
                    var row = '<td>' + val.Name + '</td><td>' + val.Price + '</td>';
                    $('<tr/>', { html: row })  // Append the name.
                        .appendTo($('#products'));
                });
            });
        }

        $(document).ready(getProducts);
</script>
当页面文件加载时,这段脚本将会创建一个AJAX请求到 “api/products”。 这个请求的返回结果是JSON格式表示的产品列表(a list of products)。之后由这段脚本将产品信息添加到HTML页面的table中。
当你运行这个应用程序时,你应该会看到这样的页面:

下一步
为ASP.NET Web API 创建帮助页面
http://blog.csdn.net/wf824284257/article/details/79462983
结束
本文为微软官方文档的个人译文。本译文的非商用转载请注明地址及作者,感谢。禁止商用转载。若经发现,将依法追究责任。
英文原文地址:https://docs.microsoft.com/en-us/aspnet/web-api/overview/getting-started-with-aspnet-web-api/using-web-api-with-aspnet-web-forms
原文作者: MikeWasson and Other 3 Contributors
主作者链接:https://github.com/MikeWasson
作者尊重微软公司的知识产权,若贵公司认为该博客有损贵公司利益,请联系作者删除
译者:大吴凡 http://dawufan.cn