一、搭建一个Maven 多模块项目
我们意思一下,假设我们构建的项目就这三个模块
- springboot-front
web层 - springboot-service
业务层 - springboot-dao
数据持久层
依赖关系如下:
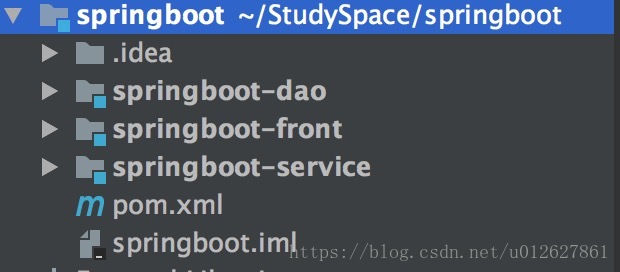
搭建完了后如下图:
二、加入jar依赖
- 在父工程中整合springboot的依赖管理
修改springboot/pom.xml文件,新增springboot parent,新增完了以后如下:
<?xml version="1.0" encoding="UTF-8"?>
<project xmlns="http://maven.apache.org/POM/4.0.0"
         xmlns:xsi="http://www.w3.org/2001/XMLSchema-instance"
         xsi:schemaLocation="http://maven.apache.org/POM/4.0.0 http://maven.apache.org/xsd/maven-4.0.0.xsd">
    <modelVersion>4.0.0</modelVersion>

    <groupId>com.chinack</groupId>
    <artifactId>springboot</artifactId>
    <packaging>pom</packaging>
    <version>1.0-SNAPSHOT</version>

	<!-- 新增 -->
    <parent>
        <groupId>org.springframework.boot</groupId>
        <artifactId>spring-boot-starter-parent</artifactId>
        <version>2.0.3.RELEASE</version>
    </parent>

    <modules>
        <module>springboot-dao</module>
        <module>springboot-service</module>
        <module>springboot-front</module>
    </modules>

</project>
说明
springboot parent对构建springboot工程spring系列和一些常用的第三方包进行了管理。我们只需要将其作为parent即可不用指定版本号来引入spring和已经加入管理的第三方包。springboot这么做,也是为了解决第三方包之间的版本冲突问题。
- 给web工程添加spring依赖
修改springboot/springboot-front/pom.xml,增加spring web starter和service工程的依赖。完了后如下:
<?xml version="1.0" encoding="UTF-8"?>
<project xmlns="http://maven.apache.org/POM/4.0.0"
         xmlns:xsi="http://www.w3.org/2001/XMLSchema-instance"
         xsi:schemaLocation="http://maven.apache.org/POM/4.0.0 http://maven.apache.org/xsd/maven-4.0.0.xsd">
    <parent>
        <artifactId>springboot</artifactId>
        <groupId>com.chinack</groupId>
        <version>1.0-SNAPSHOT</version>
    </parent>
    <modelVersion>4.0.0</modelVersion>

    <artifactId>springboot-front</artifactId>
    <packaging>jar</packaging>

    <dependencies>
        <!-- springboot web starter -->
        <dependency>
            <groupId>org.springframework.boot</groupId>
            <artifactId>spring-boot-starter-web</artifactId>
        </dependency>
        <!-- 依赖springboot-service -->
        <dependency>
            <groupId>com.chinack</groupId>
            <artifactId>springboot-service</artifactId>
            <version>1.0-SNAPSHOT</version>
        </dependency>
    </dependencies>
</project>
说明
因为这是一个web工程,所以需要增加web starter的依赖,web starter引入了构建一个web工程的jar包。
- 给
springboot-service增加spring-context和dao工程的依赖包
修改springboot/springboot-service/pom.xml如下:
<?xml version="1.0" encoding="UTF-8"?>
<project xmlns="http://maven.apache.org/POM/4.0.0"
         xmlns:xsi="http://www.w3.org/2001/XMLSchema-instance"
         xsi:schemaLocation="http://maven.apache.org/POM/4.0.0 http://maven.apache.org/xsd/maven-4.0.0.xsd">
    <parent>
        <artifactId>springboot</artifactId>
        <groupId>com.chinack</groupId>
        <version>1.0-SNAPSHOT</version>
    </parent>
    <modelVersion>4.0.0</modelVersion>

    <artifactId>springboot-service</artifactId>

    <dependencies>
        <!-- spring context -->
        <dependency>
            <groupId>org.springframework</groupId>
            <artifactId>spring-context</artifactId>
            <scope>provided</scope>
        </dependency>
        <!-- dao工程依赖 -->
        <dependency>
            <groupId>com.chinack</groupId>
            <artifactId>springboot-dao</artifactId>
            <version>1.0-SNAPSHOT</version>
        </dependency>
    </dependencies>
</project>
说明
这里的spring-context包的scope为provided,因为这个包在front的springboot web starter中已经被引入了。我们之所以需要引入这个包,是因为我们需要使用@Service、@Autowired等Spring提供的注解。如果你还需要用到别的第三方包,也可以直接引入。
三、增加启动类
我们新建启动类Application.java放在包com.chinack.springboot下。为了演示,我们新建Controller类IndexController放在com.chinack.springboot.controller中(请务必这么做,因为SpringBoot要求启动类必须要在其它组件类所在包的父包中)。
- Application.java内容如下
package com.chinack.springboot;

import org.springframework.boot.SpringApplication;
import org.springframework.boot.autoconfigure.SpringBootApplication;

@SpringBootApplication
public class Application {

    public static void main(String[] args){
        SpringApplication.run(Application.class);
    }
}
- IndexController内容如下,这里用到了
IndexService,博文中没有提到,这就是一个普通的Service而已,详情可以查看博文最后提到的源码。
package com.chinack.springboot.controller;

import com.chinack.springboot.service.IndexService;
import org.springframework.beans.factory.annotation.Autowired;
import org.springframework.web.bind.annotation.RequestMapping;
import org.springframework.web.bind.annotation.RestController;

@RestController
public class IndexController {

    @Autowired
    private IndexService indexService;

    @RequestMapping("/index")
    public String index(){
        return "Hello SpringBoot 多模块工程,Dao名称为: " + indexService.getDaoName();
    }
}
这样,SpringBoot的Maven多模块工程就搭建完了,运行Application的main方法,然后访问,得到下图:

总结
1、搭建一个Maven多模块工程
2、在parent中引入springboot parent来继承springboot的包管理
3、在web工程中引入springboot的提供的web starter
4、在非web工程引入自己需要的包,如果包已经在front中引入,那么修饰scope为provided。
实现&理解上面四点即可搭建一个Spring Boot Maven多模块工程。
我把源码放在了gitee上,地址:https://gitee.com/ck-tech/springboot-multiple-module
(完)