Android中子线程主要有AsyncTask、IntentService、HandlerThread。
来看一看AsyncTask的原理,在使用的时候,AsyncTask在4.1版本之前是需要在主线程内创建的,4.1之后就可以随便在哪里创建了,原因在于AsyncTask和主线程通信也是通过mainlooper的handler发送消息实现的,因此可以知道第一次使用的时候需要创建和主线程相关的handler,4.1之后不需要是因为在ActivityThread中已经创建了AsyncTask的handler。
AsyncTask的方法有:
onPreExecute() //此方法会在后台任务执行前被调用,用于进行一些准备工作
doInBackground(Params... params) //此方法中定义要执行的后台任务,在这个方法中可以调用publishProgress来更新任务进度(publishProgress内部会调用onProgressUpdate方法)
onProgressUpdate(Progress... values) //由publishProgress内部调用,表示任务进度更新
onPostExecute(Result result) //后台任务执行完毕后,此方法会被调用,参数即为后台任务的返回结果
onCancelled() //此方法会在后台任务被取消时被调用public AsyncTask() {
mWorker = new WorkerRunnable<Params, Result>() {
public Result call() throws Exception {
mTaskInvoked.set(true);
Process.setThreadPriority(Process.THREAD_PRIORITY_BACKGROUND);
//noinspection unchecked
Result result = doInBackground(mParams);
Binder.flushPendingCommands();
return postResult(result);
}
};
mFuture = new FutureTask<Result>(mWorker) {
@Override
protected void done() {
try {
postResultIfNotInvoked(get());
} catch (InterruptedException e) {
android.util.Log.w(LOG_TAG, e);
} catch (ExecutionException e) {
throw new RuntimeException("An error occurred while executing doInBackground()",
e.getCause());
} catch (CancellationException e) {
postResultIfNotInvoked(null);
}
}
};
}也就是说,mFuture是一个封装了我们的后台任务的FutureTask对象,FutureTask类实现了FutureRunnable接口,通过这个接口可以方便的取消后台任务以及获取后台任务的执行结果
从上面的分析我们知道了,当mWorker中定义的call方法被执行时,doInBackground就会开始执行,我们定义的后台任务也就真正开始了。那么这个call方法什么时候会被调用呢?我们可以看到经过层层封装,实际上是mFuture对象封装了call方法,当mFuture对象被提交到AsyncTask包含的线程池执行时,call方法就会被调用,我们定义的后台任务也就开始执行了。下面我们来看一下mFuture是什么时候被提交到线程池执行的。
首先来看一下execute方法的源码:
public final AsyncTask<Params, Progress, Result> execute(Params... params) {
        return executeOnExecutor(sDefaultExecutor, params);
}
我们可以看到它接收的参数是Params类型的参数,这个参数会一路传递到doInBackground方法中。execute方法仅仅是调用了executeOnExecutor方法,并将executeOnExecutor方法的返回值作为自己的返回值。我们注意到,传入了sDefaultExecutor作为executeOnExecutor方法的参数,那么sDefaultExecutor是什么呢?简单的说,它是AsyncTask的默认执行器(线程池)。AsyncTask可以以串行(一个接一个的执行)或并行(一并执行)两种方式来执行后台任务,在Android3.0及以后的版本中,默认的执行方式是串行。这个sDefaultExecutor就代表了默认的串行执行器(线程池)。也就是说我们平常在AsyncTask对象上调用execute方法,使用的是串行方式来执行后台任务。
我们再来看一下executeOnExecutor方法都做了些什么:

public final AsyncTask<Params, Progress, Result> executeOnExecutor(Executor exec,
            Params... params) {
        if (mStatus != Status.PENDING) {
            switch (mStatus) {
                case RUNNING:
                    throw new IllegalStateException("Cannot execute task:"
                            + " the task is already running.");
                case FINISHED:
                    throw new IllegalStateException("Cannot execute task:"
                            + " the task has already been executed "
                            + "(a task can be executed only once)");
            }
        }

        mStatus = Status.RUNNING;

        onPreExecute();

        mWorker.mParams = params;
        exec.execute(mFuture);

        return this;
    }
从以上代码的第4行到第12行我们可以知道,当AsyncTask对象的当前状态为RUNNING或FINISHED时,调用execute方法会抛出异常,这意味着不能对正在执行任务的AsyncTask对象或是已经执行完任务的AsyncTask对象调用execute方法,这也就解释了我们上面提到的局限中的最后一条。
接着我们看到第17行存在一个对onPreExecute方法的调用,这表示了在执行后台任务前确实会调用onPreExecute方法。
在第19行,把我们传入的execute方法的params参数赋值给了mWorker的mParams成员变量;而后在第20行调用了exec的execute方法,并传入了mFuture作为参数。exec就是我们传进来的sDefaultExecutor。那么接下来我们看看sDefaultExecutor究竟是什么。在AsyncTask类的源码中,我们可以看到这句:
private static volatile Executor sDefaultExecutor = SERIAL_EXECUTOR;sDefaultExecutor被赋值为SERIAL_EXECUTOR,那么我们来看一下SERIAL_EXECUTOR:
public static final Executor SERIAL_EXECUTOR = new SerialExecutor();
private static class SerialExecutor implements Executor {
        final ArrayDeque<Runnable> mTasks = new ArrayDeque<Runnable>();
        Runnable mActive;


        public synchronized void execute(final Runnable r) {
            mTasks.offer(new Runnable() {
                public void run() {
                    try {
                        r.run();
                    } finally {
                        scheduleNext();
                    }
                }
            });
            if (mActive == null) {
                scheduleNext();
            }
        }


        protected synchronized void scheduleNext() {
            if ((mActive = mTasks.poll()) != null) {
                THREAD_POOL_EXECUTOR.execute(mActive);
            }
        }
    }
我们来看一下execute方法的实现。mTasks代表了SerialExecutor这个串行线程池的任务缓存队列,在第6行,我们用offer方法向任务缓存队列中添加一个任务,任务的内容如第7行到第13行的run方法定义所示。我们可以看到,run方法中:第9行调用了mFuture(第5行的参数r就是我们传入的mFuture)的run方法,而mFuture的run方法内部会调用mWorker的call方法,然后就会调用doInBackground方法,我们的后台任务也就开始执行了。那么我们提交到任务缓存队列中的任务什么时候会被执行呢?我们接着往下看。
首先我们看到第三行定义了一个Runnable变量mActive,它代表了当前正在执行的AsyncTask对象。第15行判断mActive是否为null,若为null,就调用scheduleNext方法。如第20行到24行所示,在scheduleNext方法中,若缓存队列非空,则调用THREAD_POOL_EXECUTOR.execute方法执行从缓存队列中取出的任务,这时我们的后台任务便开始你真正执行了。
通过以上的分析,我们可以知道SerialExecutor所完成的工作主要是把任务加到任务缓存队列中,而真正执行任务的是THREAD_POOL_EXECUTOR。我们来看下THREAD_POOL_EXECUTOR是什么:
 public static final Executor THREAD_POOL_EXECUTOR
            = new ThreadPoolExecutor(CORE_POOL_SIZE, MAXIMUM_POOL_SIZE, KEEP_ALIVE,
                    TimeUnit.SECONDS, sPoolWorkQueue, sThreadFactory);
从上面的代码我们可以知道,它是一个线程池对象。根据AsyncTask的源码,我们可以获取它的各项参数如下:
private static final int CPU_COUNT = Runtime.getRuntime().availableProcessors();
private static final int CORE_POOL_SIZE = CPU_COUNT + 1;
private static final int MAXIMUM_POOL_SIZE = CPU_COUNT * 2 + 1;
private static final int KEEP_ALIVE = 1;


private static final ThreadFactory sThreadFactory = new ThreadFactory() {
    private final AtomicInteger mCount = new AtomicInteger(1);


    public Thread newThread(Runnable r) {
        return new Thread(r, "AsyncTask #" + mCount.getAndIncrement());
    }
};


private static final BlockingQueue<Runnable> sPoolWorkQueue =
new LinkedBlockingQueue<Runnable>(128);- corePoolSize为CPU数加一;
- maximumPoolSize为CPU数的二倍加一;
- 存活时间为1秒;
- 任务缓存队列为LinkedBlockingQueue。
现在,我们已经了解到了从我们调用AsyncTask对象的execute方法开始知道后台任务执行完都发生了什么。现在让我们回过头来看一看之前提到的postResult方法的源码:
private Result postResult(Result result) {
    @SuppressWarnings("unchecked")
    Message message = getHandler().obtainMessage(MESSAGE_POST_RESULT,
            new AsyncTaskResult<Result>(this, result));
    message.sendToTarget();
    return result;
}
在以上源码中,先调用了getHandler方法获取AsyncTask对象内部包含的sHandler,然后通过它发送了一个MESSAGE_POST_RESULT消息。我们来看看sHandler的相关代码:
private static final InternalHandler sHandler = new InternalHandler();

private static class InternalHandler extends Handler {
        public InternalHandler() {
            super(Looper.getMainLooper());
        }

        @SuppressWarnings({"unchecked", "RawUseOfParameterizedType"})
        @Override
        public void handleMessage(Message msg) {
            AsyncTaskResult<?> result = (AsyncTaskResult<?>) msg.obj;
            switch (msg.what) {
                case MESSAGE_POST_RESULT:
                    // There is only one result
                    result.mTask.finish(result.mData[0]);
                    break;
                case MESSAGE_POST_PROGRESS:
                    result.mTask.onProgressUpdate(result.mData);
                    break;
            }
        }
}
从以上代码中我们可以看到,sHandler是一个静态的Handler对象。我们知道创建Handler对象时需要当前线程的Looper,所以我们为了以后能够通过sHandler将执行环境从后台线程切换到主线程(即在主线程中执行handleMessage方法),我们必须使用主线程的Looper,因此必须在主线程中创建sHandler。这也就解释了为什么必须在主线程中加载AsyncTask类,是为了完成sHandler这个静态成员的初始化工作。
在以上代码第10行开始的handleMessage方法中,我们可以看到,当sHandler收到MESSAGE_POST_RESULT方法后,会调用finish方法,finish方法的源码如下:
private void finish(Result result) {
        if (isCancelled()) {
            onCancelled(result);
        } else {
            onPostExecute(result);
        }
        mStatus = Status.FINISHED;
}
在第2行,会通过调用isCancelled方法判断AsyncTask任务是否被取消,若取消了则调用onCancelled方法,否则调用onPostExecute方法;在第7行,把mStatus设为FINISHED,表示当前AsyncTask对象已经执行完毕。
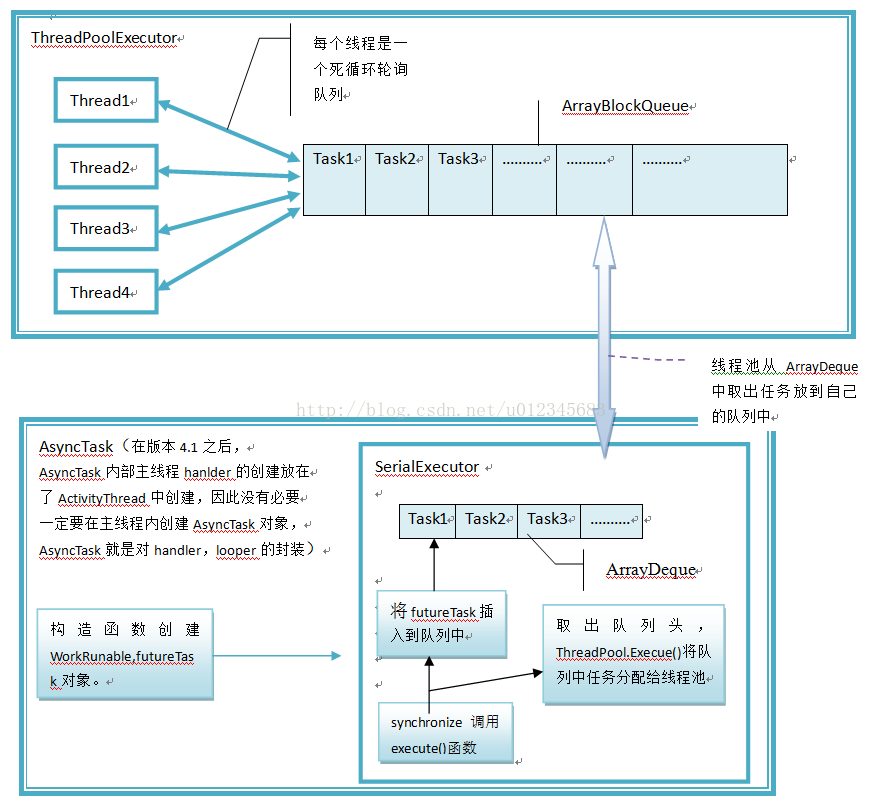
经过了以上的分析,我们大概了解了AsyncTask的内部运行逻辑,知道了它默认使用串行方式执行任务。那么如何让它以并行的方式执行任务呢? 阅读了以上的代码后,我们不难得到结论,只需调用executeOnExecutor方法,并传入THREAD_POOL_EXECUTOR作为其线程池即可。
总体的逻辑思路就如下图所示: