一、背景
本搭建流媒体服务器的环境为CentOS6.7 64位版本,软件主要是“nginx”与“nginx-rtmp-module”。
二、主要编译步骤
1、下载nginx-rtmp-module:
nginx-rtmp-module的官方github地址:https://github.com/arut/nginx-rtmp-module.git
使用git下载的命令:git clone https://github.com/arut/nginx-rtmp-module.git2、编译安装Nginx
nginx的官方网站为:http://nginx.org/en/download.html
本文采用的是最新版本为“nginx-1.13.0”。同时Nginx需要依赖其它第三方库,需要先下载编译好:
(1) zlib库
官网地址为:http://www.zlib.net/,本文采用的版本为“zlib-1.2.11”。
wget http://www.zlib.net/zlib-1.2.11.tar.gz
tar xf zlib-1.2.11.tar.gz
cd zlib-1.2.11
./configure
make && make install
官网下载地址:https://www.openssl.org/source/,本文使用的版本:“openssl-1.0.2l”。
wget https://www.openssl.org/source/openssl-1.0.2l.tar.gz
tar xf openssl-1.0.2l.tar.gz
cd openssl-1.0.2l
./config
make && make install
(3) pcre库
官网下载地址:ftp://ftp.csx.cam.ac.uk/pub/software/programming/pcre/,本文使用的版本:“pcre-8.38”。注意:pcre库建议不要使用pcre2系列的版本,会导致Nginx编译报错的问题。
wget ftp://ftp.csx.cam.ac.uk/pub/software/programming/pcre/pcre-8.38.tar.bz2
tar xf pcre-8.38.tar.bz2
cd pcre-8.38
./configure
make && make install官网下载地址:http://nginx.org/en/download.html,本文采用的版本为:“nginx-1.13.4”。
wget http://nginx.org/download/nginx-1.13.4.tar.gz
tar xf nginx-1.13.4.tar.gz
cd nginx-1.13.4
./configure --prefix=/usr/local/nginx --add-module=../nginx-rtmp-module --with-http_ssl_module  --with-pcre=../pcre-8.38 --with-openssl=../openssl-1.0.2l --with-zlib=../zlib-1.2.11
make && make install
执行完以上步骤,如果不出错误的话,Nginx编译出来会生成到“/usr/local/nginx”目录。
cd /usr/local/nginx/
tree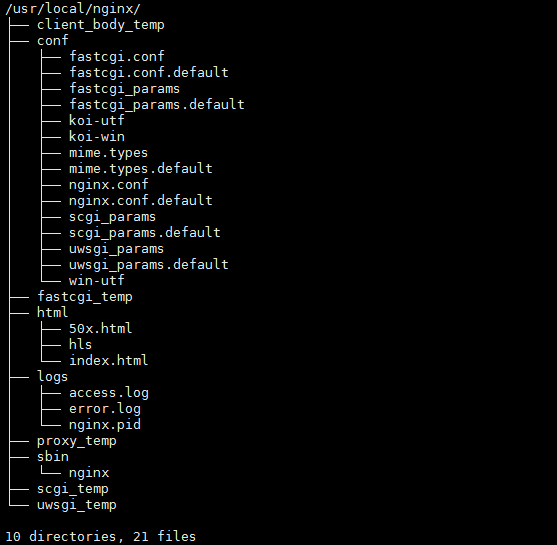
三、参数配置及播放测试
(1)Nginx参数配置
转到编译生成的目标目录“/usr/local/nginx”,修改“conf/nginx.conf”文件。
vim /usr/local/nginx/conf/nginx.conf## for RTMP and HLS
rtmp {
server {
listen 1935; #监听的端口
chunk_size 4000;
application hls { #rtmp推流请求路径
live on;
hls on;
hls_path html/hls; #生成TS文件和.m3u8文件保存目录
hls_fragment 3s;
}
}
}最后启动nginx。
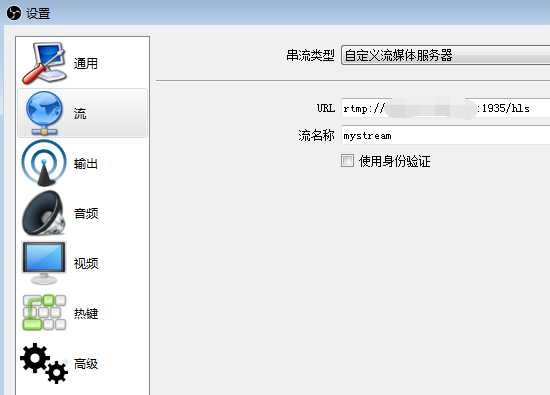
/usr/local/nginx/sbin/nginx -c /usr/local/nginx/conf/nginx.conf使用“OBS”或者“FFMPEG”等推流工具向服务器推流,本文以OBS为例,如下图配置好服务器推流URL(格式为:rtmp://服务器IP:1935/hls),然后启动推流:
或者使用FFMPEG推流,命令格式如下:
ffmpeg.exe -re -y -i test_h264.mp4 -c:v copy -c:a copy -flags +loop -f flv "rtmp://192.168.110.171:1935/hls/mystream"(3)客户端拉流播放
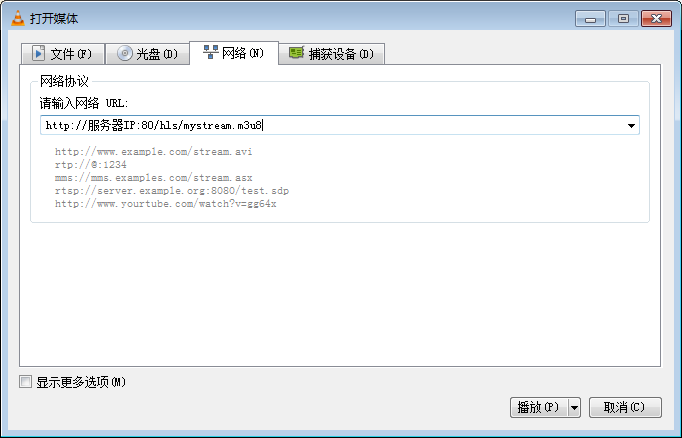
本文配置的流媒体服务器支持RTMP拉流和HLS拉流:
HLS流:
对于RTMP流,填写的URL应该为:rtmp://服务器IP:1935/hls/mystream
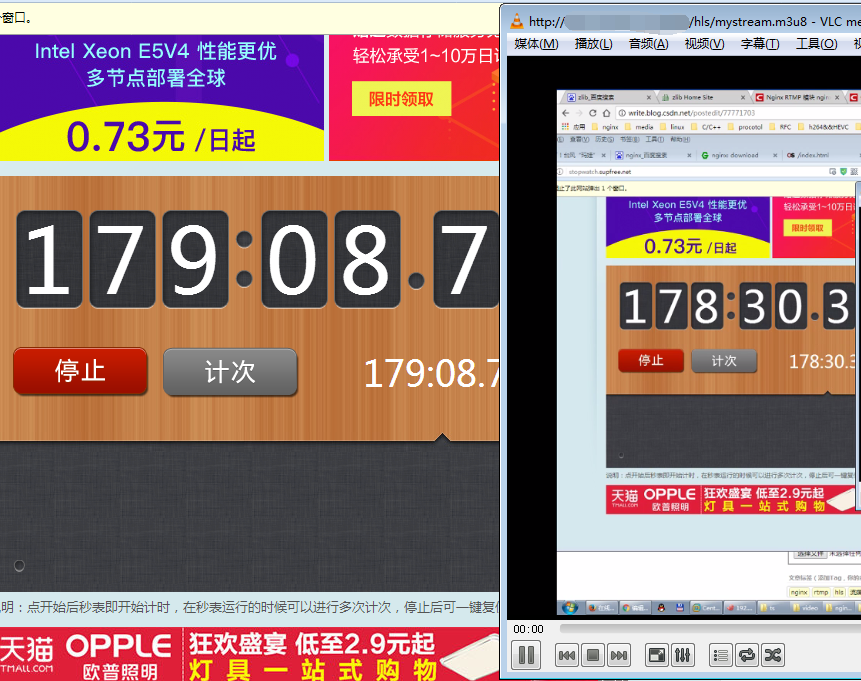
最后看到的效果图如下:
最后为了方便起见,有将所有相关的资源整合成自动编译脚本,
大家有兴趣的话可以从这里下载:http://download.csdn.net/download/liuchen1206/10167705
参考文献:
http://blog.csdn.net/zph1234/article/details/52846223