Springboot中自动配置Springmvc的文件
@Configuration
@ConditionalOnWebApplication(type = Type.SERVLET)
@ConditionalOnClass({ Servlet.class, DispatcherServlet.class, WebMvcConfigurer.class })
@ConditionalOnMissingBean(WebMvcConfigurationSupport.class)
@AutoConfigureOrder(Ordered.HIGHEST_PRECEDENCE + 10)
@AutoConfigureAfter({ DispatcherServletAutoConfiguration.class,
		ValidationAutoConfiguration.class })
public class WebMvcAutoConfiguration {
		@Bean
		@ConditionalOnBean(ViewResolver.class)
		@ConditionalOnMissingBean(name = "viewResolver", value = ContentNegotiatingViewResolver.class)
		public ContentNegotiatingViewResolver viewResolver(BeanFactory beanFactory) {
			ContentNegotiatingViewResolver resolver = new ContentNegotiatingViewResolver();
			resolver.setContentNegotiationManager(
					beanFactory.getBean(ContentNegotiationManager.class));
			// ContentNegotiatingViewResolver uses all the other view resolvers to locate
			// a view so it should have a high precedence
			resolver.setOrder(Ordered.HIGHEST_PRECEDENCE);
			return resolver;
		}
}
视图解析器是如何配置进去的呢?
如上图,利用到了ContentNegotiatingViewResolver这个类
public class ContentNegotiatingViewResolver extends WebApplicationObjectSupport
		implements ViewResolver, Ordered, InitializingBean {

	@Nullable
	private List<ViewResolver> viewResolvers;
}
该类中定义了视图解析器的集合,那么这些视图解析器是如何获取到的呢
@Override
	protected void initServletContext(ServletContext servletContext) {
		Collection<ViewResolver> matchingBeans =
				**BeanFactoryUtils.beansOfTypeIncludingAncestors(obtainApplicationContext(), ViewResolver.class).values();**
		if (this.viewResolvers == null) {
			this.viewResolvers = new ArrayList<>(matchingBeans.size());
			for (ViewResolver viewResolver : matchingBeans) {
				if (this != viewResolver) {
					this.viewResolvers.add(viewResolver);
				}
			}
		}
如上图可以看到是在springcontext容器中获取到的,因此我们根据这个原理可以让ContentNegotiatingViewResolver自动装配我们放在容器中的自定义的视图解析器
    @Bean
	public ViewResolver myResolver(){
    	return new MyResolver();
	}

	private static class MyResolver implements ViewResolver{

		@Override
		public View resolveViewName(String viewName, Locale locale) throws Exception {
			return null;
		}
	}
然后启动springboot,ContentNegotiatingViewResolver会为我们自动加载我们的自定义视图解析器,要查看效果可以看DisPatcherServlet该类的doDispastcher方法,查看传入参数request的属性viewResolver中的ContentNegotiatingViewResolver,查看他的装载的视图解析器列表,可以看到我们自定义的视图解析器
扩展springmvc
如果我们想保留springboot对springmvc的自动配置功能,同时我们想添加简单的springmvc的特殊功能,比如拦截器等,我们可以编写一个配置类,且是webMvcConfigurerAdapter类型,且不能标注@enableWebMvc
/**
 * 使用这个类来扩展springMVC的功能
 */
@Configuration
public class MyMvcConfigurer extends WebMvcConfigurerAdapter {

    // 想要扩展什么方法就实现什么方法

    @Override
    public void addViewControllers(ViewControllerRegistry registry) {
        registry.addViewController("/").setViewName("index");
    }
}
之所以要跟上面的方式写,为了避免每跳转一个template的页面就要写一个方法,造成冗杂代码,我们可以在上面注册很多个视图,比如下面这样
registry.addViewController("/").setViewName("login");
                registry.addViewController("/index.html").setViewName("login");
国际化
点击页面中的选项,选择中文或者英文显示页面中的文字
在springmvc中需要经过如下3步:
1)、编写国际化配置文件;
2)、使用ResourceBundleMessageSource管理国际化资源文件
3)、在页面使用fmt:message取出国际化内容
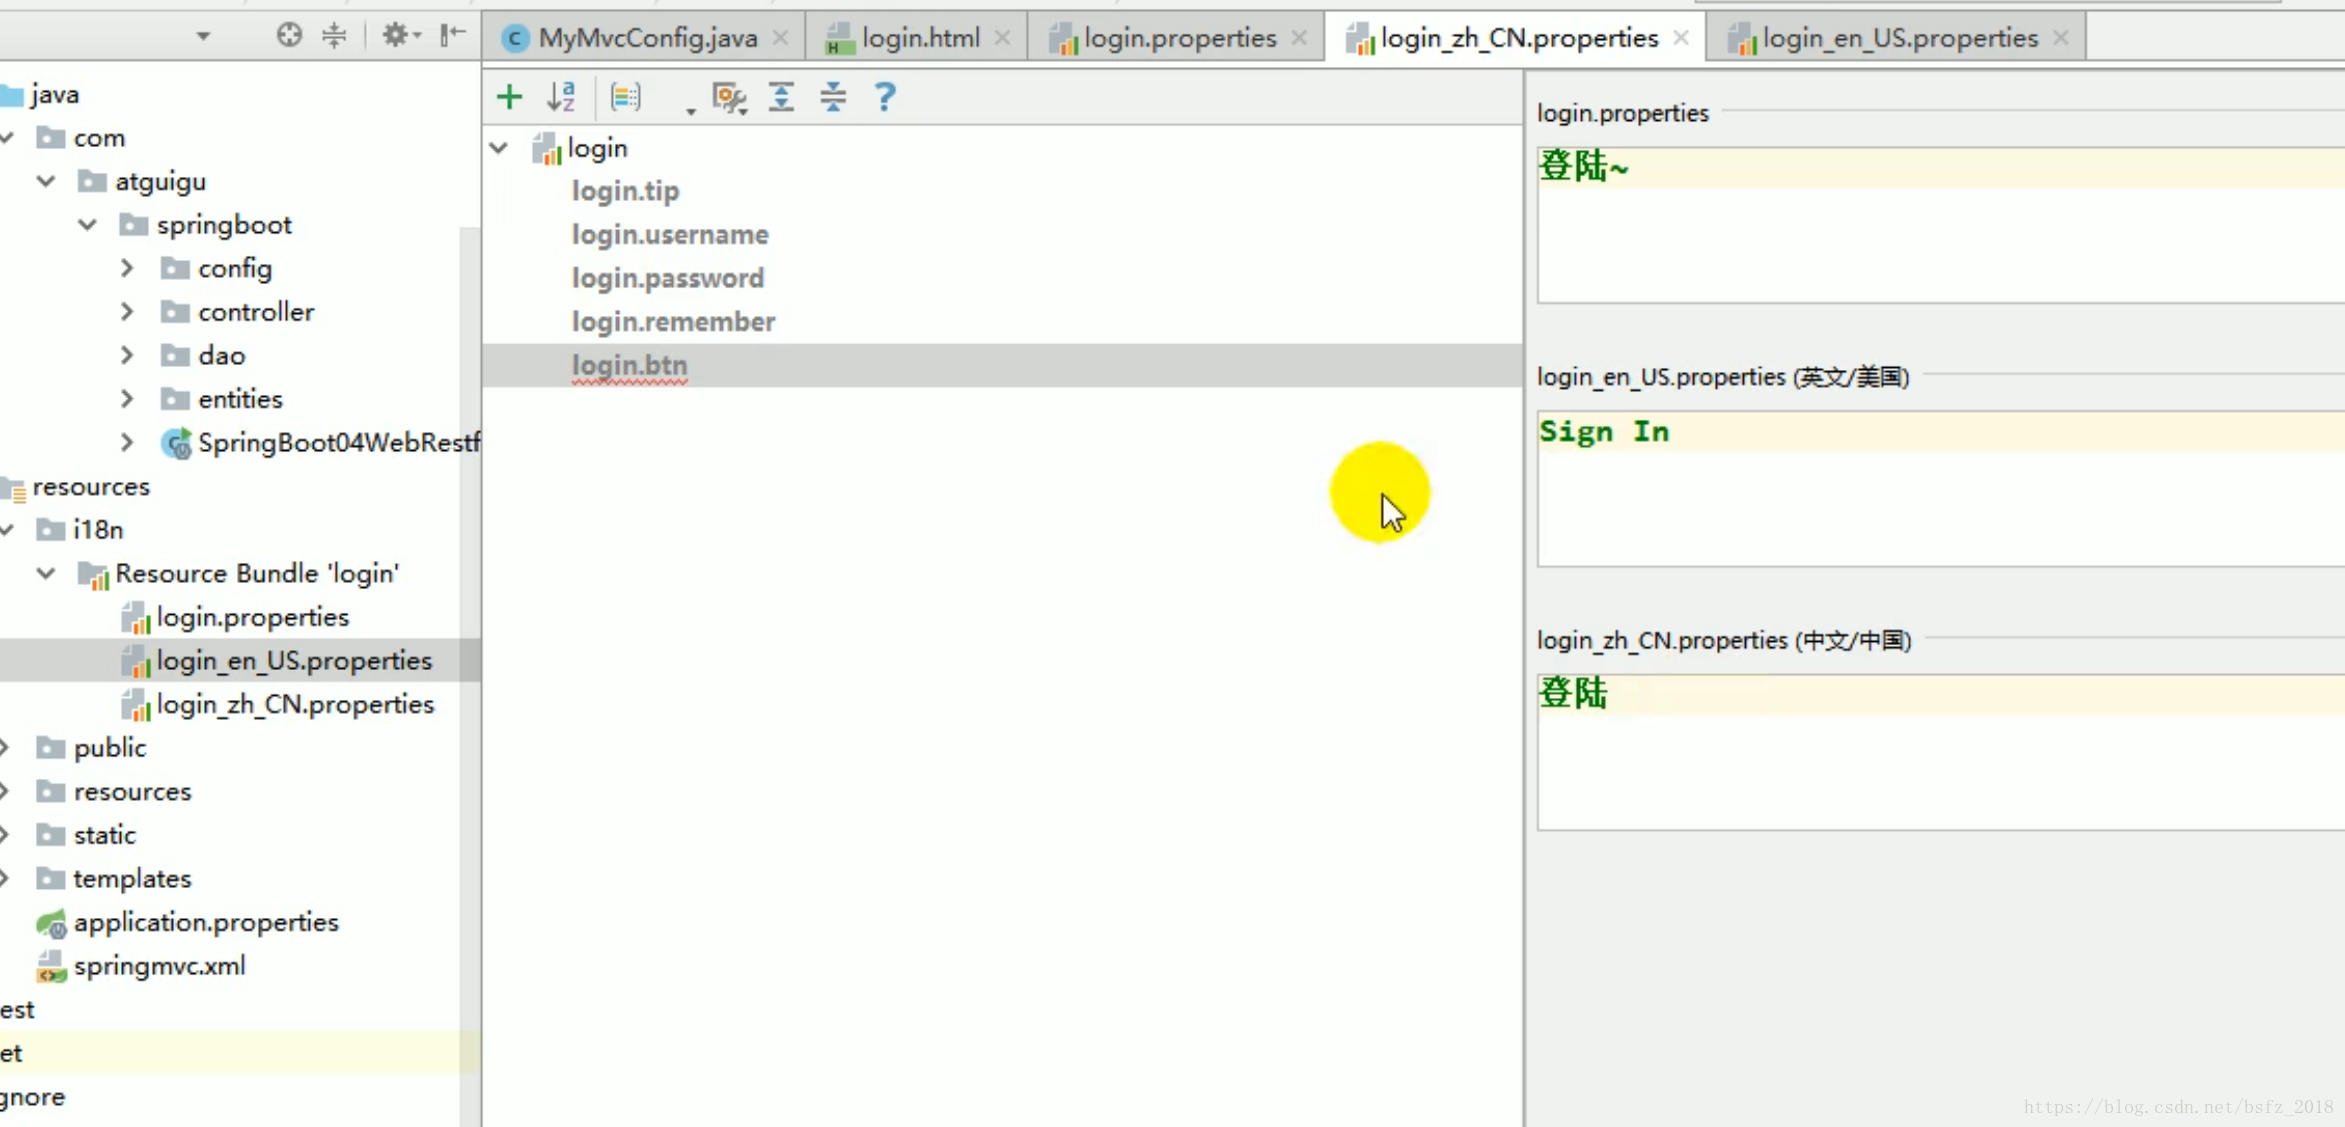
而在springboot中国际化非常容易,只需要编写国际化文件,其他springboot都帮助我们实现了
第一个配置文件:不选择语言信息默认的
第二个配置文件英文,第三个配置文件中文
拦截器进行登陆检查
/**
 * 登陆检查,
 */
public class LoginHandlerInterceptor implements HandlerInterceptor {
    //目标方法执行之前
    @Override
    public boolean preHandle(HttpServletRequest request, HttpServletResponse response, Object handler) throws Exception {
        Object user = request.getSession().getAttribute("loginUser");
        if(user == null){
            //未登陆,返回登陆页面
            request.setAttribute("msg","没有权限请先登陆");
            request.getRequestDispatcher("/index.html").forward(request,response);
            return false;
        }else{
            //已登陆,放行请求
            return true;
        }

    }

    @Override
    public void postHandle(HttpServletRequest request, HttpServletResponse response, Object handler, ModelAndView modelAndView) throws Exception {

    }

    @Override
    public void afterCompletion(HttpServletRequest request, HttpServletResponse response, Object handler, Exception ex) throws Exception {

    }
}
注册拦截器
  //所有的WebMvcConfigurerAdapter组件都会一起起作用
    @Bean //将组件注册在容器
    public WebMvcConfigurerAdapter webMvcConfigurerAdapter(){
        WebMvcConfigurerAdapter adapter = new WebMvcConfigurerAdapter() {
            @Override
            public void addViewControllers(ViewControllerRegistry registry) {
                registry.addViewController("/").setViewName("login");
                registry.addViewController("/index.html").setViewName("login");
                registry.addViewController("/main.html").setViewName("dashboard");
            }

            //注册拦截器
            @Override
            public void addInterceptors(InterceptorRegistry registry) {
                //super.addInterceptors(registry);
                //静态资源;  *.css , *.js
                //SpringBoot已经做好了静态资源映射,我们不再需要单独exclude
                //    /**任意目录,任意文件,exclude除过这些
                registry.addInterceptor(new LoginHandlerInterceptor()).addPathPatterns("/**")
                        .excludePathPatterns("/index.html","/","/user/login");
            }
        };
        return adapter;
    }
RestfulCRUD:CRUD满足Rest风格
URI: /资源名称/资源标识 HTTP请求方式区分对资源CRUD操作
| 普通CRUD(uri来区分操作) | RestfulCRUD | |
|---|---|---|
| 查询 | getEmp | emp—GET |
| 添加 | addEmp?xxx | emp—POST |
| 修改 | updateEmp?id=xxx&xxx=xx | emp/{id}—PUT |
| 删除 | deleteEmp?id=1 | emp/{id}—DELETE |
| 实验功能 | 请求URI | 请求方式 |
|---|---|---|
| 查询所有员工 | emps | GET |
| 查询某个员工(来到修改页面) | emp/1 | GET |
| 来到添加页面 | emp | GET |
| 添加员工 | emp | POST |
| 来到修改页面(查出员工进行信息回显) | emp/1 | GET |
| 修改员工 | emp | PUT |
| 删除员工 | emp/1 | DELETE |
小问题
th:if优先级高于th:text
th:if="${not #strings.isEmpty(msg)}" 显示消息
重定向
return “redirect:/main.html” 加/表示当前项目下