OpenCV强大的图像处理被广泛应用与各行各业,如何将其部署到不同的平台是每个OpenCV开发人员必须面对解决的。对于OpenCV开发,很多选择C++实现基本的算法,而如何将算法应用到IOS、Android或嵌入式设备上却 是一个问题,这节将讲解OpenCV 在Android上的部署,这里选择在Android Studio上开发Android应用程序。
1.首先在Opencv官网下载Android SDK,这里选中最新的opencv-3.4.1-android-sdk.zip下载 ,解压得到OpenCV-android-sdk。
2.启动Android-stiudio(本人安装的是AS 3.1版本),新建一个Android项目,Application name填OpencvJNI,Company domaint填xinyi61,Package name者为xinyi61.opencvjni,并且选上Include C++ support,最终效果如下:

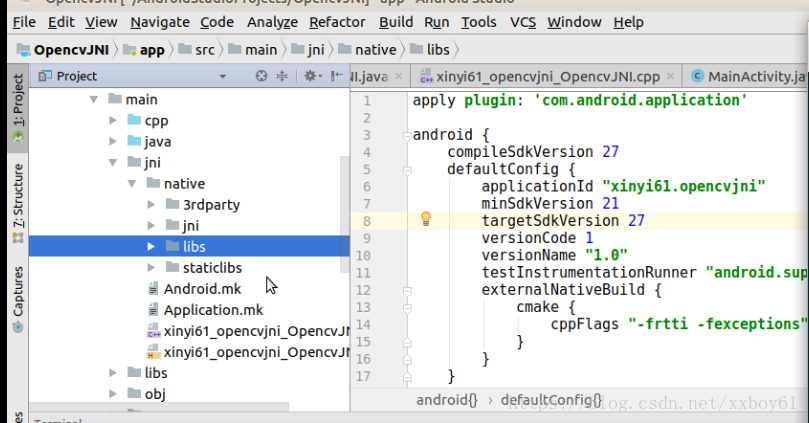
3.选中app/src/main右键 New->Folder->JNI Folder,这将在main下面创建一个jni的目录,将1解压文件夹下OpenCV-android-sdk/sdk下的native目录整个拷贝到jni目录下,此时jni目录展开如下:
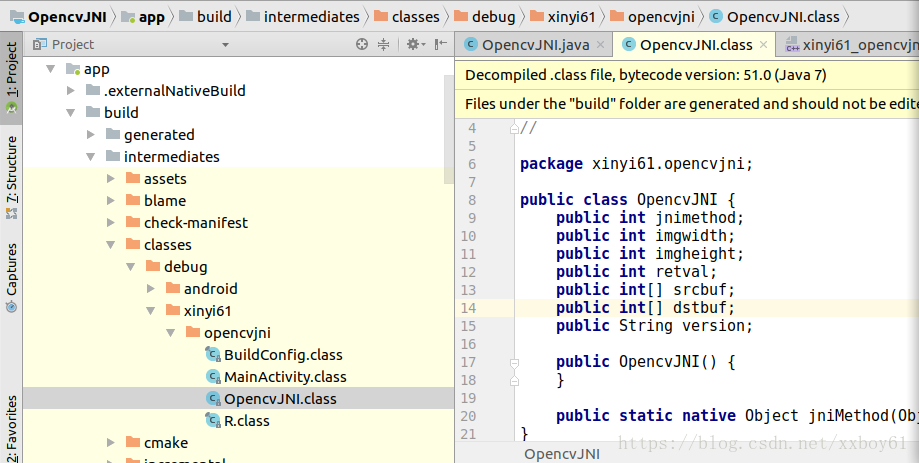
4. 选中app/src/main/java/xinyi61.opencvjni 右键New->Java Class,新建一个OpencvJNI的java类,OpencvJNI如下所示
public class OpencvJNI {
    static {
        System.loadLibrary("imgproc");
    }

    public int api_method;
    public int img_width;
    public int img_height;
    public int retval;
    public int [] srcbuf;
    public int [] dstbuf;
    public int [] outmuf;
    public int [] inmask;
    public double clarityVal;
    public String version;

    public static native Object jniApiMethod(Object param);
}
5.编写带有native声明的方法的java类,使用 javac 命令编译所编写的java类。点击Build->Make Project,完成后会在app/build/intermediates/classes/debug/xinyi61/opencvjni下生成一个OpencvJNI.class,如下所示
6.使用 “ javah -jni java类名” 生成扩展名为h的头文件,使用C/C++实现本地方法。打开Android Studio的Terminal,cd 到app/src/main/jni目录下,输入
javah -jni -classpath ../../../build/intermediates/classes/debug xinyi61.opencvjni.OpencvJNI自动生成头文件,查看jni下生成的头文件xinyi61_opencvjni_OpencvJNI.h,
/* DO NOT EDIT THIS FILE - it is machine generated */
#include <jni.h>
/* Header for class xinyi61_opencvjni_OpencvJNI */

#ifndef _Included_xinyi61_opencvjni_OpencvJNI
#define _Included_xinyi61_opencvjni_OpencvJNI
#ifdef __cplusplus
extern "C" {
#endif
/*
 * Class:     xinyi61_opencvjni_OpencvJNI
 * Method:    jniMethod
 * Signature: (Ljava/lang/Object;)Ljava/lang/Object;
 */
JNIEXPORT jobject JNICALL Java_xinyi61_opencvjni_OpencvJNI_jniMethod
  (JNIEnv *, jclass, jobject);

#ifdef __cplusplus
}
#endif
#endif
选中jni右键New->C/C++ Source FIle 命名为xinyi61_opencvjni_OpencvJNI,作为对应的java类的JNI实现源文件,其中需要访问java中定义的类对象的实例,则由以下几步完成
1.通过GetObjectClass()函数获得该对象的类class,返回值是一个jclass;
2.调用GetFieldID函数得到需要访问的实例域(变量)在该c类中id
3.调用Get【Type】Field()得到访问的变量值。其中【Type】对应变量的类型。
最终实现为:
//
// Created by Administrator on 2018/7/3/003.
//
#include <jni.h>
#include <stdio.h>
#include <stdlib.h>
#include <string>
#include <iostream>
#include <android/log.h>
#include "opencv2/opencv.hpp"
#include "xinyi61_opencvjni_OpencvJNI.h"
#define LOG_TAG "MYJNI"
#define LOGI(...) __android_log_print(ANDROID_LOG_INFO, LOG_TAG, __VA_ARGS__)
#define LOGE(...) __android_log_print(ANDROID_LOG_ERROR, LOG_TAG, __VA_ARGS__)
#ifdef __cplusplus
extern "C" {
#endif
enum JNI_API__METHOD
{
JNI_API_METHOD_GETVERSION=0, /*get build version and time*/
JNI_API_METHOD_IM2GRAY, /* convert image to gray*/
JNI_API_METHOD_INPAINT, /* image restore */
JNI_API_METHOD_AUTOCOMPLATE, /* image auto restore */
JNI_API_METHOD_AUTOWHITEBALANCE, /* image auto white balance */
JNI_API_METHOD_AUTOWHITEBACKGROUND, /* replace background with white */
JNI_API_METHOD_ADJUSTIMAGECLARITY, /* adjust image clarity*/
JNI_API_METHOD_INTERACTIVEMATTING, /* interactivate matting */
JNI_API_METHOD_END = JNI_API_METHOD_INTERACTIVEMATTING
};
JNIEXPORT jobject JNICALL Java_bc_imgproc_jniapi_jniApiMethod
(JNIEnv *env, jclass jcls, jobject jobj)
{
jclass jclsinput = env->GetObjectClass(jobj);
if (jclsinput == NULL)
{
return env->NewStringUTF("can not find class");
}
/* get jobj property id */
jfieldID jfdmethod = env->GetFieldID(jclsinput, "api_method", "I");
jfieldID jfdimgwidth = env->GetFieldID(jclsinput, "img_width", "I");
jfieldID jfdimgheight = env->GetFieldID(jclsinput, "img_height", "I");
jfieldID jfdcallret = env->GetFieldID(jclsinput, "retval", "I");
jfieldID jfdsrc = env->GetFieldID(jclsinput, "srcbuf", "[I");
jfieldID jfddst = env->GetFieldID(jclsinput, "dstbuf", "[I");
jfieldID jfdinmask = env->GetFieldID(jclsinput, "inmask", "[I");
jfieldID jfdversion = env->GetFieldID(jclsinput, "version", "Ljava/lang/String;");
jfieldID jfdclarityVal = env->GetFieldID(jclsinput, "clarityVal", "D");
/* create new object for return */
jobject jobjret = env->AllocObject(jclsinput);
/* get property value,get jni method */
int japi_call_method = env->GetIntField(jobj, jfdmethod);
LOGI("japi_call_method:%d", japi_call_method);
if ((japi_call_method < JNIAPI_METHOD_VERSION) || (japi_call_method > JNIAPI_METHOD_END))
{
LOGE("RET_ERROR_JNI_METHOD_ISNOT_SURPPORT:%x", RET_ERROR_JNI_METHOD_ISNOT_SURPPORT);
env->SetIntField(jobjret, jfdcallret, RET_ERROR_JNI_METHOD_ISNOT_SURPPORT);
return jobjret;
}
if (japi_call_method == JNIAPI_METHOD_VERSION)
{
char buf[40];
sprintf(buf, "V:%s Build Time:%s-%s", CV_VERSION, __DATE__, __TIME__);
std::string version = buf;
jstring jstr = env->NewStringUTF(version.c_str());
if (jstr == NULL)
{
env->SetIntField(jobjret, jfdcallret, RET_FAILED);
return jobjret;
}
env->SetObjectField(jobjret, jfdversion, jstr);
env->SetIntField(jobjret, jfdcallret, RET_OK);
return jobjret;
}
int ret = 0;
/* get property value,img_width img_height */
int w = env->GetIntField(jobj, jfdimgwidth);
int h = env->GetIntField(jobj, jfdimgheight);
if ((w < MINIMUM_IMAGE_WIDTH) || (h < MINIMUM_IMAGE_HEIGHT))
{
env->SetIntField(jobjret, jfdcallret, RET_ERROR_IAMGE_ISNOT_SURPPORT);
return jobjret;
}
LOGI("00japi_call_method:%d", japi_call_method);
jintArray jint_bufsrc = (jintArray)env->GetObjectField(jobj, jfdsrc);
/* get srcbuf length */
jsize len = env->GetArrayLength(jint_bufsrc);
if (len <= 0)
{
env->SetIntField(jobjret, jfdcallret, RET_ERROR_IAMGE_LEN_ERROR);
return jobjret;
}
/* get point to array object */
jint *bufsrc = env->GetIntArrayElements(jint_bufsrc, NULL);
cv::Mat srcimg(h, w, CV_8UC4, (unsigned char *)bufsrc);
cv::cvtColor(srcimg, srcimg, cv::COLOR_RGBA2BGR);
cv::Size sz = srcimg.size();
//cv::imwrite("/storage/emulated/0/imsrc.jpg", srcimg);
LOGI("01srcimg size:%d len:%d w:%d h:%d", srcimg.size().area(), len, w, h);
bc_jniapi_method method = (bc_jniapi_method)japi_call_method;
bc_jniapi_in inparam;
inparam.srcimg = srcimg;
bc_jniapi_out outparam;
switch (japi_call_method)
{
case JNIAPI_METHOD_WHITEBALANCE:
break;
case JNIAPI_METHOD_INPAINT:
{
jintArray jint_bufinmask = (jintArray)env->GetObjectField(jobj, jfdinmask);
jint *bufinmask = env->GetIntArrayElements(jint_bufinmask, NULL);
inparam.maskimg = cv::Mat(h, w, CV_8UC1, (unsigned char *)bufinmask);
break;
}
}
LOGI("02bc_algorithm_api call:%d", japi_call_method);
ret = bc_algorithm_api(method, &inparam, &outparam);
LOGI("111bc_algorithm_api call end ret:%d result mat:%zu %d", ret, outparam.dstimg.size(), outparam.dstimg[0].channels());
/* new an jintArray object */
jintArray retdst = env->NewIntArray(outparam.dstimg.size() * w * h);
if (retdst == NULL)
{
env->SetIntField(jobjret, jfdcallret, RET_MALLOC_MEMORY_ERROR);
return jobjret;
}
LOGI("03bc_algorithm_api call:%d", japi_call_method);
jint *dbuf = env->GetIntArrayElements(retdst, NULL);
for (int i = 0; i < outparam.dstimg.size(); ++i)
{
cv::cvtColor(outparam.dstimg[i], outparam.dstimg[i], cv::COLOR_BGR2RGBA);
cv::resize(outparam.dstimg[i],outparam.dstimg[i], sz, cv::INTER_AREA);
//char buf[60];
//sprintf(buf, "/storage/emulated/0/imresut_%d.jpg", i);
//LOGI("return result mat rows:%d cols:%d channels:%d",
// outparam.dstimg[i].rows, outparam.dstimg[i].cols, outparam.dstimg[i].channels());
//cv::imwrite(buf, outparam.dstimg[i]);
env->SetIntArrayRegion(retdst, i * w * h, w * h, (int *)outparam.dstimg[i].data);
}
env->SetObjectField(jobjret, jfddst, retdst);
env->SetIntField(jobjret, jfdcallret, ret);
env->ReleaseIntArrayElements(jint_bufsrc, bufsrc, 0);
env->ReleaseIntArrayElements(retdst, dbuf, 0);
LOGI("0000000api_call_method call end with ret:%d", ret);
return jobjret;
}
#ifdef __cplusplus
}
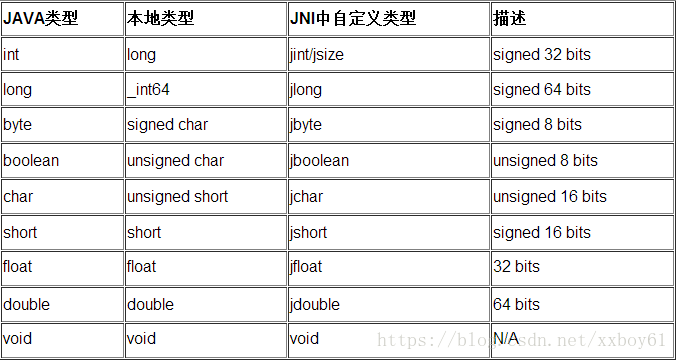
#endif其中java数据类型和c数据类型关系如下表所示
7. 将C/C++编写的文件生成动态连接库。选中jni右键New->File 建立jni的Android.mk,
LOCAL_PATH:=$(call my-dir)

include $(CLEAR_VARS)
OpenCV_INSTALL_MODULES := on
OpenCV_CAMERA_MODULES := off
OPENCV_LIB_TYPE :=STATIC

ifeq ("$(wildcard $(OPENCV_MK_PATH))","")
include $(LOCAL_PATH)/native/jni/OpenCV.mk
else
include $(OPENCV_MK_PATH)
endif
LOCAL_MODULE := opencv_world
LOCAL_SRC_FILES := xinyi61_opencvjni_OpencvJNI.cpp
LOCAL_LDLIBS +=  -lm -llog
include $(BUILD_SHARED_LIBRARY)
选中jni右键New->File 建立jni的Application.mk,
APP_STL := gnustl_static
APP_CPPFLAGS := -frtti -fexceptions
APP_PLATFORM := android-14
直接到Terminal下的jni目录运行ndk-build,此时就会在app/src/main/libs下生成各个平台的libopencv_world.so 。
libopencv_world.so 就可以拿来使用了。
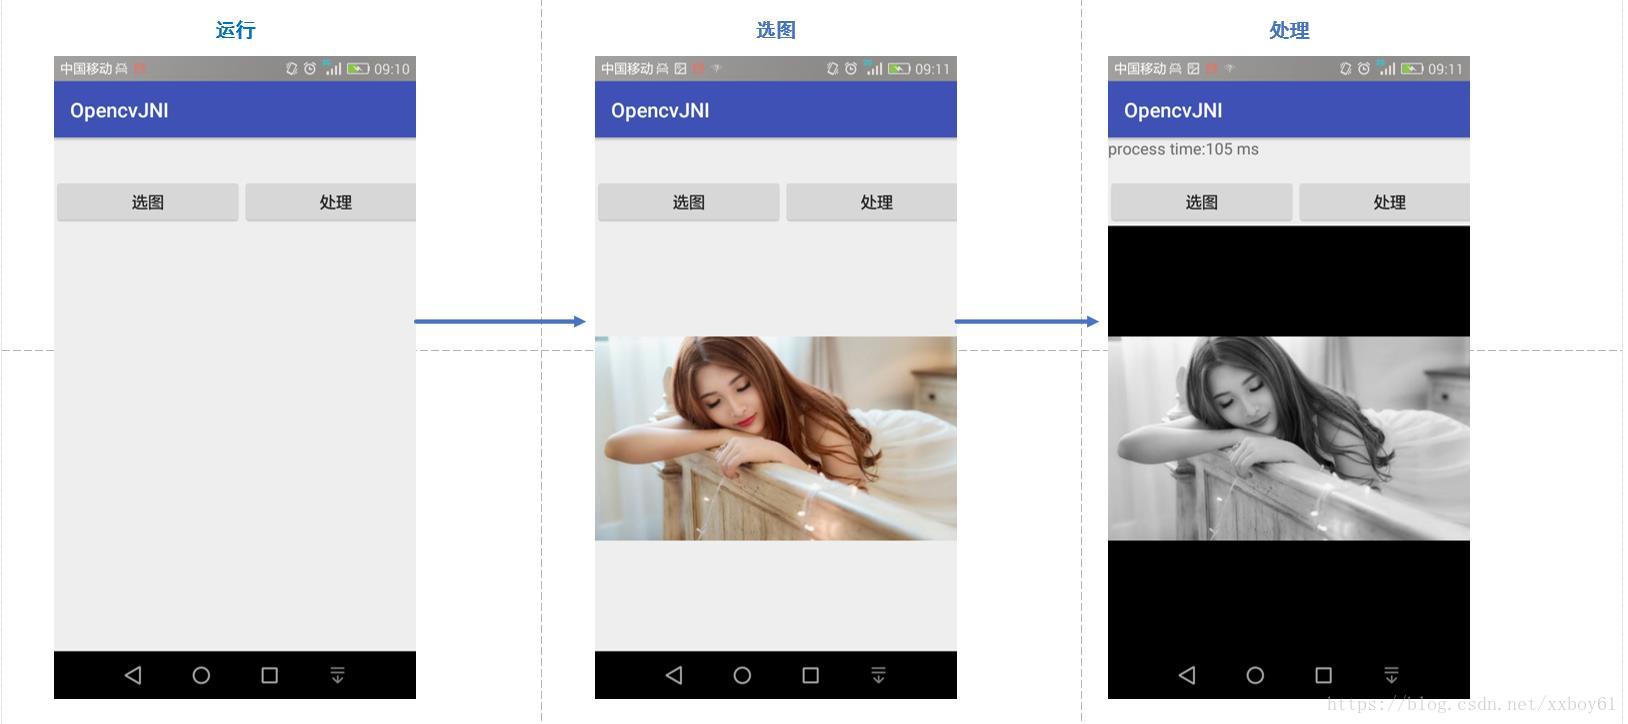
这里简单写个demo程序进行验证,最后结果图如下所示:
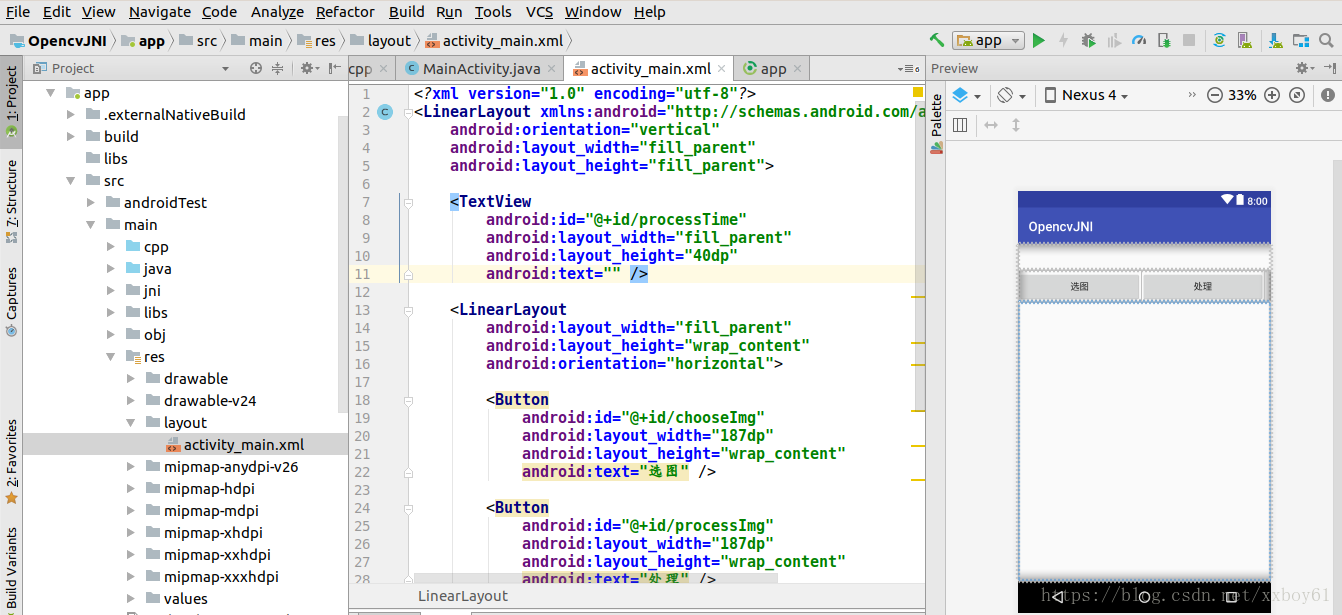
8.修改app/src/main/res/layout/activity_main.xml,修改后为下
<?xml version="1.0" encoding="utf-8"?>
<LinearLayout xmlns:android="http://schemas.android.com/apk/res/android"
    android:orientation="vertical"
    android:layout_width="fill_parent"
    android:layout_height="fill_parent">

        <TextView
        android:id="@+id/processTime"
        android:layout_width="fill_parent"
        android:layout_height="20dp"
        android:text="" />

    <LinearLayout
        android:layout_width="fill_parent"
        android:layout_height="wrap_content"
        android:orientation="horizontal">

        <Button
            android:id="@+id/chooseImg"
            android:layout_width="187dp"
            android:layout_height="wrap_content"
            android:text="选图" />

        <Button
            android:id="@+id/processImg"
            android:layout_width="187dp"
            android:layout_height="wrap_content"
            android:text="处理" />
    </LinearLayout>

    <ImageView
        android:id="@+id/imageView"
        android:layout_width="fill_parent"
        android:layout_height="fill_parent"
        android:layout_weight="1" />
    <TextView
        android:id="@+id/bccvVersion"
        android:layout_width="fill_parent"
        android:layout_height="20dp"
        android:text="" />
</LinearLayout>
9,选图按钮实现从手机中选中一副图片,这就需要给手机开权限,到app/src/main/res下修改AndroidManifest.xml,修改后的文件
如下,加粗体部分为添加的部分。
<?xml version="1.0" encoding="utf-8"?> <manifest xmlns:android="http://schemas.android.com/apk/res/android" package="xinyi61.opencvjni"><uses-permission android:name="android.permission.READ_EXTERNAL_STORAGE"/> <uses-permission android:name="android.permission.VIBRATE" /> <uses-permission android:name="android.permission.WRITE_EXTERNAL_STORAGE" /> <uses-permission android:name="android.permission.READ_EXTERNAL_STORAGE" /> <uses-permission android:name="android.permission.SYSTEM_ALERT_WINDOW" /> <uses-permission android:name="android.permission.WRITE_CONTACTS" /> <uses-permission android:name="android.permission.WRITE_SETTINGS" /> <uses-permission android:name="android.permission.CHANGE_CONFIGURATION" /> <uses-permission android:name="android.permission.MOUNT_UNMOUNT_FILESYSTEMS"/> <uses-permission android:name="android.permission.MOUNT_FORMAT_FILESYSTEMS"/<application android:allowBackup="true" android:icon="@mipmap/ic_launcher" android:label="@string/app_name" android:roundIcon="@mipmap/ic_launcher_round" android:supportsRtl="true" android:theme="@style/AppTheme"> <activity android:name=".MainActivity"> <intent-filter> <action android:name="android.intent.action.MAIN" /> <category android:name="android.intent.category.LAUNCHER" /> </intent-filter> </activity> </application> </manifest><application android:allowBackup="true" android:icon="@mipmap/ic_launcher" android:label="@string/app_name" android:roundIcon="@mipmap/ic_launcher_round" android:supportsRtl="true" android:theme="@style/AppTheme"> <activity android:name=".MainActivity"> <intent-filter> <action android:name="android.intent.action.MAIN" /> <category android:name="android.intent.category.LAUNCHER" /> </intent-filter> </activity> </application> </manifest>
10.编辑app/src/main/java/xinyi61.opencvjni/MainActivity下实现整个处理,
package xinyi61.opencvjni;

import android.support.v7.app.AppCompatActivity;
import android.os.Bundle;
import android.widget.TextView;
import android.content.Context;
import android.content.Intent;
import android.database.Cursor;
import android.graphics.Bitmap;
import android.graphics.BitmapFactory;
import android.graphics.Bitmap.Config;
import android.net.Uri;
import android.provider.MediaStore;
import android.util.Log;
import android.view.View;
import android.widget.Button;
import android.widget.ImageView;
import android.widget.TextView;
import java.io.FileNotFoundException;
import java.io.FileOutputStream;
import java.io.IOException;
import java.io.InputStream;
import java.text.DateFormat;
import java.text.SimpleDateFormat;
import java.util.Date;
public class MainActivity extends AppCompatActivity {

    // Used to load the 'native-lib' library on application startup.
    static {
        System.loadLibrary("native-lib");
        System.loadLibrary("opencv_world");
    }

    private static final int IMAGE = 1;
    private TextView processTime;
    private TextView bccvVersion;
    private ImageView imageView;
    private Button btnChooseImg;
    private Bitmap yourSelectedImage = null;

    private Process myjni = new Process();
    private Process res = new Process();
    private static final String TAG = "bccv";
    Bitmap bm;
    @Override
    protected void onCreate(Bundle savedInstanceState) {
        super.onCreate(savedInstanceState);
        setContentView(R.layout.activity_main);
        processTime = (TextView) findViewById(R.id.processTime);
        bccvVersion = (TextView) findViewById(R.id.bccvVersion);
        imageView = (ImageView) findViewById(R.id.imageView);

        btnChooseImg = (Button) findViewById(R.id.chooseImg);
        btnChooseImg.setOnClickListener(new View.OnClickListener() {
            @Override
            public void onClick(View v) {
                switch (v.getId()) {
                    case R.id.chooseImg: {
                        Intent intent = new Intent(Intent.ACTION_PICK, null);
                        intent.setDataAndType(MediaStore.Images.Media.EXTERNAL_CONTENT_URI,"image/*");
                        startActivityForResult(intent, 0x1);
                        break;
                    }
                }
            }
        });

        Button processImg = (Button) findViewById(R.id.processImg);
        processImg.setOnClickListener(new View.OnClickListener() {
            @Override
            public void onClick(View v) {
                switch (v.getId()) {
                    case R.id.processImg: {
                        imageView.setDrawingCacheEnabled(true);
                        //Bitmap bitmap = imageView.getDrawingCache();
                        int w = bm.getWidth();
                        int h = bm.getHeight();
                        int[] pix = new int[w * h];
                        bm.getPixels(pix, 0, w, 0, 0, w, h);
                        long start_time = System.currentTimeMillis();
                        /* call jni api */
                        myjni.api_method =7;
                        myjni.srcbuf = new int[w * h];
                        bm.getPixels(myjni.srcbuf, 0, w, 0, 0, w, h);
                        myjni.img_width = w;
                        myjni.img_height = h;
                        Log.e(TAG, "111111111111111111a:" + myjni.api_method + " w:" + w + " h:" + h);
                        //res = (Process)myjni.jniApiMethod(myjni);
                        res =(Process)com.example.imageproc.Process.jniApiMethod(myjni);
                        if (myjni.api_method == 0)
                        {
                            bccvVersion.setText(res.version);
                            break;
                        }
                        else
                        {
                            Bitmap bm = Bitmap.createBitmap(w, h, Bitmap.Config.ARGB_8888);
                            bm.setPixels(res.dstbuf, 0, w, 0, 0, w, h);
                            long end_time = System.currentTimeMillis();
                            long procss_time = end_time - start_time;

                            imageView.setImageBitmap(bm);
                            imageView.setDrawingCacheEnabled(false);
                            Log.e(TAG, "process time:" + procss_time);
                            processTime.setText("w:" + w + " h:" + h + " ProcessTime:" + procss_time + "ms");
                            bccvVersion.setText(res.version);
                            break;
                        }
                    }
                }
            }
        });
    }

    @Override
    protected void onActivityResult(int requestCode, int resultCode, Intent data) {
        super.onActivityResult(requestCode, resultCode, data);
        /* get image path */
        if (requestCode == IMAGE && resultCode == RESULT_OK && data != null) {
            Uri selectedImage = data.getData();
            String[] filePathColumns = {MediaStore.Images.Media.DATA};
            Cursor c = getContentResolver().query(selectedImage, filePathColumns, null, null, null);
            c.moveToFirst();
            int columnIndex = c.getColumnIndex(filePathColumns[0]);
            String imagePath = c.getString(columnIndex);
            showImage(imagePath);
            c.close();
        }
    }

    /* load image */
    private void showImage(String imaePath){
        bm = BitmapFactory.decodeFile(imaePath);
        ((ImageView)findViewById(R.id.imageView)).setImageBitmap(bm);
    }
}
最终运行效果图如下:
备注:第一次接触Android平台,都是各种baidu完成的,很多Java上的术语不知道怎么说,只能以记流水的形式记录下整个实现过程,以备后期参考,各位看官勿喷。
感谢以下小伙伴的精华帖,