本篇主要讲述利用MTCNN的预训练模型得到原图中人脸的分割,代码如下:https://github.com/davidsandberg/facenet
结合博客https://blog.csdn.net/FortiLZ/article/details/81396566?tdsourcetag=s_pctim_aiomsg看起来省力些
要是对MTCNN的训练过程感兴趣的,可以看https://www.cnblogs.com/helloworld0604/p/9808795.html
MTCNN原理
经过P,R,O三层网络,一层层检测,具体网络构建如下:
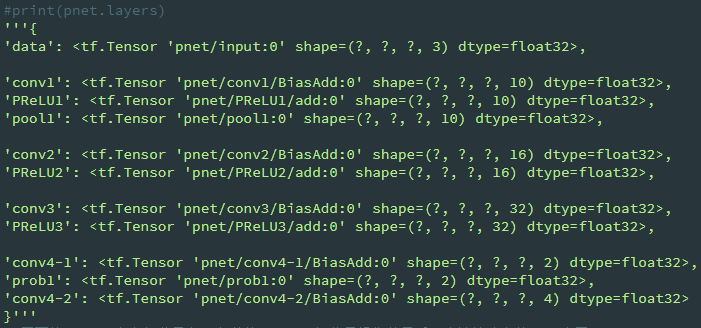
PNet


class PNet(Network):
    def setup(self):
        (self.feed('data') #pylint: disable=no-value-for-parameter, no-member
             .conv(3, 3, 10, 1, 1, padding='VALID', relu=False, name='conv1')
             .prelu(name='PReLU1')
             .max_pool(2, 2, 2, 2, name='pool1')
             .conv(3, 3, 16, 1, 1, padding='VALID', relu=False, name='conv2')
             .prelu(name='PReLU2')
             .conv(3, 3, 32, 1, 1, padding='VALID', relu=False, name='conv3')
             .prelu(name='PReLU3')
             .conv(1, 1, 2, 1, 1, relu=False, name='conv4-1')
             .softmax(3,name='prob1'))

        (self.feed('PReLU3') #pylint: disable=no-value-for-parameter
             .conv(1, 1, 4, 1, 1, relu=False, name='conv4-2'))
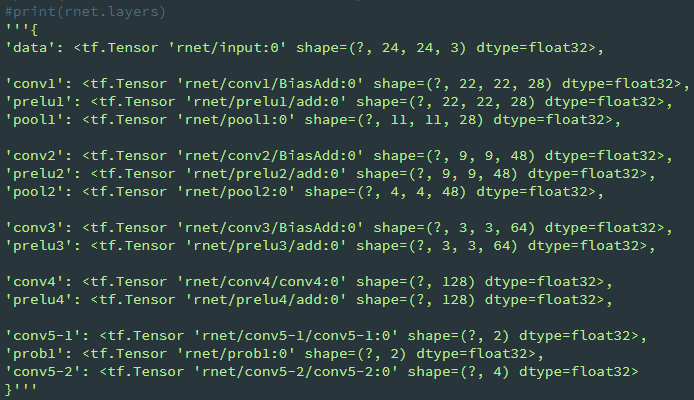
RNet
class RNet(Network):
    def setup(self):
        (self.feed('data') #pylint: disable=no-value-for-parameter, no-member
             .conv(3, 3, 28, 1, 1, padding='VALID', relu=False, name='conv1')
             .prelu(name='prelu1')
             .max_pool(3, 3, 2, 2, name='pool1')
             .conv(3, 3, 48, 1, 1, padding='VALID', relu=False, name='conv2')
             .prelu(name='prelu2')
             .max_pool(3, 3, 2, 2, padding='VALID', name='pool2')
             .conv(2, 2, 64, 1, 1, padding='VALID', relu=False, name='conv3')
             .prelu(name='prelu3')
             .fc(128, relu=False, name='conv4')
             .prelu(name='prelu4')
             .fc(2, relu=False, name='conv5-1')
             .softmax(1,name='prob1'))

        (self.feed('prelu4') #pylint: disable=no-value-for-parameter
             .fc(4, relu=False, name='conv5-2'))
ONet
class ONet(Network):
    def setup(self):
        (self.feed('data') #pylint: disable=no-value-for-parameter, no-member
             .conv(3, 3, 32, 1, 1, padding='VALID', relu=False, name='conv1')
             .prelu(name='prelu1')
             .max_pool(3, 3, 2, 2, name='pool1')
             .conv(3, 3, 64, 1, 1, padding='VALID', relu=False, name='conv2')
             .prelu(name='prelu2')
             .max_pool(3, 3, 2, 2, padding='VALID', name='pool2')
             .conv(3, 3, 64, 1, 1, padding='VALID', relu=False, name='conv3')
             .prelu(name='prelu3')
             .max_pool(2, 2, 2, 2, name='pool3')
             .conv(2, 2, 128, 1, 1, padding='VALID', relu=False, name='conv4')
             .prelu(name='prelu4')
             .fc(256, relu=False, name='conv5')
             .prelu(name='prelu5')
             .fc(2, relu=False, name='conv6-1')
             .softmax(1, name='prob1'))

        (self.feed('prelu5') #pylint: disable=no-value-for-parameter
             .fc(4, relu=False, name='conv6-2'))

        (self.feed('prelu5') #pylint: disable=no-value-for-parameter
             .fc(10, relu=False, name='conv6-3'))

配置运行环境
export PYTHONPATH=xx/xx/facenet/src #保证import facenet这句话不出错
参数选项
import argparse
def parse_arguments(argv):
    parser = argparse.ArgumentParser()

    parser.add_argument('input_dir', type=str, help='Directory with unaligned images.')      # 待检测的图片
    parser.add_argument('output_dir', type=str, help='Directory with aligned face thumbnails.')   #检测出的人脸图的保存目录
    parser.add_argument('--image_size', type=int, help='Image size (height, width) in pixels.', default=182)    #保存的人脸图大小
    parser.add_argument('--margin', type=int,
                        help='Margin for the crop around the bounding box (height, width) in pixels.', default=44)   #检测出人脸后的外围扩充
    parser.add_argument('--random_order',
                        help='Shuffles the order of images to enable alignment using multiple processes.', action='store_true')
    parser.add_argument('--gpu_memory_fraction', type=float,
                        help='Upper bound on the amount of GPU memory that will be used by the process.', default=1.0)
    parser.add_argument('--detect_multiple_faces', type=bool,
                        help='Detect and align multiple faces per image.', default=False)
    return parser.parse_args(argv)
检测核心代码:src/align/detect_face.py/detect_face函数
def detect_face(img, minsize, pnet, rnet, onet, threshold, factor):
    """Detects faces in an image, and returns bounding boxes and points for them.
    img: input image
    minsize: minimum faces' size   20
    pnet, rnet, onet: caffemodel
    threshold: threshold=[th1, th2, th3], th1-3 are three steps's threshold  [ 0.6, 0.7, 0.7 ]
    factor: the factor used to create a scaling pyramid of face(图像金字塔) sizes to detect in the image. 0.709
    """
    #print('img shape before detect:',img.shape)
    factor_count=0
    total_boxes=np.empty((0,9))
    points=np.empty(0)
    h=img.shape[0]
    w=img.shape[1]
    minl=np.amin([h, w])
    m=12.0/minsize
    minl=minl*m
    # create scale pyramid
    scales=[]
    while minl>=12:         #满足这个条件,即min(h,w)>=minsize
        scales += [m*np.power(factor, factor_count)]
        minl = minl*factor
        factor_count += 1

    #print('scales:',scales)  #若min(h,w)==250,则有8个scale,乘过(12/minsize)*250*factor^8<12可理解为250*factor^N<minsize,求N即可
   # first stage
    for scale in scales:
     #print('******scale:',scale)
        hs=int(np.ceil(h*scale))
        ws=int(np.ceil(w*scale))
        im_data = imresample(img, (hs, ws))
        im_data = (im_data-127.5)*0.0078125

        #print('im_data:',im_data.shape)
        img_x = np.expand_dims(im_data, 0)
        img_y = np.transpose(img_x, (0,2,1,3))
        #print('img_y (to the pnet):',img_y.shape)
        out = pnet(img_y)-----------------------------------------------------------------------第一层用PNet模型预测
        out0 = np.transpose(out[0], (0,2,1,3))
        out1 = np.transpose(out[1], (0,2,1,3))
        #print('out0 (after pnet):',out0.shape)
        #print("out0",out0[0,:2,:2,:])
        #from ipdb import set_trace;set_trace()
        boxes, _ = generateBoundingBox(out1[0,:,:,1].copy(), out0[0,:,:,:].copy(), scale, threshold[0])
     '''
     最终输出的 boundingbox 是形如 (x, 9),其中前4位是 block 在原图中的坐标,
     第5位是判定为人脸的概率,后4位是 boundingbox regression 的值。
     具体 boundingbox regression 到底是什么,现在还不清楚。
     '''

        # inter-scale nms
     '''
     NMS (Non-Maximum Suppression):在上述生成的 bb 中,找出判定为人脸概率最大的那个 bb,计算出这个 bb 的面积,
     然后计算其余 bb 与这个 bb 重叠面积的大小,用重叠面积除以:(Min) 两个 bb 中面积较小者;(Union) 两个 bb 的总和面积。
     如果这个值大于 threshold,那么就认为这两个 bb 框的是同一个地方,舍弃判定概率小的;
     如果小于 threshold,则认为两个 bb 框的是不同地方,保留判定概率小的。重复上述过程直至所有 bb 都遍历完成。
     将图片按照所有的 scale 处理过一遍后,会得到在原图上基于不同 scale 的所有的 bb,然后对这些 bb 再进行一次 NMS,并且这次 NMS 的 threshold 要提高。
     '''
        pick = nms(boxes.copy(), 0.5, 'Union')
        if boxes.size>0 and pick.size>0:
            boxes = boxes[pick,:]
            #print(boxes[:,2]-boxes[:,0])
            #print(boxes[:,3]-boxes[:,1])
            total_boxes = np.append(total_boxes, boxes, axis=0)

    #print('all scales has done!!!')
    numbox = total_boxes.shape[0]
    if numbox>0:
        pick = nms(total_boxes.copy(), 0.7, 'Union')
        total_boxes = total_boxes[pick,:]
        # 因为pnet的移动大小是12*12,对于一种scale,regw和regh是差不多的
        # 校准bb,得到了真真正正的在原图上 bb 的坐标
        regw = total_boxes[:,2]-total_boxes[:,0]
        regh = total_boxes[:,3]-total_boxes[:,1]
        qq1 = total_boxes[:,0]+total_boxes[:,5]*regw
        qq2 = total_boxes[:,1]+total_boxes[:,6]*regh
        qq3 = total_boxes[:,2]+total_boxes[:,7]*regw
        qq4 = total_boxes[:,3]+total_boxes[:,8]*regh
        total_boxes = np.transpose(np.vstack([qq1, qq2, qq3, qq4, total_boxes[:,4]]))
        total_boxes = rerec(total_boxes.copy())  #调整成正方形
        total_boxes[:,0:4] = np.fix(total_boxes[:,0:4]).astype(np.int32)
        dy, edy, dx, edx, y, ey, x, ex, tmpw, tmph = pad(total_boxes.copy(), w, h)  #把超过原图边界的坐标剪裁一下
        # print(dy[0], edy[0], dx[0], edx[0], y[0], ey[0], x[0], ex[0], tmpw[0], tmph[0])
        # (1, 76, 1, 76, 85, 160, 189, 264, 76, 76)

    #print("***********  second stage  **************")
    numbox = total_boxes.shape[0]   #45
    if numbox>0:
        # second stage
        tempimg = np.zeros((24,24,3,numbox))
        for k in range(0,numbox):
            tmp = np.zeros((int(tmph[k]),int(tmpw[k]),3))
            #tmp生成的图片是高*宽的,rnet的输入要求是宽*高,别忘记转置
            tmp[dy[k]-1:edy[k],dx[k]-1:edx[k],:] = img[y[k]-1:ey[k],x[k]-1:ex[k],:]
            if tmp.shape[0]>0 and tmp.shape[1]>0 or tmp.shape[0]==0 and tmp.shape[1]==0:
                tempimg[:,:,:,k] = imresample(tmp, (24, 24))
            else:
                return np.empty()
        tempimg = (tempimg-127.5)*0.0078125
        #print('temping:',tempimg.shape)  #(24, 24, 3, 45)
        tempimg1 = np.transpose(tempimg, (3,1,0,2))
        #print('before rnet:',tempimg1.shape)  #(45, 24, 24, 3)
        out = rnet(tempimg1)----------------------------------------------------------------第二层用RNet
        out0 = np.transpose(out[0])  #(4,45)
        out1 = np.transpose(out[1])  #(2,45)
        score = out1[1,:]
        ipass = np.where(score>threshold[1])
        #print("ipass:",ipass[0].shape)#(8,)
        total_boxes = np.hstack([total_boxes[ipass[0],0:4].copy(), np.expand_dims(score[ipass].copy(),1)])   #(8,5)
        mv = out0[:,ipass[0]]    #再根据rnet预测出的回归校准bb
        if total_boxes.shape[0]>0:
            pick = nms(total_boxes, 0.7, 'Union')
            total_boxes = total_boxes[pick,:]
            #print('total_boxes:',total_boxes.shape) #(5,5)
            total_boxes = bbreg(total_boxes.copy(), np.transpose(mv[:,pick]))
            total_boxes = rerec(total_boxes.copy())

    #print("***********  third stage  **************")
    numbox = total_boxes.shape[0]  # 5
    if numbox>0:
        # third stage
        total_boxes = np.fix(total_boxes).astype(np.int32)
        dy, edy, dx, edx, y, ey, x, ex, tmpw, tmph = pad(total_boxes.copy(), w, h)
        tempimg = np.zeros((48,48,3,numbox))
        for k in range(0,numbox):
            tmp = np.zeros((int(tmph[k]),int(tmpw[k]),3))
            tmp[dy[k]-1:edy[k],dx[k]-1:edx[k],:] = img[y[k]-1:ey[k],x[k]-1:ex[k],:]
            if tmp.shape[0]>0 and tmp.shape[1]>0 or tmp.shape[0]==0 and tmp.shape[1]==0:
                tempimg[:,:,:,k] = imresample(tmp, (48, 48))
            else:
                return np.empty()
        tempimg = (tempimg-127.5)*0.0078125   #(48, 48, 3, 5)
        tempimg1 = np.transpose(tempimg, (3,1,0,2))
        out = onet(tempimg1)-------------------------------------------------------------------第三层用ONet
        out0 = np.transpose(out[0])   #(4,5)
        out1 = np.transpose(out[1])   #(10,5)
        out2 = np.transpose(out[2])   #(2,5)
        score = out2[1,:]
        points = out1
        ipass = np.where(score>threshold[2])
        points = points[:,ipass[0]]
        #print("ipass:",ipass[0].shape)#(5,)
        total_boxes = np.hstack([total_boxes[ipass[0],0:4].copy(), np.expand_dims(score[ipass].copy(),1)])
        mv = out0[:,ipass[0]]

        w = total_boxes[:,2]-total_boxes[:,0]+1
        h = total_boxes[:,3]-total_boxes[:,1]+1
        points[0:5,:] = np.tile(w,(5, 1))*points[0:5,:] + np.tile(total_boxes[:,0],(5, 1))-1
        points[5:10,:] = np.tile(h,(5, 1))*points[5:10,:] + np.tile(total_boxes[:,1],(5, 1))-1
        if total_boxes.shape[0]>0:                       #最后一个阶段是先校准再nms,且采用‘min’的方式
            total_boxes = bbreg(total_boxes.copy(), np.transpose(mv))
            pick = nms(total_boxes.copy(), 0.7, 'Min')
            total_boxes = total_boxes[pick,:]
            points = points[:,pick]
            #print('total_boxes:',total_boxes.shape) #(1,5)

    return total_boxes, points
generateBoundingBox(imap, reg, scale, t)
def generateBoundingBox(imap, reg, scale, t):
    # use heatmap to generate bounding boxes
    #print("generateBoundingBox-scale:",scale)
    stride=2
    cellsize=12

    imap = np.transpose(imap)
    dx1 = np.transpose(reg[:,:,0])
    dy1 = np.transpose(reg[:,:,1])
    dx2 = np.transpose(reg[:,:,2])
    dy2 = np.transpose(reg[:,:,3])
    y, x = np.where(imap >= t)   #返回的是另外两维的序号
    #print("y:",y.shape)    # (H,)
    if y.shape[0]==1:            #只有一个概率>threshold的block
        dx1 = np.flipud(dx1)     #上下翻转
        dy1 = np.flipud(dy1)
        dx2 = np.flipud(dx2)
        dy2 = np.flipud(dy2)
    score = imap[(y,x)]          #取可能是人脸的block的概率值
    reg = np.transpose(np.vstack([ dx1[(y,x)], dy1[(y,x)], dx2[(y,x)], dy2[(y,x)] ]))
    #print("reg:",reg.shape) #(H,4)
    if reg.size==0:
        reg = np.empty((0,3))
    bb = np.transpose(np.vstack([y,x]))
    #print("bb:",bb.shape)  #(H,2)
    # 计算原图中的位置
    q1 = np.fix((stride*bb+1)/scale)  #np.fix():Round to nearest integer towards zero.
    q2 = np.fix((stride*bb+cellsize-1+1)/scale)
    boundingbox = np.hstack([q1, q2, np.expand_dims(score,1), reg])   #(H,2)+(H,2)+(H,1)+(H,4)
    #print("boundingbox:",boundingbox.shape)  #(H,9)
    #print(boundingbox[1,:])
    #array([  8.50000000e+01,   1.05000000e+02,   1.03000000e+02,  1.23000000e+02,   6.87459767e-01,  -1.91520154e-02, -7.52890855e-03,  -7.97504187e-03,   2.32149601e-01])
    return boundingbox, reg
nms(boxes, threshold, method)
def nms(boxes, threshold, method):
    if boxes.size==0:
        return np.empty((0,3))
    x1 = boxes[:,0]
    y1 = boxes[:,1]
    x2 = boxes[:,2]
    y2 = boxes[:,3]
    s = boxes[:,4]
    area = (x2-x1+1) * (y2-y1+1)
    I = np.argsort(s)   #返回排序后的索引
    pick = np.zeros_like(s, dtype=np.int16)
    counter = 0
    while I.size>0:
        i = I[-1]
        pick[counter] = i
        counter += 1
        idx = I[0:-1]
        xx1 = np.maximum(x1[i], x1[idx])
        yy1 = np.maximum(y1[i], y1[idx])
        xx2 = np.minimum(x2[i], x2[idx])
        yy2 = np.minimum(y2[i], y2[idx])
        w = np.maximum(0.0, xx2-xx1+1)
        h = np.maximum(0.0, yy2-yy1+1)
        inter = w * h     # 相交面积
        if method is 'Min':
            o = inter / np.minimum(area[i], area[idx])
        else:
            o = inter / (area[i] + area[idx] - inter)
        I = I[np.where(o<=threshold)]
    pick = pick[0:counter]   #保留下来的box的序号
    return pick
得到人脸框坐标和关键点坐标之后,即可以将其裁剪和描绘出来了,可自行学习align_dataset_mtcnn.py中的实现
疑惑
自己看的过程中,最为困惑的点就是网络是如何训练的,训练样本是什么样子的,解答都在https://www.cnblogs.com/helloworld0604/p/9808795.html中