优化必须先搞清楚什么是渲染管线
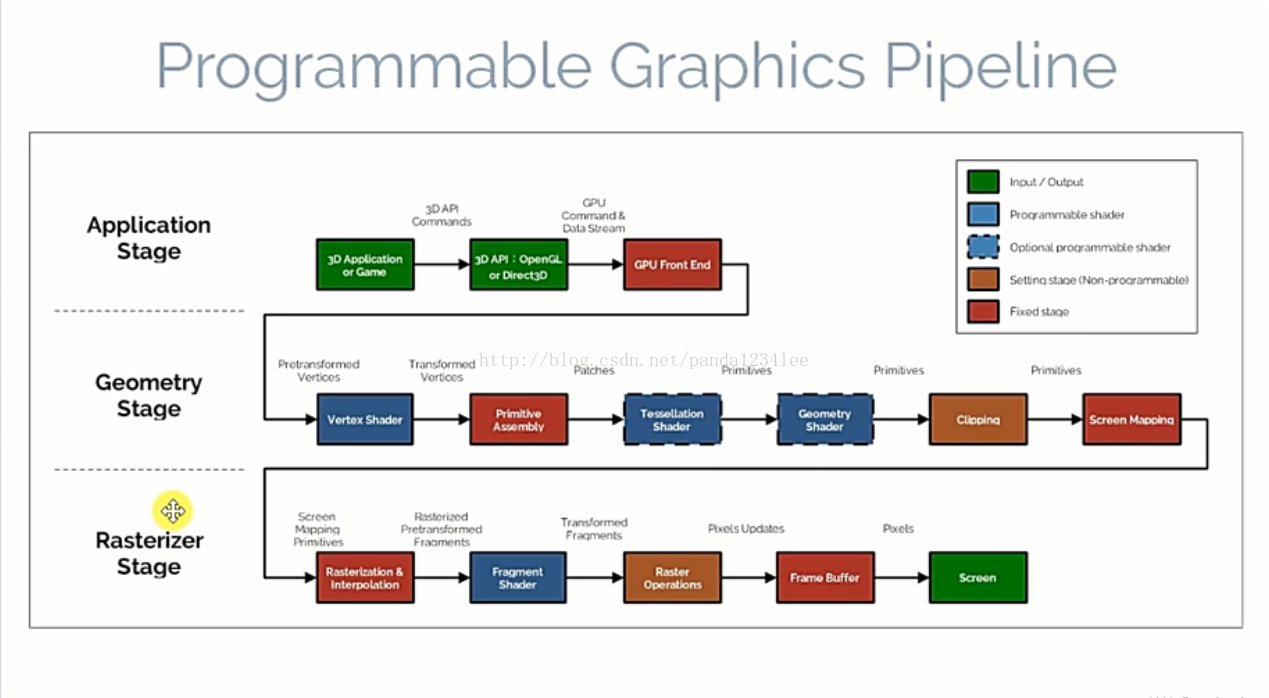
应用程序阶段:主要是CPU与内存打交道,例如碰撞检测,计算好的数据(顶点坐标、法向量、纹理坐标、纹理)就会通过数据总线传给图形硬件 。
几何阶段:其实上图有个问题(网上不少博客也没写清楚这个问题),根据 OpenGL 蓝宝书(Super Bible)上的讲解,“几何图元装配”应该位于“细分着色器”阶段之后(细分着色器处理的还是一个个 Patch),然后再进入“几何着色器”(因为几何着色器处理的基础就是一整个图元)生成新的图元,在该阶段的最后,就是我们熟悉的MVP变换视锥体裁剪操作了。

光栅化阶段:进入光栅化器进行光栅化(还包括剪刀测试、深度测试、模板测试),最后输出到屏幕的 framebuffer 中。
编写shader时的一些建议
转自:http://www.cnblogs.com/sifenkesi/p/4716791.html1、只计算需要计算的东西
2、尽量在 VS 总计算
通常,需要渲染的像素比顶点数多,而顶点数又比物体数多很多。所以如果可以,尽量将运算从 FS 移到 VS,或直接通过 script 来设置某些固定值;
3、指令优化【Unity】
在使用Surface Shader时,可以通过一些指令让shader优化很多。
(1) approxview 对于使用了 view direction 的shader,该选项会让 view dir 的 normalize 操作 per-vertex 进行,而不是 per-pixel。这个优化通常效果明显。
(2) halfasview 可以让Specular shader变得快一些,使用一个介于光照方向和观察方向之间的 half vector 来代替真正的观察方向 viewDir 来计算光照函数。
(3) noforwardadd Forward Rende r时,完全只支持一盏方向光的 per-pixel 渲染,其余的光照全部按照 per-vertex 或 SH 渲染。这样可以确保shader在一个pass里渲染完成。
(4) noambient 禁掉 ambient lighting 和 SH lighting,可以让 shader 快一点儿。
4、浮点数精度相关:
float:最高精度,通常32位half:中等精度,通常16位,-60000到60000,
fixed:最低精度,通常11位,-2.0到2.0,1/256的精度。
尽量使用低精度。对于 color 和 unit length vectors,使用fixed,其他情况,根据取值范围尽量使用 half,实在不够则使用 float 。
在移动平台,关键是在 FS 中尽可能多的使用低精度数据。另外,对于多数移动GPU,在低精度和高精度之间转换是非常耗的,在fixed上做swizzle操作也是很费事的。
5、Alpha Test
Alpha test 和 clip() 函数,在不同平台有不同的性能开销。通常使用它来剔除那些完全透明的像素。
但是,在 iOS 和一些 Android 上使用的 PowerVR GPUs上面,alpha test非常的昂贵。
6、Color Mask
在移动设备上,Color Mask 也是非常昂贵的,所以尽量别使用它,除非真的是需要。
shader中用for,if等条件语句为什么会使得帧率降低很多?
作者:空明流转链接:https://www.zhihu.com/question/27084107/answer/39281771
来源:知乎
著作权归作者所有,转载请联系作者获得授权。
1. For和If不一定意味着动态分支
在GPU上的分支语句(for,if-else,while),可以分为三类。Branch的Condition仅依赖编译期常数
此时编译器可以直接摊平分支,或者展开(unloop)。对于For来说,会有个权衡,如果For的次数特别多,或者body内的代码特别长,可能就不展开了,因为会指令装载也是有限或者有耗费的
额外成本可以忽略不计
Branch的Condition仅依赖编译期常数和Uniform变量
一个运行期固定的跳转语句,可预测
同一个Warp内所有micro thread均执行相同分支
额外成本很低
Branch 的 Condition 是动态的表达式
这才是真正的“动态分支”
会存在一个Warp的 Micro Thread 之间各自需要走不同分支的问题
2. 跳转本身的成本非常低
随着IP/EP(Instruction Pointer/Execution Pointer)的引入,现代GPU在执行指令上的行为,和CPU没什么两样。跳转仅仅是重新设置一个寄存器。3.Micro Thread 走不同分支时的处理
GPU本身的执行速度快,是因为它一条指令可以处理多个 Micro Thread 的数据(SIMD)。但是这需要多个 Micro Thread 同一时刻的指令是相同的。如果不同,现代GPU通常的处理方法是,按照每个Micro Thread的不同需求多次执行分支。
x = tex.Load();
if(x == 5)
{
    // Thread 1 & 2 使用这个路径
   out.Color = float4(1, 1, 1, 1);
}
else
{
    // Thread 3 & 4 使用这个路径
   out.Color = float4(0, 0, 0, 0);
}
比如在上例中,两个分支的语句Shader Unit都会执行,只是不同的是如果在执行if分支,那么计算结果将不会写入到thread 3 和 4的存储中(无副作用)。
这样做就相当于运算量增加了不少,这是动态分支的主要成本。
但是如果所有的线程,都走的是同一分支,那么另外一个分支就不用走了。这个时候Shader Unit也不会去傻逼一样的执行另外一个根本不需要执行的分支。此时性能的损失也不多。并且,在实际的Shader中,除非特殊情况,大部分Warp内的线程,即便在动态分支的情况下,也多半走的是同一分支。
4. 动态分支和代码优化难度有相关性
这一点经常被忽视,就是有动态分支的代码,因为没准你要读写点什么,前后还可能有依赖,往往也难以被优化。比如说你非要闹这样的语句出来:if(x == 1)
{
color = tex1.Load(coord);
}
else if(x == 2)
{
color = tex2.Load(coord);
}
...你说编译器怎么给你优化。
说句题外话,为啥要有TextureArray呢?也是为了这个场合。TextureArray除了纹理不一样,无论格式、大小、坐标、LoD、偏移,都可以是相同的。这样甚至可以预见不同Texture Surface上取数据的内存延迟也是非常接近的。这样有很多的操作都可以合并成SIMD,就比多个Texture分别来取快得多了。这就是一个通过增加了约束(纹理格式、大小、寻址坐标)把SISD优化成SIMD的例子。
定位渲染通道瓶颈的方法
转自:http://blog.csdn.net/rabbit729/article/details/6398343一般来说, 定位渲染通道瓶颈的方法就是改变渲染通道每个步骤的工作量, 如果吞吐量也改变了, 那个步骤就是瓶颈.。找到了瓶颈就要想办法消除瓶颈, 可以减少该步骤的工作量, 增加其他步骤的工作量。
一般在光栅化之前的瓶颈称作”transform bound”, 三角形设置处理后的瓶颈称作”fill bound”
定位瓶颈的办法:
1. 改变帧缓冲或者渲染目标(Render Target)的颜色深度(16 到 32 位), 如果帧速改变了, 那么瓶颈应该在帧缓冲(RenderTarget)的填充率上。
2. 否则试试改变贴图大小和贴图过滤设置, 如果帧速变了,那么瓶颈应该是在贴图这里。
3. 否则改变分辨率.如果帧速改变了, 那么改变一下pixel shader的指令数量, 如果帧速变了, 那么瓶颈应该就是pixel shader. 否则瓶颈就在光栅化过程中。
4. 否则, 改变顶点格式的大小, 如果帧速改变了, 那么瓶颈应该在显卡带宽上。
5. 如果以上都不是, 那么瓶颈就在CPU这一边。
Best Practices for Shaders
Compile and Link Shaders During Initialization
Creating a shader program is an expensive operation compared to other OpenGL ES state changes. Compile, link, and validate your programs when your app is initialized. Once you’ve created all your shaders, the app can efficiently switch between them by calling glUseProgram.
Check for Shader Program Errors When Debugging
Reading diagnostic information after compiling or linking a shader program is not necessary in a Release build of your app and can reduce performance. Use OpenGL ES functions to read shader compile or link logs only in development builds of your app, as shown in Listing 10-1.Listing 10-1 Read shader compile/link logs only in development builds
// After calling glCompileShader, glLinkProgram, or similar

#ifdef DEBUG
// Check the status of the compile/link
glGetProgramiv(prog, GL_INFO_LOG_LENGTH, &logLen);
if(logLen > 0) {
// Show any errors as appropriate
glGetProgramInfoLog(prog, logLen, &logLen, log);
fprintf(stderr, “Prog Info Log: %s\n”, log);
}
#endif
Similarly, you should call the glValidateProgram function only in development builds. You can use this function to find development errors such as failing to bind all texture units required by a shader program. But because validating a program checks it against the entire OpenGL ES context state, it is an expensive operation. Since the results of program validation are only meaningful during development, you should not call this function in Release builds of your app.
Use Separate Shader Objects to Speed Compilation and Linking
OpenGL ES 2.0 and 3.0 contexts on iOS support the EXT_separate_shader_objects extension. You can use the functions provided by this extension to compile vertex and fragment shaders separately, and to mix and match precompiled shader stages at render time using program pipeline objects. Additionally, this extension provides a simplified interface for compiling and using shaders, shown in Listing 10-2.
- (void)loadShaders
{
const GLchar *vertexSourceText = " ... vertex shader GLSL source code ... ";
const GLchar *fragmentSourceText = " ... fragment shader GLSL source code ... ";

// Compile and link the separate vertex shader program, then read its uniform variable locations
_vertexProgram = glCreateShaderProgramvEXT(GL_VERTEX_SHADER, 1, &vertexSourceText);
_uniformModelViewProjectionMatrix = glGetUniformLocation(_vertexProgram, "modelViewProjectionMatrix");
_uniformNormalMatrix = glGetUniformLocation(_vertexProgram, "normalMatrix");

// Compile and link the separate fragment shader program (which uses no uniform variables)
_fragmentProgram = glCreateShaderProgramvEXT(GL_FRAGMENT_SHADER, 1, &fragmentSourceText);

// Construct a program pipeline object and configure it to use the shaders
glGenProgramPipelinesEXT(1, &_ppo);
glBindProgramPipelineEXT(_ppo);
glUseProgramStagesEXT(_ppo, GL_VERTEX_SHADER_BIT_EXT, _vertexProgram);
glUseProgramStagesEXT(_ppo, GL_FRAGMENT_SHADER_BIT_EXT, _fragmentProgram);
}

- (void)glkView:(GLKView *)view drawInRect:(CGRect)rect
{
// Clear the framebuffer
glClearColor(0.65f, 0.65f, 0.65f, 1.0f);
glClear(GL_COLOR_BUFFER_BIT | GL_DEPTH_BUFFER_BIT);

// Use the previously constructed program pipeline and set uniform contents in shader programs
glBindProgramPipelineEXT(_ppo);
glProgramUniformMatrix4fvEXT(_vertexProgram, _uniformModelViewProjectionMatrix, 1, 0, _modelViewProjectionMatrix.m);
glProgramUniformMatrix3fvEXT(_vertexProgram, _uniformNormalMatrix, 1, 0, _normalMatrix.m);

// Bind a VAO and render its contents
glBindVertexArrayOES(_vertexArray);
glDrawElements(GL_TRIANGLE_STRIP, _indexCount, GL_UNSIGNED_SHORT, 0);
}
Respect the Hardware Limits on Shaders
Use Precision Hints
Precision hints were added to the GLSL ES language specification to address the need for compact shader variables that match the smaller hardware limits of embedded devices. Each shader must specify a default precision; individual shader variables may override this precision to provide hints to the compiler on how that variable is used in your app. An OpenGL ES implementation is not required to use the hint information, but may do so to generate more efficient shaders. The GLSL ES specification lists the range and precision for each hint.
Important: The range limits defined by the precision hints are not enforced. You cannot assume your data is clamped to this range.
Follow these guidelines:
When in doubt, default to high precision.
Colors in the 0.0 to 1.0 range can usually be represented using low precision variables.
Position data should usually be stored as high precision.
Normals and vectors used in lighting calculations can usually be stored as medium precision.
After reducing precision, retest your app to ensure that the results are what you expect.
For example:
precision highp float; // Defines precision for float and float-derived (vector/matrix) types.
uniform lowp sampler2D sampler; // Texture2D() result is lowp.
varying lowp vec4 color;
varying vec2 texCoord;   // Uses default highp precision.

void main()
{
    gl_FragColor = color * texture2D(sampler, texCoord);
}
Perform Vector Calculations Lazily
Not all graphics processors include vector processors; they may perform vector calculations on a scalar processor. When performing calculations in your shader, consider the order of operations to ensure that the calculations are performed efficiently even if they are performed on a scalar processor.
If the code in Listing 10-4 were executed on a vector processor, each multiplication would be executed in parallel across all four of the vector’s components. However, because of the location of the parenthesis, the same operation on a scalar processor would take eight multiplications, even though two of the three parameters are scalar values.
Listing 10-4 Poor use of vector operators
highp float f0, f1;
highp vec4 v0, v1;
v0 = (v1 * f0) * f1;
The same calculation can be performed more efficiently by shifting the parentheses as shown in Listing 10-5. In this example, the scalar values are multiplied together first, and the result multiplied against the vector parameter; the entire operation can be calculated with five multiplications.
Listing 10-5 Proper use of vector operations
highp float f0, f1;
highp vec4 v0, v1;
v0 = v1 * (f0 * f1);
Similarly, your app should always specify a write mask for a vector operation if it does not use all of the components of the result. On a scalar processor, calculations for components not specified in the mask can be skipped. Listing 10-6 runs twice as fast on a scalar processor because it specifies that only two components are needed.
Listing 10-6 Specifying a write mask
highp vec4 v0;
highp vec4 v1;
highp vec4 v2;
v2.xz = v0 * v1;
Use Uniforms or Constants Instead of Computing Values in a Shader
Whenever a value can be calculated outside the shader, pass it into the shader as a uniform or a constant. Recalculating dynamic values can potentially be very expensive in a shader.
Use Branching Instructions with Caution
Branches are discouraged in shaders, as they can reduce the ability to execute operations in parallel on 3D graphics processors (although this performance cost is reduced on OpenGL ES 3.0–capable devices).Your app may perform best if you avoid branching entirely. For example, instead of creating a large shader with many conditional options, create smaller shaders specialized for specific rendering tasks. There is a tradeoff between reducing the number of branches in your shaders and increasing the number of shaders you create. Test different options and choose the fastest solution.
If your shaders must use branches, follow these recommendations:
Best performance: Branch on a constant known when the shader is compiled.
Acceptable: Branch on a uniform variable.
Potentially slow: Branch on a value computed inside the shader.
Eliminate Loops
You can eliminate many loops by either unrolling the loop or using vectors to perform operations. For example, this code is very inefficient:int i;
float f;
vec4 v;
for(i = 0; i < 4; i++)
v[i] += f;
The same operation can be done directly using a component-wise add:
float f;
vec4 v;
v += f;
When you cannot eliminate a loop, it is preferred that the loop have a constant limit to avoid dynamic branches.
Avoid Computing Array Indices in Shaders
Using indices computed in the shader is more expensive than a constant or uniform array index. Accessing uniform arrays is usually cheaper than accessing temporary arrays.Be Aware of Dynamic Texture Lookups
Dynamic texture lookups, also known as dependent texture reads, occur when a fragment shader computes texture coordinates rather than using the unmodified texture coordinates passed into the shader. Dependent texture reads are supported at no performance cost on OpenGL ES 3.0–capable hardware; on other devices, dependent texture reads can delay loading of texel data, reducing performance. When a shader has no dependent texture reads, the graphics hardware may prefetch texel data before the shader executes, hiding some of the latency of accessing memory.Listing 10-7 shows a fragment shader that calculates new texture coordinates. The calculation in this example can easily be performed in the vertex shader, instead. By moving the calculation to the vertex shader and directly using the vertex shader’s computed texture coordinates, you avoid the dependent texture read.
Note: It may not seem obvious, but any calculation on the texture coordinates counts as a dependent texture read. For example, packing multiple sets of texture coordinates into a single varying parameter and using a swizzle command to extract the coordinates still causes a dependent texture read.
Listing 10-7 Dependent Texture Read
varying vec2 vTexCoord;
uniform sampler2D textureSampler;

void main()
{
vec2 modifiedTexCoord = vec2(1.0 - vTexCoord.x, 1.0 - vTexCoord.y);
gl_FragColor = texture2D(textureSampler, modifiedTexCoord);
}
Fetch Framebuffer Data for Programmable Blending
Traditional OpenGL and OpenGL ES implementations provide a fixed-function blending stage, illustrated in Figure 10-1. Before issuing a draw call, you specify a blending operation from a fixed set of possible parameters. After your fragment shader outputs color data for a pixel, the OpenGL ES blending stage reads color data for the corresponding pixel in the destination framebuffer, then combines the two according to the specified blending operation to produce an output color.
Figure 10-1 Traditional fixed-function blending

In iOS 6.0 and later, you can use the EXT_shader_framebuffer_fetch extension to implement programmable blending and other effects. Instead of supplying a source color to be blended by OpenGL ES, your fragment shader reads the contents of the destination framebuffer corresponding to the fragment being processed. Your fragment shader can then use whatever algorithm you choose to produce an output color, as shown in Figure 10-2.
Figure 10-2 Programmable blending with framebuffer fetch

This extension enables many advanced rendering techniques:
Additional blending modes. By defining your own GLSL ES functions for combining source and destination colors, you can implement blending modes not possible with the OpenGL ES fixed-function blending stage. For example, Listing 10-8 implements the Overlay and Difference blending modes found in popular graphics software.
Post-processing effects. After rendering a scene, you can draw a full-screen quad using a fragment shader that reads the current fragment color and transforms it to produce an output color. The shader in Listing 10-9 can be used with this technique to convert a scene to grayscale.
Non-color fragment operations. Framebuffers may contain non-color data. For example, deferred shading algorithms use multiple render targets to store depth and normal information. Your fragment shader can read such data from one (or more) render targets and use them to produce an output color in another render target.
These effects are possible without the framebuffer fetch extension—for example, grayscale conversion can be done by rendering a scene into a texture, then drawing a full-screen quad using that texture and a fragment shader that converts texel colors to grayscale. However, using this extension generally results in better performance.
To enable this feature, your fragment shader must declare that it requires the EXT_shader_framebuffer_fetch extension, as shown in Listing 10-8 and Listing 10-9. The shader code to implement this feature differs between versions of the OpenGL ES Shading Language (GLSL ES).
Using Framebuffer Fetch in GLSL ES 1.0
For OpenGL ES 2.0 contexts and OpenGL ES 3.0 contexts not using #version 300 es shaders, you use the gl_FragColor builtin variable for fragment shader output and the gl_LastFragData builtin variable to read framebuffer data, as illustrated in Listing 10-8.Listing 10-8 Fragment shader for programmable blending in GLSL ES 1.0
#extension GL_EXT_shader_framebuffer_fetch : require

#define kBlendModeDifference 1
#define kBlendModeOverlay    2
#define BlendOverlay(a, b) ( (b<0.5) ? (2.0*b*a) : (1.0-2.0*(1.0-a)*(1.0-b)) )

uniform int blendMode;
varying lowp vec4 sourceColor;

void main()
{
    lowp vec4 destColor = gl_LastFragData[0];
    if (blendMode == kBlendModeDifference) {
        gl_FragColor = abs( destColor - sourceColor );
    } else if (blendMode == kBlendModeOverlay) {
        gl_FragColor.r = BlendOverlay(sourceColor.r, destColor.r);
        gl_FragColor.g = BlendOverlay(sourceColor.g, destColor.g);
        gl_FragColor.b = BlendOverlay(sourceColor.b, destColor.b);
        gl_FragColor.a = sourceColor.a;
    } else { // normal blending
        gl_FragColor = sourceColor;
    }
}
Using Framebuffer Fetch in GLSL ES 3.0
In GLSL ES 3.0, you use user-defined variables declared with the out qualifier for fragment shader outputs. If you declare a fragment shader output variable with the inout qualifier, it will contain framebuffer data when the fragment shader executes. Listing 10-9 illustrates a grayscale post-processing technique using an inout variable.Listing 10-9 Fragment shader for color post-processing in GLSL ES 3.0
#version 300 es
#extension GL_EXT_shader_framebuffer_fetch : require

layout(location = 0) inout lowp vec4 destColor;

void main()
{
    lowp float luminance = dot(vec3(0.3, 0.59, 0.11), destColor.rgb);
    destColor.rgb = vec3(luminance);
}
Use Textures for Larger Memory Buffers in Vertex Shaders
In iOS 7.0 and later, vertex shaders can read from currently bound texture units. Using this technique you can access much larger memory buffers during vertex processing, enabling high performance for some advanced rendering techniques. For example:
① Displacement mapping. Draw a mesh with default vertex positions, then read from a texture in the vertex shader to alter the position of each vertex. Listing 10-10 demonstrates using this technique to generate three-dimensional geometry from a grayscale height map texture.
② Instanced drawing. As described in Use Instanced Drawing to Minimize Draw Calls, instanced drawing can dramatically reduce CPU overhead when rendering a scene that contains many similar objects. However, providing per-instance information to the vertex shader can be a challenge. A texture can store extensive information for many instances. For example, you could render a vast cityscape by drawing hundreds of instances from vertex data describing only a simple cube. For each instance, the vertex shader could use the gl_InstanceID variable to sample from a texture, obtaining a transformation matrix, color variation, texture coordinate offset, and height variation to apply to each building.
Listing 10-10 Vertex shader for rendering from a height map
attribute vec2 xzPos;

uniform mat4 modelViewProjectionMatrix;
uniform sampler2D heightMap;

void main()
{
// Use the vertex X and Z values to look up a Y value in the texture.
vec4 position = texture2D(heightMap, xzPos);
// Put the X and Z values into their places in the position vector.
position.xz = xzPos;

// Transform the position vector from model to clip space.
gl_Position = modelViewProjectionMatrix * position;
}
You can also use uniform arrays and uniform buffer objects (in OpenGL ES 3.0) to provide bulk data to a vertex shader, but vertex texture access offers several potential advantages. You can store much more data in a texture than in either a uniform array or uniform buffer object, and you can use texture wrapping and filtering options to interpolate the data stored in a texture. Additionally, you can render to a texture, taking advantage of the GPU to produce data for use in a later vertex processing stage.
To determine whether vertex texture sampling is available on a device (and the number of texture units available to vertex shaders), check the value of the MAX_VERTEX_TEXTURE_IMAGE_UNITS limit at run time. (See Verifying OpenGL ES Capabilities.)
其他优化资料:GPU 优化总结