1、创建应用:
到极光开发平台注册并获取应用的AppKey;
2、推送设置:
上传APNs证书(包括开发证书和生产证书 --- .p12文件)
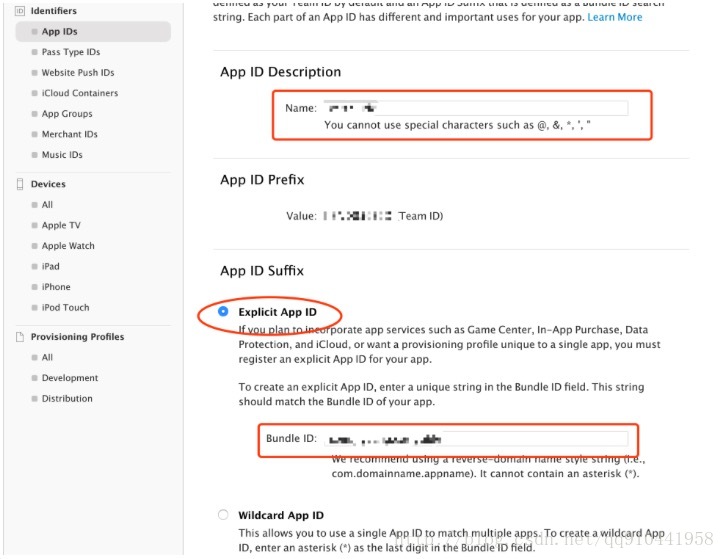
①从开发者账户页面左侧入口进入“Certificates, IDs & Profiles” 页面
②点击左侧Identifiers --- App IDs创建 App ID,填写 App ID 的 NAME 和 Bundle ID(如果 ID 已经存在可以直接跳过此步骤)
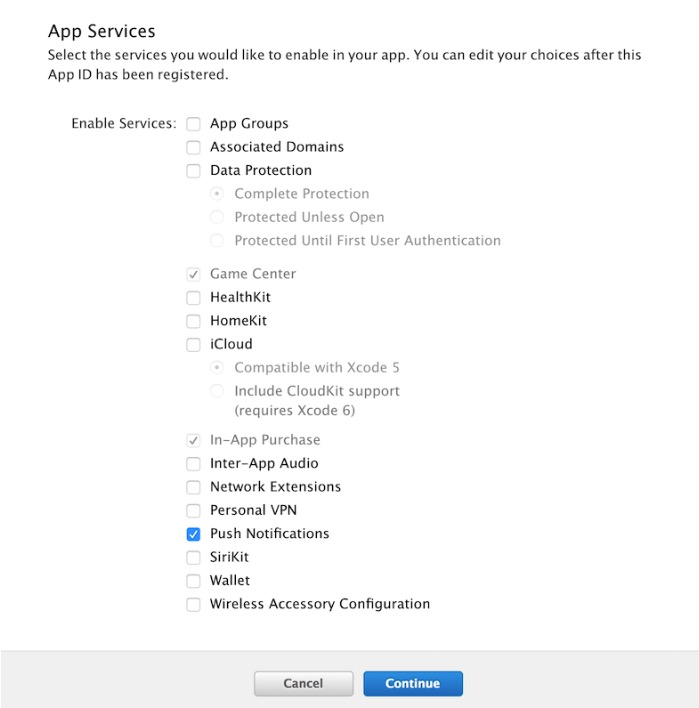
③选中App Services --- Push Notification , continue.
④添加证书

- 点击 “Continue”,会进入 CSR 说明界面。

- 再点 “Continue” 会让你上传 CSR 文件。( CSR 文件会在下一步创建)

- 打开系统自带的 KeychainAccess 创建 Certificate Signing Request。如下图操作:

- 填写“用户邮箱”和“常用名称” ,并选择“存储到磁盘”,证书文件后缀为 .certSigningRequest 。

- 回到浏览器中 CSR 上传页面,上传刚刚生成的后缀为 .certSigningRequest 的文件。
- 生成证书成功后,点击 “Download” 按钮把证书下载下来,是后缀为 .cer 的文件。

- 双击证书后,会在“KeychainAccess”中打开,选择左侧“钥匙串”列表中“登录”,以及“种类”列表中“我的证书”,找到刚才下载的证书,并导出为 .p12 文件。如下图:


- 在极光控制台上,进入你应用的应用设置中 iOS 的鉴权方式选择 “证书”,上传刚才导出的 .p12 证书。极光会在后台为你的应用进行鉴权。

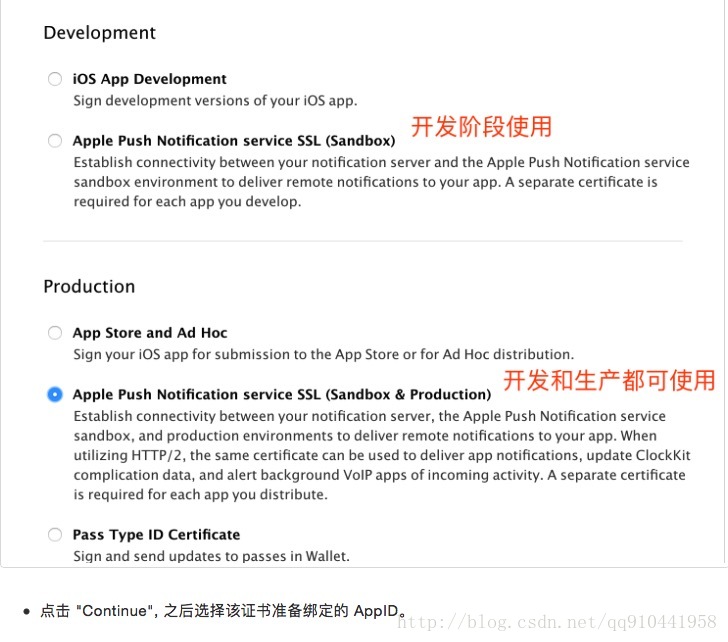
鉴权成功后,下面有一个
是否将生产证书用于开发环境的选项
是 - 对于开发环境和生产环境都可用
否 - 只对生产环境可用
3、导入SDK(本文用的是3.0.6版本)
选择1:Cocoapods导入
- 通过Cocoapods下载地址:
pod 'JPush'
- 如果需要安装指定版本则使用以下方式(以3.0.2版本为例):
pod 'JPush', '3.0.2'
选择2:手动导入
- 在极光官网下载最新SDK
- 将SDK包解压,在Xcode中选择“Add files to 'Your project name'...”,将解压后的lib子文件夹(包含JPUSHService.h、jpush-ios-x.x.x.a、jcore-ios-x.x.x.a)添加到你的工程目录中。
- 添加Framework
- CFNetwork.framework
- CoreFoundation.framework
- CoreTelephony.framework
- SystemConfiguration.framework
- CoreGraphics.framework
- Foundation.framework
- UIKit.framework
- Security.framework
- libz.tbd (Xcode7以下版本是libz.dylib)
- AdSupport.framework (获取IDFA需要;如果不使用IDFA,请不要添加)
- UserNotifications.framework (Xcode8及以上)
- libresolv.tbd (JPush 2.2.0及以上版本需要, Xcode7以下版本是libresolv.dylib)
注意: 如果集成JPush 3.0.1及以上版本, 且同时集成极光其他SDK(如:JMessage 3.0.0及以上版本)
1. Cocoapods导入,建议都更新为线上最新版本,来避免Jcore版本不一致导致的冲突。
2. 手动导入,在工程中只需保留一个最新版本的jcore-ios-x.x.x.a静态库文件。
4、在App Delegate中添加头文件,添加<JPUSHRegisterDelegate>协议
请将以下代码添加到 AppDelegate.m 引用头文件的位置。
// 引入JPush功能所需头文件
#import "JPUSHService.h"
// iOS10注册APNs所需头文件
#ifdef NSFoundationVersionNumber_iOS_9_x_Max
#import <UserNotifications/UserNotifications.h>
#endif
// 如果需要使用idfa功能所需要引入的头文件(可选)
#import <AdSupport/AdSupport.h>
5、添加初始化代码
- (BOOL)application:(UIApplication *)application didFinishLaunchingWithOptions:(NSDictionary *)launchOptions {
[self jpushInitWith:launchOptions];
return YES;
}
-(void)jpushInitWith:(NSDictionary*)launchOptions
{
JPUSHRegisterEntity * entity = [[JPUSHRegisterEntity alloc] init];
entity.types = JPAuthorizationOptionAlert|JPAuthorizationOptionBadge|JPAuthorizationOptionSound;
[JPUSHService registerForRemoteNotificationConfig:entity delegate:self];
// NSString*advertisingId=[SimulateIDFA createSimulateIDFA];
// DDLog(@"----ifda----%@",advertisingId);
// if (advertisingId) {
// [[NSUserDefaults standardUserDefaults] setObject:advertisingId forKey:@"advertisingId"];
// }
NSNotificationCenter *defaultCenter = [NSNotificationCenter defaultCenter];
[defaultCenter addObserver:self selector:@selector(networkDidReceiveMessage:) name:kJPFNetworkDidReceiveMessageNotification object:nil];
[defaultCenter addObserver:self selector:@selector(networkDidLogin:) name:kJPFNetworkDidLoginNotification object:nil];
[JPUSHService setupWithOption:launchOptions appKey:appKey
channel:channel
apsForProduction:isProduction
advertisingIdentifier:nil];
[UIApplication sharedApplication].applicationIconBadgeNumber = 0;
[JPUSHService setBadge:0];
}
- (void)application:(UIApplication *)application didReceiveRemoteNotification:(NSDictionary *)userInfo fetchCompletionHandler:(void (^)(UIBackgroundFetchResult))completionHandler {
//发送通知
[[NSNotificationCenter defaultCenter] postNotificationName:@"showRedBadge" object:nil userInfo:userInfo];
// Required, iOS 7 Support
[JPUSHService handleRemoteNotification:userInfo];
// [self handleRemoteNotification:userInfo];
completionHandler(UIBackgroundFetchResultNewData);
}
- (void)application:(UIApplication *)application didReceiveRemoteNotification:(NSDictionary *)userInfo {
DDLog(@"----userinfo---%@----",userInfo);
// Required,For systems with less than or equal to iOS6
[JPUSHService handleRemoteNotification:userInfo];
// [self handleRemoteNotification:userInfo];
}
- (void)application:(UIApplication *)application didFailToRegisterForRemoteNotificationsWithError:(NSError *)error {
//Optional
NSLog(@"did Fail To Register For Remote Notifications With Error: %@", error);
}
- (void)application:(UIApplication *)application didRegisterForRemoteNotificationsWithDeviceToken:(NSData *)deviceToken
{
[JPUSHService registerDeviceToken:deviceToken];
}
#pragma mark- JPUSHRegisterDelegate (点击通知栏通知触发的方法)
// iOS 10 Support
- (void)jpushNotificationCenter:(UNUserNotificationCenter *)center willPresentNotification:(UNNotification *)notification withCompletionHandler:(void (^)(NSInteger))completionHandler {
// Required
NSDictionary * userInfo = notification.request.content.userInfo;
DDLog(@"----userInfo---%@",userInfo);
if([notification.request.trigger isKindOfClass:[UNPushNotificationTrigger class]]) {
[JPUSHService handleRemoteNotification:userInfo];
// [self handleRemoteNotification:userInfo];
}
completionHandler(UNNotificationPresentationOptionAlert); // 需要执行这个方法,选择是否提醒用户,有Badge、Sound、Alert三种类型可以选择设置
}
// iOS 10 Support
- (void)jpushNotificationCenter:(UNUserNotificationCenter *)center didReceiveNotificationResponse:(UNNotificationResponse *)response withCompletionHandler:(void (^)())completionHandler {
// Required
NSDictionary * userInfo = response.notification.request.content.userInfo;
if([response.notification.request.trigger isKindOfClass:[UNPushNotificationTrigger class]]) {
// [JPUSHService handleRemoteNotification:userInfo];
[self handleRemoteNotification:userInfo];
}
completionHandler(); // 系统要求执行这个方法
}
#pragma mark 通知
- (void)networkDidReceiveMessage:(NSNotification *)notification {
NSDictionary * userInfo = [notification userInfo];
// NSString *content = [userInfo valueForKey:@"content"];
// NSDictionary *extras = [userInfo valueForKey:@"extras"];
// NSString *customizeField1 = [extras valueForKey:@"customizeField1"]; //服务端传递的Extras附加字段,key是自己定义的
DDLog(@"----userInfo---%@",userInfo);
//发送通知
[[NSNotificationCenter defaultCenter] postNotificationName:@"showRedBadge" object:nil userInfo:userInfo];
}
- (void)networkDidLogin:(NSNotification *)notification {
NSLog(@"已登录");
NSUserDefaults *userDefaults = [NSUserDefaults standardUserDefaults];
NSString* uid=[userDefaults objectForKey:@"user_uid"];
if (uid) {
// 设置别名Alias(唯一标识):发送推送的时候可以根据别名来推送
[JPUSHService setAlias:uid completion:^(NSInteger iResCode, NSString *iAlias, NSInteger seq) {
if (iResCode == 0) {
DDLog(@"设置成功!");
}
} seq:0];
}
/*
也可以设置tag(标签):可以通过不同的标签内容来推送
设置标签:
+ (void)setTags:(NSSet<NSString *> *)tags
 completion:(JPUSHTagsOperationCompletion)completion
        seq:(NSInteger)seq;//设置标签
添加标签:
+ (void)addTags:(NSSet<NSString *> *)tags
 completion:(JPUSHTagsOperationCompletion)completion
        seq:(NSInteger)seq;
*/
if ([JPUSHService registrationID]) {
//下面是我拿到registeID,发送给服务器的代码,可以根据你需求来处理
NSString *registerid = [JPUSHService registrationID];
NSLog(@"APPDelegate开始上传rgeisterID---%@",registerid);
if(registerid)
{
[[NSUserDefaults standardUserDefaults] setObject:registerid forKey:@"registerid"];
}
}
}
// 重写handleRemoteNotification:方法
- (void)handleRemoteNotification:(NSDictionary*)userInfo{
// if ([UIApplication sharedApplication].applicationState == UIApplicationStateActive) {
// 用于判断App的状态
// UIApplicationStateActive, 活跃
// UIApplicationStateInactive, 关闭或停止
// UIApplicationStateBackground 后台
// }
/*
说明:
本App的结构是tab + navigation 类型;
通过从后台获取的字段类型来判断,进行不同的页面跳转;
跳转下个页面要获取到相应的字段内容,用于下个界面的显示
*/
UITabBarController *tab = (UITabBarController *)self.window.rootViewController;
UINavigationController *nav = tab.viewControllers[tab.selectedIndex];
NSArray *allControllers = nav.viewControllers;
//如果app处于活跃状态,lastController用于获取App当前视图(当前显示的界面)
UIViewController *lastController = [allControllers lastObject];
if ([userInfo[@"type"] isEqualToString:@"logistics"])//推送的是物流消息
{
if (![lastController isKindOfClass:[SellerOrderLogisticsDetailController class]]) {
//跳转物流详情页
SellerOrderLogisticsDetailController *logistics = [[SellerOrderLogisticsDetailController alloc]init];
logistics.order_shop_sn = userInfo[@"order_shop_sn"];
logistics.hidesBottomBarWhenPushed = YES;
[nav pushViewController:logistics animated:NO];
}
}
else if ([userInfo[@"type"] isEqualToString:@"index"])//推送的是首页
{
if (![lastController isKindOfClass:[HomeController class]])
{
[tab setSelectedIndex:0];
UINavigationController *nav = tab.viewControllers[0];
[nav popToRootViewControllerAnimated:NO];
}
}
}