环境部署
一、基本配置要求
配置:
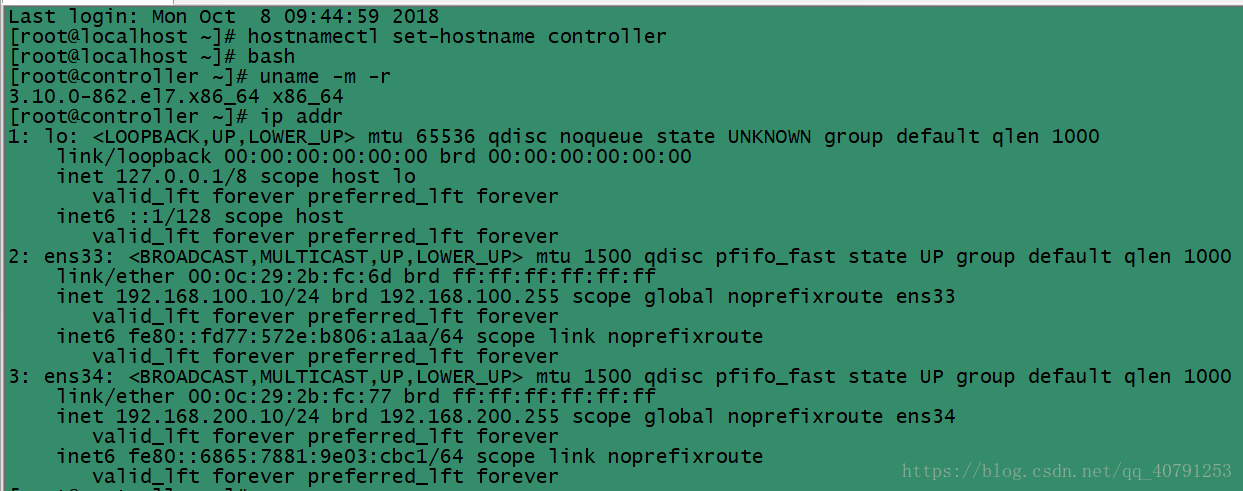
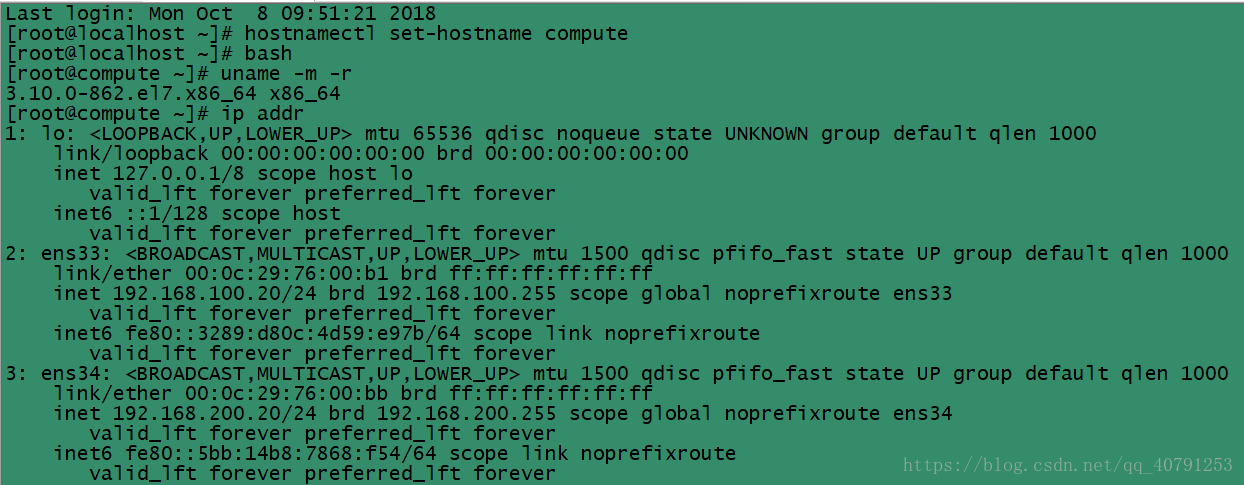
VMware-14、Centos7.5、双节点
Controller节点:4G运行内存、2个处理器、50G硬盘
Compute 节点:2G运行内存、2个处理、50G硬盘
网络要求:
同我之前搭建的OpenStack-M版(一个内网,一个外网)
ens33作为管理网络,主要负责各节点之间的通信
ens34作为外部网络,主要负责与外部通信
配置过程(略)
Centos7—网卡设置
VM OpenStack网络配置教程
二、配置主机映射
Controller、Compute节点
修改/etc/hosts(添加)
# vi /etc/hosts
192.168.100.10 controller
192.168.100.20 compute
检查网络连通性


三、配置阿里yum源
    备份
    mv /etc/yum.repos.d/CentOS-Base.repo /etc/yum.repos.d/CentOS-Base.repo.backup
    下载
    curl -o /etc/yum.repos.d/CentOS-Base.repo http://mirrors.aliyun.com/repo/Centos-7.repo
    # yum clean all (清除yum缓存)
四、安装NTP时钟服务
Controller节点
# yum install -y chrony

编辑chrony.conf文件,在文件中添加、更改或删除以下内容
vi /etc/chrony.conf
server  controlelr  iburst  ##所有节点向controller节点同步时间
allow 10.71.11.0/24         ##设置时间同步网段

设置NTP服务开机启动
# systemctl enable chronyd.service
# systemctl start chronyd.service
compute节点
    # yum install chrony -y

    配置所有节点指向controller同步时间
    vi /etc/chrony.conf
    server  controlelr  iburst

    # systemctl enable chronyd.service
    # systemctl start chronyd.service
验证时钟同步服务
在controller节点执行
[root@controller ~]# chronyc sources
210 Number of sources = 4
MS Name/IP address         Stratum Poll Reach LastRx Last sample
===============================================================================
^* time4.aliyun.com              2  10   377  1015   +115us[ +142us] +/-   14ms
^- ntp8.flashdance.cx            2  10   347   428    +27ms[  +27ms] +/-  259ms
^- 85.199.214.101                1  10   377   988    +38ms[  +38ms] +/-  202ms
^- ntp7.flashdance.cx            2  10   367   836    +35ms[  +35ms] +/-  247ms
MS列中的内容应该指明* NTP服务当前同步的服务器。
在其他节点执行
[root@compute ~]# chronyc sources
210 Number of sources = 4
MS Name/IP address         Stratum Poll Reach LastRx Last sample
===============================================================================
^* leontp.ccgs.wa.edu.au         1  10   377   752    +49ms[  +49ms] +/-  121ms
^+ ntp5.flashdance.cx            2  10   373  1155    +15ms[  +16ms] +/-  258ms
^+ 85.199.214.101                1  10   377   46m    -22ms[  -21ms] +/-  164ms
^+ ntp8.flashdance.cx            2  10   333   900  -6333us[-5976us] +/-  257ms
注意:日常运维中经常遇见时钟飘逸问题,导致集群服务脑裂
五、安装Q版OpenStack
Controller、Compute节点
# yum install -y centos-release-openstack-queens
更新linux包
# yum upgrade
安装OpenStack client
# yum install -y python-openstackclient
安装OpenStack-selinux来自动化管理OpenStack服务的安全策略
# yum install -y openstack-selinux
六、安装SQL database
Controller节点
# yum install -y mariadb mariadb-server python2-PyMySQL

创建并编写/etc/my.cnf.d/openstack.cnf文件
(备份你/etc/my.cnf.d/目录下所需的配置文件)

创建一个[mysqld]部分,并将bind-address设置为controller节点的管理IP地址,以支持通过管理网络访问其他节点。设置额外的键来启用有用的选项和UTF-8字符集:
[mysqld]
bind-address = 192.168.100.10
default-storage-engine = innodb
innodb_file_per_table = on
max_connections = 4096
collation-server = utf8_general_ci
character-set-server = utf8
# systemctl enable mariadb.service
# systemctl start mariadb.service
# mysql_secure_installation

NOTE: RUNNING ALL PARTS OF THIS SCRIPT IS RECOMMENDED FOR ALL MariaDB
      SERVERS IN PRODUCTION USE!  PLEASE READ EACH STEP CAREFULLY!

In order to log into MariaDB to secure it, we'll need the current
password for the root user.  If you've just installed MariaDB, and
you haven't set the root password yet, the password will be blank,
so you should just press enter here.

Enter current password for root (enter for none):
OK, successfully used password, moving on...

Setting the root password ensures that nobody can log into the MariaDB
root user without the proper authorisation.

Set root password? [Y/n] y   (数据库密码设为  123456,避免出错)
New password:
Re-enter new password:
Password updated successfully!
Reloading privilege tables..
 ... Success!


By default, a MariaDB installation has an anonymous user, allowing anyone
to log into MariaDB without having to have a user account created for
them.  This is intended only for testing, and to make the installation
go a bit smoother.  You should remove them before moving into a
production environment.

Remove anonymous users? [Y/n] y
 ... Success!

Normally, root should only be allowed to connect from 'localhost'.  This
ensures that someone cannot guess at the root password from the network.

Disallow root login remotely? [Y/n] n
 ... skipping.

By default, MariaDB comes with a database named 'test' that anyone can
access.  This is also intended only for testing, and should be removed
before moving into a production environment.

Remove test database and access to it? [Y/n] y
 - Dropping test database...
 ... Success!
 - Removing privileges on test database...
 ... Success!

Reloading the privilege tables will ensure that all changes made so far
will take effect immediately.

Reload privilege tables now? [Y/n] y
 ... Success!

Cleaning up...

All done!  If you've completed all of the above steps, your MariaDB
installation should now be secure.

Thanks for using MariaDB!
七、安装RabbitMQ(消息队列)组件
controller节点
# yum install -y rabbitmq-server
# systemctl enable rabbitmq-server.service;systemctl start rabbitmq-server.service

添加openstack 用户
rabbitmqctl add_user openstack 123456
openstack用户配置读写、访问的权限
rabbitmqctl set_permissions openstack ".*" ".*" ".*"

安装缓存数据库Memcached
# yum install -y memcached python-memcached

编辑/etc/sysconfig/memcached通过管理网络支持其他节点访问
(在OPTIONS中添加controller)
vi /etc/sysconfig/memcached
OPTIONS="-l 127.0.0.1,::1,controller"
八、Etcd服务安装
Controller节点
1.安装服务
# yum install -y etcd
2.编辑/etc/etcd/etcd.conf文件,设置为管理controller节点的IP地址和主机名,以支持通过管理网络访问其他节点
#[Member]
ETCD_DATA_DIR="/var/lib/etcd/default.etcd"
ETCD_LISTEN_PEER_URLS="http://192.168.100.10:2380"
ETCD_LISTEN_CLIENT_URLS="http://192.168.100.10:2379"
ETCD_NAME="controller"
#[Clustering]
ETCD_INITIAL_ADVERTISE_PEER_URLS="http://192.168.100.10:2380"
ETCD_ADVERTISE_CLIENT_URLS="http://192.168.100.10:2379"
ETCD_INITIAL_CLUSTER="controller=http://192.168.100.10:2380"
ETCD_INITIAL_CLUSTER_TOKEN="etcd-cluster-01"
ETCD_INITIAL_CLUSTER_STATE="new"