1.创建目录
实际搭建的时候需要确认下面几件事情:
1.检查jdk环境,我这里是1.8,如果是openjdk须先卸载,安装jdk1.8
2.集群的时间是否一致,同步时间
3.检测防火墙是否关闭,可以开启需要的端口,或者学习的时候可以直接关闭防火墙,
service iptables stop
4.检测主机有没有做ip映射
因为没有那么多的主机,所以体验了一把zookeeper的伪分布式,第一步就是要创建目录;
创建好的目录结构如下:

我在/usr/local下创建了一个zookeeper目录,并在其下分别创建了data和logs文件夹为后期做准备
那个zookeeper-3.4.10这个文件夹是zookeeper的安装包的文件夹,等会儿再上传
创建好后就是下载zookeeper安装包,链接地址https://mirrors.tuna.tsinghua.edu.cn/apache/zookeeper/,下载3.4.10版本
接下来就是将压缩文件移动到到server01这个文件夹下,然后解压
接着就是进入zookeeper-3.4.10这个文件夹下的conf文件夹,然后发现有一个zoo_sample.cfg,我们在同目录下复制文件
cp zoo_sample.cfg zoo.cfg这里要复制伪zoo.cfg是因为zookeeper默认加载的是这个文件名
然后我们打开这个文件zoo.cfg
# The number of milliseconds of each tick
tickTime=2000
# The number of ticks that the initial
# synchronization phase can take
initLimit=10
# The number of ticks that can pass between
# sending a request and getting an acknowledgement
syncLimit=5
# the directory where the snapshot is stored.
# do not use /tmp for storage, /tmp here is just
# example sakes.
dataDir=/tmp/zookeeper
# the port at which the clients will connect
clientPort=2181
# the maximum number of client connections.
# increase this if you need to handle more clients
#maxClientCnxns=60
#
# Be sure to read the maintenance section of the
# administrator guide before turning on autopurge.
#
# http://zookeeper.apache.org/doc/current/zookeeperAdmin.html#sc_maintenance
#
# The number of snapshots to retain in dataDir
#autopurge.snapRetainCount=3
# Purge task interval in hours
# Set to "0" to disable auto purge feature
#autopurge.purgeInterval=1
然后我们将他修改为这样的
# The number of milliseconds of each tick
tickTime=2000
# The number of ticks that the initial
# synchronization phase can take
initLimit=10
# The number of ticks that can pass between
# sending a request and getting an acknowledgement
syncLimit=5
# the directory where the snapshot is stored.
# do not use /tmp for storage, /tmp here is just
# example sakes.
dataDir=/usr/local/zookeeper/server01/data
dataLogDir=/usr/local/zookeeper/server01/logs
# the port at which the clients will connect
clientPort=2181
# the maximum number of client connections.
# increase this if you need to handle more clients
#maxClientCnxns=60
#
# Be sure to read the maintenance section of the
# administrator guide before turning on autopurge.
#
# http://zookeeper.apache.org/doc/current/zookeeperAdmin.html#sc_maintenance
#
# The number of snapshots to retain in dataDir
#autopurge.snapRetainCount=3
# Purge task interval in hours
# Set to "0" to disable auto purge feature
#autopurge.purgeInterval=1
server.1=127.0.0.1:8881:7771
server.2=127.0.0.1:8882:7772
server.3=127.0.0.1:8883:7773
server.4=127.0.0.1:8884:7774
server.5=127.0.0.1:8885:7775
- tickTime:这个时间是作为 Zookeeper 服务器之间或客户端与服务器之间维持心跳的时间间隔,也就是每个 tickTime 时间就会发送一个心跳。
- dataDir:顾名思义就是 Zookeeper 保存数据的目录,默认情况下,Zookeeper 将写数据的日志文件也保存在这个目录里。
- clientPort:这个端口就是客户端连接 Zookeeper 服务器的端口,Zookeeper 会监听这个端口,接受客户端的访问请求。
- initLimit:这个配置项是用来配置 Zookeeper 接受客户端(这里所说的客户端不是用户连接 Zookeeper 服务器的客户端,而是 Zookeeper 服务器集群中连接到 Leader 的 Follower 服务器)初始化连接时最长能忍受多少个心跳时间间隔数。当已经超过 5个心跳的时间(也就是 tickTime)长度后 Zookeeper 服务器还没有收到客户端的返回信息,那么表明这个客户端连接失败。总的时间长度就是 5*2000=10 秒
- syncLimit:这个配置项标识 Leader 与 Follower 之间发送消息,请求和应答时间长度,最长不能超过多少个 tickTime 的时间长度,总的时间长度就是 2*2000=4 秒
- server.A=B:C:D:其中 A 是一个数字,表示这个是第几号服务器;B 是这个服务器的 ip 地址;C 表示的是这个服务器与集群中的 Leader 服务器交换信息的端口;D 表示的是万一集群中的 Leader 服务器挂了,需要一个端口来重新进行选举,选出一个新的 Leader,而这个端口就是用来执行选举时服务器相互通信的端口。如果是伪集群的配置方式,由于 B 都是一样,所以不同的 Zookeeper 实例通信端口号不能一样,所以要给它们分配不同的端口号。
这里需要注意的是三个地方
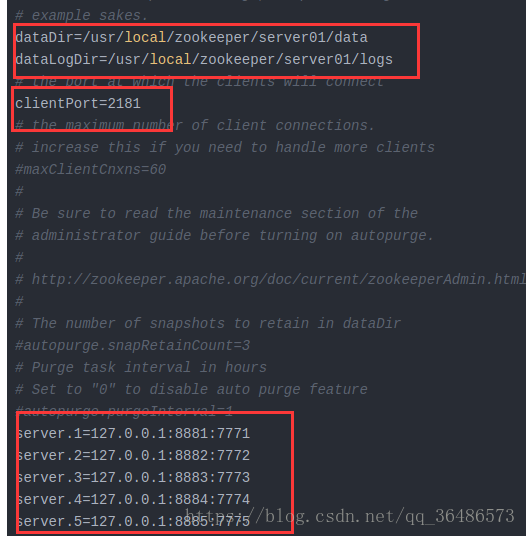
配置好后直接将整个文件zookeeper3.4.10这个文件夹分别复制到server02,server03.....文件夹下,然后分别修改这个配置文件,然后需要注意的三个地方需要注意一下,
clientPort=2181这个配置,分别需要配置伪2181,2182,2183,2184,2185,这些配置好后,还需要将每个server一个id
echo 1 > /usr/local/zookeeper/server01/data/myid
echo 2 > /usr/local/zookeeper/server02/data/myid
echo 3 > /usr/local/zookeeper/server03/data/myid
echo 4 > /usr/local/zookeeper/server04/data/myid
echo 5 > /usr/local/zookeeper/server05/data/myid
到这里基本上配置就配置好了
然后依次进入zookeeper3.4.10/bin文件夹下执行
./zkServer.sh start如果你看到了如下信息
ZooKeeper JMX enabled by default
Using config: /usr/local/zookeeper/server01/zookeeper-3.4.10/bin/../conf/zoo.cfg
Starting zookeeper ... STARTED
说明启动成功,然后都启动完成之后,可以执行

这样一个伪分布式就搭建完成了!
不足之处,欢迎指出