一、实验题目
实验一: 中山大学智慧健康服务平台应用开发
实验代码:传送门:https://github.com/dick20/Android
二、实现内容
1.基本的UI界面设计
实现一个Android应用,界面呈现如图中的效果。

要求
- 该界面为应用启动后看到的第一个界面。
- 各控件的要求
- 标题字体大小20sp,与顶部距离20dp,居中;
- 图片与上下控件的间距均为20dp,居中;
- 输入框整体距左右屏幕各间距20dp,内容(包括提示内容)如图所示,内容字体大小18sp;
- 按钮与输入框间距10dp,文字大小18sp。按钮背景框左右边框与文字间距10dp,上下边框与文字间距5dp,圆角半径180dp,背景色为**#3F51B5**;
- 四个单选按钮整体居中,与输入框间距10dp,字体大小18sp,各个单选按钮之间间距10dp,默认选中的按钮为第一个。
使用的组件
TextView、EditText、ConstraintLayout、Button、ImageView、RadioGroup、RadioButton。
实现一个Android应用,界面呈现如图中的效果。
验收内容
- 各控件的位置,间距,字体大小等属性与要求无误
- 图片大小不作为验收内容给之一
2.基础的事件处理
要求
- 该界面为应用启动后看到的第一个界面。
- 各控件处理的要求
- 点击搜索按钮:
- 如果搜索内容为空,弹出Toast信息“搜索内容不能为空”。
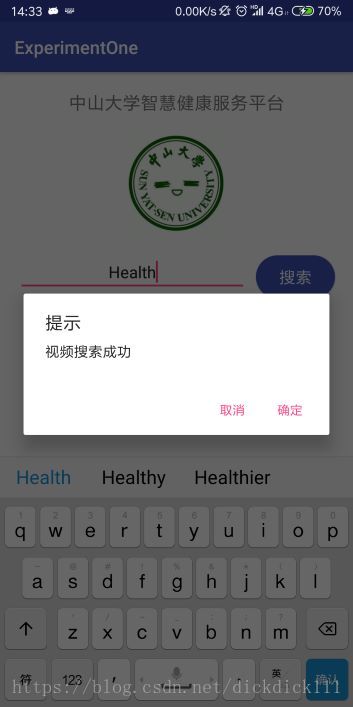
- 如果搜索内容为“Health”,根据选中的RadioButton项弹出如下对话框。

点击“确定”,弹出Toast信息——对话框“确定”按钮被点击。
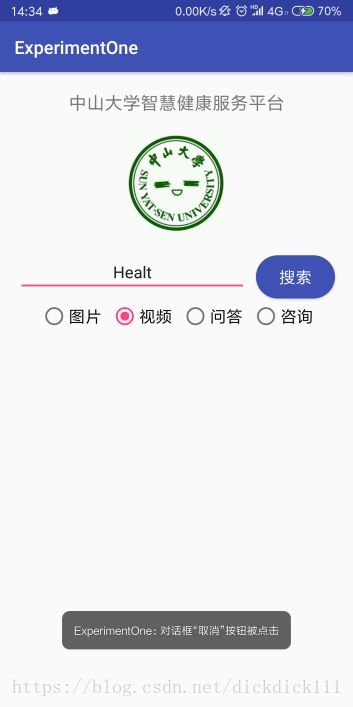
点击“取消”,弹出Toast 信息——对话框“取消”按钮被点击。
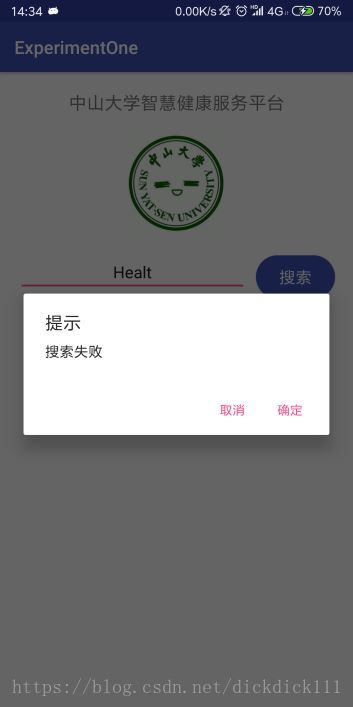
否则弹出如下对话框,对话框点击效果同上。

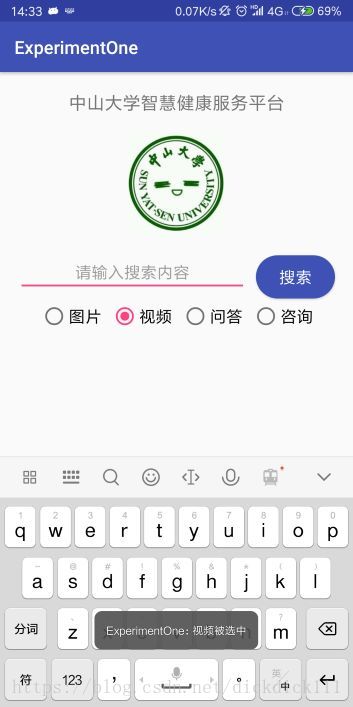
- RadioButton选择项切换:选择项切换之后,弹出Toast信息“XX被选中”,例如从图片切换到视频,弹出Toast信息“视频被选中”
- 点击搜索按钮:
验收内容
- 布局是否正常
- 搜索内容为空时,提示是否正常
- 输入搜索内容后,点击搜索按钮是否能根据不同的搜索内容显示相应的弹出框,以及弹出框内容是否符合要求
- 点击弹出框的相应按钮是否能提示正确的内容
- RadioButton切换时,提示是否正常
三、实验结果
(1)实验截图
切换按钮时候,显示当前切换到的按钮名字,如下图,视频被选中
搜索Health关键词时,显示对话框搜索成功
搜索其他关键词,无法正确搜索,显示搜索错误对话框
点击取消按钮时,显示toast取消被单击
(2)实验步骤以及关键代码
这个实验前两部分包括简单的UI设计以及UI的交互。
首先,我们当然要从UI的构建开始。
1.插入标题以及图片
这里应用到了TextView以及ImageView两个控件。由于本次的ui是使用ConstraintLayout布局,所以必须对每一个控件设置左右上下分别对齐什么。故要利用app:layout_constraintLeft_toLeftOf等属性,表示该组件的左边对齐于xx的左边,这里的textview就要与parent即整个页面的左边对齐,然后设置居中。宽度,大小就根据实验要求来设置,而id是用于后面的交互部分识别该控件用的。
<TextView android:id="@+id/title"
        android:layout_width="wrap_content"
        android:layout_height="wrap_content"
        android:text="@string/title"
        android:textSize="20sp"
        app:layout_constraintTop_toTopOf="parent"
        android:layout_marginTop="20dp"
        app:layout_constraintLeft_toLeftOf="parent"
        app:layout_constraintRight_toRightOf="parent"
        />
    <ImageView
        android:id="@+id/image"
        android:layout_width="wrap_content"
        android:layout_height="wrap_content"
        android:layout_marginTop="20dp"
        android:src="@mipmap/sysu"
        app:layout_constraintBottom_toTopOf="@+id/search_content"
        app:layout_constraintLeft_toLeftOf="parent"
        app:layout_constraintRight_toRightOf="parent"
        app:layout_constraintTop_toBottomOf="@id/title" />
2.插入搜索输入框以及搜索按钮
对于输入框要使用EditText控件,对于按钮要使用Button控件。对于输入框的显示内容,预先在string文件中写入,然后直接在控件中调用即可。对于button还用到了style属性,表示直接引用style写好的按钮样式。而style里面又调用了其他文件中已经预设好的属性,例如color中颜色。
<style name="search_button">
        <item name="android:textColor">@color/white</item>
        <item name="android:background">@drawable/button</item>
    </style>
<EditText
        android:id="@+id/search_content"
        android:layout_width="0dp"
        android:layout_height="wrap_content"
        android:layout_marginLeft="20dp"
        android:layout_marginRight="10dp"
        android:layout_marginTop="20dp"
        android:gravity="center"
        android:hint="@string/search_content"
        android:textSize="18sp"
        app:layout_constraintBottom_toTopOf="@+id/radioGroup"
        app:layout_constraintLeft_toLeftOf="parent"
        app:layout_constraintRight_toLeftOf="@+id/but1"
        app:layout_constraintTop_toBottomOf="@id/image" />
    <Button
        android:id="@+id/but1"
        style="@style/search_button"
        android:layout_width="wrap_content"
        android:layout_height="wrap_content"
        android:layout_marginRight="20dp"
        android:layout_marginTop="20dp"
        android:text="@string/search_button"
        android:textSize="18sp"
        app:layout_constraintBottom_toTopOf="@+id/radioGroup"
        app:layout_constraintRight_toRightOf="parent"
        app:layout_constraintTop_toBottomOf="@id/image" />
3. 插入选择按钮
选择按钮组要使用RadioGroup与RadioButton相配合,在group中设置边距以及大小,对于每一个radiobutton使用其他设置好的样式属性,在第一个选择按钮中设置checked属性设置为true就会默认第一个按钮被选定。
<RadioGroup
        android:id="@+id/radioGroup"
        android:layout_width="wrap_content"
        android:layout_height="wrap_content"
        android:layout_marginTop="10dp"
        android:orientation="horizontal"
        app:layout_constraintLeft_toLeftOf="parent"
        app:layout_constraintRight_toRightOf="parent"
        app:layout_constraintTop_toBottomOf="@id/search_content">
        <RadioButton
            android:id="@+id/selection1"
            style="@style/MyRadioButton"
            android:layout_height="match_parent"
            android:checked="true"
            android:text="@string/selection1" />
        <RadioButton
            android:id="@+id/selection2"
            style="@style/MyRadioButton"
            android:text="@string/selection2" />
        <RadioButton
            android:id="@+id/selection3"
            style="@style/MyRadioButton"
            android:text="@string/selection3" />
        <RadioButton
            android:id="@+id/selection4"
            style="@style/MyRadioButton"
            android:text="@string/selection4" />
    </RadioGroup>
这就基本完成了UI的界面设置,接下来要根据他们的id来设置一些函数实现实验要求,例如弹出对话框或者toast等等。
4.获取搜索输入框的内容,以及点击搜索按钮显示提示
这一步主要要调用findViewById这个函数来分别得到输入框以及按钮,给按钮设置监听函数setOnClickListener, 然后在里面对于输入框的内容searchContent.getText().toString()来进行判断,分别有三种情况,搜索内容为空,搜索内容为Health,搜索内容为其他。
然后,关于对话框的显示要使用dialog,分别给它设置标题,中间内容以及按钮。而toast则要对于对话框的按钮来设置监听函数,当点击时候来Toast.makeText()显示一个具体的toast内容。
		Button button =(Button) findViewById(R.id.but1);
        final EditText searchContent = (EditText) findViewById(R.id.search_content);
        button.setOnClickListener(new View.OnClickListener(){
            @Override
            public void onClick(View view){
                //搜索为空情况
                if(TextUtils.isEmpty(searchContent.getText().toString())){
                    //弹出 Toast
                    Toast.makeText(MainActivity.this, "搜索内容不能为空",Toast.LENGTH_SHORT).show();
                }
                //搜索成功情况
                else if(searchContent.getText().toString().equals("Health")){
                    AlertDialog.Builder dialog = new AlertDialog.Builder(MainActivity.this);
                    dialog.setTitle("提示");
                    RadioButton temp = findViewById(radioGroup.getCheckedRadioButtonId());
                    dialog.setMessage(temp.getText().toString()+"搜索成功");
                    dialog.setPositiveButton("确定", new DialogInterface.OnClickListener() {
                        @Override
                        public void onClick(DialogInterface dialogInterface, int i) {
                            Toast.makeText(MainActivity.this, "对话框“确定”按钮被点击",Toast.LENGTH_SHORT).show();
                        }
                    });
                    dialog.setNegativeButton("取消", new DialogInterface.OnClickListener() {
                        @Override
                        public void onClick(DialogInterface dialogInterface, int i) {
                            Toast.makeText(MainActivity.this, "对话框“取消”按钮被点击",Toast.LENGTH_SHORT).show();
                        }
                    });
                    dialog.show();
                }
                //搜索失败情况
                else{
                    AlertDialog.Builder dialog = new AlertDialog.Builder(MainActivity.this);
                    dialog.setTitle("提示");
                    dialog.setMessage("搜索失败");
                    dialog.setPositiveButton("确定", new DialogInterface.OnClickListener() {
                        @Override
                        public void onClick(DialogInterface dialogInterface, int i) {
                            Toast.makeText(MainActivity.this, "对话框“确定”按钮被点击",Toast.LENGTH_SHORT).show();
                        }
                    });
                    dialog.setNegativeButton("取消", new DialogInterface.OnClickListener() {
                        @Override
                        public void onClick(DialogInterface dialogInterface, int i) {
                            Toast.makeText(MainActivity.this, "对话框“取消”按钮被点击",Toast.LENGTH_SHORT).show();
                        }
                    });
                    dialog.show();
                }
            }
        });
4.对于选择按钮组的切换
与上面相同,先要通过id来找到相应的控件,然后对于radioGroup来设置选择改变的监听函数,当切换的时候会根据选择的不同按钮上的信息来生成一个toast。
 		final RadioGroup radioGroup = findViewById(R.id.radioGroup);
        final RadioButton radioButton = findViewById(radioGroup.getCheckedRadioButtonId());
        radioGroup.setOnCheckedChangeListener(new RadioGroup.OnCheckedChangeListener(){
            @Override
            //选择变化时,弹出toast提示信息
            public void onCheckedChanged(RadioGroup group, int checkedID){
                String str = "";
                RadioButton select1 = findViewById(R.id.selection1);
                RadioButton select2 = findViewById(R.id.selection2);
                RadioButton select3 = findViewById(R.id.selection3);
                RadioButton select4 = findViewById(R.id.selection4);
                if(select1.getId() == checkedID){
                    str = select1.getText().toString();
                }
                else if(select2.getId() == checkedID){
                    str = select2.getText().toString();
                }
                else if(select3.getId() == checkedID){
                    str = select3.getText().toString();
                }
                else if(select4.getId() == checkedID){
                    str = select4.getText().toString();
                }
                Toast.makeText(MainActivity.this, str + "被选中",Toast.LENGTH_SHORT).show();
            }
        });
(3)实验遇到的困难以及解决思路
a.关于UI部分的边距问题
起初对于ConstraintLayout布局不熟悉,不理解为什么需要对于一个控件的左右边限制跟随另一个的左右边,单纯认为只需要改变margin即可完成布局。而实际情况时,根据布局出来的结果可以看到仅改变margin之后相对于父亲来改变距离,而不能完全地设置两个组件的相应距离。于是完成一个组件时候,对于下一个组件的上下左右边缘要根据相对应的组件来限制一下。
而在修改UI的时候,多使用preview功能以及在xml下切换至design模式,可以清晰看出组件之间的边距关系,查看布局是否正确。

b.如何让中间的搜索框以及搜索按钮以合适的大小安放在同一行
这个问题就是在ui部分一直困扰我的,由于搜索框与左边要有限制,在右边又要与搜索按钮有限制,而搜索框也要与右边有限制。这样设置app:layout_constraintRight_toRightOf等等需要十分注意。
而且输入框的长度也要合适,当android:layout_width="wrap_parent"时候仅显示了提示内容的长度。而android:layout_width="fill_parent"时候又占满了整个显示屏,显然是不行。而选择固定长度则不符合我们安卓手机界面设计的原则,无法在各种机型中显示合理。
经过查询多种资料,可以通过设置android:layout_width="0dp"来使这个输入框自适应边距,因此问题迎刃而解。
c.实现交互部分的api
比较通用的找到控件的函数为findViewById,通过id来找到控件,这与我们设置的id就很关键了,必须要注意大小写以及名字的正确性。
关于组件的监听函数,包括点击按钮,切换radiobutton等等,都要了解其中的参数,查看手册。
四、实验思考及感想
本次是第一次安卓开发的实验,主要关于UI界面的设计与一些简单的交互,这与我之前学过的web网页设计十分相似,定义组件以及通过id来对于每一个组件来设置一些监听函数,完成所需要的功能。
但是,安卓开发上也有许多不同之处,对于java文件中必须要了解调用组件的监听函数,名字比较长,而且参数多,必须在平时熟练使用并要经常查阅手册。
对于ui界面,我这次主要是通过xml的书写来生成界面,用里面的一些属性来定义组件的大小,边距等等,除此之外,安卓开发中还很讲究文件的分类,将string,color,style设置成另外的文件,在主的xml可以调用这些文件中的内容来实现,这样的好处便于修改界面的内容,例如可以根据这个来开发中文英文不同的ui界面版本。