版权声明:本文为博主原创文章,未经博主允许不得转载。 https://blog.csdn.net/Coder_Boy_/article/details/82846943
使用注解完成依赖注入
@Autowired @Qualifier
. 构造器注入
. set方式注入。
注:
@Autowired也可以写在属性上,作用和写在set
方法上类似,但只会执行一行代码:
this.computer = computer;
@Resource
. 只支持set方式注入。
使用 @Value来完成基本类型的值的注入
@Value注解也可以使用Spring表达式。
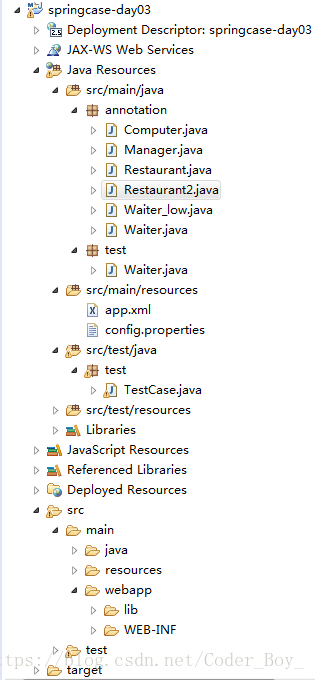
案例演示:
工程案例目录结构
spring环境搭建必备jar:
pom.xml
<project xmlns="http://maven.apache.org/POM/4.0.0" xmlns:xsi="http://www.w3.org/2001/XMLSchema-instance" xsi:schemaLocation="http://maven.apache.org/POM/4.0.0 http://maven.apache.org/xsd/maven-4.0.0.xsd">
  <modelVersion>4.0.0</modelVersion>
  <groupId>com.study</groupId>
  <artifactId>springcase-day03</artifactId>
  <version>0.0.1-SNAPSHOT</version>
  <packaging>war</packaging>

  <dependencies>
  	<dependency>
  		<groupId>junit</groupId>
  		<artifactId>junit</artifactId>
  		<version>4.12</version>
  	</dependency>
  	<dependency>
  		<groupId>javax</groupId>
  		<artifactId>javaee-api</artifactId>
  		<version>6.0</version>
  	</dependency>

  </dependencies>
</project>
Waiter.java
package annotation;

import org.springframework.stereotype.Component;

@Component("wt")
public class Waiter {

	public Waiter(){
		System.out.println("Waiter的无参构造器...");
	}
}
Waiter_low.java
package annotation;

import org.springframework.stereotype.Component;

@Component("wt_low")
public class Waiter_low extends Waiter{

	public Waiter_low() {
		System.out.println("Waiter_low的无参构造器...");
	}

}
Restaurant.java
package annotation;

import org.springframework.beans.factory.annotation.Autowired;
import org.springframework.beans.factory.annotation.Qualifier;
import org.springframework.stereotype.Component;


/**
 * 演示使用@Autowired注解来
 * 完成构造器方式的注入。
 * @author Cher_du
 *
 */
@Component("rest")
public class Restaurant {

	private Waiter wt2;

	public Restaurant() {
		System.out.println("Restaurant的无参构造器...");
	}


	@Autowired(required=false)
	//@Qualifier指定要注入的bean的id
	public Restaurant(@Qualifier("wt_low") Waiter wt2) {
		System.out.println("Restaurant的有参构造器...");
		this.wt2 = wt2;
	}

	@Override
	public String toString() {
		return "Restaurant [wt=" + wt2 + "]";
	}

}
Restaurant2.java
package annotation;
import org.springframework.beans.factory.annotation.Autowired;
import org.springframework.beans.factory.annotation.Qualifier;
import org.springframework.stereotype.Component;
/**
* 演示使用@Autowired注解来完成
* set方式的注入。
* @author Cher_du
*
*/
@Component("rest2")
public class Restaurant2 {
@Autowired
@Qualifier("wt")
private Waiter wt;
public Restaurant2() {
System.out.println("Restaurant2的无参构造器...");
}
public Waiter getWt() {
return wt;
}
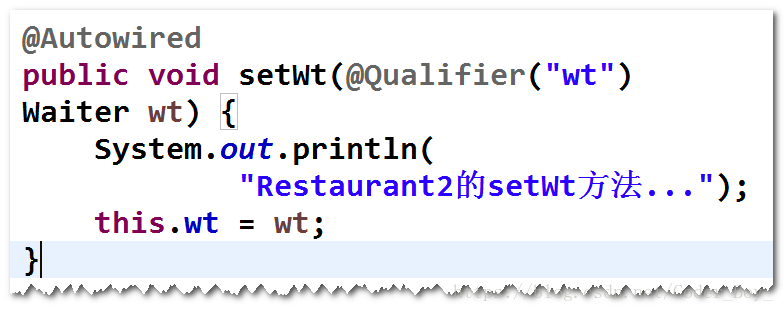
@Autowired
public void setWt(@Qualifier("wt") Waiter wt) {
System.out.println("Restaurant2的setWt方法...");
this.wt = wt;
System.out.println("setWt---over.....");
}
@Override
public String toString() {
return "Restaurant2 [wt=" + wt + "]";
}
}
Computer.java
package annotation;

import org.springframework.stereotype.Component;

@Component("cp")
public class Computer {

	public Computer() {
		System.out.println("Computer的无参构造器...");
	}

}
Manager.java
package annotation;
import javax.annotation.Resource;
import org.springframework.beans.factory.annotation.Value;
import org.springframework.stereotype.Component;
/**
* 演示使用@Resource注解来完成set方式的注入。
* 只支持set方式注入。
* @author Cher_du
*
*/
@Component("mg")
public class Manager {
private Computer cp;
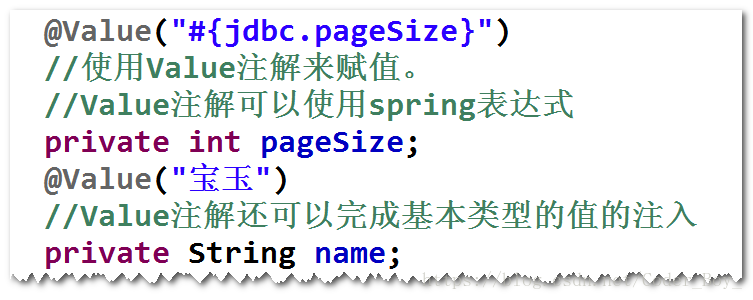
@Value("#{jdbc.pageSize}")
//使用Value注解来赋值。
//Value注解可以使用spring表达式
private int pageSize;
@Value("宝玉")
//Value注解还可以完成基本类型的值的注入
private String name;
public Manager() {
System.out.println("Manager的无参构造器...");
}
public Computer getCp() {
return cp;
}
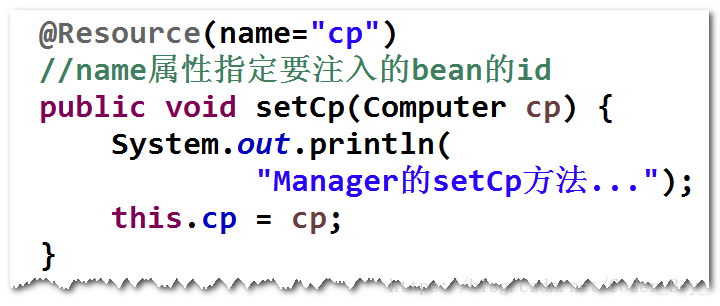
@Resource(name="cp")
//name属性指定要注入的bean的id
public void setCp(Computer cp) {
System.out.println("Manager的setCp方法...");
this.cp = cp;
}
public int getPageSize() {
return pageSize;
}
public void setPageSize(int pageSize) {
this.pageSize = pageSize;
}
public String getName() {
return name;
}
public void setName(String name) {
this.name = name;
}
@Override
public String toString() {
return "Manager [cp=" + cp + ", pageSize=" + pageSize + ", name=" + name + "]";
}
}
app.xml
<?xml version="1.0" encoding="UTF-8"?>
<beans xmlns="http://www.springframework.org/schema/beans"
	xmlns:xsi="http://www.w3.org/2001/XMLSchema-instance"
	xmlns:context="http://www.springframework.org/schema/context"
	xmlns:jdbc="http://www.springframework.org/schema/jdbc"
	xmlns:jee="http://www.springframework.org/schema/jee"
	xmlns:tx="http://www.springframework.org/schema/tx"
	xmlns:aop="http://www.springframework.org/schema/aop"
	xmlns:mvc="http://www.springframework.org/schema/mvc"
	xmlns:util="http://www.springframework.org/schema/util"
	xmlns:jpa="http://www.springframework.org/schema/data/jpa"
	xsi:schemaLocation="
		http://www.springframework.org/schema/beans http://www.springframework.org/schema/beans/spring-beans-3.2.xsd
		http://www.springframework.org/schema/context http://www.springframework.org/schema/context/spring-context-3.2.xsd
		http://www.springframework.org/schema/jdbc http://www.springframework.org/schema/jdbc/spring-jdbc-3.2.xsd
		http://www.springframework.org/schema/jee http://www.springframework.org/schema/jee/spring-jee-3.2.xsd
		http://www.springframework.org/schema/tx http://www.springframework.org/schema/tx/spring-tx-3.2.xsd
		http://www.springframework.org/schema/data/jpa http://www.springframework.org/schema/data/jpa/spring-jpa-1.3.xsd
		http://www.springframework.org/schema/aop http://www.springframework.org/schema/aop/spring-aop-3.2.xsd
		http://www.springframework.org/schema/mvc http://www.springframework.org/schema/mvc/spring-mvc-3.2.xsd
		http://www.springframework.org/schema/util http://www.springframework.org/schema/util/spring-util-3.2.xsd">
	 <!-- 配置组件扫描
	 	容器会扫描base-package指定的包及其子
	 	包下面的所有的类,如果该类前面有特定的
	 	注解(比如@Component),则容器会将其纳入
	 	进行管理(相当在配置文件当中,有一个bean)。
	  -->
	 <context:component-scan
	 base-package="annotation"/>

	 <!-- 读取location指定位置的配置文件的
	 内容 -->
	 <util:properties id="jdbc"
	 location="classpath:config.properties"/>


</beans>
config.properties
pageSize=10TestCase.java
package test;

import org.junit.Test;
import org.springframework.context.ApplicationContext;
import org.springframework.context.support.ClassPathXmlApplicationContext;

import annotation.Manager;
import annotation.Restaurant2;

public class TestCase {

	@Test
	//测试@Autowired来完成依赖注入。
//	 注意事项:
//
//	 在使用@Autowired时,首先在容器中查询对应 类型 的bean
//
//	  如果查询结果刚好为一个,就将该bean装配给@Autowired指定的属性
//
//	  如果查询的结果不止一个,那么@Autowired会根据名称来查找。
//
//	  如果查询的结果为空,那么会抛出异常。解决方法是,使用required=false
	public void test1(){
		ApplicationContext ac = new ClassPathXmlApplicationContext("app.xml");
		Restaurant2 rest = ac.getBean("rest2", Restaurant2.class);
		System.out.println(rest);
	}

	@Test
	//测试@Resource来完成依赖注入。
	public void test2(){
		ApplicationContext ac = new ClassPathXmlApplicationContext("app.xml");
		Manager mg = ac.getBean("mg", Manager.class);
		System.out.println(mg);
	}

}
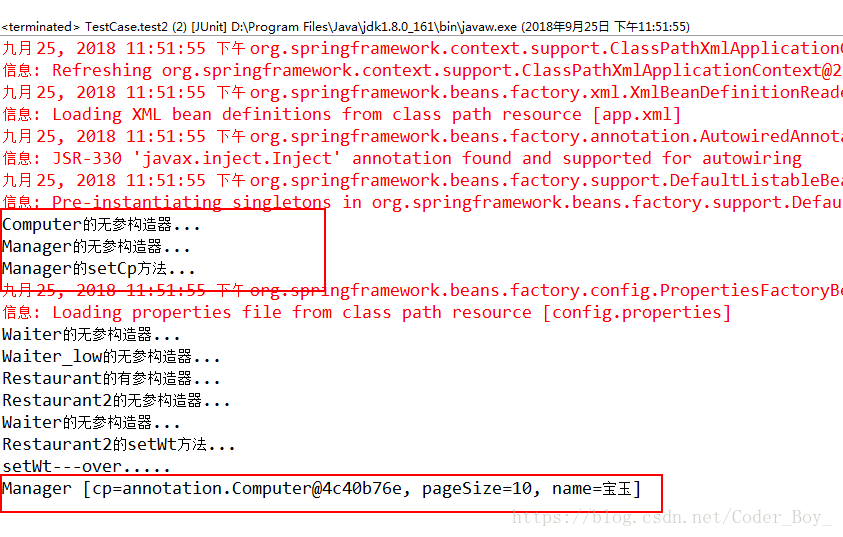
依次运行test1,test2,后台运行结果
A.
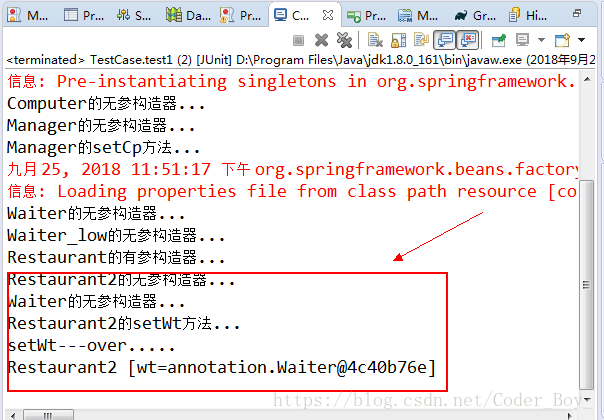
B.