Spring Cloud Config是Spring Cloud团队创建的一个全新项目,用来为分布式系统中的基础设施和微服务应用提供集中化的外部配置支持,它分为服务端与客户端两个部分。其中服务端也称为分布式配置中心,它是一个独立的微服务应用,用来连接配置仓库并为客户端提供获取配置信息、加密/解密信息等访问接口;而客户端则是微服务架构中的各个微服务应用或基础设施,它们通过指定的配置中心来管理应用资源与业务相关的配置内容,并在启动的时候从配置中心获取和加载配置信息。Spring Cloud Config实现了对服务端和客户端中环境变量和属性配置的抽象映射,所以它除了适用于Spring构建的应用程序之外,也可以在任何其他语言运行的应用程序中使用。由于Spring Cloud Config实现的配置中心默认采用Git来存储配置信息,所以使用Spring Cloud Config构建的配置服务器,天然就支持对微服务应用配置信息的版本管理,并且可以通过Git客户端工具来方便的管理和访问配置内容。当然它也提供了对其他存储方式的支持,比如:SVN仓库、本地化文件系统。
在本文中,我们将学习如何构建一个基于Git存储的分布式配置中心,并对客户端进行改造,并让其能够从配置中心获取配置信息并绑定到代码中的整个过程。
配置服务端
准备配置仓库
准备一个git仓库,可以在码云或Github上创建都可以,这是我的git仓库,具体如何创建git仓库可以参考我这篇文章《创建GitHub仓库并与本地Git绑定》。
https://github.com/WYA1993/spring_cloud_config_demo
构建配置中心
第一步,构建一个Spring Boot项目,命名config-server-vFinchley.RC2,并引入如下依赖
<parent>
	<groupId>org.springframework.boot</groupId>
	<artifactId>spring-boot-starter-parent</artifactId>
	<version>2.0.2.RELEASE</version>
	<relativePath /> <!-- lookup parent from repository -->
</parent>

<properties>
	<project.build.sourceEncoding>UTF-8</project.build.sourceEncoding>
	<project.reporting.outputEncoding>UTF-8</project.reporting.outputEncoding>
	<java.version>1.8</java.version>
	<spring-cloud.version>Finchley.RC2</spring-cloud.version>
</properties>

<dependencies>
	<dependency>
		<groupId>org.springframework.boot</groupId>
		<artifactId>spring-boot-starter-web</artifactId>
	</dependency>
	<dependency>
		<groupId>org.springframework.boot</groupId>
		<artifactId>spring-boot-starter-test</artifactId>
    	<scope>test</scope>
	</dependency>

	<dependency>
		<groupId>org.springframework.cloud</groupId>
		<artifactId>spring-cloud-config-server</artifactId>
	</dependency>
</dependencies>第二步,创建Application主类,添加@EnableConfigServer注解,开启Spring Cloud Config的服务端功能。
@EnableConfigServer
@SpringBootApplication
public class Application {

	public static void main(String[] args) {
		SpringApplication.run(Application.class, args);
	}
}
第三步,创建application.yml配置文件
spring:
  application:
    name: config-server
  cloud:
    config:
      server:
        git:
          uri: https://github.com/WYA1993/spring_cloud_config_demo
          search-paths:
          - config/config_repo/
server:
  port: 5666
其中git的配置信息如下:

spring.cloud.config.server.git.uri:配置git仓库位置
spring.cloud.config.server.git.search-paths:配置仓库路径下的相对搜索位置(远程仓库中配置文件所在路径),可以配置多个,如果没有配置此属性,会默认在仓库根路径找,如果你的配置文件在根路径下的目录内会找不到。
如果Git仓库需要权限访问(公开仓库不需要用户名密码),那么可以通过配置下面的两个属性来实现:
spring.cloud.config.server.git.username:访问Git仓库的用户名
spring.cloud.config.server.git.password:访问Git仓库的用户密码
第四步,启动项目,确保没有报错。
第五步,为了验证上面的分布式配置中心,在git仓库https://github.com/WYA1993/spring_cloud_config_demo/config/下创建config-repo目录作为配置仓库,并为不同环境新建四个配置文件:
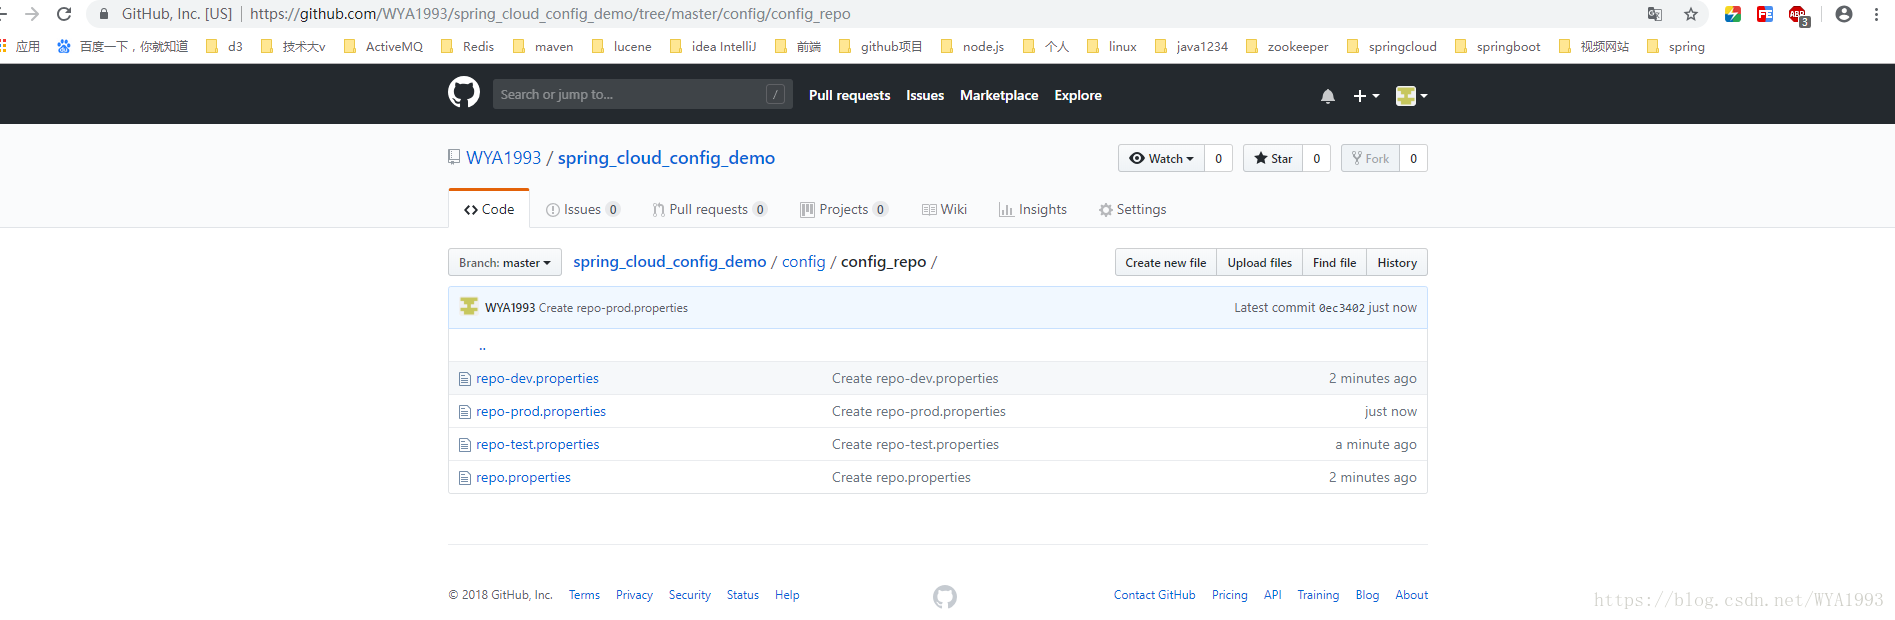
四个配置文件的内容依次为:
form=git-dev-1.0
form=git-prod-1.0
form=git-test-1.0
form=git-deafult-1.0
为了测试版本控制,加入一个新的分支config_label_test,创建上面的文件,只是将form属性的值改为2.0后缀。
第六步,接下来就可以访问这些配置内容了。访问配置信息的URL与配置文件的映射关系如下:
- /{application}/{profile}[/{label}]
- /{application}-{profile}.yml
- /{label}/{application}-{profile}.yml
- /{application}-{profile}.properties
- /{label}/{application}-{profile}.properties
解释一下上面的映射关系
- / { 应用名 } / { 环境名 } [ / { 分支名 } ]
- / { 应用名 } - { 环境名 }.yml
- / { 应用名 } - { 环境名 }.properties
- / { 分支名 } / { 应用名 } - { 环境名 }.yml
- / { 分支名 } / { 应用名 } - { 环境名 }.properties
{application}通常是客户端微服务的应用名,对应Git仓库中文件名的前缀如repo-dev.properties的application就是repo;
{profile}对应{application}-后面的dev、pro、test等;
{label}对应Git仓库的分支名,默认为master。
注意:
- 第一个规则的分支名是可以省略的,默认是master分支
- label也可以叫做提交id、分支名称或者tag
- 无论你的配置文件是properties,还是yml,只要是应用名+环境名能匹配到这个配置文件,那么就能取到
- 如果是想直接定位到没有写环境名的默认配置,那么就可以使用default去匹配没有环境名的配置文件,如http://localhost:5666/repo/default/master
- 使用第一个规则会匹配到默认配置
- 如果直接使用应用名来匹配,会出现404错误,此时可以加上分支名匹配到默认配置文件
- 如果配置文件的命名很由多个-分隔,此时直接使用这个文件名去匹配的话,会出现直接将内容以源配置文件内容直接返回,内容前可能会有默认配置文件的内容(已测试)
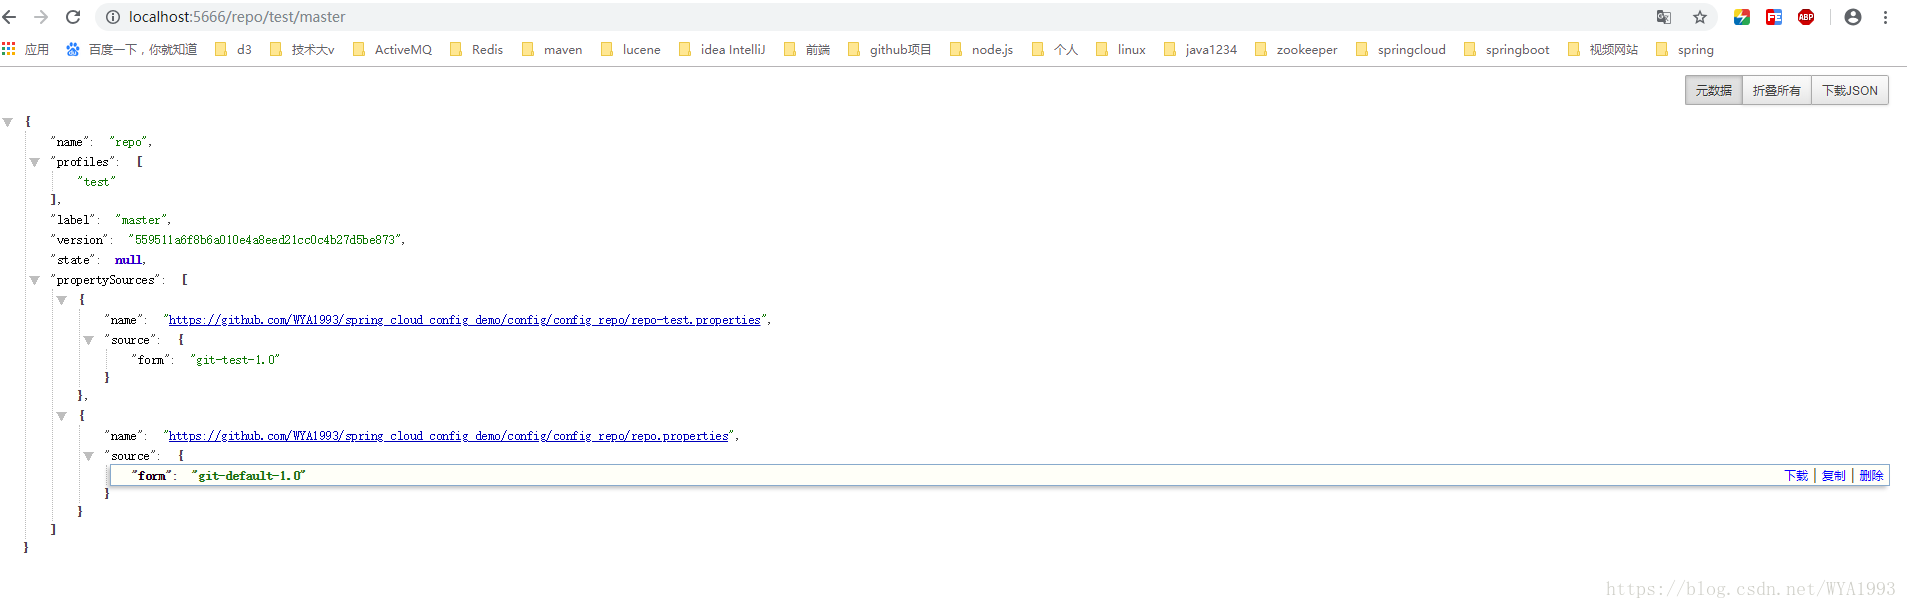
我们可以尝试构造不同的url来访问不同的配置内容,比如,要访问master分支,repo应用的test环境,就可以访问这个url:http://localhost:5666/repo/test/master,并获得如下返回:
其余四种映射的url示例(这四种是直接返回文件的内容)
http://localhost:5666/config_label_test/repo-dev.yml --form: git-dev-2.0
http://localhost:5666/repo-dev.yml --form: git-dev-1.0
http://localhost:5666/repo-dev.properties --form: git-dev-1.0
http://localhost:5666/config_label_test/repo-dev.properties --form: git-dev-2.0
注意:
1.如果propertySources值是空的,看一下你的配置文件是否存在,文件存在的话就看你application.yml的配置路径是否写对。
2.如果你报这个错:
springboot: Finchley.RC2 Cannot load environment] with root cause
java.lang.StringIndexOutOfBoundsException: String index out of range: -1
    at java.lang.String.substring(String.java:1967) ~[na:1.8.0_131]
    at org.springframework.cloud.config.server.environment.HttpClientConfigurableHttpConnectionFactory.lookupHttpClientBuilder(HttpClientConfigurableHttpConnectionFactory.java:69) ~[spring-cloud-config-server-2.0.0.RC2.jar:2.0.0.RC2]
    at org.springframework.cloud.config.server.environment.HttpClientConfigurableHttpConnectionFactory.create(HttpClientConfigurableHttpConnectionFactory.java:56) ~[spring-cloud-config-server-2.0.0.RC2.jar:2.0.0.RC2]
    at org.eclipse.jgit.transport.TransportHttp.httpOpen(TransportHttp.java:830) ~[org.eclipse.jgit-4.11.0.201803080745-r.jar:4.11.0.201803080745-r]
    at org.eclipse.jgit.transport.TransportHttp.connect(TransportHttp.java:491) ~[org.eclipse.jgit-4.11.0.201803080745-r.jar:4.11.0.201803080745-r]
    at org.apache.catalina.core.ApplicationFilterChain.doFilter(ApplicationFilterChain.java:166) ~[tomcat-embed-core-8.5.31.jar:8.5.31]
    at org.apache.tomcat.websocket.server.WsFilter.doFilter(WsFilter.java:52) ~[tomcat-embed-websocket-8.5.31.jar:8.5.31]
    at org.apache.catalina.core.ApplicationFilterChain.internalDoFilter(ApplicationFilterChain.java:193) ~[tomcat-embed-core-8.5.31.jar:8.5.31]
    at org.apache.catalina.core.ApplicationFilterChain.doFilter(ApplicationFilterChain.java:166) ~[tomcat-embed-core-8.5.31.jar:8.5.31]
    at org.springframework.boot.actuate.metrics.web.servlet.WebMvcMetricsFilter.filterAndRecordMetrics(WebMvcMetricsFilter.java:158) ~[spring-boot-actuator-2.0.3.RELEASE.jar:2.0.3.RELEASE]
    at org.springframework.boot.actuate.metrics.web.servlet.WebMvcMetricsFilter.filterAndRecordMetrics(WebMvcMetricsFilter.java:126) ~[spring-boot-actuator-2.0.3.RELEASE.jar:2.0.3.RELEASE]
    at
    at org.apache.tomcat.util.threads.TaskThread$WrappingRunnable.run(TaskThread.java:61) [tomcat-embed-core-8.5.31.jar:8.5.31]
    at java.lang.Thread.run(Thread.java:748) [na:1.8.0_131]
解决方法:是Finchley.RC2版本问题,改成Finchley.RC1即可。
我们可以看到该JSON返回了应用名repo,环境名test,分支名master,以及default环境和test环境的配置内容。另外version对应得是Git上的commit号。同时在控制台还输出了如下内容。
2018-09-25 11:36:02.144  INFO 3016 --- [nio-5666-exec-5] s.c.a.AnnotationConfigApplicationContext : Refreshing org.springframework.context.annotation.AnnotationConfigApplicationContext@58e3d589: startup date [Tue Sep 25 11:36:02 CST 2018]; root of context hierarchy
2018-09-25 11:36:02.153  INFO 3016 --- [nio-5666-exec-5] o.s.c.c.s.e.NativeEnvironmentRepository  : Adding property source: file:/C:/Users/ADMINI~1/AppData/Local/Temp/config-repo-8649563955543866185/config/config_repo/repo-test.properties
2018-09-25 11:36:02.153  INFO 3016 --- [nio-5666-exec-5] o.s.c.c.s.e.NativeEnvironmentRepository  : Adding property source: file:/C:/Users/ADMINI~1/AppData/Local/Temp/config-repo-8649563955543866185/config/config_repo/repo.properties
2018-09-25 11:36:02.153  INFO 3016 --- [nio-5666-exec-5] s.c.a.AnnotationConfigApplicationContext : Closing org.springframework.context.annotation.AnnotationConfigApplicationContext@58e3d589: startup date [Tue Sep 25 11:36:02 CST 2018]; root of context hierarchy
配置服务器在从Git中获取配置信息后,会存储一份在config-server的文件系统中,实质上config-server是通过git clone命令将配置内容复制了一份在本地存储,然后读取这些内容并返回给微服务应用进行加载。
config-server通过Git在本地仓库暂存,可以有效防止当Git仓库出现故障而引起无法加载配置信息的情况。我们可以断开网络再次发起http://localhost:5666/repo/test/master请求,在控制台输出了如下内容,但是它依然会返回配置内容,这些内容源自于之前访问时存于config-server的本地文件系统中的配置内容。
2018-09-25 11:46:53.166  WARN 3016 --- [nio-5666-exec-8] .c.s.e.MultipleJGitEnvironmentRepository : Could not fetch remote for master remote: https://github.com/WYA1993/spring_cloud_config_demo
2018-09-25 11:46:53.479  INFO 3016 --- [nio-5666-exec-8] s.c.a.AnnotationConfigApplicationContext : Refreshing org.springframework.context.annotation.AnnotationConfigApplicationContext@81e8011: startup date [Tue Sep 25 11:46:53 CST 2018]; root of context hierarchy
2018-09-25 11:46:53.487  INFO 3016 --- [nio-5666-exec-8] o.s.c.c.s.e.NativeEnvironmentRepository  : Adding property source: file:/C:/Users/ADMINI~1/AppData/Local/Temp/config-repo-8649563955543866185/config/config_repo/repo-test.properties
2018-09-25 11:46:53.487  INFO 3016 --- [nio-5666-exec-8] o.s.c.c.s.e.NativeEnvironmentRepository  : Adding property source: file:/C:/Users/ADMINI~1/AppData/Local/Temp/config-repo-8649563955543866185/config/config_repo/repo.properties
2018-09-25 11:46:53.487  INFO 3016 --- [nio-5666-exec-8] s.c.a.AnnotationConfigApplicationContext : Closing org.springframework.context.annotation.AnnotationConfigApplicationContext@81e8011: startup date [Tue Sep 25 11:46:53 CST 2018]; root of context hierarchy
构建客户端
完成上述验证后,确定了配置服务中心已经正常工作,下面尝试如何在微服务应用中获取上述配置信息。
第一步,创建Spring Boot项目,命名config-client-vFinchley.RC2,引入如下依赖
<parent>
	<groupId>org.springframework.boot</groupId>
	<artifactId>spring-boot-starter-parent</artifactId>
	<version>2.0.2.RELEASE</version>
	<relativePath /> <!-- lookup parent from repository -->
</parent>

<properties>
	<project.build.sourceEncoding>UTF-8</project.build.sourceEncoding>
	<project.reporting.outputEncoding>UTF-8</project.reporting.outputEncoding>
	<java.version>1.8</java.version>
	<spring-cloud.version>Finchley.RC1</spring-cloud.version>
</properties>

<dependencies>
	<!-- web的依赖,必须加 -->
	<dependency>
	    <groupId>org.springframework.boot</groupId>
    	<artifactId>spring-boot-starter-web</artifactId>
	</dependency>
	<!--Spring Boot Actuator,感应服务端变化 -->
	<dependency>
		<groupId>org.springframework.boot</groupId>
		<artifactId>spring-boot-starter-test</artifactId>
		<scope>test</scope>
	</dependency>
	<dependency>
		<groupId>org.springframework.boot</groupId>
		<artifactId>spring-boot-starter-actuator</artifactId>
	</dependency>

	<!--Spring Cloud Config 客户端依赖 -->
	<dependency>
		<groupId>org.springframework.cloud</groupId>
		<artifactId>spring-cloud-config-server</artifactId>
	</dependency>
</dependencies>第二步,创建应用主类
@SpringBootApplication
public class Application {

	public static void main(String[] args) {
		SpringApplication.run(Application.class, args);
	}
}
第三步,创建bootstrap.yml配置文件
spring:
  application:
    name: repo #要获取的应用名
  cloud:
    config:
      uri: http://localhost:5666/  # 配置服务中心的地址 默认值http://localhost:8888
      label: master #要获取的分支名
      profile: dev  #要获取的环境名
      fail-fast: true  #没有读取成功则执行快速失败
server:
  port: 5777
上述配置参数与Git中存储的配置文件中各个部分的对应关系如下:
- spring.application.name:对应配置文件规则中的{application}部分
- spring.cloud.config.profile:对应配置文件规则中的{profile}部分
- spring.cloud.config.label:对应配置文件规则中的{label}部分
- spring.cloud.config.uri:配置中心config-server的地址
- fail-fast:没有读取成功则执行快速失败
这里需要格外注意:上面这些属性必须配置在bootstrap.yml或者properties文件中中,这样config-server中的配置信息才能被正确加载。为何需要把 config server 的信息放在 bootstrap.yml 里?bootstrap.yml 先于 application.yml 加载,当使用 Spring Cloud 的时候,配置信息一般是从 config server 加载的,为了取得配置信息(比如密码等),你需要一些提早的或引导配置。因此,把 config server 信息放在 bootstrap.yml,用来加载真正需要的配置信息。
关于bootstrap.yml 和 application.yml可以看一下这篇文章:《application.yml和 bootstrap.yml区别》
第四步,创建一个RESTful接口返回配置中心的form属性,也就是Git仓库里配置文件里的key,通过@Value("${form}")绑定配置服务中心配置的form属性,具体实现如下:
@RefreshScope
@RestController
public class TestController {

	@Value("${form}")
	private String form;

	@GetMapping("test1")
	public String getForm(){
		return form;
	}
}
除了通过@Value注解绑定注入外,也可以通过Environment对象来获取配置属性。
import org.springframework.beans.factory.annotation.Autowired;
import org.springframework.beans.factory.annotation.Value;
import org.springframework.cloud.context.config.annotation.RefreshScope;
import org.springframework.core.env.Environment;
import org.springframework.web.bind.annotation.GetMapping;
import org.springframework.web.bind.annotation.RestController;
@RefreshScope
@RestController
public class TestController {

	@Value("${form}")
	private String form;

	@GetMapping("test1")
	public String getForm(){
		return form;
	}

	@Autowired
	private Environment env;

	@GetMapping("test2")
	public String getForm2(){
		return env.getProperty("form", "undefined");
	}
}
测试
启动客户端,访问http://localhost:5777/test1或者http://localhost:5777/test2,页面返回如下内容git-dev-1.0。