SQL Server 真是越来越有看头。当我们还在为 Linux 上运行 SQL Server 而兴奋的时候,SQL Server 已经开启了 容器化之路,至此才能看清微软的胸怀,开始拥抱更大的世界。当我越来越深入去阅读有关 Docker 容器的文档,已然发现曾经部署上千台 Linux MySQL 的场景,如今在 Docker 的帮助下,SQL Server 也是手到擒来。如果 SQL Server 再匹配一个分布式计算引擎,那也是分分钟即可打造一个计算怪兽,和小象 Hadoop 分庭抗礼。届时玩 SQL 的朋友们不用分心去折腾 Hadoop/Spark, 仅用 T-SQL 依然可以笑傲江湖。因为人工智能,机器学习算法本就是数据集合操作,天生和 SQL 结合紧密。不信看我的这篇: [机器学习算法之 KNN 的 SQL 实现](https://blog.csdn.net/wujiandao/article/details/80685641) 当然,理想是要有的,目前还是将心放一放,回归这次的主题, Docker. 接触容器化实践,始于团队 2017 的 CRM 产品发布流程改革,微服务化。
现将整个过程梳理一下,对 SQL Server 容器化进程做一个明晰的总结。
Docker 概念以及作用
Docker 用来发布 SQL Server 部署的方法和优势
Docker 的概念以及作用
Docker 的安装
安装的必备条件:
- 64位 CPU
- Linux 3.8 以上版本
- 内核必须支持一种合适的存储驱动(storage driver),如:
Device Manager
AUFS
vfs
btrfs
默认存储驱动是 Device Mapper
- 内核必须支持并开启 cgroup 和命名空间功能
检查 Centos 版本:
[root@centos00 log]# uname -a
Linux centos00 3.10.0-514.el7.x86_64 #1 SMP Tue Nov 22 16:42:41 UTC 2016 x86_64 x86_64 x86_64 GNU/Linux
检查存储驱动:
[root@centos00 log]# ls -l /sys/class/misc/device-mapper
lrwxrwxrwx. 1 root root 0 Aug 22 18:33 /sys/class/misc/device-mapper -> ../../devices/virtual/misc/device-mapper
或者直接查当前运行的设备
[root@centos00 log]# grep device-mapper /proc/devices
253 device-mapper
若没有则运行下面脚本安装
yum install -y device-mapper
modprobe dm_mod
安装 EPEL 软件包仓库
此仓库只是在 centos 上安装 Docker 的时候需要,当然 RedHat 也是同门。而 Fedora 则不需要,因为 EPEL 是 Fedora 出品,已经包含了此库。
https://fedoraproject.org/wiki/EPEL
EPEL: Extra Packages For Enterprise Linux
顾名思义,这是专门为企业版 Linux 打造的扩展功能库。
CentOS 6/7 安装路径各不相同:
yum install https://dl.fedoraproject.org/pub/epel/epel-release-latest-7.noarch.rpm
而正式的安装则简单的多:
yum install -y docker
Docker 运行时检查:
[root@centos00 log]# docker info
Cannot connect to the Docker daemon at unix:///var/run/docker.sock. Is the docker daemon running?
以上脚本可用来检查 Docker 运行时信息,亦可用来检查 Docker 是否运行
启动 Docker 进程以及配置开机运行 Docker :
systemctl start docker
systemctl enable docker
[root@centos00 log]# systemctl start docker
Job for docker.service failed because the control process exited with error code. See "systemctl status docker.service" and "journalctl -xe" for details.
[root@centos00 log]# systemctl status docker.service -l
● docker.service - Docker Application Container Engine
Loaded: loaded (/usr/lib/systemd/system/docker.service; disabled; vendor preset: disabled)
Active: failed (Result: exit-code) since Thu 2018-08-30 07:45:41 CST; 2min 19s ago
Docs: http://docs.docker.com
Process: 31489 ExecStart=/usr/bin/dockerd-current --add-runtime docker-runc=/usr/libexec/docker/docker-runc-current --default-runtime=docker-runc --exec-opt native.cgroupdriver=systemd --userland-proxy-path=/usr/libexec/docker/docker-proxy-current --init-path=/usr/libexec/docker/docker-init-current --seccomp-profile=/etc/docker/seccomp.json $OPTIONS</span> <span class="hljs-variable" style="font-size: inherit; line-height: inherit; margin: 0px; padding: 0px; color: rgb(98, 151, 85); word-wrap: inherit !important; word-break: inherit !important;">$DOCKER_STORAGE_OPTIONS $DOCKER_NETWORK_OPTIONS</span> <span class="hljs-variable" style="font-size: inherit; line-height: inherit; margin: 0px; padding: 0px; color: rgb(98, 151, 85); word-wrap: inherit !important; word-break: inherit !important;">$ADD_REGISTRY $BLOCK_REGISTRY</span> <span class="hljs-variable" style="font-size: inherit; line-height: inherit; margin: 0px; padding: 0px; color: rgb(98, 151, 85); word-wrap: inherit !important; word-break: inherit !important;">$INSECURE_REGISTRY $REGISTRIES (code=exited, status=1/FAILURE)
Main PID: 31489 (code=exited, status=1/FAILURE)
Aug 30 07:45:38 centos00 systemd[1]: Starting Docker Application Container Engine...
Aug 30 07:45:38 centos00 dockerd-current[31489]: time="2018-08-30T07:45:38.949026762+08:00" level=warning msg="could not change group /var/run/docker.sock to docker: group docker not found"
Aug 30 07:45:38 centos00 dockerd-current[31489]: time="2018-08-30T07:45:38.954488551+08:00" level=info msg="libcontainerd: new containerd process, pid: 31496"
Aug 30 07:45:41 centos00 dockerd-current[31489]: Error starting daemon: SELinux is not supported with the overlay2 graph driver on this kernel. Either boot into a newer kernel or disable selinux in docker (--selinux-enabled=false)
Aug 30 07:45:41 centos00 systemd[1]: docker.service: main process exited, code=exited, status=1/FAILURE
Aug 30 07:45:41 centos00 systemd[1]: Failed to start Docker Application Container Engine.
Aug 30 07:45:41 centos00 systemd[1]: Unit docker.service entered failed state.
Aug 30 07:45:41 centos00 systemd[1]: docker.service failed.
参考这篇文章:
https://stackoverflow.com/questions/45461307/selinux-is-not-supported-with-the-overlay-graph-driver
执行命令:
[root@centos00 log]#  cat /etc/sysconfig/docker-storage
DOCKER_STORAGE_OPTIONS="--storage-driver overlay2 "
修改其 storage driver,使其应用 devicemapper :
[root@centos00 log]#  cat /etc/sysconfig/docker-storage
DOCKER_STORAGE_OPTIONS="--storage-driver devicemapper "
再次启动 docker, 并检查 Docker 的状态
[root@centos00 log]# docker info
Containers: 0
 Running: 0
 Paused: 0
 Stopped: 0
Images: 0
Server Version: 1.13.1
Storage Driver: devicemapper
 Pool Name: docker-253:0-101679883-pool
 Pool Blocksize: 65.54 kB
 Base Device Size: 10.74 GB
 Backing Filesystem: xfs
 Data file: /dev/loop0
 Metadata file: /dev/loop1
 Data Space Used: 11.8 MB
 Data Space Total: 107.4 GB
 Data Space Available: 29.25 GB
 Metadata Space Used: 581.6 kB
 Metadata Space Total: 2.147 GB
 Metadata Space Available: 2.147 GB
 Thin Pool Minimum Free Space: 10.74 GB
 Udev Sync Supported: true
 Deferred Removal Enabled: true
 Deferred Deletion Enabled: true
 Deferred Deleted Device Count: 0
 Data loop file: /var/lib/docker/devicemapper/devicemapper/data
 WARNING: Usage of loopback devices is strongly discouraged for production use. Use `--storage-opt dm.thinpooldev` to specify a custom block storage device.
 Metadata loop file: /var/lib/docker/devicemapper/devicemapper/metadata
 Library Version: 1.02.135-RHEL7 (2016-09-28)
Logging Driver: journald
Cgroup Driver: systemd
Plugins:
 Volume: local
 Network: bridge host macvlan null overlay
Swarm: inactive
Runtimes: runc docker-runc
Default Runtime: docker-runc
Init Binary: /usr/libexec/docker/docker-init-current
containerd version:  (expected: aa8187dbd3b7ad67d8e5e3a15115d3eef43a7ed1)
runc version: 5eda6f6fd0c2884c2c8e78a6e7119e8d0ecedb77 (expected: 9df8b306d01f59d3a8029be411de015b7304dd8f)
init version: fec3683b971d9c3ef73f284f176672c44b448662 (expected: 949e6facb77383876aeff8a6944dde66b3089574)
Security Options:
 seccomp
  WARNING: You're not using the default seccomp profile
  Profile: /etc/docker/seccomp.json
 selinux
Kernel Version: 3.10.0-514.el7.x86_64
Operating System: CentOS Linux 7 (Core)
OSType: linux
Architecture: x86_64
Number of Docker Hooks: 3
CPUs: 4
Total Memory: 3.699 GiB
Name: centos00
ID: DORM:3S6Z:Y33P:TWDH:MT52:NRJR:T5LY:MZYT:37MU:HP3O:JDTS:OFRE
Docker Root Dir: /var/lib/docker
Debug Mode (client): false
Debug Mode (server): false
Registry: https://index.docker.io/v1/
Experimental: false
Insecure Registries:
 127.0.0.0/8
Live Restore Enabled: false
Registries: docker.io (secure)
创建一个容器:
[root@centos00 log]# docker run -i -t ubuntu /bin/bash
Unable to find image 'ubuntu:latest' locally
Trying to pull repository docker.io/library/ubuntu ...
latest: Pulling from docker.io/library/ubuntu
124c757242f8: Downloading [===============================>                   ] 19.84 MB/31.76 MB
2ebc019eb4e2: Download complete
dac0825f7ffb: Download complete
82b0bb65d1bf: Download complete
ef3b655c7f88: Download complete
这是简易版本的创建新容器的方式。如果容器不是远程服务器维护的,而在本地局域网(为了安全,放在本地局域网缓存),创立新容器的方法又有稍微不同。
当命令执行完毕,此时我们已经在 Docker 新建的容器里面:
root@ecb9d7b74b07:~# cat /etc/hosts
127.0.0.1    localhost
::1    localhost ip6-localhost ip6-loopback
fe00::0    ip6-localnet
ff00::0    ip6-mcastprefix
ff02::1    ip6-allnodes
ff02::2    ip6-allrouters
172.17.0.2    ecb9d7b74b07
另起一个窗口,检查开启的容器
[root@centos00 huangyun]# docker ps -a
CONTAINER ID        IMAGE               COMMAND             CREATED             STATUS              PORTS               NAMES
ecb9d7b74b07        ubuntu              "/bin/bash"         9 minutes ago       Up 9 minutes                            vibrant_thompson
这是一个临时起的容器,一旦退出执行了 docker run -i -t ubuntu /bin/bash 的窗口,容器就随之关闭了。
如果要建立一个长久不关闭的容器,就需要执行面的命令来安装守护容器:
docker run --name daemon_dave -d ubuntu /bin/sh -c "while true ;
do echo hello world; sleep 1 ; done"
-d 标识了此容器运行在后台,命令执行完之后,返回主机。
可以执行下面的命令,连接后台执行的容器:
[root@centos00 huangyun]# docker exec -i -t daemon_dave /bin/bash
root@eb6cb2a3b7b6:/# top


top - 14:19:01 up 16:17,  0 users,  load average: 0.29, 0.21, 0.20
Tasks:   4 total,   1 running,   3 sleeping,   0 stopped,   0 zombie
%Cpu(s):  0.6 us,  1.2 sy,  0.0 ni, 98.2 id,  0.0 wa,  0.0 hi,  0.0 si,  0.0 st
KiB Mem :  3878288 total,   114852 free,  2647828 used,  1115608 buff/cache
KiB Swap:  2097148 total,  2092540 free,     4608 used.   831552 avail Mem
关闭一个容器:
执行下面命令即可关闭一个正在运行的容器:
[root@centos00 website]# docker stop  nginx_server_1
nginx_server_1
[root@centos00 website]# docker ps
CONTAINER ID        IMAGE               COMMAND             CREATED             STATUS              PORTS               NAMES
[root@centos00 website]#
docker ps 可以用来检查当前运行着的容器。
以特定名字运行一个容器之后,这名字就一直保存着,下次运行,如果再以这份名字执行相应的运行程序,会报如下的错误:
[root@centos00 website]# docker run -d -p 80 --name nginx_server_1 -v /var/www/html/website:/var/www/html/website:rw ubuntu/nginx3
/usr/bin/docker-current: Error response from daemon: Conflict. The container name "/nginx_server_1" is already in use by container f40d10674908782758915399d3f16f1c5207e2907cb90e25f3689bccb9449d34. You have to remove (or rename) that container to be able to reuse that name..
See '/usr/bin/docker-current run --help'.
不知道为什么 Docker 主程会一直保存着运行过的 docker 名字:
[root@centos00 website]# docker ps -a
CONTAINER ID        IMAGE               COMMAND                  CREATED             STATUS                      PORTS               NAMES
17f8ba709f49        ubuntu/nginx3       "nginx"                  4 minutes ago       Exited (0) 3 minutes ago                        hardcore_pare
f40d10674908        ubuntu/nginx3       "nginx"                  10 hours ago        Exited (0) 6 minutes ago                        nginx_server_1
7baea86e09b2        ubuntu/nginx2       "/bin/sh"                10 hours ago        Exited (2) 10 hours ago                         determined_bartik
a4a3348bf5b4        ubuntu/nginx2       "/bin/sh"                10 hours ago        Exited (0) 10 hours ago                         quirky_keller
d944f39ba4b5        ubuntu/nginx2       "nginx"                  10 hours ago        Exited (1) 10 hours ago                         amazing_wozniak
498f38dab68d        ubuntu/nginx2       "nginx"                  10 hours ago        Exited (1) 10 hours ago                         website
e91147812d90        ubuntu/nginx2       "/bin/sh"                11 hours ago        Exited (0) 10 hours ago                         reverent_golick
b2dc934e76cb        ubuntu/nginx2       "/bin/sh"                11 hours ago        Exited (0) 11 hours ago                         nginx2
4389f303f89f        ubuntu/ping         "/bin/sh"                11 hours ago        Exited (0) 11 hours ago                         dockernginx1
425db7295d54        ubuntu/ping         "/bin/sh"                11 hours ago        Exited (0) 11 hours ago                         dockernginx
4092ee432cdc        ubuntu/ping         "/bin/sh"                11 hours ago        Exited (0) 11 hours ago                         ubuntu00
2eedc14e316f        c58e6a4eb329        "/bin/sh -c 'apt-g..."   11 hours ago        Exited (100) 11 hours ago                       nervous_stallman
8393f330888c        ubuntu/nginx        "/bin/bash"              12 hours ago        Exited (0) 12 hours ago                         gracious_leavitt
b106b1b31c84        ubuntu/nginx        "/bin/bash"              13 hours ago        Exited (127) 12 hours ago                       nginx_server
6f748f358454        ubuntu/ping         "/bin/bash"              15 hours ago        Exited (0) 15 hours ago                         compassionate_brahmagupta
e4a3a8acc032        centos:7.4.1708     "/bin/sh"                17 hours ago        Exited (0) 17 hours ago                         centos7
eb6cb2a3b7b6        ubuntu              "/bin/sh -c 'while..."   2 days ago          Exited (137) 12 hours ago                       daemon_dave
ecb9d7b74b07        ubuntu              "/bin/bash"              2 days ago          Exited (127) 12 hours ago                       vibrant_thompson
[root@centos00 website]#
当再一次使用其中之一运行容器时,名字会因为重复而被拒绝运行。
针对这种需要使用同一个名字重启容器的情况,一般的解决方法有3种:
- 在每次运行容器时,指定关闭容器之后,销毁
# docker run -d -p 80 --rm --name nginx_server_1 -v /var/www/html/website:/var/www/html/website:rw ubuntu/nginx3
- 先关闭容器,再移除容器名字
# docker stop nginx_server_1
# docker rm nginx_server_1
- 重启容器而不用先销毁
# docker restart nginx_server_1
Docker 的镜像与仓库
Docker 公司出版了自己维护和运营的一些镜像,官方网站维护了这份列表:
https://hub.docker.com/
注册一个 Docker 官网的账户 , dblenis, l*w*6.
每个仓库中都存放着各种镜像,执行命令,可以将这些镜像都拉到本地存储:
[root@centos00 containers]# docker pull centos
Using default tag: latest
Trying to pull repository docker.io/library/centos ...
latest: Pulling from docker.io/library/centos
256b176beaff: Pull complete
Digest: sha256:6f6d986d425aeabdc3a02cb61c02abb2e78e57357e92417d6d58332856024faf
Status: Downloaded newer image for docker.io/centos:latest
[root@centos00 containers]# docker images
REPOSITORY          TAG                 IMAGE ID            CREATED             SIZE
docker.io/ubuntu    latest              16508e5c265d        9 days ago          84.1 MB
docker.io/centos    latest              5182e96772bf        3 weeks ago         200 MB
[root@centos00 containers]#
每个镜像都会带有自己的标签,在建立新容器的时候带上这份标签,会让我们更明白操作的对象是什么,会有什么异常:
[root@centos00 containers]# docker run --name centos7 -d centos:centos7.4.1708 /bin/sh
如果不指定特定标签,在拉取官网镜像时,则拉取的是最新的。
构建镜像
两种方法:
使用 Docker Commit 命令
使用 Docker build 命令和 Dockerfile 文件
通过前面新建的 ubuntu 没有 ping 的功能,我希望可以将 ping 功能安装进去,然后打包一个新的镜像,放在 Docker 上分享。
# apt-get install iputils-ping
Reading package lists... Done
Building dependency tree
Reading state information... Done
The following additional packages will be installed:
  libcap2 libcap2-bin libidn11 libpam-cap
The following NEW packages will be installed:
  iputils-ping libcap2 libcap2-bin libidn11 libpam-cap
0 upgraded, 5 newly installed, 0 to remove and 0 not upgraded.
Need to get 140 kB of archives.
After this operation, 537 kB of additional disk space will be used.
Do you want to continue? [Y/n] y
apt-get 安装一些其他软件,方便以后使用,提交这些更改,将其完整的做成一个容器镜像。以后若要新建容器,只需要在此镜像基础上新建便可。
[root@centos00 huangyun]# docker commit daemon_dave ubuntu/ping
若此时查看镜像库:
[root@centos00 huangyun]# docker images
REPOSITORY          TAG                 IMAGE ID            CREATED             SIZE
ubuntu/ping         latest              2eb12722cb2f        2 minutes ago       186 MB
docker.io/ubuntu    latest              16508e5c265d        9 days ago          84.1 MB
docker.io/centos    7.4.1708            d3949e34634c        3 weeks ago         197 MB
docker.io/centos    centos7.4.1708      d3949e34634c        3 weeks ago         197 MB
docker.io/centos    latest              5182e96772bf        3 weeks ago         200 MB
发现 repository 里面多了一个 ubuntu/ping 的镜像。
就像是虚拟机多保存了一个 snapshot 一样,更方便的是我们居然可以依据这份 snapshot 来构建一个新的虚拟机。
官方更推荐使用 Dockerfile 和 Docker build 来构建新容器镜像
Dockerfile 是一种特殊的文件,用来编写 DSL 指令,这些指令可以被 Docker 进程识别,并根据这些指令进行处理,最终完成一个可用的镜像制作。每一个镜像都是从基础镜像之上,一点点添加其他镜像组成的。一开始的基础镜像只是符合最低运行库的内核,比如 ubuntu 的基础镜像,居然连 ping, vi 都没有。如果需要这些功能作为新镜像的一部分,那么就要在 Dockerfile 里面新加。
更多的 Dockerfile 支持的指令:
http://docs.docker.com/reference/builder
Docker build 就是基于 Dockerfile ,将其中的指令发送给 Docker 进程,使其进行构建新镜像。Docker 进程可以看做是服务进程,提供一系列的后台服务,docker build 就是客户端,发送请求给 Docker ,Docker 统一调度工作完成 build 的请求。
[root@centos00 DockerWeb]# cat Dockerfile
# version : 0.0.1

FROM ubuntu:14.04

MAINTAINER Lenis Huang "[email protected]"
RUN apt-get update
RUN apt-get install -y nginx
RUN echo "Hello, World!" > /usr/share/nginx/html/index.html
EXPOSE 80
上面的脚本安装了 nginx 服务,并且创建了一个简单的静态网页,最后允许 80 开放给外界访问。
构建开始:
[root@centos00 DockerWeb]# docker build -t="ubuntu/nginx" .
Sending build context to Docker daemon 2.048 kB
Step 1/6 : FROM ubuntu:14.04
Trying to pull repository docker.io/library/ubuntu ...
14.04: Pulling from docker.io/library/ubuntu
72c01b436656: Extracting [=====>                                             ] 7.799 MB/67.13 MB
944f9cf63457: Download complete
6856614e8780: Download complete
9d0e4b6507f2: Download complete
c00913272b9b: Download complete
正在 build 之中的镜像,这一步步看的更详细:
[root@centos00 DockerWeb]# docker build -t="ubuntu/nginx" .
Sending build context to Docker daemon 2.048 kB
Step 1/6 : FROM ubuntu:14.04
Trying to pull repository docker.io/library/ubuntu ...
14.04: Pulling from docker.io/library/ubuntu
72c01b436656: Pull complete
944f9cf63457: Pull complete
6856614e8780: Pull complete
9d0e4b6507f2: Pull complete
c00913272b9b: Pull complete
Digest: sha256:d6b8e25d0f3073bad48fda3f28d01ac0e8bd0e2a6d034c7f462619591a72c791
Status: Downloaded newer image for docker.io/ubuntu:14.04
 ---> 8789038981bc
Step 2/6 : MAINTAINER Lenis Huang "[email protected]"
 ---> Running in 6a16f9906861
 ---> aacb0d62260f
Removing intermediate container 6a16f9906861
Step 3/6 : RUN apt-get update
 ---> Running in ed843eeaf662

Ign http://archive.ubuntu.com trusty InRelease
Get:1 http://security.ubuntu.com trusty-security InRelease [65.9 kB]
Get:2 http://archive.ubuntu.com trusty-updates InRelease [65.9 kB]
Get:3 http://archive.ubuntu.com trusty-backports InRelease [65.9 kB]
Get:4 http://archive.ubuntu.com trusty Release.gpg [933 B]
Get:5 http://security.ubuntu.com trusty-security/main amd64 Packages [952 kB]
Get:6 http://archive.ubuntu.com trusty-updates/universe Sources [260 kB]
Get:7 http://security.ubuntu.com trusty-security/universe Sources [96.3 kB]
Get:8 http://archive.ubuntu.com trusty-updates/main amd64 Packages [1372 kB]
Get:9 http://archive.ubuntu.com trusty-updates/restricted amd64 Packages [21.4 kB]
Get:10 http://archive.ubuntu.com trusty-updates/universe amd64 Packages [606 kB]
Get:11 http://archive.ubuntu.com trusty-updates/multiverse amd64 Packages [16.0 kB]
Get:12 http://security.ubuntu.com trusty-security/restricted amd64 Packages [18.1 kB]
Get:13 http://archive.ubuntu.com trusty-backports/main amd64 Packages [14.7 kB]
Get:14 http://archive.ubuntu.com trusty-backports/restricted amd64 Packages [40 B]
Get:15 http://archive.ubuntu.com trusty-backports/universe amd64 Packages [52.5 kB]
Get:16 http://archive.ubuntu.com trusty-backports/multiverse amd64 Packages [1392 B]
Get:17 http://archive.ubuntu.com trusty Release [58.5 kB]
Get:18 http://archive.ubuntu.com trusty/universe Sources [7926 kB]
Get:19 http://archive.ubuntu.com trusty/main amd64 Packages [1743 kB]
Get:20 http://archive.ubuntu.com trusty/restricted amd64 Packages [16.0 kB]
Get:21 http://archive.ubuntu.com trusty/universe amd64 Packages [7589 kB]
Get:22 http://archive.ubuntu.com trusty/multiverse amd64 Packages [169 kB]
Get:23 http://security.ubuntu.com trusty-security/multiverse amd64 Packages [4721 B]
Get:24 http://security.ubuntu.com trusty-security/universe amd64 Packages [311 kB]
Fetched 21.4 MB in 11s (1822 kB/s)
Reading package lists...
 ---> 582a2a0c6fb9
Removing intermediate container ed843eeaf662
Step 4/6 : RUN apt-get install -y nginx
 ---> Running in 7199f88e91ef

Reading package lists...
Building dependency tree...
Reading state information...
The following extra packages will be installed:
  fontconfig-config fonts-dejavu-core geoip-database libfontconfig1
  libfreetype6 libgd3 libgeoip1 libjbig0 libjpeg-turbo8 libjpeg8 libtiff5
  libvpx1 libx11-6 libx11-data libxau6 libxcb1 libxdmcp6 libxml2 libxpm4
  libxslt1.1 nginx-common nginx-core sgml-base xml-core
Suggested packages:
  libgd-tools geoip-bin fcgiwrap nginx-doc sgml-base-doc debhelper
The following NEW packages will be installed:
  fontconfig-config fonts-dejavu-core geoip-database libfontconfig1
  libfreetype6 libgd3 libgeoip1 libjbig0 libjpeg-turbo8 libjpeg8 libtiff5
  libvpx1 libx11-6 libx11-data libxau6 libxcb1 libxdmcp6 libxml2 libxpm4
  libxslt1.1 nginx nginx-common nginx-core sgml-base xml-core
0 upgraded, 25 newly installed, 0 to remove and 0 not upgraded.
Need to get 5593 kB of archives.
After this operation, 19.8 MB of additional disk space will be used.
Get:1 http://archive.ubuntu.com/ubuntu/ trusty/main libgeoip1 amd64 1.6.0-1 [71.0 kB]
Get:2 http://archive.ubuntu.com/ubuntu/ trusty/main libxau6 amd64 1:1.0.8-1 [8376 B]
Get:3 http://archive.ubuntu.com/ubuntu/ trusty/main libxdmcp6 amd64 1:1.1.1-1 [12.8 kB]
Get:4 http://archive.ubuntu.com/ubuntu/ trusty/main libxcb1 amd64 1.10-2ubuntu1 [38.0 kB]
Get:5 http://archive.ubuntu.com/ubuntu/ trusty-updates/main libx11-data all 2:1.6.2-1ubuntu2.1 [111 kB]
Get:6 http://archive.ubuntu.com/ubuntu/ trusty-updates/main libx11-6 amd64 2:1.6.2-1ubuntu2.1 [561 kB]
Get:7 http://archive.ubuntu.com/ubuntu/ trusty-updates/main libxml2 amd64 2.9.1+dfsg1-3ubuntu4.13 [573 kB]
Get:8 http://archive.ubuntu.com/ubuntu/ trusty/main sgml-base all 1.26+nmu4ubuntu1 [12.5 kB]
Get:9 http://archive.ubuntu.com/ubuntu/ trusty/main fonts-dejavu-core all 2.34-1ubuntu1 [1024 kB]
Get:10 http://archive.ubuntu.com/ubuntu/ trusty-updates/main fontconfig-config all 2.11.0-0ubuntu4.2 [47.4 kB]
Get:11 http://archive.ubuntu.com/ubuntu/ trusty-updates/main libfreetype6 amd64 2.5.2-1ubuntu2.8 [304 kB]
Get:12 http://archive.ubuntu.com/ubuntu/ trusty-updates/main libfontconfig1 amd64 2.11.0-0ubuntu4.2 [123 kB]
Get:13 http://archive.ubuntu.com/ubuntu/ trusty-updates/main libjpeg-turbo8 amd64 1.3.0-0ubuntu2.1 [104 kB]
Get:14 http://archive.ubuntu.com/ubuntu/ trusty/main libjpeg8 amd64 8c-2ubuntu8 [2194 B]
Get:15 http://archive.ubuntu.com/ubuntu/ trusty-updates/main libjbig0 amd64 2.0-2ubuntu4.1 [26.1 kB]
Get:16 http://archive.ubuntu.com/ubuntu/ trusty-updates/main libtiff5 amd64 4.0.3-7ubuntu0.9 [147 kB]
Get:17 http://archive.ubuntu.com/ubuntu/ trusty/main libvpx1 amd64 1.3.0-2 [556 kB]
Get:18 http://archive.ubuntu.com/ubuntu/ trusty-updates/main libxpm4 amd64 1:3.5.10-1ubuntu0.1 [33.2 kB]
Get:19 http://archive.ubuntu.com/ubuntu/ trusty-updates/main libgd3 amd64 2.1.0-3ubuntu0.10 [123 kB]
Get:20 http://archive.ubuntu.com/ubuntu/ trusty-updates/main libxslt1.1 amd64 1.1.28-2ubuntu0.1 [145 kB]
Get:21 http://archive.ubuntu.com/ubuntu/ trusty/main geoip-database all 20140313-1 [1196 kB]
Get:22 http://archive.ubuntu.com/ubuntu/ trusty/main xml-core all 0.13+nmu2 [23.3 kB]
Get:23 http://archive.ubuntu.com/ubuntu/ trusty-updates/main nginx-common all 1.4.6-1ubuntu3.8 [19.1 kB]
Get:24 http://archive.ubuntu.com/ubuntu/ trusty-updates/main nginx-core amd64 1.4.6-1ubuntu3.8 [325 kB]
Get:25 http://archive.ubuntu.com/ubuntu/ trusty-updates/main nginx all 1.4.6-1ubuntu3.8 [5394 B]
debconf: unable to initialize frontend: Dialog
debconf: (TERM is not set, so the dialog frontend is not usable.)
debconf: falling back to frontend: Readline
debconf: unable to initialize frontend: Readline
debconf: (This frontend requires a controlling tty.)
debconf: falling back to frontend: Teletype
dpkg-preconfigure: unable to re-open stdin:
Fetched 5593 kB in 6min 9s (15.2 kB/s)
Selecting previously unselected package libgeoip1:amd64.
(Reading database ... 11571 files and directories currently installed.)
Preparing to unpack .../libgeoip1_1.6.0-1_amd64.deb ...
Unpacking libgeoip1:amd64 (1.6.0-1) ...
Selecting previously unselected package libxau6:amd64.
Preparing to unpack .../libxau6_1%3a1.0.8-1_amd64.deb ...
Unpacking libxau6:amd64 (1:1.0.8-1) ...
Selecting previously unselected package libxdmcp6:amd64.
Preparing to unpack .../libxdmcp6_1%3a1.1.1-1_amd64.deb ...
Unpacking libxdmcp6:amd64 (1:1.1.1-1) ...
Selecting previously unselected package libxcb1:amd64.
Preparing to unpack .../libxcb1_1.10-2ubuntu1_amd64.deb ...
Unpacking libxcb1:amd64 (1.10-2ubuntu1) ...
Selecting previously unselected package libx11-data.
Preparing to unpack .../libx11-data_2%3a1.6.2-1ubuntu2.1_all.deb ...
Unpacking libx11-data (2:1.6.2-1ubuntu2.1) ...
Selecting previously unselected package libx11-6:amd64.
Preparing to unpack .../libx11-6_2%3a1.6.2-1ubuntu2.1_amd64.deb ...
Unpacking libx11-6:amd64 (2:1.6.2-1ubuntu2.1) ...
Selecting previously unselected package libxml2:amd64.
Preparing to unpack .../libxml2_2.9.1+dfsg1-3ubuntu4.13_amd64.deb ...
Unpacking libxml2:amd64 (2.9.1+dfsg1-3ubuntu4.13) ...
Selecting previously unselected package sgml-base.
Preparing to unpack .../sgml-base_1.26+nmu4ubuntu1_all.deb ...
Unpacking sgml-base (1.26+nmu4ubuntu1) ...
Selecting previously unselected package fonts-dejavu-core.
Preparing to unpack .../fonts-dejavu-core_2.34-1ubuntu1_all.deb ...
Unpacking fonts-dejavu-core (2.34-1ubuntu1) ...
Selecting previously unselected package fontconfig-config.
Preparing to unpack .../fontconfig-config_2.11.0-0ubuntu4.2_all.deb ...
Unpacking fontconfig-config (2.11.0-0ubuntu4.2) ...
Selecting previously unselected package libfreetype6:amd64.
Preparing to unpack .../libfreetype6_2.5.2-1ubuntu2.8_amd64.deb ...
Unpacking libfreetype6:amd64 (2.5.2-1ubuntu2.8) ...
Selecting previously unselected package libfontconfig1:amd64.
Preparing to unpack .../libfontconfig1_2.11.0-0ubuntu4.2_amd64.deb ...
Unpacking libfontconfig1:amd64 (2.11.0-0ubuntu4.2) ...
Selecting previously unselected package libjpeg-turbo8:amd64.
Preparing to unpack .../libjpeg-turbo8_1.3.0-0ubuntu2.1_amd64.deb ...
Unpacking libjpeg-turbo8:amd64 (1.3.0-0ubuntu2.1) ...
Selecting previously unselected package libjpeg8:amd64.
Preparing to unpack .../libjpeg8_8c-2ubuntu8_amd64.deb ...
Unpacking libjpeg8:amd64 (8c-2ubuntu8) ...
Selecting previously unselected package libjbig0:amd64.
Preparing to unpack .../libjbig0_2.0-2ubuntu4.1_amd64.deb ...
Unpacking libjbig0:amd64 (2.0-2ubuntu4.1) ...
Selecting previously unselected package libtiff5:amd64.
Preparing to unpack .../libtiff5_4.0.3-7ubuntu0.9_amd64.deb ...
Unpacking libtiff5:amd64 (4.0.3-7ubuntu0.9) ...
Selecting previously unselected package libvpx1:amd64.
Preparing to unpack .../libvpx1_1.3.0-2_amd64.deb ...
Unpacking libvpx1:amd64 (1.3.0-2) ...
Selecting previously unselected package libxpm4:amd64.
Preparing to unpack .../libxpm4_1%3a3.5.10-1ubuntu0.1_amd64.deb ...
Unpacking libxpm4:amd64 (1:3.5.10-1ubuntu0.1) ...
Selecting previously unselected package libgd3:amd64.
Preparing to unpack .../libgd3_2.1.0-3ubuntu0.10_amd64.deb ...
Unpacking libgd3:amd64 (2.1.0-3ubuntu0.10) ...
Selecting previously unselected package libxslt1.1:amd64.
Preparing to unpack .../libxslt1.1_1.1.28-2ubuntu0.1_amd64.deb ...
Unpacking libxslt1.1:amd64 (1.1.28-2ubuntu0.1) ...
Selecting previously unselected package geoip-database.
Preparing to unpack .../geoip-database_20140313-1_all.deb ...
Unpacking geoip-database (20140313-1) ...
Selecting previously unselected package xml-core.
Preparing to unpack .../xml-core_0.13+nmu2_all.deb ...
Unpacking xml-core (0.13+nmu2) ...
Selecting previously unselected package nginx-common.
Preparing to unpack .../nginx-common_1.4.6-1ubuntu3.8_all.deb ...
Unpacking nginx-common (1.4.6-1ubuntu3.8) ...
Selecting previously unselected package nginx-core.
Preparing to unpack .../nginx-core_1.4.6-1ubuntu3.8_amd64.deb ...
Unpacking nginx-core (1.4.6-1ubuntu3.8) ...
Selecting previously unselected package nginx.
Preparing to unpack .../nginx_1.4.6-1ubuntu3.8_all.deb ...
Unpacking nginx (1.4.6-1ubuntu3.8) ...
Processing triggers for ureadahead (0.100.0-16) ...
Setting up libgeoip1:amd64 (1.6.0-1) ...
Setting up libxau6:amd64 (1:1.0.8-1) ...
Setting up libxdmcp6:amd64 (1:1.1.1-1) ...
Setting up libxcb1:amd64 (1.10-2ubuntu1) ...
Setting up libx11-data (2:1.6.2-1ubuntu2.1) ...
Setting up libx11-6:amd64 (2:1.6.2-1ubuntu2.1) ...
Setting up libxml2:amd64 (2.9.1+dfsg1-3ubuntu4.13) ...
Setting up sgml-base (1.26+nmu4ubuntu1) ...
Setting up fonts-dejavu-core (2.34-1ubuntu1) ...
Setting up fontconfig-config (2.11.0-0ubuntu4.2) ...
Setting up libfreetype6:amd64 (2.5.2-1ubuntu2.8) ...
Setting up libfontconfig1:amd64 (2.11.0-0ubuntu4.2) ...
Setting up libjpeg-turbo8:amd64 (1.3.0-0ubuntu2.1) ...
Setting up libjpeg8:amd64 (8c-2ubuntu8) ...
Setting up libjbig0:amd64 (2.0-2ubuntu4.1) ...
Setting up libtiff5:amd64 (4.0.3-7ubuntu0.9) ...
Setting up libvpx1:amd64 (1.3.0-2) ...
Setting up libxpm4:amd64 (1:3.5.10-1ubuntu0.1) ...
Setting up libgd3:amd64 (2.1.0-3ubuntu0.10) ...
Setting up libxslt1.1:amd64 (1.1.28-2ubuntu0.1) ...
Setting up geoip-database (20140313-1) ...
Setting up xml-core (0.13+nmu2) ...
Setting up nginx-common (1.4.6-1ubuntu3.8) ...
debconf: unable to initialize frontend: Dialog
debconf: (TERM is not set, so the dialog frontend is not usable.)
debconf: falling back to frontend: Readline
debconf: unable to initialize frontend: Readline
debconf: (This frontend requires a controlling tty.)
debconf: falling back to frontend: Teletype
Processing triggers for ureadahead (0.100.0-16) ...
Setting up nginx-core (1.4.6-1ubuntu3.8) ...
invoke-rc.d: policy-rc.d denied execution of start.
Setting up nginx (1.4.6-1ubuntu3.8) ...
Processing triggers for libc-bin (2.19-0ubuntu6.14) ...
Processing triggers for sgml-base (1.26+nmu4ubuntu1) ...
 ---> 3e46f256a08d
Removing intermediate container 7199f88e91ef
Step 5/6 : RUN echo "Hello, World!" > /usr/share/nginx/html/index.html
 ---> Running in 7478088422e9

 ---> e7cab50d7846
Removing intermediate container 7478088422e9
Step 6/6 : EXPOSE 80
 ---> Running in fadc982b2846
 ---> a99888e05c01
Removing intermediate container fadc982b2846
Successfully built a99888e05c01
似乎中间也出现了一些异常:
debconf: unable to initialize frontend: Dialog
debconf: (TERM is not set, so the dialog frontend is not usable.)
debconf: falling back to frontend: Readline
debconf: unable to initialize frontend: Readline
debconf: (This frontend requires a controlling tty.)
debconf: falling back to frontend: Teletype
似乎也没有影响继续 build 的进程。
Setting up nginx (1.4.6-1ubuntu3.8) ...
Processing triggers for libc-bin (2.19-0ubuntu6.14) ...
Processing triggers for sgml-base (1.26+nmu4ubuntu1) ...
 ---> 3e46f256a08d
Removing intermediate container 7199f88e91ef
Step 5/6 : RUN echo "Hello, World!" > /usr/share/nginx/html/index.html
 ---> Running in 7478088422e9

 ---> e7cab50d7846
Removing intermediate container 7478088422e9
Step 6/6 : EXPOSE 80
 ---> Running in fadc982b2846
 ---> a99888e05c01
Removing intermediate container fadc982b2846
Successfully built a99888e05c01
中间层的镜像,在顺利 build 完之后,被移除,而只保留了最后一个顺利完成 build 的镜像,而这正是我们需要的。
查看刚才 Build 完之后的镜像,基于这份镜像再新建一个新的容器:
[root@centos00 DockerWeb]# docker images
REPOSITORY          TAG                 IMAGE ID            CREATED             SIZE
ubuntu/nginx        latest              a99888e05c01        6 minutes ago       230 MB
ubuntu/ping         latest              2eb12722cb2f        2 hours ago         186 MB
docker.io/ubuntu    14.04               8789038981bc        9 days ago          188 MB
docker.io/ubuntu    latest              16508e5c265d        9 days ago          84.1 MB
docker.io/centos    7.4.1708            d3949e34634c        3 weeks ago         197 MB
docker.io/centos    centos7.4.1708      d3949e34634c        3 weeks ago         197 MB
docker.io/centos    latest              5182e96772bf        3 weeks ago         200 MB
Docker 测试网站
先按照书上的代码敲一遍,看看效果如何。但在 Linux 下安装配置 nginx 是必知必会的东西。我觉得有必要另开一篇好好说道。
新建一份 Dockerfile :
[root@centos00 DockerNginx]# cat Dockerfile
FROM ubuntu
MAINTAINER Lenis Huang "[email protected]"
ENV REFRESHED_AT 2018-09-01
RUN apt-get update
RUN apt-get install -y -q nginx
RUN mkdir -p /var/www/html
ADD nginx/global.conf /etc/nginx/conf.d/
ADD nginx/nginx.conf /etc/nginx/nginx.conf
EXPOSE 80
Nginx 的两个配置文件:
# global.conf

server    {
    listen      0.0.0.0:80;
    server_name _;

    root        /var/www/html/website;
    index       index.html  index.htm

    access_log  /var/log/nginx/default_access.log;
    error_log   /var/log/nginx/default_error.log;
}
# nginx.conf
user www-data;
worker_processes 4;
pid /run/nginx.pid;
daemon off;


events {}

http {
    sendfile on ;
    tcp_nopush on ;
    tcp_nodelay on ;
    keepalive_timeout 65;
    types_hash_max_size 2048;
    include /etc/nginx/mime.types;
    default_type application/octet-stream;
    access_log /var/log/nginx/access.log;
    error_log /var/log/nginx/error.log;
    gzip on;
    gzip_disable "msie6";
    include /etc/nginx/conf.d/*.conf;
}
Dockerfile 和 nginx 目录是平级的,docker build 在构建的时候,会依据相对路径找到对应的文件进行操作。docker build 命令会在指定的路径下寻找 dockerfile ,所以最简单的方式便是指定当前目录为 Build 起始路径:
[root@centos00 DockerNginx]# docker build -t ubuntu/nginx2 .
很不幸的是遇到一些问题:
E: Failed to fetch http://archive.ubuntu.com/ubuntu/pool/main/libx/libxau/libxau6_1.0.8-1_amd64.deb  Connection failed [IP: 91.189.88.152 80]
E: Unable to fetch some archives, maybe run apt-get update or try with --fix-missing?
The command '/bin/sh -c apt-get install -y -q nginx' returned a non-zero code: 100
再一次运行 build 命令这个错误消失,我认为这是一次简单的链接失效问题。
虽然安装了 nginx,但是在主机访问容器中的 web 服务,却是访问不了的。要登录 docker 虚拟机,开启 Nginx.
还记得配置 Nginx 的时候,指定了 root 文件吧:
# global.conf

server    {
    listen      0.0.0.0:80;
    server_name _;

    root        /var/www/html/website;
    index       index.html  index.htm

    access_log  /var/log/nginx/default_access.log;
    error_log   /var/log/nginx/default_error.log;
}
在这里,只要简单的编写 html 文件,放在 /var/www/html/website/目录下,以 index.html 命名即可。
在本地建立一个文件夹 website,专门放置需要在容器 nginx 服务下托管的网页。再指定容器开启时直接运行 nginx ,保持后台运行的容器可以一直处于运行状态而不退出。
[root@centos00 html]# docker run -d -p 80 --name website -v $PWD/website:/var/www/html/website ubuntu/nginx2 nginx
498f38dab68d3f5bc7166b2f92aeb344a795af7462081b68ca1cbeaa2f433b7d
但是亲测, Nginx 命令写在 docker run 之后不管用,还是要写在 dockerfile 之中:
FROM ubuntu
MAINTAINER Lenis Huang "[email protected]"
ENV REFRESHED_AT 2018-09-01
RUN apt-get update
RUN apt-get install -y -q nginx
RUN mkdir -p /var/www/html
ADD nginx/global.conf /etc/nginx/conf.d/
ADD nginx/nginx.conf /etc/nginx/nginx.conf
CMD ["nginx"]
EXPOSE 80
在本地的文件夹 $PWD/website 下面编写简单的 index.html 文件:
[root@centos00 html]# cat index.html
This web page is built up outside of docker nginx.
But it is hosted by docer nginx.
It's amazing, like shared folder in vmware!
访问虚拟机,即可看到 index.html 中所写的内容。
非常利索的一个借壳托管网页的 docker 程序就那么完成了!
Docker 构建 Web 应用程序
# Dockerfile

FROM ubuntu
MAINTAINER Lenis Huang [email protected]

RUN apt-get update
RUN apt-get -y install ruby ruby-dev build-essential redis-tools
RUN gem install --no-rdoc --no-ri sinatra json redis


RUN mkdir -p /opt/webapp

ADD webapp/bin /opt/webapp/bin
ADD webapp/lib /opt/webapp/lib


EXPOSE 4567

CMD ["/opt/webapp/bin/webapp"]
# webapp

#!/usr/bin/ruby

$:.unshift(FIle.expand_path(File.join(File.dirname(__FILE__),"..","lib")))

require 'app'

App.run!
# app.rb

require "rubygems"
require "sinatra"
require "json"

class App < Sinatra::Application

    set :bind, '0.0.0.0'

    get '/' do
        "<h1>DockerBook TEst Sinatra app</h1>"
    end

    post '/json/?' do
        params.to_json
    end

end
新建容器,打开服务:
# docker run -i -t -p 4567 --rm --name sinatrapp ubuntu/sinatra3 /bin/sh
传入参数,返回 json:
# curl -i -H 'Accept:application/json' -d 'name=Foo&status=Bar' http://127.0.0.1:32781/json
HTTP/1.1 200 OK
Content-Type: text/html;charset=utf-8
Content-Length: 29
X-Xss-Protection: 1; mode=block
X-Content-Type-Options: nosniff
X-Frame-Options: SAMEORIGIN
Server: WEBrick/1.4.2 (Ruby/2.5.1/2018-03-29)
Date: Sun, 02 Sep 2018 07:27:23 GMT
Connection: Keep-Alive

{"name":"Foo","status":"Bar"}
Redis on Docker
有意义的应用离不开数据库,用 Redis 为 Sinatra 应用来提供存储。
新建一台 Redis 数据库容器
# Dockerfile

FROM ubuntu

MAINTAINER Lenis Huang [email protected]

RUN apt-get update
RUN apt-get -y install redis-server redis-tools

EXPOSE 6379
ENTRYPOINT ["/usr/bin/redis-server"]

CMD []
开启 Redis 容器之后,验证 Redis 是否可用:
# redis-cli -h 127.0.0.1 -p 32783
这里的端口 32783 是通过 docker ps 看来的:
[root@centos00 Redis]# docker ps
CONTAINER ID        IMAGE               COMMAND                  CREATED             STATUS              PORTS                     NAMES
e324f0fd3d31        ubuntu/redis        "/usr/bin/redis-se..."   9 minutes ago       Up 9 minutes        0.0.0.0:32783->6379/tcp   redis
9ccf74ce181d        ubuntu/sinatra3     "/bin/sh"                25 minutes ago      Up 25 minutes       0.0.0.0:32781->4567/tcp   sinatrapp
bbef28a8db2b        ubuntu/nginx3       "nginx"                  7 hours ago         Up 7 hours          0.0.0.0:32775->80/tcp     nginx_server_1
[root@centos00 Redis]#
0.0.0.0:32783->6379/tcp 就是宿主机端口与容器端口的映射。
Web App Sinatra 与 Redis 的连接
连接 Redis 有多种方法:
基于宿主机与容器之间端口映射
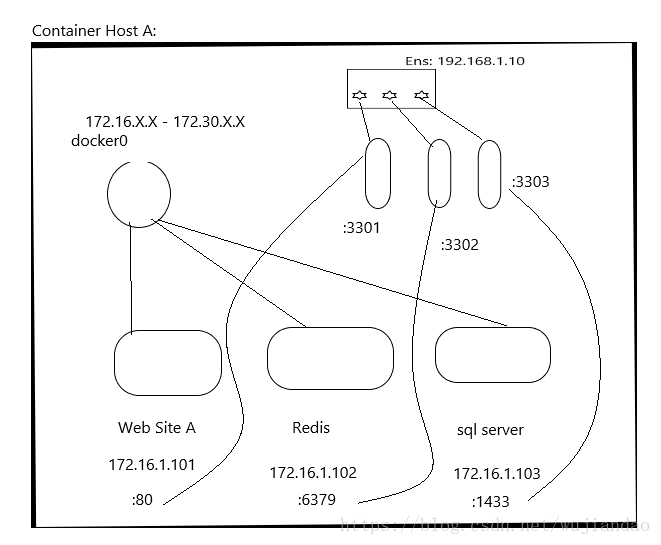
在运行容器的时候,通常会暴露一个端口 (docker run -p 80), 此时容器端口默认会映射到宿主机中的随机一个端口,比如33728. 外部计算机通过访问宿主机的映射端口(33728)就可以访问容器所提供的(80)服务了。
基于 Docker 栈的连接
Docker 在安装完毕之后,分配一个 172.16.X.X - 172.30.X.X IP 地址,也 就是所有宿主机可分配给新建容器的 IP 地址范围。Docker 服务进程自占一个 IP 作为路由,与宿主机进行通信的 IP,比如 172.17.0.1.
通过 docker 命令 inspect 来查看 redis 分配的 IP 地址
# docker inspect redis
 "NetworkSettings": {
            "Bridge": "",
            "SandboxID": "2f679e6d9361654ec54f0e2c4c26cf358e008394580920921e106a66bb619c77",
            "HairpinMode": false,
            "LinkLocalIPv6Address": "",
            "LinkLocalIPv6PrefixLen": 0,
            "Ports": {
                "6379/tcp": [
                    {
                        "HostIp": "0.0.0.0",
                        "HostPort": "32783"
                    }
                ]
            },
            "SandboxKey": "/var/run/docker/netns/2f679e6d9361",
            "SecondaryIPAddresses": null,
            "SecondaryIPv6Addresses": null,
            "EndpointID": "5d4467ebd24ce1ab75ec0f8c7df7411cd157c8f1305b6ea9fa08363d6d7781fc",
            "Gateway": "172.17.0.1",
            "GlobalIPv6Address": "",
            "GlobalIPv6PrefixLen": 0,
            "IPAddress": "172.17.0.4",
            "IPPrefixLen": 16,
            "IPv6Gateway": "",
            "MacAddress": "02:42:ac:11:00:04",
            "Networks": {
                "bridge": {
                    "IPAMConfig": null,
                    "Links": null,
                    "Aliases": null,
                    "NetworkID": "6416f1f801bd82855cc4ffaf4c8086a61d5b56a3311b900ebfc12b70c9bd0775",
                    "EndpointID": "5d4467ebd24ce1ab75ec0f8c7df7411cd157c8f1305b6ea9fa08363d6d7781fc",
                    "Gateway": "172.17.0.1",
                    "IPAddress": "172.17.0.4",
                    "IPPrefixLen": 16,
                    "IPv6Gateway": "",
                    "GlobalIPv6Address": "",
                    "GlobalIPv6PrefixLen": 0,
                    "MacAddress": "02:42:ac:11:00:04"
                }
            }
        }
分配的 IP 可能下一次启动的时候会变,所以通过 IP 来连接 redis 不是很稳定。
这时候就需要 docker link 了
Docker Link 连接两个容器
这是一个令人兴奋的功能。不仅仅是省去了暴露端口的步骤,更赞的是绝对的安全。只要使用 link 连接了两个容器,不需要将端口暴露给宿主机,而两台容器之间依然可以相互通信。
# docker run -p 4567 --name webapp --link redis:db -t -i ubuntu/sinatra3 /bin/bash
root@3e140f12028b:/# cat /etc/hosts
127.0.0.1    localhost
::1    localhost ip6-localhost ip6-loopback
fe00::0    ip6-localnet
ff00::0    ip6-mcastprefix
ff02::1    ip6-allnodes
ff02::2    ip6-allrouters
172.17.0.2    db b078287c5cb9 redis
172.17.0.3    3e140f12028b
–link redis:db : redis 容器名,db 是别名,反应在父容器(指定–link的容器)的 hosts 文件中。
有了这个别名也就彻底解决了 Redis 服务器 IP 硬编码和 IP 地址不稳定的因素。
划了个简单的草图,理解 Docker 网络