个人备忘
linux 下载地址:wget http://mirrors.tuna.tsinghua.edu.cn/apache/maven/maven-3/3.3.9/binaries/apache-maven-3.3.9-bin.tar.gz
一. maven简介
maven是一个强大的项目构建和管理工具,利用java进行开发,属于Apache下的开源项目,现在的最新版本为Apache Maven 3.3.9,官网为 http://maven.apache.org。maven是跨平台的,并且功能很强大,能够帮助使用者完成从清理,编译,测试,生成报告,打包和部署的一系列操作过程。maven标准化了项目的构建过程,有利于团队之间的协作。此外,maven可以有效的解决java项目中jar包依赖问题,解决由此带来的版本不一致等问题。maven还提供了一个免费的中央仓库,几乎可以找到任何开源类库。
二. maven常用命令
本节介绍几个maven常用的命令,以备遗忘时可以查看。
mvn -version 查看maven的版本及配置信息
mvn archetype:create -DgroupId= DartifactId= 构建java项目
mvn archetype:create -DgroupId= DartifactId= -DarchetypeArtifactId=maven-archetype-webapp 创建web项目
mvn compile 编译项目代码
mvn package 打包项目
mvn package -Dmaven.test.skip=true 打包项目时跳过单元测试
mvn test 运行单元测试
mvn clean 清除编译产生的target文件夹内容,可以配合相应命令一起使用,如mvn clean package, mvn clean test
mvn install 打包后将其安装在本地仓库
mvn deploy 打包后将其安装到pom文件中配置的远程仓库
mvn eclipse:eclipse 将maven生成eclipse项目结构
mvn eclipse:clean 清除maven项目中eclipse的项目结构
mvn site 生成站点目录
mvn dependency:list 显示所有已经解析的所有依赖
mvn dependency:tree 以树的结构展示项目中的依赖
mvn dependency:analyze 对项目中的依赖进行分析,依赖未使用,使用单未引入
mvn tomcat:run 启动tomcat
三. maven中pom文件
pom文件是maven中最重要的文件,以上命令的也需要根据pom文件进行运行。一般在构建完maven项目后需要修改pom文件添加诸如依赖关系,打包机制及一些项目的详细信息。一般的pom包含如下一些基本的信息:
groupId:项目或者组织的唯一标志
artifactId:项目的名称
version:项目的版本
packaging:打包机制
name:用户描述项目的名称
url:应该是只是写明开发团队的网站
其中groupId,artfactId及version是所有的pom文件必须拥有的。除了这些基本信息外就是pom的依赖,集成,合成关系,插件,构建信息的一些声明,这里不进行详细介绍,下面给出一个简单的pom文件示例如下:
<?xml version="1.0" encoding="UTF-8"?>
<project xmlns="http://maven.apache.org/POM/4.0.0" xmlns:xsi="http://www.w3.org/2001/XMLSchema-instance" xsi:schemaLocation="http://maven.apache.org/POM/4.0.0 http://maven.apache.org/xsd/maven-4.0.0.xsd">
	<modelVersion>4.0.0</modelVersion>

	<groupId>com.znf4.common</groupId>
	<artifactId>znf4</artifactId>
	<version>1.0.0-SNAPSHOT</version>
	<packaging>pom</packaging>

	<name>znf4</name>
	<url>http://maven.apache.org</url>

	<organization>
		<name>znf4</name>
		<url>http://www.bigpay8.com</url>
	</organization>
    <dependency>
		<groupId>com.znf4.common</groupId>
		<artifactId>znf4-common-core</artifactId>
		<version>${project.parent.version}</version>
	</dependency>

	<dependency>
		<groupId>com.znf4.service</groupId>
		<artifactId>znf4-service</artifactId>
		<version>${project.parent.version}</version>
	</dependency>

    /***顺次打包**/
	<modules>
		<module>znf4-app-timer</module>
		<module>znf4-common-config</module>
		<module>znf4-common-core</module>
		<module>znf4-common-parent</module>
		<module>znf4-server</module>
		<module>znf4-web-boss</module>
		<module>znf4-app-polling</module>
		<module>znf4-web-merchant</module>
	</modules>
</project>
四. maven中热部署
前言 : maven 中有很多的插件,打包的,引入依赖的等等,我们热部署也是通过maven 的插件去做。
<!--第一次去配置这个插件,要等待一会,涉及到下载会很慢。-->
<!-- 热部署 -->
<plugin>
	<groupId>org.codehaus.cargo</groupId>
	<artifactId>cargo-maven2-plugin</artifactId>
	<version>1.4.9</version>
	<configuration>
		<container>
			<containerId>tomcat8x</containerId>
			<home>E:/apache-tomcat-8.0.43</home>
			<!-- <log>${project.build.directory}/cargo.log</log> <output>${project.build.directory}/output.log</output> -->
		</container>
		<configuration>
			<type>existing</type>
			<home>E:/apache-tomcat-8.0.43</home>
			<!-- <properties> 更改监听端口 <cargo.servlet.port>80</cargo.servlet.port>
				</properties> -->
		</configuration>
	</configuration>
	<executions>
		<execution>
			<id>cargo-run</id>
			<phase>install</phase>
			<goals>
				<goal>run</goal>
			</goals>
		</execution>
	</executions>
</plugin>
//启动
C:\Users\agui\Desktop\znf4\znf4-web-boss>mvn cargo:run
Maven 的热启动并没什么用,测试的时候能用一下,但是tomcat也有加载机制,热部署我们用的还是jenkins 。
五. maven中多个配置中心
对于使用Maven3,我们可以有多个地方定义profile。定义的地方不同,它的作用范围也不同。
(1) 针对于特定项目的profile配置我们可以定义在该项目的pom.xml中。
(2) 针对于特定用户的profile配置,我们可以在用户的settings.xml文件中定义profile。该文件在用户家目录下的“.m2”目录下。
(3) 全局的profile配置。全局的profile是定义在Maven安装目录下的“conf/settings.xml”文件中的。
//xxx.properties  文件

redis.sentinel.master.name=${redis.sentinel.master.name}


//pom.xml 中 project 标签下 :

<profiles>
       <profile>
              <id>profileTest1</id>
              <properties>
                     <redis.sentinel.master.name>world</redis.sentinel.master.name>
              </properties>
       </profile>
       <profile>
              <id>profileTest2</id>
              <properties>
                     <redis.sentinel.master.name>andy</redis.sentinel.master.name>
              </properties>
       </profile>
<profiles>
配置多套 配置怎么实现激活呢,方式有很多,点击下面的超链接可以查看。
六. maven私服
nexus
如果没有私服,我们所需的所有构件都需要通过maven的中央仓库和第三方的Maven仓库下载到本地,而一个团队中的所有人都重复的从maven仓库下载构件无疑加大了仓库的负载和浪费了外网带宽,如果网速慢的话,还会影响项目的进程。很多情况下项目的开发都是在内网进行的,连接不到maven仓库怎么办呢?开发的公共构件怎么让其它项目使用?这个时候我们不得不为自己的团队搭建属于自己的maven私服,这样既节省了网络带宽也会加速项目搭建的进程,当然前提条件就是你的私服中拥有项目所需的所有构件。
Maven工作原理
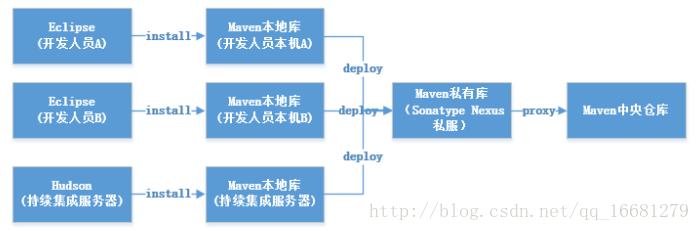
如果构建的Maven项目本地仓库没有对应的依赖包,会去Nexus私服去下载;如果Nexus私服也没有此依赖包,就会去远程中央仓库下载依赖,Nexus私服下载成功后再下载至本地Maven库供项目引用。
(1) . 在我门的服务器中下载 nexus-2.14.3-02 , nexus的安装教程
如何通过网页方式将jar包上传到nexus?
在 linux 安装 压缩包之后,解压缩到指定文件夹,然后 在 安装目录bin 下 执行 :
/**安装步骤**/
[root@VM_12_177_centos apache-maven-3.5.2]# wget http://download.sonatype.com/nexus/oss/nexus-2.12.0-01-bundle.zip
[root@VM_12_177_centos apache-maven-3.5.2]# mv nexus-2.12.0-01-bundle.zip /agui/installfile/
[root@VM_12_177_centos nexus]# unzip nexus-2.12.0-01-bundle.zip
[root@VM_12_177_centos nexus]# ll
total 70472
drwxr-xr-x 8 root root     4096 Dec 16  2015 nexus-2.12.0-01
-rw-r--r-- 1 root root 72076571 Dec 24  2015 nexus-2.12.0-01-bundle.zip
drwxr-xr-x 3 root root     4096 Dec 16  2015 sonatype-work


/**启动服务**/
./nexus start
****************************************
WARNING - NOT RECOMMENDED TO RUN AS ROOT
****************************************
If you insist running as root, then set the environment variable RUN_AS_USER=root before running this script.
[root@VM_12_177_centos conf]# export RUN_AS_USER=root
[root@VM_12_177_centos conf]# cd ../bin
[root@VM_12_177_centos bin]# ./nexus start
浏览器输入 : http://ip:8081/nexus
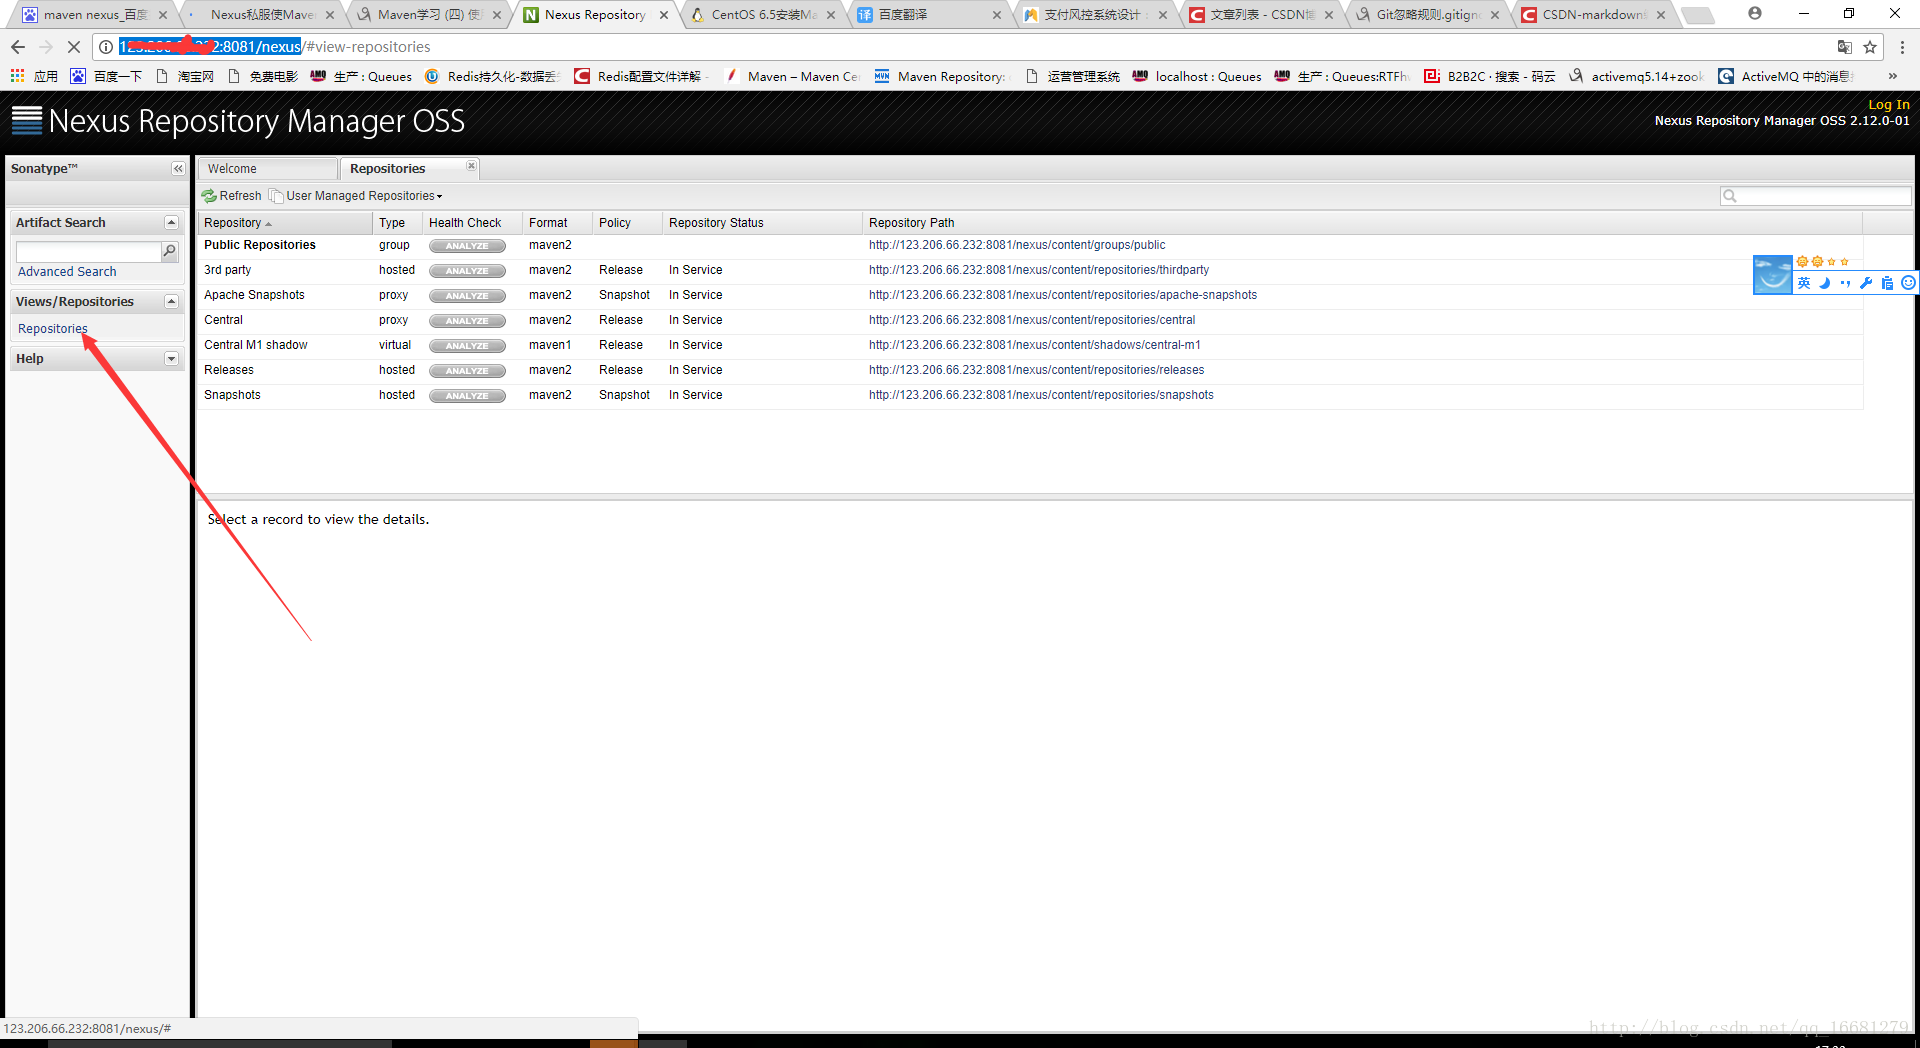
页面怎么操作,这里就介绍了,下面会粘贴出来使用地址,自己也可以去网站查找。
(2) Windos 安装教程 window安装教程路径
(3) 其他操作步骤 不分操作系统,操作的是 nexus 提供的网页 和 maven 和 pom 这三样都行,如下所述 。
maven/conf/
**setting.xml **
这种配置属于 : 全局配置
<mirrors>
<mirror>
<!--This sends everything else to /public -->
<id>nexus</id>
<mirrorOf>*</mirrorOf>
<url>http://192.168.2.140:8081/nexus/content/groups/public</url>
</mirror>
</mirrors>
//复制代码
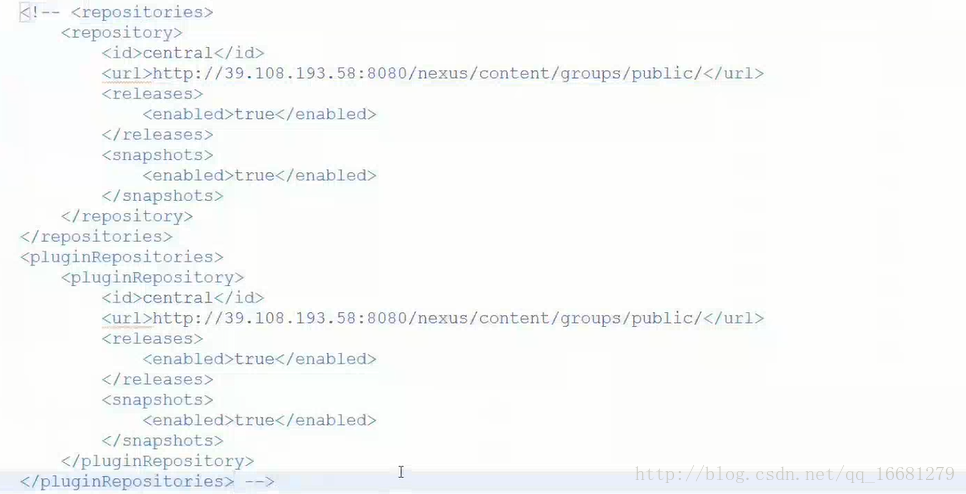
<profiles>
<profile>
<id>nexus</id>
<!--Enable snapshots for the built in central repo to direct -->
<!--all requests to nexus via the mirror -->
<repositories>
<repository>
<id>central</id>
<url>http://central</url>
<releases><enabled>true</enabled></releases>
<snapshots><enabled>true</enabled></snapshots>
</repository>
</repositories>
<pluginRepositories>
<pluginRepository>
<id>central</id>
<url>http://central</url>
<releases><enabled>true</enabled></releases>
<snapshots><enabled>true</enabled></snapshots>
</pluginRepository>
</pluginRepositories>
</profile>
</profiles>
<activeProfiles>
<activeProfile>nexus</activeProfile>
</activeProfiles>
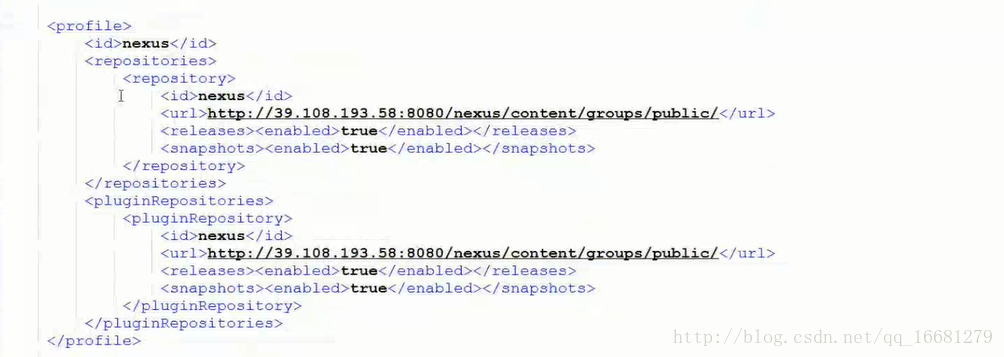
以上配置用来加载私服, 并激活 , 和 配置一个即可, 这里是为了双保险。
**pom.xml **
这种配置属于 : 局部配置,那里需要配置在那里
**上传jar包到 私服 **
非 nexus 提供的页面操作方法,通过pom.xml 配置如下 :
<!-- 配置maven地址  , 本地jar 上传到 私服  -->

说明 : http://xxx.xxxx.xxx.xxx:8081/nexus/content/repositories/releases/  这个路径中,只有最后一位  releases 是我们在nexus 提供的页面中自己创建的仓库名称,前面的路径都是nexus 提供的 。

<distributionManagement>
	<repository>
		<id>nexus-releases</id>
		<name>Nexus Release Repository</name>
		<url>http://xxx.xxxx.xxx.xxx:8081/nexus/content/repositories/releases/</url>
	</repository>
	<!--<snapshotRepository>
		<id>nexus-snapshots</id>
		<name>Nexus Snapshot Repository</name>
		<url>http://xxx.xxx.xxx.xxx:8081/nexus/content/repositories/snapshots/</url>
	</snapshotRepository> -->
</distributionManagement>
如上配置完成之后,执行命令 :
mvn deploy 打包后将其安装到pom文件中配置的远程仓库 。
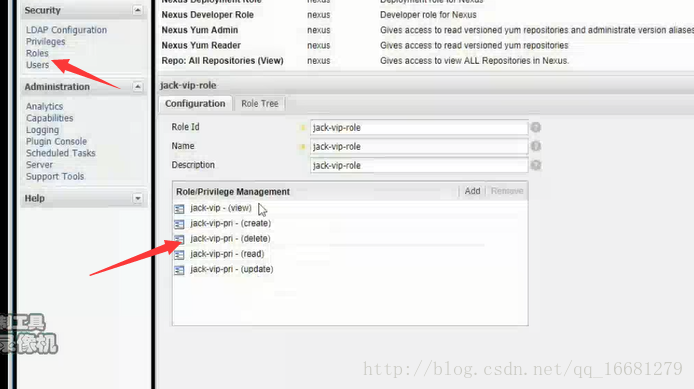
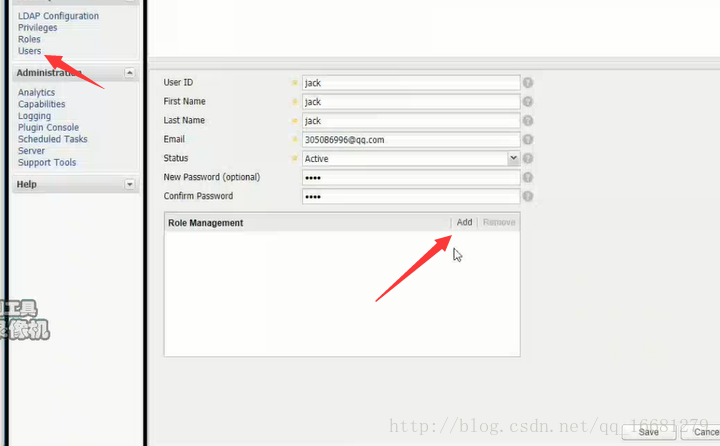
会出现一个没有权限的错误, 我们需要继续到 nexus 管理界面,添加 role , 分配 仓库权限(删除,查看,读写)
创建用户 :
找到maven的 setting.xml ,配置如下 :
<server>
  <id>siteServer</id>
  <username>/path/to/private/key</username>
  <password>optional; leave empty if not used.</password>
</server>

/**
* id 是 上面创建仓库时设置 的 id  .
*username是 我们用户的帐号
*password是我们帐号的密码
*/
在次执行命令 :
mvn deploy 打包后将其安装到pom文件中配置的远程仓库 。
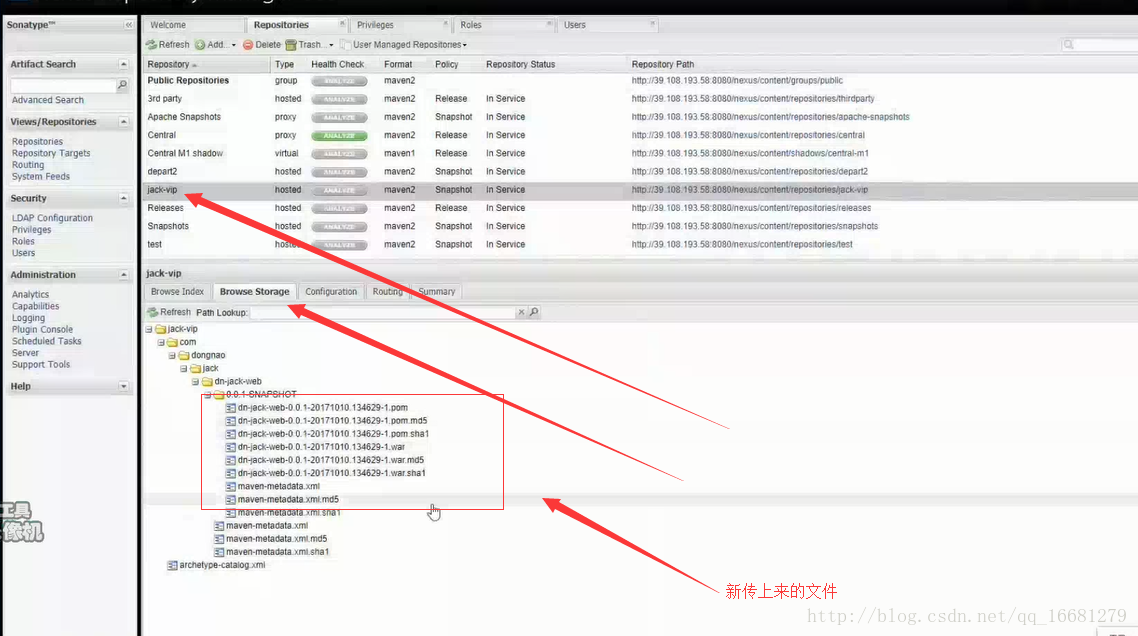
如果提示 BUILD SUCCESS 表示 操作成功,我们回到nexus 管理界面 选择我们上传的仓库,点击 Browse Storage 展开 刷新,就能看到我们 刚才上传的 jar包了(文件) 。
其他更多细节,可以自己多找找。。。。。。。